2.7、整合模板引擎
2.7.1、Thymeleaf
1、简介
前后端分离可以说是当今最主流的思想(前端写前端的代码,后端写后端的代码,之间互不影响)。
在传统的 Java Web 开发中,通常都是使用 JSP 来进行前台页面的开发。但 JSP 页面是HTML+Java一起写的,显然不符合“前后端分离”的思想。因此在现在的 Java Web 开发中,JSP的使用已经逐渐变小。其中 Thymeleaf 就是其中较为优秀的代替JSP使用的技术之一。
Thymeleaf 它是一种模板引擎框架,用来渲染 XML、XHTML、HTML5、JavaScript、CSS 甚至纯文本。能与 Spring MVC 等 Web 框架集成,即使不运行项目也可以直接被浏览器打开,但是浏览器会忽略未定义的 Thymeleaf 标签属性,展示的为静态页面效果,只要通过 Web 应用程序访问时,Thymeleaf 才会动态地替换掉静态内容,使页面动态显示。
- 动静结合:既可以直接使用浏览器打开,查看页面的静态效果,也可以通过 Web 应用程序进行访问,查看动态页面效果。
- 开箱即用:提供了 Spring 标准方言以及一个与 SpringMVC 完美集成的可选模块,可以快速的实现表单绑定、属性编辑器、国际化等功能。
- 多方言支持:它提供了 Thymeleaf 标准和 Spring 标准两种方言,可以直接套用模板实现 JSTL、 OGNL 表达式;必要时,开发人员也可以扩展和创建自定义的方言。
- 与 SpringBoot 完美整合:Springboot官方大力推荐和支持,并为 Thymeleaf 提供了的默认配置,并且还为 Thymeleaf 设置了视图解析器。
在Spring中使用 Thymeleaf 需要导入相关的依赖(jar包):
<!--  thymeleaf的依赖  -->
<dependency>
    <groupId>org.thymeleaf</groupId>
    <artifactId>thymeleaf</artifactId>
    <version>3.0.15.RELEASE</version>
</dependency>
<dependency>
    <groupId>org.thymeleaf</groupId>
    <artifactId>thymeleaf-spring5</artifactId>
    <version>3.0.15.RELEASE</version>
</dependency>
<!--  html、xml解析器-->
<dependency>
    <groupId>org.attoparser</groupId>
    <artifactId>attoparser</artifactId>
    <version>2.0.5.RELEASE</version>
</dependency>
<!--转义反转义词库-->
<dependency>
    <groupId>org.unbescape</groupId>
    <artifactId>unbescape</artifactId>
    <version>1.1.6.RELEASE</version>
</dependency>
2、语法
Thymeleaf 内部有很多代替HTML的标签,还有一些表达式,正是这些标签和表达式使得Thymeleaf 拥有了动态显示的功能。
使用时在HTML的页面上加声明空间,避免编辑时出现错误。
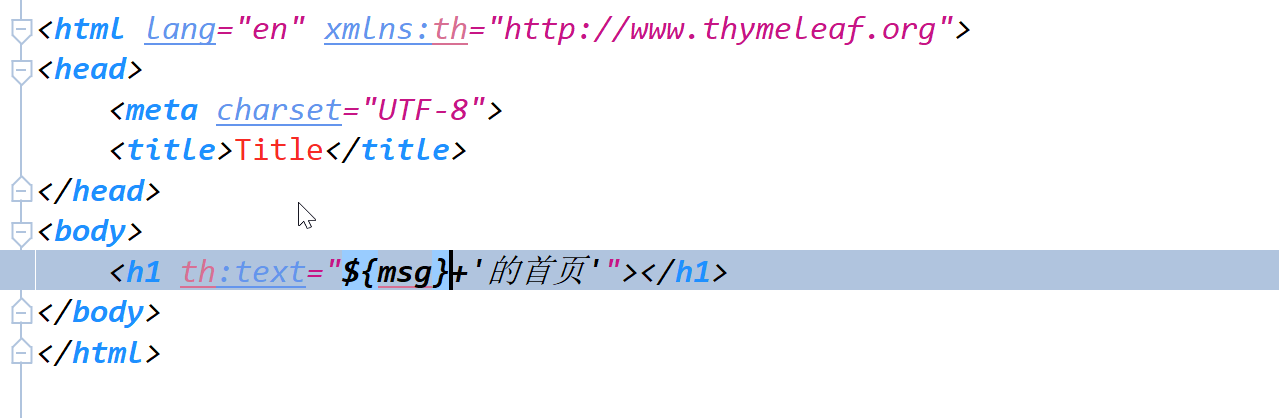
<html lang="en" xmlns:th="http://www.thymeleaf.org">
-
th标签: thymeleaf 之所以能实现静态和动态的不同展示,就得益于它在HTML标签的基础上,拓展了 th 的属性,基本原先HTML标签的属性,都可以用 th:属性 来代替。这些带 th 的属性可以直接在 HTML 标签中使用,所以Thymeleaf 中的HTML在静态的时候显示的是原来的内容,经过web访问后显示的是 带的属性设置的内容,就这样使 其html 动态、静态两方面的显示
属性 描述 示例 th:id 替换 HTML 的 id 属性 < input id=“html-id” th:id=“thymeleaf-id” /> th:text 设置当前元素的文本内容(不转义html标签) < h1 th:text=“helloSpringBoot” >hello< /h1 > th:utext 文本替换,不转义特殊字符(可以识别HTML标签) < div th:utext=“‘< h1>显示< /h1>’” >文本< /div> th:object 在父标签选择对象,子标签使用 *{…} 选择表达式选取对象的属性值。 没有选择对象,那子标签使用选择表达式和 ${…} 变量表达式是一样的效果。 同时即使选择了对象,子标签仍然可以使用变量表达式。 < div th:object=“${session.user}” >
< p th:text=“*{name}”>< /p>
</ div>th:value 替换 value 属性 < input th:value = “${user.name}” /> th:with 局部变量赋值运算 < div th:with=“isEvens = p r o d S t a t . c o u n t {prodStat.count}%2 == 0" th:text=" prodStat.count{isEvens}”>< /div> th:style 设置样式 < div th:style=“‘color:#F00; font-weight:bold’”>< /div> th:onclick 点击事件 < td th:onclick = “‘getInfo()’”>< /td> th:each 遍历,支持 Iterable、Map、数组等。 < table>
< tr th:each=“m: s e s s i o n . m a p " > < b r / > < t d t h : t e x t = " {session.map}"> <br /> < td th:text=" session.map"><br/><tdth:text="{m.getKey()}”>< /td>
< td th:text=“${m.getValue()}”>< /td>
< /tr>
< /table>th:if 根据条件判断是否需要展示此标签 < a th:if =“${userId == collect.userId}”> th:unless 和 th:if 判断相反,满足条件时不显示 < div th:unless=“${m.getKey()==‘name’}” >< /div> th:switch 与 Java 的 switch case语句类似 通常与 th:case 配合使用 < div th:switch=“${name}”>
< span th:case=“值1”>< /span>
< span th:case=“值2”>< /span>
</ div>th:selected select 选择框选中 < select>
< option th:selected=“${name==‘a’}”> < /option>
……
< /select>th:src 替换 HTML 中的 src 属性 < img th:src=“@{}” src=“” /> th:action 替换表单提交地址 < form th:action=“@{/user/login}” th:method=“post”> < /form> th:inline 内联属性; 该属性有 text、none、javascript 三种取值。 在 < script> 标签中使用时,js 代码中可以获取到后台传递页面的对象。 th:replace 布局标签; 使用 th:fragment 属性指定的模板片段(包含标签)替换当前整个标签。 th:insert 布局标签; 将使用 th:fragment 属性指定的模板片段(包含标签)插入到当前标签中。 th:fragment 模板布局,类似 JSP 的 tag,用来定义一段被引用或包含的模板片段 -
表达式:
-
变量表达式: ${}使用 ${} 包裹的表达式就是变量表达式
-
获取对象的属性和方法:controller发送了一个student对象
获取学生的id:${student.getId} -
使用内置的基本对象
-
#ctx :上下文对象
-
#vars :上下文变量
-
#locale:上下文的语言环境
-
#request:Web 应用中可用(服务端:setAttribute(“student”,student))
${request.getAttribute('student')} -
#response:Web 应用中可用
-
#session:Web 应用中可用
-
#servletContext:Web 应用中可用
-
-
使用内置的工具对象
-
strings、numbers、arrays、集合类、dates日期等等
${#strings.equals(o1,o2}
-
-
-
选择变量表达式: *{}(与变量表达式功能基本一致,但可以配合th:object 使用,th:object 存储一个对象后,在其内部子标签内可以获取该对象)
-
国际化: #{}(可以获取国际化的配置)
-
链接 URL 表达式: 引用其他连接(静态资源、form 表单的请求、a标签等等等等)
- 无参请求:@{xxx}
- 有参请求:@{/xxx(k1=v1,k2=v2)}
-
片段表达式:~(用于在模板页面中引用其他的模板片段)
-
-
文字
- 文本字面量:
'one text','Another one!', … - 数字字面量:
0,34,3.0,12.3,… - 布尔文字:
true,false - 空字面量:
null - 文字标记:
one,sometext,main,…
- 文本字面量:
-
文本操作:
- 字符串连接:
+ - 字面替换:
|The name is ${name}|
- 字符串连接:
-
算术运算:
- 二元运算符:
+,-,*,/,% - 减号(一元运算符):
-
- 二元运算符:
-
布尔运算:
- 二元运算符:
and,or - 布尔否定(一元运算符):
!,not
- 二元运算符:
-
比较与相等:
- 比较器:
>,<,>=,<=(gt,lt,ge,le) - 等式运算符:
==,!=(eq,ne)
- 比较器:
-
条件运算符:
- 如果-那么:
(if) ? (then) - 如果-然后-其他:
(if) ? (then) : (else) - 默认:
(value) ?: (defaultvalue)
- 如果-那么:
3、使用
Spring Boot 推荐使用 Thymeleaf 作为其模板引擎。SpringBoot 为 Thymeleaf 提供了一系列默认配置,项目中一但导入了 Thymeleaf 的依赖,相对应的自动配置 (ThymeleafAutoConfiguration 或 FreeMarkerAutoConfiguration) 就会自动生效,因此 Thymeleaf 可以与 Spring Boot 完美整合 。
Spring Boot 整合 Thymeleaf 模板引擎,需要以下步骤:
-
引入 Starter启动器
<!--thymeleaf模板的依赖--> <dependency> <groupId>org.springframework.boot</groupId> <artifactId>spring-boot-starter-thymeleaf</artifactId> </dependency> -
其模板引擎大多都使用默认值,不配置也能直接使用
-
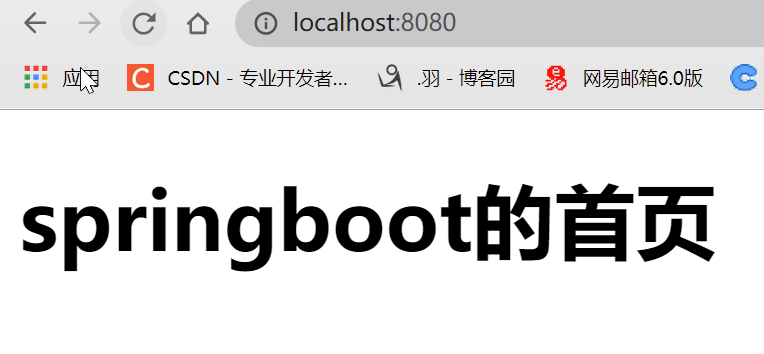
通过controller访问

2.7.2、Freemarker
一种基于模板和要改变的数据, 并用来生成输出文本(HTML网页,电子邮件,配置文件,源代码等)的通用工具。 是一种用Java语言编写的模板引擎,与Web容器无关,在Web运行时,它并不知道Servlet或HTTP。它不仅可以用作表现层的实现技术,而且还可以用于生产XML,JSP或Java等。目前企业中主要用Freemarker做静态页面或是页面展示
freemarker并不关心数据的来源,只是根据模板的内容,将数据模型在模板中显示并输出文件
-
添加Freemarker 的依赖
<dependency> <groupId>org.springframework.boot</groupId> <artifactId>spring-boot-starter-freemarker</artifactId> </dependency> -
yml中配置
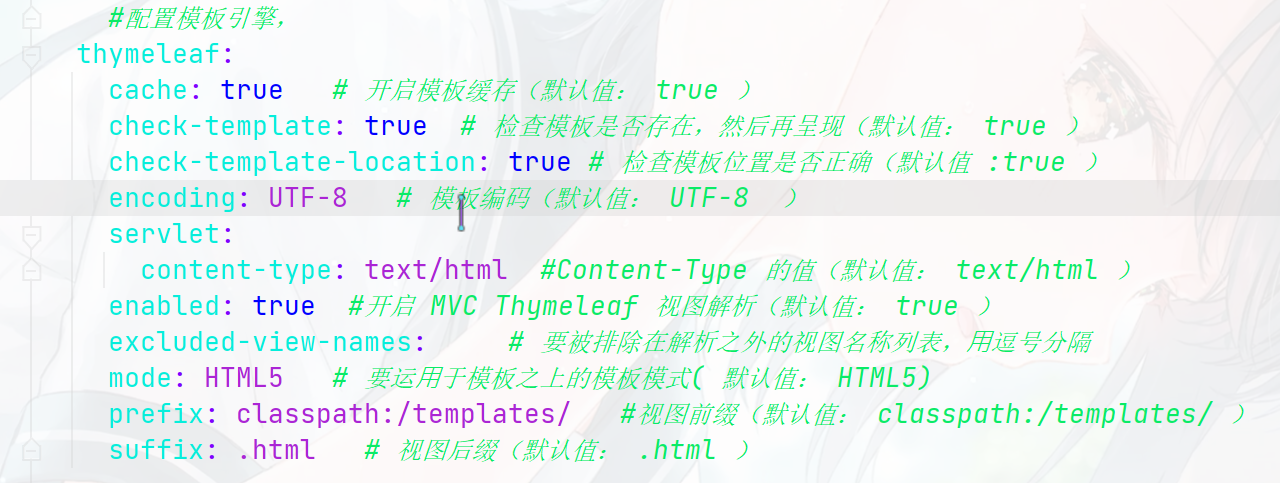
spring: freemarker: cache: false charset: utf-8 template-loader-path: classpath:/templates/ suffix: .html content-type: text/html request-context-attribute: request -
html页面
<!DOCTYPE html>
<html>
    <head>
        <meta charset="UTF-8">
        <title>FreeMarker</title>
    </head>
    <body>
        <h1>Welcome ${user} !</h1>

        <u1>
            <#list lists as list>
                <li>${list} </li>
            </#list>
         </u1>
     </body>
</html>
2.7.3、整合JSP
SpringBoot默认是不支持JSP模板引擎的,但是可以通过引入相关依赖来整合JSP模板引擎。
-
导入支持JSP的依赖
<!-- 内置的不支持jsp,所以要添加支持jsp的tomcat--> <dependency> <groupId>org.apache.tomcat.embed</groupId> <artifactId>tomcat-embed-jasper</artifactId> </dependency> <!--jsp标签库支持--> <dependency> <groupId>javax.servlet</groupId> <artifactId>jstl</artifactId> </dependency> -
添加webapp文件
-
yml文件中配置支持jsp页面
spring:
 mvc:    #支持的jsp路径
    view:
      prefix: /WEB-INF/
      suffix: .jsp