感谢作者:https://www.jianshu.com/p/5a70b13a4fa7
本章目标
实现SpringBoot项目中整合Redis非关系数据库作为内存缓存框架,并测试数据读取源。
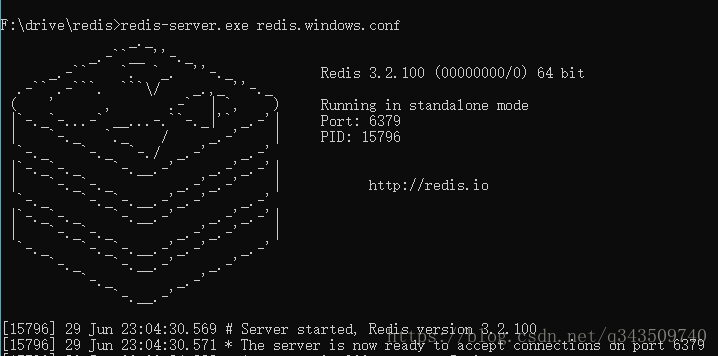
开启Redis
执行redis-server.exe redis.windows.conf
构建项目
添加依赖Web, MySQL, JPA, Druid, Redis, Jedis支持
     <dependencies>
        <dependency>
            <groupId>org.springframework.boot</groupId>
            <artifactId>spring-boot-starter-data-jpa</artifactId>
        </dependency>
        <dependency>
            <groupId>org.springframework.boot</groupId>
            <artifactId>spring-boot-starter-web</artifactId>
        </dependency>
        <!-- 引入Druid依赖 -->
        <dependency>
            <groupId>com.alibaba</groupId>
            <artifactId>druid-spring-boot-starter</artifactId>
            <version>1.1.9</version>
        </dependency>
        <!-- 添加缓存支持 -->
        <dependency>
            <groupId>org.springframework.boot</groupId>
            <artifactId>spring-boot-starter-cache</artifactId>
        </dependency>
        <!-- 添加Redis缓存支持 -->
        <dependency>
            <groupId>org.springframework.boot</groupId>
            <artifactId>spring-boot-starter-redis</artifactId>
        </dependency>
        <dependency>
            <groupId>org.springframework.data</groupId>
            <artifactId>spring-data-redis</artifactId>
        </dependency>
        <!-- 添加Jedis支持 -->
        <dependency>
            <groupId>redis.clients</groupId>
            <artifactId>jedis</artifactId>
            <version>2.9.0</version>
        </dependency>
        <dependency>
            <groupId>mysql</groupId>
            <artifactId>mysql-connector-java</artifactId>
            <scope>runtime</scope>
        </dependency>
        <dependency>
            <groupId>org.springframework.boot</groupId>
            <artifactId>spring-boot-starter-tomcat</artifactId>
            <!--<scope>provided</scope>-->
        </dependency>
        <dependency>
            <groupId>org.springframework.boot</groupId>
            <artifactId>spring-boot-starter-test</artifactId>
            <scope>test</scope>
        </dependency>
    </dependencies>
配置Redis数据库
application.yml 配置(适用SpringBoot2)
spring:
  datasource:
    type: com.alibaba.druid.pool.DruidDataSource
    driver-class-name: com.mysql.jdbc.Driver
    url: jdbc:mysql://127.0.0.1:3306/test?characterEncoding=utf8
    username: root
    password: root
    druid:
      #配置控制统计拦截的filters,去掉后监控界面sql将无法统计, wall用于防火墙
      filters: stat,wall
      #最大活跃数
      max-active: 20
      #初始化数量
      initial-size: 1
      #最小连接池数量
      min-idle: 1
      #最大连接等待超时时间
      max-wait: 60000
      #打开PSCache,并且指定每个连接PSCache的大小,mysql可以配置为false
      pool-prepared-statements: false
      max-pool-prepared-statement-per-connection-size: 20
      #通过connectionProperties属性来打开mergeSql功能;慢SQL记录
      connection-properties: druid.stat.mergeSql=true;stat.slowSqlMillis=5000
      #配置间隔多久才进行一次检测,检测需要关闭的空闲连接,单位是毫秒
      time-between-eviction-runs-millis: 60000
      #配置一个连接在池中最小生存的时间,单位是毫秒
      min-evictable-idle-time-millis: 300000
      #用来检测连接是否有效的sql
      validation-query: SELECT 'x'
      test-while-idle: true
      test-on-borrow: false
      test-on-return: false
      async-init: true
  jpa:
    properties:
      hibernate:
        show_sql: true
        format_sql: true

  #配置redis数据库连接
  redis:
    host: 127.0.0.1
    port: 6379
    jedis:
      pool:
        #最大连接数
        max-active: 8
        #最大阻塞等待时间(负数表示没限制)
        max-wait: -1ms
        #最大空闲
        max-idle: 8
        #最小空闲
        min-idle: 0
    #连接超时时间
    timeout: 10000ms
    #数据库索引
    database: 0
配置CacheManager
让SpringBoot内置的缓存框架适用我们的Redis作为新的缓存, 添加一个RedisConfiguration的配置类,
SpringBoot2 略有不同, 具体配置如下:
/**
 * @author Ray
 * @date 2018/6/29 0029
 * 让SpringBoot内置的缓存框架使用我们的Redis作为新的缓存
 * 使用@EnableCaching注解来开启我们的项目支持缓存
 */
@Configuration
@EnableCaching
public class RedisConfiguration {

    /**
     * 采用RedisCacheManager作为缓存管理器
     * 为了处理高可用Redis,可以使用RedisSentinelConfiguration来支持Redis Sentinel。
     */
    @Bean
    public CacheManager cacheManager(RedisConnectionFactory connectionFactory){
        RedisCacheManager redisCacheManager = RedisCacheManager.builder(connectionFactory).build();
        return redisCacheManager;
    }
}
测试Redis(一)
访问地址: http://localhost:8080/list

再次访问地址: http://localhost:8080/list
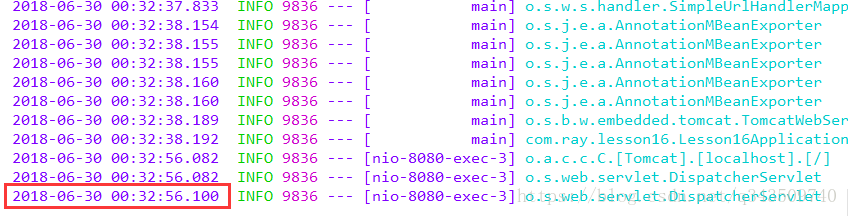
可以看到只有一次输出, 这个输出还是我们上次访问的时候执行的, 证明我们配置的Redis缓存已经生效.
自定义Key
修改RedisConfiguration配置类, 继承CachingConfigurerSupport类, 并重写方法keyGenerator()
/**
* @author Ray
* @date 2018/6/29 0029
* 让SpringBoot内置的缓存框架使用我们的Redis作为新的缓存
*/
@Configuration
@EnableCaching
public class RedisConfiguration extends CachingConfigurerSupport {
/**
* 采用RedisCacheManager作为缓存管理器
* 添加spring-data-redis依赖
* 为了处理高可用Redis,可以使用RedisSentinelConfiguration来支持Redis Sentinel。
*/
@Bean
public CacheManager cacheManager(RedisConnectionFactory connectionFactory){
RedisCacheManager redisCacheManager = RedisCacheManager.builder(connectionFactory).build();
return redisCacheManager;
}
/**
* 自定义生成key的规则
*/
@Override
public KeyGenerator keyGenerator() {
return new KeyGenerator() {
@Override
public Object generate(Object o, Method method, Object... objects) {
// 格式化缓存key字符串
StringBuilder stringBuilder = new StringBuilder();
// 追加类名
stringBuilder.append(o.getClass().getName());
// 追加方法名
stringBuilder.append(method.getName());
// 遍历参数并且追加
for (Object obj :
objects) {
stringBuilder.append(obj.toString());
}
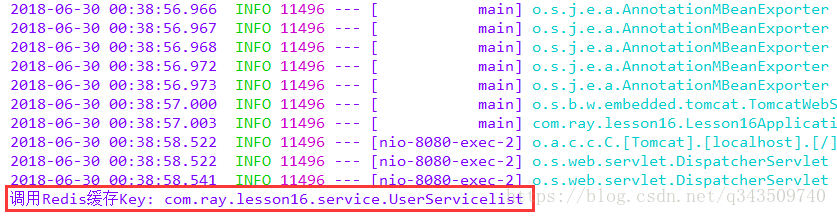
System.out.println("调用Redis缓存Key: " + stringBuilder.toString());
return stringBuilder.toString();
}
};
}
}再次访问地址: http://localhost:8080/list