一、简介
在实际开发中,对于要反复读写的数据,最好的处理方式是将之在内存中缓存一份,频繁的数据库访问会造成程序效率低下,同时内存的读写速度本身就要强于硬盘。Spring在这一方面给我们提供了诸多的处理手段,而Spring Boot又将这些处理方式进一步简化,接下来我们就来看看如何在Spring Boot中解决数据缓存问题。
二、创建项目
这里我们添加Web、Cache、MySQL、JPA依赖,如下图:

工程创建好之后,添加 Druid 依赖,完整的依赖如下:
        <dependency>
            <groupId>com.alibaba</groupId>
            <artifactId>druid-spring-boot-starter</artifactId>
            <version>1.1.10</version>
        </dependency>
        <dependency>
            <groupId>org.springframework.boot</groupId>
            <artifactId>spring-boot-starter-cache</artifactId>
        </dependency>
        <dependency>
            <groupId>org.springframework.boot</groupId>
            <artifactId>spring-boot-starter-data-jpa</artifactId>
        </dependency>
        <dependency>
            <groupId>org.springframework.boot</groupId>
            <artifactId>spring-boot-starter-web</artifactId>
        </dependency>

        <dependency>
            <groupId>mysql</groupId>
            <artifactId>mysql-connector-java</artifactId>
            <scope>runtime</scope>
        </dependency>
        <dependency>
            <groupId>org.springframework.boot</groupId>
            <artifactId>spring-boot-starter-test</artifactId>
            <scope>test</scope>
            <exclusions>
                <exclusion>
                    <groupId>org.junit.vintage</groupId>
                    <artifactId>junit-vintage-engine</artifactId>
                </exclusion>
            </exclusions>
</dependency>在application.properties中数据库配置相关属性,配置方式还是和前文一模一样
spring.datasource.url=jdbc:mysql://localhost:3306/springboot?characterEncoding=utf8&useSSL=false&serverTimezone=Asia/Shanghai
spring.datasource.username=root
spring.datasource.password=123456
spring.datasource.type=com.alibaba.druid.pool.DruidDataSource

# JPA配置
spring.jpa.database=mysql
# 在控制台打印SQL
spring.jpa.show-sql=true
# 数据库平台
spring.jpa.database-platform=mysql
# 每次启动项目时,数据库初始化策略
spring.jpa.hibernate.ddl-auto=update
# 指定默认的存储引擎为InnoDB
spring.jpa.properties.hibernate.dialect=org.hibernate.dialect.MySQL57Dialect创建实体类,还是和前文一模一样
package com.example.springboottest12.model;

import javax.persistence.Entity;
import javax.persistence.GeneratedValue;
import javax.persistence.GenerationType;
import javax.persistence.Id;

@Entity
public class Person {
    @Id
    @GeneratedValue(strategy = GenerationType.IDENTITY)
    private Long id;
    private String name;
    private Integer age;
    private String address;

    public Person() {
    }

    public Long getId() {
        return id;
    }

    public void setId(Long id) {
        this.id = id;
    }

    public String getName() {
        return name;
    }

    public void setName(String name) {
        this.name = name;
    }

    public Integer getAge() {
        return age;
    }

    public void setAge(Integer age) {
        this.age = age;
    }

    public String getAddress() {
        return address;
    }

    public void setAddress(String address) {
        this.address = address;
    }

    public Person(Long id, String name, Integer age, String address) {
        this.id = id;
        this.name = name;
        this.age = age;
        this.address = address;
    }
}
创建实体类的Repository
package com.example.springboottest12.repository;

import com.example.springboottest12.model.Person;
import org.springframework.data.jpa.repository.JpaRepository;

public interface PersonRepository extends JpaRepository<Person,Long> {
}
创建业务接口
package com.example.springboottest12.service;

import com.example.springboottest12.model.Person;

public interface DemoService {

    public Person save(Person person);

    public void deleteById(Long id);

    public Person findById(Person person);
}
创建业务接口实现
package com.example.springboottest12.service.impl;

import com.example.springboottest12.model.Person;
import com.example.springboottest12.repository.PersonRepository;
import com.example.springboottest12.service.DemoService;
import org.springframework.beans.factory.annotation.Autowired;
import org.springframework.cache.annotation.CacheEvict;
import org.springframework.cache.annotation.CachePut;
import org.springframework.cache.annotation.Cacheable;
import org.springframework.stereotype.Service;

import java.util.Optional;

@Service
public class DemoServiceImpl implements DemoService {
    @Autowired
    private PersonRepository personRepository;

    @CachePut(value = "people",key = "#person.id")
    @Override
    public Person save(Person person) {
        Person p = personRepository.save(person);
        System.out.println("为id、key为" + p.getId() + "数据做了缓存");
        return p;
    }

    @CacheEvict(value = "people")
    @Override
    public void deleteById(Long id) {
        System.out.println("删除了id、key为" + id + "的数据缓存");
        personRepository.deleteById(id);
    }

    @Cacheable(value = "people",key = "#person.id")
    @Override
    public Person findById(Person person) {
        Optional<Person> p = personRepository.findById(person.getId());
        System.out.println("为id、key为" + p.get().getId() + "数据做了缓存");
        return p.get();
    }
}
关于这个实现类我说如下几点:
1.@CachePut表示缓存新添加的数据或者更新的数据到缓存中,两个参数value表示缓存的名称为people,key表示缓存的key为person的id
2.@CacheEvict表示从缓存people中删除key为id的数据
3.@Cacheable表示添加数据到缓存中,缓存名称为people,缓存key为person的id属性。
创建Controller
package com.example.springboottest12.controller;

import com.example.springboottest12.model.Person;
import com.example.springboottest12.service.DemoService;
import org.springframework.beans.factory.annotation.Autowired;
import org.springframework.web.bind.annotation.RequestMapping;
import org.springframework.web.bind.annotation.RestController;

@RestController
public class CacheController {
    @Autowired
    DemoService demoService;

    @RequestMapping("/put")
    public Person put(Person person) {
        return demoService.save(person);
    }

    @RequestMapping("/able")
    public Person cacheable(Person person) {
        return demoService.findById(person);
    }

    @RequestMapping("/evit")
    public String evit(Long id) {
        demoService.deleteById(id);
        return "ok";
    }
}
入口类开启缓存
package com.example.springboottest12;

import org.springframework.boot.SpringApplication;
import org.springframework.boot.autoconfigure.SpringBootApplication;
import org.springframework.cache.annotation.EnableCaching;

@EnableCaching
@SpringBootApplication
public class SpringbootTest12Application {

    public static void main(String[] args) {
        SpringApplication.run(SpringbootTest12Application.class, args);
    }

}
OK ,做完这一切我们就可以来测试我们刚刚写的缓存了。
三、测试
首先我们在浏览器中访问http://localhost:8080/able?id=1,得到如下访问结果:
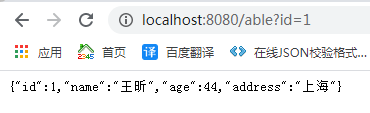
这个时候查看控制台,输出内容如下:

说是数据已经被缓存了,这个时候我们再继续在浏览器中刷新继续请求id为1的数据,会发现控制台不会继续打印日志出来,就是因为数据已被存于缓存之中了。
接下来我们向浏览器中输入http://localhost:8080/put?age=47&name=奥巴牛&address=米国,访问结果如下:
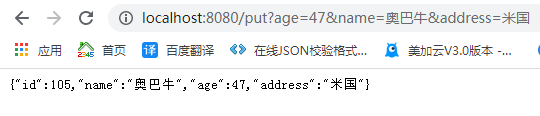
这个时候查看控制台打印的日志如下:

再查看数据表,数据已插入成功。
此时,我们在浏览器中输入http://localhost:8080/able?id=105,访问刚刚插入的这条数据,结果如下:

这个时候查看控制台,发现并没有数据打印,就是因为数据已经处于缓存中了。
最后我们在浏览器中输入http://localhost:8080/evit?id=105,将数据从缓存中移除,访问结果如下:
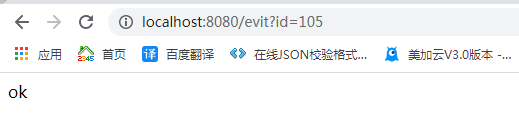
这个时候查看控制台,已经提示缓存移除掉了:

同时数据也从数据库删除掉了,这个时候如果还需要该数据则需要我们继续向表中添加数据。
四、缓存技术切换
Spring Boot默认情况下使用ConcurrentMapCacheManager作为缓存技术,有的时候你可能想替换为其他的缓存方式,在Spring Boot中进行缓存的切换非常简单,我这里以Google提供的Guava为例,如果要使用这种缓存策略,只需要添加相应的依赖即可,如下:
<dependency>
    <groupId>com.google.guava</groupId>
    <artifactId>guava</artifactId>
    <version>20.0</version>
</dependency>
就这样就可以了。实际上在Spring Boot中,底层使用哪一种缓存我们并不必做过多考虑,切换的方式也很简单,如上文引入相应的依赖即可,我们只需要把上层的逻辑写好即可。
学习借鉴自https://blog.csdn.net/u012702547/article/details/54142243
