版权声明:本文为博主原创文章,未经博主允许不得转载。 https://blog.csdn.net/o_cYj/article/details/82154016
本文只贴主要相关代码,祥细见项目代码地址:https://github.com/chenyingjun/springboot2
如果觉得可以,别忘了star...
使用jar包:
    <parent>
		<groupId>org.springframework.boot</groupId>
		<artifactId>spring-boot-starter-parent</artifactId>
		<version>2.0.4.RELEASE</version>
		<relativePath/>
	</parent>
    <dependency>
		<groupId>org.springframework.boot</groupId>
	    <artifactId>spring-boot-starter-data-redis</artifactId>
</dependency>- 在application.properties中加入redis的配置信息
#redis spring.redis.host=127.0.0.1 spring.redis.port=6379 # 数据库连接超时时间,2.0 中该参数的类型为Duration,这里在配置的时候需要指明单位 spring.redis.timeout=60s # 连接池配置,2.0中直接使用jedis或者lettuce配置连接池 # 最大活跃连接数,负数为不限制 spring.redis.lettuce.pool.max-active=500 # 等待可用连接的最大时间,负数为不限制 spring.redis.lettuce.pool.max-wait=-1ms # 最大空闲连接数 spring.redis.lettuce.pool.max-idle=100 # 最小空闲连接数 spring.redis.lettuce.pool.min-idle=20 - 新增RedisConfig.java文件,其中注释掉的两行代码不能打开。打开的话会使value使序例化,序例化了以后会跟后面要使用的@Cacheable不一致,导致取不到值
package com.chenyingjun.springboot2.config; import com.fasterxml.jackson.annotation.JsonAutoDetect; import com.fasterxml.jackson.annotation.PropertyAccessor; import com.fasterxml.jackson.databind.ObjectMapper; import org.springframework.cache.annotation.EnableCaching; import org.springframework.context.annotation.Bean; import org.springframework.context.annotation.Configuration; import org.springframework.data.redis.connection.lettuce.LettuceConnectionFactory; import org.springframework.data.redis.core.RedisTemplate; import org.springframework.data.redis.serializer.Jackson2JsonRedisSerializer; import org.springframework.data.redis.serializer.RedisSerializer; import org.springframework.data.redis.serializer.StringRedisSerializer; /** * RedisConfig工具类配置 * * @author chenyingjun * @since 1.0 * @version 2018年8月15日 chenyingjun */ @Configuration @EnableCaching public class RedisConfig { /** * RedisTemplate配置 */ @Bean public RedisTemplate<String, Object> redisTemplate(LettuceConnectionFactory lettuceConnectionFactory) { // 设置序列化 Jackson2JsonRedisSerializer<Object> jackson2JsonRedisSerializer = new Jackson2JsonRedisSerializer<>( Object.class); ObjectMapper om = new ObjectMapper(); om.setVisibility(PropertyAccessor.ALL, JsonAutoDetect.Visibility.ANY); om.enableDefaultTyping(ObjectMapper.DefaultTyping.NON_FINAL); jackson2JsonRedisSerializer.setObjectMapper(om); // 配置redisTemplate RedisTemplate<String, Object> redisTemplate = new RedisTemplate<>(); redisTemplate.setConnectionFactory(lettuceConnectionFactory); RedisSerializer<?> stringSerializer = new StringRedisSerializer(); // // key序列化 redisTemplate.setKeySerializer(stringSerializer); // value序列化 // redisTemplate.setValueSerializer(jackson2JsonRedisSerializer); // Hash key序列化 redisTemplate.setHashKeySerializer(stringSerializer); // Hash value序列化 // redisTemplate.setHashValueSerializer(jackson2JsonRedisSerializer); redisTemplate.afterPropertiesSet(); return redisTemplate; } } - 在service层中加入@Cacheable(key="'userId_'+#id", value="user")来缓存信息,这样println只会打印一次
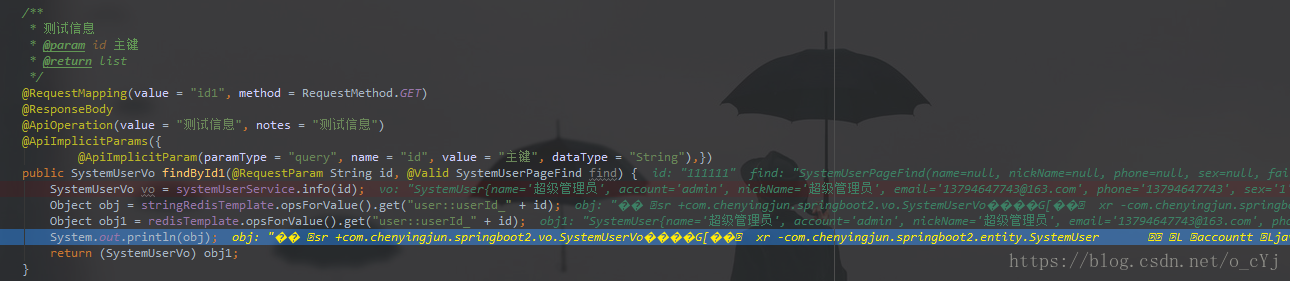
@Cacheable(key="'userId_'+#id", value="user") public SystemUserVo info(String id) { System.out.println("-------------------------------------------------------"); SystemUserVo user = systemUserMapper.info(id); return user; } - 缓存后数据如下图
- 使用RedisTemplate和StringRedisTemplate来获取缓存中的值,其中obj1也已经获取到了redis中的数据。效果如下