最近做三角剖分发现了一篇很好的博客,其中的代码都可以实现,特在此分享给大家,希望可以一起学习,有问题共同探讨。
---------转载源---------
--------------------------------------------------------
Delaunay三角剖分是1934年发明的将空间点连接为三角形,使得所有三角形中最小角最大的一个技术。
如果你熟悉计算机图形学,你便会知道Delaunay三角剖分是变现三维形状的基础。如果我们在三维空间渲染一个,我们可以通过这个物体的投影来建立二维视觉图,并用二维Delaunay三角剖分来分析识别该物体,或者将它与实物相比较。Delaunay剖分是连接计算机视觉与计算机图形学的桥梁。然而使用OpenCV实现三角剖分的不足之处就是OpenCV只实现了二维的Delaunay剖分。如果我们能够对三维点进行三角剖分,也就是说构成立体视觉,那么我们可以在三维的计算机图形和计算机视觉进行无缝的转换。然而二维三角剖分通常用于计算机视觉中标记空间目标的特征或运动场景跟踪,目标识别,或两个不同的摄像机的场景匹配(如图从立体图像中获得深度信息)。
下面内容摘自:http://www.cnblogs.com/RenLiQQ/archive/2008/02/06/1065399.html
1、三角剖分与Delaunay剖分的定义
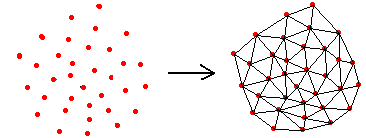
如何把一个离散几何剖分成不均匀的三角形网格,这就是离散点的三角剖分问题,散点集的三角剖分,对数值分析以及图形学来说,都是极为重要的一项处理技术。该问题图示如下:
1.1 三角剖分定义
【定义】三角剖分:假设V是二维实数域上的有限点集,边e是由点集中的点作为端点构成的封闭线段,E为e的集合。那么该点集V的一个三角剖分T=(V,E)是一个平面图G,该平面图满足条件:
1、除了端点,平面图中的边不包含点集中的任何点。
2、没有相交边。(边和边没有交叉点)
3、平面图中所有的面都是三角面,且所有三角面的合集是散点集V的凸包。
1.2 Delaunay三角剖分的定义
在实际中运用的最多的三角剖分是Delaunay三角剖分,它是一种特殊的三角剖分。先从Delaunay边说起:
【定义】Delaunay边:假设E中的一条边e(两个端点为a,b),e若满足下列条件,则称之为Delaunay边:存在一个圆经过a,b亮点,圆内(注意是园内,圆上最多三点共圆)不含点集V中任何其他的点,这一特性又称空圆特性。
【定义】Delaunay三角剖分:如果点集V的一个三角剖分T只包含Delaunay边,那么该三角剖分称为Delaunay三角剖分。
1.3 Delaunay三角剖分的准则
要满足Delaunay三角剖分的定义,必须符合两个重要的准则:
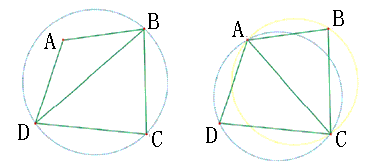
1、空圆特性:Delaunay三角网是唯一的(任意四点不能共圆),在Delaunay三角形网中任一三角形的外接圆范围内不会有其它点存在。如下图所示:

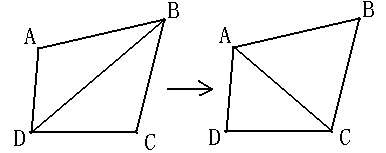
2、最大化最小角特性:在散点集可能形成的三角剖分中,Delaunay三角剖分所形成的三角形的最小角最大。从这个意义上讲,Delaunay三角网是“最接近于规则化的”三角网。具体的说是在两个相邻的三角形构成凸四边形的对角线,在相互交换后,两个内角的最小角不再增大。如下图所示:
1.4 Delaunay三角剖分的特性
以下是Delaunay剖分所具备的优异特性:
1、最接近:以最接近的 三点形成三角形,且各线段(三角行的边)皆不相交。
2、唯一性:不论从区域何处开始构建,最终都将得到一致的结果。
3、最优性:任意两个相邻三角形构成的凸四边形的对角线如何可以互换的话,那么两个三角形六个内角中最小角度不会变化。
4、最规则:如果将三角网中的每个三角形的最小角进行升序排列,则Delaunay三角网的排列得到的数值最大。
5、区域性:新增、删除、移动某一个顶点只会影响邻近的三角形。
6、具有凸边形的外壳:三角网最外层的边界形成一个凸多边形的外壳。
1.5局部最优化处理
理论上为了构造Delaunay三角网,Lawson提出的局部优化过程LOP(Local Optimization Procedure),一般三角网经过LOP处理,即可确保为Delaunay三角网,其基本做法如下所示:
1、将两个具有共同边的三角形合成一个多边形。
2、以最大空圆准则作检查,看其第四个顶点是否在三角形的外接圆内。
3、如果在,修正对角线即将对角线对调,即完成局部优化过程的处理。
LOP处理过程如下图所示:
2、Delaunay剖分的算法
Delaunay剖分是一种三角剖分的标准,实现它有多种算法。
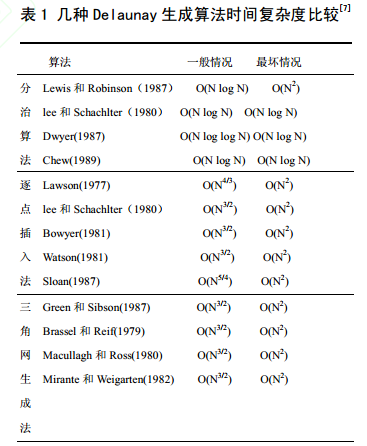
由表可以看出,三角网生成法的时间效率最低,分治算法的时间效率最高,逐点插入法效率居中。由于区域生长法本质的缺陷,导致其效率受限,这种方法在80年代中期以后已经很少使用。分治算法时间效率相对较高,但是由于其递归执行,所以需要较大的内存空间,导致其空间效率较低。此外,分治法的数据处理及结果的优化需要的工作量也比较大。逐点插入算法实现简单,时间效率比较高,而运行占用的空间也较小,从时间效率和空间效率综合考虑,性价比最高,因而应用广泛。
1977年,Lawson提出了逐点插入法建立Delaunay三角网的算法思想。之后Lee和Schachlter,Bowyer,Watson,Sloan,先后进行了发展和完善。他们的算法在初始化三角网的建立方法、定位点所在三角形的过程、以及插入的过程方面各具特点。
2.1 Lawson算法
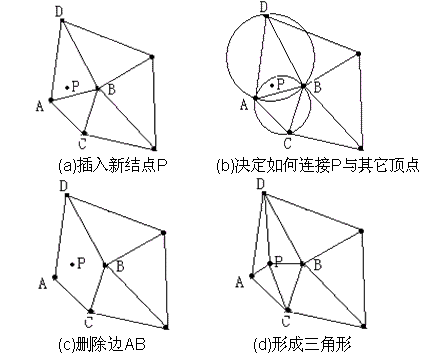
逐点插入的Lawson算法是Lawson在1977提出的,该算法思路简单,易于编程实现。基本原理为:首先建立一个大的三角形或多边形,把所有数据点包围起来,向其中插入一点,该点与包含它的三角形三个顶点相连,形成三个新的三角形,然后逐个对它们进行空外接圆检测,同时用Lawson设计的局部最优化过程LOP进行优化,集通过交换对角线的方法来保证所形成的三角网为Delaunay三角网。
上述基于散点的构网算法理论严密、唯一性好,网格满足空圆特性,较为理想。由其逐点插入的构网过程可知,遇到非Delaunay边时,通过删除调整,可以构造形成新的Delaunay边。在完成构网后,增加新点时,无需对所有点进行重新构网,只需要对新点的影响三角形范围进行局部联网,且局部联网的方法简单易行。同样,点的删除、移动也可快速动态地进行。但在实际应用当中,这种构网算法当点集较大时网速度也较慢,如果点集范围是非凸区域或者存在内环,则会产生非法三角形。
2.2 Bowyer-Watson算法
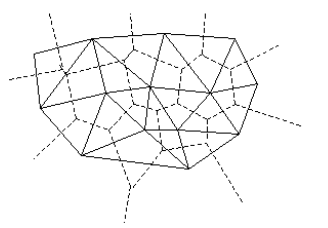
目前采用逐点插入方式生成的Delaunay三角网的算法主要基于Bowyer-Watson算法,Bowyer-Watson算法的主要步骤如下:
1)建立初始三角网格:针对给定的点集V,找到一个包含该点集的矩形R,我们称R为辅助窗口。连接R的任意一条对角线,形成两个三角形,作为初始Delaunay三角网格。
2)逐点插入:假设目前已经有一个Delaunay三角网格T,现在在它里面再插入一个点P,需要找到该点P所在的三角形。从P所在的三角形开始,搜索该三角形的邻近三角形,并进行空外接圆检测。找到外接圆包含点P的所有的三角形并删除这些三角形,形成一个包含P的多边形空腔,我们称之为Delaunay空腔。然后连接P与Delaunay腔的每一个顶点,形成新的Delaunay三角网格。
3)删除辅助窗口R:重复步骤2),当点集V中所有点都已经插入到三角形网格中后,将顶点包含辅助窗口R的三角形全部删除。
在这些步骤中,快速定位点所在的三角形、确定点的影响并构建Delaunay腔的过程是每插入一个点都会进行的。随着点数的增加,三角形数目增加很快,因此缩短这两个过程的计算时间,是提高算法效率的关键。
算法执行图示如下:
3、OpenCV中的Delaunay和Voronoi细分
学习这部分,也是一个头疼的问题,要理解需要较好的数据结构作为基础。由于自己对数据结构也是敬畏三分,所以下面理解不免有误。
OpenCV中现实的Delaunay三角剖分应该是Bowyer-Watson算法。
3.1创建一个Delaunay或Voronoi细分。
我们需要存储Delaunay的内存空间和一个外接矩形(该矩形盒子用来确定虚拟三角形)
// STORAGE AND STRUCTURE FOR DELAUNAY SUBDIVISION //存储和结构 for三角剖分
//
CvRect rect = { 0, 0, 600, 600 };  //Our outer bounding box //我们的外接边界盒子
CvMemStorage* storage;    //Storage for the Delaunay subdivsion //用来存储三角剖分
storage = cvCreateMemStorage(0);    //Initialize the storage //初始化存储器
CvSubdiv2D* subdiv; //The subdivision itself // 细分
subdiv = init_delaunay( storage, rect);   //See this function below //函数返回CvSubdiv类型指针
init_delaunay函数如下,它是一个OpenCV函数,是一个包含一些OpenCV函数的函数包。
//INITIALIZATION CONVENIENCE FUNCTION FOR DELAUNAY SUBDIVISION //为三角剖分初始化便利函数
//
CvSubdiv2D* init_delaunay(CvMemStorage* storage,CvRect rect) {
CvSubdiv2D* subdiv;
subdiv = cvCreateSubdiv2D(CV_SEQ_KIND_SUBDIV2D,sizeof(*subdiv),sizeof(CvSubdiv2DPoint),sizeof(CvQuadEdge2D),storage);//为数据申请空间
cvInitSubdivDelaunay2D( subdiv, rect ); //rect sets the bounds
return subdiv;//返回申请空间的指针
}
我们知道三角剖分是对散点集进行处理的,我们知道了散点集就可以获得点集的三角剖分。如何传入(插入)散点集呢?
这些点必须是32位浮点型,并通过下面的方式插入点:
CvPoint2D32f fp; //This is our point holder//这是我们点的持有者(容器)
for( i = 0; i < as_many_points_as_you_want; i++ ) {
// However you want to set points //如果我们的点集不是32位的,在这里我们将其转为CvPoint2D32f,如下两种方法。
//
fp = your_32f_point_list[i];
cvSubdivDelaunay2DInsert( subdiv, fp );
}
转换为CvPoint2D32f的两种方法:
1)通过宏cvPoint2D32f(double x,double y)
2)通过cxtype.h下的cvPointTo32f(CvPoint point)函数将整形点方便的转换为32位浮点型。
当可以通过输入点(散点集)得到Delaunay三角剖分后,接下来,我们用一下两个函数设置和清除相关的Voronoi划分:
view plaincopy在CODE上查看代码片派生到我的代码片
cvCalcSubdivVoronoi2D( subdiv ); // Fill out Voronoi data in subdiv //在subdiv中填充Vornoi的数据
cvClearSubdivVoronoi2D( subdiv ); // Clear the Voronoi from subdiv//从subdiv中清除Voronoi的数据
CvSubdiv2D结构如下:
#define CV_SUBDIV2D_FIELDS() \
CV_GRAPH_FIELDS() \
int quad_edges; \
int is_geometry_valid; \
CvSubdiv2DEdge recent_edge; \
CvPoint2D32f topleft; \
CvPoint2D32f bottomright;
typedef struct CvSubdiv2D
{
CV_SUBDIV2D_FIELDS()
}
CvSubdiv2D;
#define CV_GRAPH_FIELDS()
CV_SET_FIELDS() /* set of vertices */
CvSet *edges;  /* set of edges    */
#define CV_SET_FIELDS()
CV_SEQUENCE_FIELDS()             /*inherits from [#CvSeq CvSeq] */
struct CvSetElem* free_elems;   /*list of free nodes           */
平面划分是将一个平面分割为一组不重叠的、能够覆盖整个平面的区域。结构CvSubdiv2D描述了建立在二维点集上的划分结构,其中点集互相连接且构成平面图形,该图形通过结合一些无线连接外部划分点(称为凸形点)的边缘,将一个平面用按照其边缘划分成很多小区域。
对于每一个划分操作,都有一个对偶划分与之对应。对偶的意思是小区域与点(划分的顶点)变换角色,即在对偶划分中,小区域被当做一个顶点(以下称为虚拟点)而原始的划分顶点被当做小区域。如下图所示,原始的划分用实线表示,而对偶划分用虚线表示。
OpenCV使用Delaunay算法将平面分割成小的三角形区域(该三角形确保包括所有的分割点)开始不断迭代完成。在这种情况下,对偶划分就是输入的二维点集的Voronoi图表。这种划分可以用于对一个平面进行三维分段变换、形态变换、平面点的快速 定位以及建立特定的图结构(如NNG,RNG)。
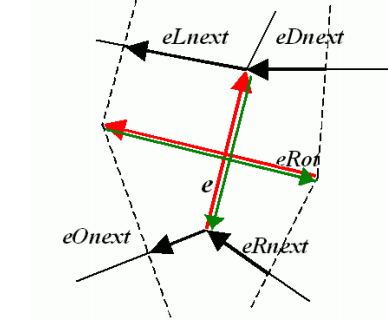
CvQuadEdge2D
CvQuadEdge2D结构包含了两个Delaunay点和两个Vorionoi点以及连接它们的边缘(假设Voronoi点和边缘已经由函数计算出来,通过上面的函数:cvCalSubdivVoronoi2D(subdiv))。
CvQuadEdge2D定义平面划分中的Quad-edge(四方边缘结构),其结构如下:
/
*
one of edges within quad-edge, lower 2 bits is index (0..3)
and upper bits are quad-edge pointer
*
/
typedef long CvSubdiv2DEdge;  //四方边缘结构中的一条边缘,低两位表示该边缘的索引号,其他高位表示边缘指针。

 /*quad-edge structure fields*/四方边缘的结构场
#define CV_QUADEDGE2D_FIELDS() \
int flags; \
struct CvSubdiv2DPoint*pt[4]; \
CvSubdiv2DEdge next[4];
typedef struct CvQuadEdge2D
{
CV_QUADEDGE2D_FIELDS()
}
CvQuadEdge2D;
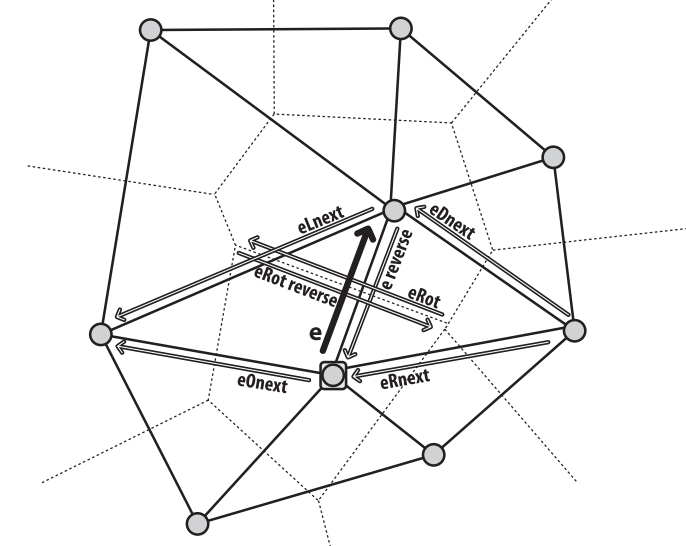
四方边缘结构是平面划分的基元,其中包括四条边缘(e,eRot,以及他们的反方向),如下图所示:
CvSubdiv2DPoint
CvSubdiv2DPoint结构包含Delaunay边缘及其相连的顶点。
其结构定义如下:
#define CV_SUBDIV2D_POINT_FIELDS()\
int flags; \
CvSubdiv2DEdge first; \
CvPoint2D32f pt; \
int id; //This integer can be used to index auxillary data asscoiated with each vertex of the planar subdivison.
#define CV_SUBDIV2D_VIRTUAL_POINT_FLAG (1 << 30)
typedef struct CvSubdiv2DPoint
{
CV_SUBDIV2D_POINT_FIELDS()
}
CvSubdiv2DPoint;
边缘的遍历
Subdiv2DRotateEdge函数
功能:函数Subdiv2DRotateEdge根据输入的边缘返回四方边缘结构中的一条边缘。
格式:
CvSubdiv2DEdge cvSubdiv2DRotateEdge(CvSubdiv2DEdge edge,int rotate );
参数:
edge划分的边缘(不是四方边缘结构,即不是CvQuadEdge2D)
rotate 确定函数根据输入的边缘返回同一四方边缘结构中的哪条边缘,为下列值之一:
1)0 输入边缘(如果e是输入边缘,则为e)。
2)1 旋转比那样(eRot)
3)2 逆边缘(e的反向边缘)。
4)3旋转比那样的反向边缘(eRot的反向边缘)。
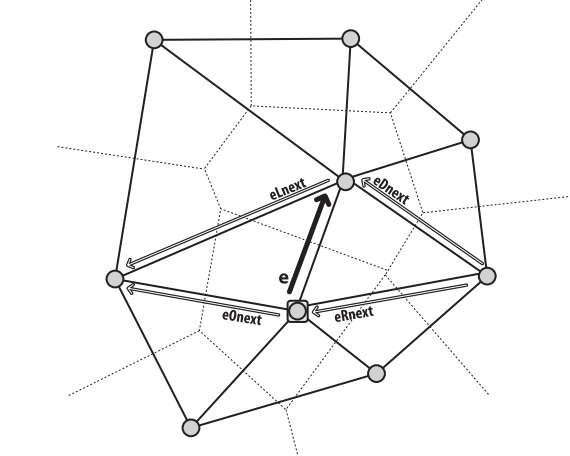
cvSubdiv2DGetEdge函数
使用该函数我们可以遍历Delaunay图。该函数返回与输入边缘相关的边缘。
格式:
CvSubdiv2DEdge cvSubdiv2DGetEdge( CvSubdiv2DEdge edge, CvNextEdgeType type );参数:
edge 划分的边缘(不是四方边缘结构)
type 确定函数返回哪条相关边缘,为下列值之一:
CV_NEXT_AROUND_ORG 边缘原点的下一条(eOnext,如果e是输入边)。
CV_NEXT_AROUND_DST 边缘顶点的下一条(eDnext)
CV_PREV_AROUND_ORG 边缘原点的前一条(eRnext的反向)
CV_PREV_AROUND_DST边缘终点的前一条(eLnext的反向)
CV_NEXT_AROUND_LEFT 左区域的下一条(eLnext) 或下一个左平面
CV_NEXT_AROUND_RIGHT 右区域的下一条(eRnext) 或下一个右平面
CV_PREV_AROUND_LEFT 左区域的前一条(eOnext的反向)或前一个左平面
CV_PREV_AROUND_RIGHT 右区域的前一条(eDnext的反向)或前一个右平面
来至边缘的点
我们可以通过下面的两个函数获得Delaunay或者Voronoi边缘的两个实际点:
CvSubdiv2DPoint* cvSubdiv2DEdgeOrg( CvSubdiv2DEdge edge );
CvSubdiv2DPoint* cvSubdiv2DEdgeDst( CvSubdiv2DEdge edge );
下面是将CvSubdiv2DPoint点转换为更熟悉的点CvPoint2D32f 或者CvPoint:
CvSubdiv2DPoint ptSub;   //Subdivision vertex point
CvPoint2D32f pt32f = ptSub->pt;    // to 32f point
CvPoint pt = cvPointFrom32f(pt32f);  // to an integer point
如何从Delaunay/Voronoi细分得到第一条边或点?
有两种方法:1)使用一个外部点定位边缘或顶点 2)遍历一系列点或边缘
方法一:使用外部点定位边缘或顶点
第一种方法是任取一点,然后在细分中定位该点。该点不一定是三角剖分中点,而可以为任意点。
cvSubdiv2DLocate()函数填充三角形的边缘和顶点(如果必要)或者填充该点所在的Voronoi面,函数的声明如下:
CvSubdiv2DPointLocation cvSubdiv2DLocate(
CvSubdiv2D*   subdiv,
CvPoint2D32f    pt,
CvSubdiv2DEdge* edge,//要填充的边缘
CvSubdiv2DPoint** vertex = NULL//如果需要,则填充顶点
);
请注意,这些不必是最接近的边缘或顶点,它们只需要在三角形上。此函数的返回值按下列的方式说明点的位置:
1)CV_PTLOC_INSIDE 点落入某些面;*edge将包含该面的一个边缘。
2)CV_PTLOC_ON_ENCODE 点落于边缘;*edge含有这个边缘。
3)CV_PTLOC_VERTEX 该点与一个细分顶点重合;*vertex将包含该顶点的指针。
4)CV_PTLOC_OUTSIDE_RECT 该点处于细分参考矩形之外;该函数返回后不填充指针。
5)CV_PTLOC_ERROR 输入变量无效。
方法二:遍历一系列点或边缘
外接三角形(虚拟)的三个顶点和三个边的获取:
1)首先我们要有一个建立的Delaunay细分。
2)我们还需要调用cvCalcSubdivVoronoi2D(subdiv)函数计算相关的Voronoi划分。
3)然后我们就能用CvSubdiv2DPoint *outer_vtx[3]和CvQuadEdge2D*outer_gedges[3]来存储三个顶点和三条边。
如下:
CvSubdiv2DPoint* outer_vtx[3];
for( i = 0; i < 3; i++ ) {
outer_vtx[i] =
(CvSubdiv2DPoint*)cvGetSeqElem( (CvSeq*)subdiv, I );
}
CvQuadEdge2D* outer_ qedges[3];
for( i = 0; i < 3; i++ ) {
outer_qedges[i] =
(CvQuadEdge2D*)cvGetSeqElem( (CvSeq*)(my_subdiv->edges), I );
}
确定凸包的外接三角形(Bounding triangle)或边缘并遍历凸包
我们回想一下,我们通过调用cvInitSubdivDelaunay2D(subdiv,rect)来初始化Delaunay三角剖分。在这种情况下,下面的论述成立:
1、如果边缘的起点和终点都在矩形之外,那么此边缘也在细分的外接三角形上。(即如果一个边缘的两个点出了矩形边界,那么该边缘为虚拟三角形的边缘)
2、如果边缘的一端在矩形内,一段在矩形外,那么矩形边界内的点落在凸集上,凸集上的每个点与虚拟外接三角形的两顶点相连,这两边相继出现。
(英语原文:If you are on an edge with one point inside and one point outside the rect bounds,then the point in bounds is on the convex hull of the set。。。)
(注释:Learning OpenCV中第343页,将In bounds翻译为在边界上,这里个人感觉应该是在翻译为在边界内,为了方便理解,个人猜测如下图,可能不对:)
从上述第二个条件可知,我们可以使用cvSubdiv2DNextEdge(),移动到第一条边上,这条边的dst端点在边界内。
两个端点都在边界内的这条边在点集的凸包上,因此记下那个点和边。一旦它在凸包上,那么你可以如下遍历所有顶点。(切记参考英文原版,我感觉下面的步骤应该参考具体操作理解。)
1·、将凸包遍历一周后,通过cvSubdiv2DRotateEdge(CvSubdiv2DEdge edge,0)函数移动到凸包的下一条边。
2、接着,两次调用宏cvSubdiv2DNextEdge()就到了凸包的下一条边。跳转到第一步。
使用实例:
1、使用函数cvSubdiv2DLoacate()遍历Delaunay三角剖分的边。
2、使用函数cvFindNearestPoint2D()函数找到距离输入最近的点。
3、使用函数draw_subdiv_facet()函数逐步遍历Voronoi面,这个函数是组合函数,实现参考OpenCV的344页。
4、使用CvSeqReader逐步遍历Delaunay或者Voronoi边。
5、找到了三角剖分的所有顶点,我们就可以利用内敛宏cvTriangleArea()函数来计算剖分的面积。
三角剖分例程序:
在OpenCV的sample的c目录下:delaunay.c文件
程序一:
#include <opencv2/imgproc/imgproc_c.h>
#include <opencv2/legacy/legacy.hpp>
#include "opencv2/highgui/highgui.hpp"
#include<opencv2\opencv.hpp>
#include<iostream>
#include <stdio.h>
using namespace std;
using namespace cv;
static void help( void )
{
    printf("\nThis program demostrates iterative construction of\n"//这个程序阐述了delaunay剖分和voronoi细分的迭代构造
        "delaunay triangulation and voronoi tesselation.\n"
        "It draws a random set of points in an image and then delaunay triangulates them.\n"//在图像上画出一些随机点,然后进行delaunay三角剖分
        "Usage: \n"
        "./delaunay \n"
        "\nThis program builds the traingulation interactively, you may stop this process by\n"
        "hitting any key.\n");//迭代构造三角剖分,如果像停止,则按任意键
}

static CvSubdiv2D* init_delaunay( CvMemStorage* storage,//初始化三角剖分结构,为其分配单元
    CvRect rect )
{
    CvSubdiv2D* subdiv;//三角剖分的数据单元

    subdiv = cvCreateSubdiv2D( CV_SEQ_KIND_SUBDIV2D, sizeof(*subdiv),
        sizeof(CvSubdiv2DPoint),
        sizeof(CvQuadEdge2D),
        storage );
    cvInitSubdivDelaunay2D( subdiv, rect );

    return subdiv;
}


static void draw_subdiv_point( IplImage* img, CvPoint2D32f fp, CvScalar color )//画出三角剖分的顶点
{
    cvCircle( img, cvPoint(cvRound(fp.x), cvRound(fp.y)),5, color, CV_FILLED, 8, 0 );
}


static void draw_subdiv_edge( IplImage* img, CvSubdiv2DEdge edge, CvScalar color )//画出三角剖分的边
{
    CvSubdiv2DPoint* org_pt;//源顶点
    CvSubdiv2DPoint* dst_pt;//目地顶点
    CvPoint2D32f org;
    CvPoint2D32f dst;
    CvPoint iorg, idst;

    org_pt = cvSubdiv2DEdgeOrg(edge);//通过边获取顶点
    dst_pt = cvSubdiv2DEdgeDst(edge);

    if( org_pt && dst_pt )//如果两个端点不为空
    {
        org = org_pt->pt;
        dst = dst_pt->pt;

        iorg = cvPoint( cvRound( org.x ), cvRound( org.y ));
        idst = cvPoint( cvRound( dst.x ), cvRound( dst.y ));

        cvLine( img, iorg, idst, color, 1, CV_AA, 0 );
    }
}


static void draw_subdiv( IplImage* img, CvSubdiv2D* subdiv,
    CvScalar delaunay_color, CvScalar voronoi_color  )//画出剖分和细分
{
    CvSeqReader  reader;
    int i, total = subdiv->edges->total;//边的数量
    int elem_size = subdiv->edges->elem_size;//边的大小
    cout<<typeid(subdiv->edges).name()<<endl;

    cvStartReadSeq( (CvSeq*)(subdiv->edges), &reader, 0 );//使用CvSeqReader遍历Delaunay或者Voronoi边

    for( i = 0; i < total; i++ )
    {
        CvQuadEdge2D* edge = (CvQuadEdge2D*)(reader.ptr);

        if( CV_IS_SET_ELEM( edge ))
        {
            // draw_subdiv_edge( img, (CvSubdiv2DEdge)edge + 1, voronoi_color );
            draw_subdiv_edge( img, (CvSubdiv2DEdge)edge, delaunay_color );
        }

        CV_NEXT_SEQ_ELEM( elem_size, reader );
    }

}


static void locate_point( CvSubdiv2D* subdiv, CvPoint2D32f fp, IplImage* img,//遍历三角剖分的边
    CvScalar active_color )
{
    CvSubdiv2DEdge e;
    CvSubdiv2DEdge e0 = 0;
    CvSubdiv2DPoint* p = 0;

    cvSubdiv2DLocate( subdiv, fp, &e0, &p );

    if( e0 )
    {
        e = e0;
        do
        {
            draw_subdiv_edge( img, e, active_color );
            e = cvSubdiv2DGetEdge(e,CV_NEXT_AROUND_LEFT);
        }
        while( e != e0 );
    }

    draw_subdiv_point( img, fp, active_color );
}

//@author andme-单目视觉
void dashLine(Mat &img, Point2d& pt1, Point2d& pt2, int n)//n为虚线段数
{
    Point sub = pt2 - pt1;
    for (int i = 0; i < 2*n; i += 2)
    {
        line(img, Point(pt1.x + sub.x * i / (2 * n - 1), pt1.y + sub.y * i / (2 * n - 1)), Point(pt1.x + sub.x * (i+1) / (2 * n - 1), pt1.y + sub.y * (i+1) / (2 * n - 1)), Scalar(0,255,0), 2);
    }
}


//调用形式draw_subdiv_facet( img, cvSubdiv2DRotateEdge( e, 1 ));
static void draw_subdiv_facet( IplImage* img, CvSubdiv2DEdge edge )//画出voronoi面
{
    //cout<<edge<<endl;//edge低两位表示表示索引,高位表示四方边缘指针。
    //cout<<(edge&3)<<endl;
    CvSubdiv2DEdge t = edge;//当我们按上面的调用形式时,edge为eRot。
    int i, count = 0;
    CvPoint* buf = 0;
    Point2d *buf1=0;

    // count number of edges in facet //面内边的计数
    do
    {
        count++;
        t = cvSubdiv2DGetEdge( t, CV_NEXT_AROUND_LEFT );
    } while (t != edge );//我们绕着一个voronoi单元一周,遍历该vornonoi边缘所拥有的边缘数。

    buf = (CvPoint*)malloc( count * sizeof(buf[0]));
    buf1=(Point2d*)malloc(count*sizeof(buf1[0]));

    // gather points
    t = edge;
    for( i = 0; i < count; i++ )
    {
        CvSubdiv2DPoint* pt = cvSubdiv2DEdgeOrg( t );//第一次获取eRot边缘的起始点
        if( !pt ) break;//如果得不到该源点,则退出循环
        buf[i] = cvPoint( cvRound(pt->pt.x), cvRound(pt->pt.y));//将该点转换为cvPoint类型点,存储在buf中
        t = cvSubdiv2DGetEdge( t, CV_NEXT_AROUND_LEFT );//然后绕着vornonoi单元,左旋转。
    }

    if( i == count )//如果所有的点都存储起来了。
    {
        CvSubdiv2DPoint* pt = cvSubdiv2DEdgeDst( cvSubdiv2DRotateEdge( edge, 1 ));//这里eRot的旋转边缘应该是reversed e,那么目的点,就是e的源点。
        // cvFillConvexPoly( img, buf, count, CV_RGB(rand()&255,rand()&255,rand()&255), CV_AA, 0 );//填充凸多边形
        for(i=0;i<count;i++)
        {
            buf1[i].x=buf[i].x;
            buf1[i].y=buf[i].y;
        }
        Mat mat_img(img);

        cvPolyLine( img, &buf, &count, 1, 1, CV_RGB(0,200,0), 1, CV_AA, 0);//画出线。
        //for(int i=0;i<count-1;i++)
        //{
        //dashLine(mat_img,buf1[i],buf1[i+1],100);
        //}
        //dashLine(mat_img,buf1[i],buf1[0],100);
        draw_subdiv_point( img, pt->pt, CV_RGB(255,0,0));//用黑色画出画出剖分顶点。
    }
    free( buf );
}

static void paint_voronoi( CvSubdiv2D* subdiv, IplImage* img )//画出voronoi面
{
    CvSeqReader  reader;
    int i, total = subdiv->edges->total;//边缘总数
    int elem_size = subdiv->edges->elem_size;//边缘的大小

    cvCalcSubdivVoronoi2D( subdiv );

    cvStartReadSeq( (CvSeq*)(subdiv->edges), &reader, 0 );

    for( i = 0; i < total; i++ )
    {
        CvQuadEdge2D* edge = (CvQuadEdge2D*)(reader.ptr);//获取四方边缘

        if( CV_IS_SET_ELEM( edge ))//判断边缘是否在边缘集中
        {
            CvSubdiv2DEdge e = (CvSubdiv2DEdge)edge;//edge是四方边缘的指针,而CvSubdiv2DEdge高位表示四方边缘的指针。
            //cout<<(e&3)<<endl;//通过测试e低2位即索引值应该设置为0了,即输入边缘
            // left
            draw_subdiv_facet( img, cvSubdiv2DRotateEdge( e, 1 ));//e为Delaunay边,获得Delaunay边对应的voronoi边,即e的旋转边缘

            // right
            draw_subdiv_facet( img, cvSubdiv2DRotateEdge( e, 3 ));//反向的旋转边缘
        }

        CV_NEXT_SEQ_ELEM( elem_size, reader );//移动到下一个位置
    }
}


static void run(void)
{
    char win[] = "source";
    int i;
    CvRect rect = { 0, 0, 600, 600 };
    CvMemStorage* storage;
    CvSubdiv2D* subdiv;
    IplImage* img;
    CvScalar active_facet_color, delaunay_color, voronoi_color, bkgnd_color;

    active_facet_color = CV_RGB( 255, 0, 0 );//红色
    delaunay_color  = CV_RGB( 0,0,0);//黑色
    voronoi_color = CV_RGB(0, 180, 0);//绿色
    bkgnd_color = CV_RGB(255,255,255);//白色

    img = cvCreateImage( cvSize(rect.width,rect.height), 8, 3 );
    cvSet( img, bkgnd_color, 0 );

    cvNamedWindow( win, 1 );

    storage = cvCreateMemStorage(0);
    subdiv = init_delaunay( storage, rect );

    printf("Delaunay triangulation will be build now interactively.\n"
        "To stop the process, press any key\n\n");

    vector<CvPoint2D32f> points;
    for( i = 0; i < 5; i++ )
    {
        CvPoint2D32f fp = cvPoint2D32f( (float)(rand()%(rect.width-10)),//使点约束在距离边框10像素之内。
            (float)(rand()%(rect.height-10)));
        points.push_back(fp);

        locate_point( subdiv, fp, img, active_facet_color );//定位点的位置,并画出点所在voronoi面的边。
        cvShowImage( win, img );//刷新显示

        if( cvWaitKey( 100 ) >= 0 )
            break;

        cvSubdivDelaunay2DInsert( subdiv, fp );//向三角剖分中插入该点,即对该点进行三角剖分
        cvCalcSubdivVoronoi2D( subdiv );//计算Voronoi细分,有时候我们不需要
        cvSet( img, bkgnd_color, 0 );//设置图像的背景颜色为白色
        draw_subdiv( img, subdiv, delaunay_color, voronoi_color);
        cvShowImage( win, img );

        //cvWaitKey();
        if( cvWaitKey( 100 ) >= 0 )
            break;
    }
    for(int i=0;i<points.size();i++)
        draw_subdiv_point( img, points[i], active_facet_color );
    cvShowImage(win,img);
    cvWaitKey();

    //  cvSet( img, bkgnd_color, 0 );//重新刷新画布,即设置背景颜色为白色
    paint_voronoi( subdiv, img );//画出细分
    cvShowImage( win, img );//

    cvWaitKey(0);

    cvReleaseMemStorage( &storage );
    cvReleaseImage(&img);
    cvDestroyWindow( win );
}

int main( int argc, char** argv )
{
    (void)argc; (void)argv;
    help();
    run();
    return 0;
}

#ifdef _EiC
main( 1, "delaunay.c" );
#endif
执行效果如下图所示:黑色线表示三角剖分、绿色线表示相应的Voronoi细分,顶点用红色表示。
程序二:
和程序一类似,只是加了根据一个点,然后获取该点在所在的剖分平面(即包含该点的三角形),然后遍历该三角形:
#include <opencv2/imgproc/imgproc_c.h>
#include <opencv2/legacy/legacy.hpp>
#include "opencv2/highgui/highgui.hpp"
#include<opencv2\opencv.hpp>
#include<iostream>
#include <stdio.h>
using namespace std;
using namespace cv;
static void help( void )
{
printf("\nThis program demostrates iterative construction of\n"//这个程序阐述了delaunay剖分和voronoi细分的迭代构造
"delaunay triangulation and voronoi tesselation.\n"
"It draws a random set of points in an image and then delaunay triangulates them.\n"//在图像上画出一些随机点,然后进行delaunay三角剖分
"Usage: \n"
"./delaunay \n"
"\nThis program builds the traingulation interactively, you may stop this process by\n"
"hitting any key.\n");//迭代构造三角剖分,如果像停止,则按任意键
}
static CvSubdiv2D* init_delaunay( CvMemStorage* storage,//初始化三角剖分结构,为其分配单元
CvRect rect )
{
CvSubdiv2D* subdiv;//三角剖分的数据单元
subdiv = cvCreateSubdiv2D( CV_SEQ_KIND_SUBDIV2D, sizeof(*subdiv),
sizeof(CvSubdiv2DPoint),
sizeof(CvQuadEdge2D),
storage );
cvInitSubdivDelaunay2D( subdiv, rect );
return subdiv;
}
static void draw_subdiv_point( IplImage* img, CvPoint2D32f fp, CvScalar color )//画出三角剖分的顶点
{
cvCircle( img, cvPoint(cvRound(fp.x), cvRound(fp.y)),5, color, CV_FILLED, 8, 0 );
}
static void draw_subdiv_edge( IplImage* img, CvSubdiv2DEdge edge, CvScalar color )//画出三角剖分的边
{
CvSubdiv2DPoint* org_pt;//源顶点
CvSubdiv2DPoint* dst_pt;//目地顶点
CvPoint2D32f org;
CvPoint2D32f dst;
CvPoint iorg, idst;
org_pt = cvSubdiv2DEdgeOrg(edge);//通过边获取顶点
dst_pt = cvSubdiv2DEdgeDst(edge);
if( org_pt && dst_pt )//如果两个端点不为空
{
org = org_pt->pt;
dst = dst_pt->pt;
iorg = cvPoint( cvRound( org.x ), cvRound( org.y ));
idst = cvPoint( cvRound( dst.x ), cvRound( dst.y ));
cvLine( img, iorg, idst, color, 1, CV_AA, 0 );
}
}
static void draw_subdiv( IplImage* img, CvSubdiv2D* subdiv,
CvScalar delaunay_color, CvScalar voronoi_color )//画出剖分和细分
{
CvSeqReader reader;
int i, total = subdiv->edges->total;//边的数量
int elem_size = subdiv->edges->elem_size;//边的大小
cout<<typeid(subdiv->edges).name()<<endl;
cvStartReadSeq( (CvSeq*)(subdiv->edges), &reader, 0 );//使用CvSeqReader遍历Delaunay或者Voronoi边
for( i = 0; i < total; i++ )
{
CvQuadEdge2D* edge = (CvQuadEdge2D*)(reader.ptr);
if( CV_IS_SET_ELEM( edge ))
{
// draw_subdiv_edge( img, (CvSubdiv2DEdge)edge + 1, voronoi_color );
draw_subdiv_edge( img, (CvSubdiv2DEdge)edge, delaunay_color );
}
CV_NEXT_SEQ_ELEM( elem_size, reader );
}
}
static void locate_point( CvSubdiv2D* subdiv, CvPoint2D32f fp, IplImage* img,//遍历三角剖分的边
CvScalar active_color )
{
CvSubdiv2DEdge e;
CvSubdiv2DEdge e0 = 0;
CvSubdiv2DPoint* p = 0;
cvSubdiv2DLocate( subdiv, fp, &e0, &p );
if( e0 )
{
e = e0;
do
{
draw_subdiv_edge( img, e, active_color );
e = cvSubdiv2DGetEdge(e,CV_NEXT_AROUND_LEFT);
}
while( e != e0 );
}
draw_subdiv_point( img, fp, active_color );
}
//@author andme-单目视觉
void dashLine(Mat &img, Point2d& pt1, Point2d& pt2, int n)//n为虚线段数
{
Point sub = pt2 - pt1;
for (int i = 0; i < 2*n; i += 2)
{
line(img, Point(pt1.x + sub.x * i / (2 * n - 1), pt1.y + sub.y * i / (2 * n - 1)), Point(pt1.x + sub.x * (i+1) / (2 * n - 1), pt1.y + sub.y * (i+1) / (2 * n - 1)), Scalar(0,255,0), 2);
}
}
//调用形式draw_subdiv_facet( img, cvSubdiv2DRotateEdge( e, 1 ));
static void draw_subdiv_facet( IplImage* img, CvSubdiv2DEdge edge )//画出voronoi面
{
//cout<<edge<<endl;//edge低两位表示表示索引,高位表示四方边缘指针。
//cout<<(edge&3)<<endl;
CvSubdiv2DEdge t = edge;//当我们按上面的调用形式时,edge为eRot。
int i, count = 0;
CvPoint* buf = 0;
Point2d *buf1=0;
// count number of edges in facet //面内边的计数
do
{
count++;
t = cvSubdiv2DGetEdge( t, CV_NEXT_AROUND_LEFT );
} while (t != edge );//我们绕着一个voronoi单元一周,遍历该vornonoi边缘所拥有的边缘数。
buf = (CvPoint*)malloc( count * sizeof(buf[0]));
buf1=(Point2d*)malloc(count*sizeof(buf1[0]));
// gather points
t = edge;
for( i = 0; i < count; i++ )
{
CvSubdiv2DPoint* pt = cvSubdiv2DEdgeOrg( t );//第一次获取eRot边缘的起始点
if( !pt ) break;//如果得不到该源点,则退出循环
buf[i] = cvPoint( cvRound(pt->pt.x), cvRound(pt->pt.y));//将该点转换为cvPoint类型点,存储在buf中
t = cvSubdiv2DGetEdge( t, CV_NEXT_AROUND_LEFT );//然后绕着vornonoi单元,左旋转。
}
if( i == count )//如果所有的点都存储起来了。
{
CvSubdiv2DPoint* pt = cvSubdiv2DEdgeDst( cvSubdiv2DRotateEdge( edge, 1 ));//这里eRot的旋转边缘应该是reversed e,那么目的点,就是e的源点。
// cvFillConvexPoly( img, buf, count, CV_RGB(rand()&255,rand()&255,rand()&255), CV_AA, 0 );//填充凸多边形
for(i=0;i<count;i++)
{
buf1[i].x=buf[i].x;
buf1[i].y=buf[i].y;
}
Mat mat_img(img);
cvPolyLine( img, &buf, &count, 1, 1, CV_RGB(0,200,0), 1, CV_AA, 0);//画出线。
//for(int i=0;i<count-1;i++)
//{
//dashLine(mat_img,buf1[i],buf1[i+1],100);
//}
//dashLine(mat_img,buf1[i],buf1[0],100);
draw_subdiv_point( img, pt->pt, CV_RGB(255,0,0));//用黑色画出画出剖分顶点。
}
free( buf );
}
/**********************************************重点部分:如何实现变量所有的Delauany或者Voronoi边*****************************/
static void paint_voronoi( CvSubdiv2D* subdiv, IplImage* img )//画出voronoi面
{
CvSeqReader reader;
int i, total = subdiv->edges->total;//边缘总数
int elem_size = subdiv->edges->elem_size;//边缘的大小
cvCalcSubdivVoronoi2D( subdiv );
cvStartReadSeq( (CvSeq*)(subdiv->edges), &reader, 0 );
for( i = 0; i < total; i++ )
{
CvQuadEdge2D* edge = (CvQuadEdge2D*)(reader.ptr);//获取四方边缘
if( CV_IS_SET_ELEM( edge ))//判断边缘是否在边缘集中
{
CvSubdiv2DEdge e = (CvSubdiv2DEdge)edge;//edge是四方边缘的指针,而CvSubdiv2DEdge高位表示四方边缘的指针。
//cout<<(e&3)<<endl;//通过测试e低2位即索引值应该设置为0了,即输入边缘
// left
draw_subdiv_facet( img, cvSubdiv2DRotateEdge( e, 1 ));//e为Delaunay边,获得Delaunay边对应的voronoi边,即e的旋转边缘
// right
draw_subdiv_facet( img, cvSubdiv2DRotateEdge( e, 3 ));//反向的旋转边缘
}
CV_NEXT_SEQ_ELEM( elem_size, reader );//移动到下一个位置
}
}
/*************************************************************************************/
void draw_edge(CvSubdiv2DEdge e0,IplImage *img,const char *cp )
{
CvSubdiv2DPoint *point1_org=cvSubdiv2DEdgeOrg(e0);
CvSubdiv2DPoint *point1_dst=cvSubdiv2DEdgeDst(e0);
CvPoint pt_org=cvPointFrom32f(point1_org->pt);
CvPoint pt_dst=cvPointFrom32f(point1_dst->pt);
CvPoint pt;
pt.x=(pt_org.x+pt_dst.x)/2;
pt.y=(pt_org.y+pt_dst.y)/2;
CvFont font;
cvInitFont(&font,CV_FONT_ITALIC,1,1,0,2,8);
cvLine(img,pt_org,pt_dst,cvScalar(255,0,0),2,8);
cvCircle(img,pt,6,cvScalar(0,0,0),2,CV_AA);
cout<<"点位于"<<pt.x<<" "<<pt.y<<endl;
cvPutText(img,cp,pt,&font,cvScalar(0,255,0));
if(pt_dst.y-pt_org.y>0)
{
cout<<"箭头朝下"<<endl;
}else
{
cout<<"箭头朝上"<<endl;
}
}
static void run(void)
{
char win[] = "source";
int i;
CvRect rect = { 0, 0, 600, 600 };
CvMemStorage* storage;
CvSubdiv2D* subdiv;
IplImage* img;
CvScalar active_facet_color, delaunay_color, voronoi_color, bkgnd_color;
active_facet_color = CV_RGB( 255, 0, 0 );//红色
delaunay_color = CV_RGB( 0,0,0);//黑色
voronoi_color = CV_RGB(0, 180, 0);//绿色
bkgnd_color = CV_RGB(255,255,255);//白色
img = cvCreateImage( cvSize(rect.width,rect.height), 8, 3 );
cvSet( img, bkgnd_color, 0 );
cvNamedWindow( win, 1 );
storage = cvCreateMemStorage(0);
subdiv = init_delaunay( storage, rect );
printf("Delaunay triangulation will be build now interactively.\n"
"To stop the process, press any key\n\n");
vector<CvPoint2D32f> points;
for( i = 0; i < 5; i++ )
{
CvPoint2D32f fp = cvPoint2D32f( (float)(rand()%(rect.width-10)),//使点约束在距离边框10像素之内。
(float)(rand()%(rect.height-10)));
points.push_back(fp);
locate_point( subdiv, fp, img, active_facet_color );//定位点的位置,并画出点所在voronoi面的边。
cvShowImage( win, img );//刷新显示
if( cvWaitKey( 100 ) >= 0 )
break;
cvSubdivDelaunay2DInsert( subdiv, fp );//向三角剖分中插入该点,即对该点进行三角剖分
cvCalcSubdivVoronoi2D( subdiv );//计算Voronoi细分,有时候我们不需要
cvSet( img, bkgnd_color, 0 );//设置图像的背景颜色为白色
draw_subdiv( img, subdiv, delaunay_color, voronoi_color);
cvShowImage( win, img );
//cvWaitKey();
if( cvWaitKey( 100 ) >= 0 )
break;
}
for(int i=0;i<points.size();i++)
draw_subdiv_point( img, points[i], active_facet_color );
cvShowImage(win,img);
cvWaitKey();
// cvSet( img, bkgnd_color, 0 );//重新刷新画布,即设置背景颜色为白色
paint_voronoi( subdiv, img );//画出细分
CvPoint2D32f point1=cvPoint2D32f(300,300);//图像中心选择一点。
CvSubdiv2DEdge e;
CvSubdiv2DEdge e0 = 0;
CvSubdiv2DPoint* p = 0;
CvSubdiv2DPointLocation loc=cvSubdiv2DLocate( subdiv, point1, &e0, &p );
if(loc==CV_PTLOC_INSIDE)
{
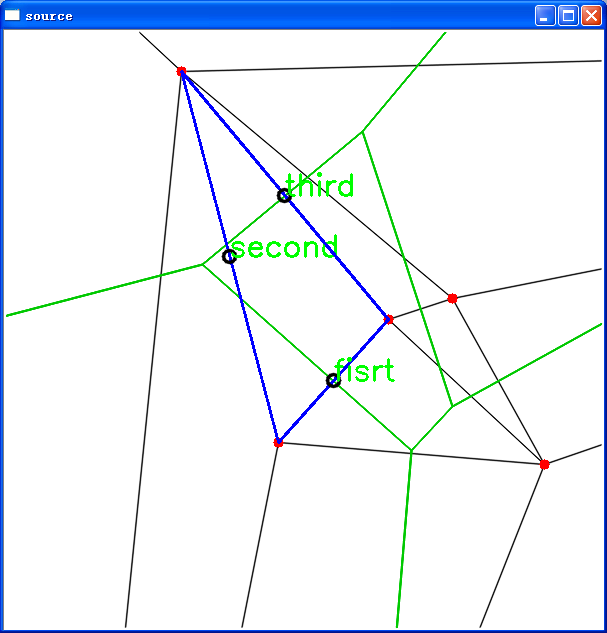
cout<<"落入某些面,箭头的方向用来说明图的方向"<<endl;
draw_edge(e0,img,"fisrt");
CvSubdiv2DEdge e_lnext=cvSubdiv2DGetEdge(e0,CV_NEXT_AROUND_LEFT);
draw_edge(e_lnext,img,"second");
CvSubdiv2DEdge e_Onext=cvSubdiv2DGetEdge(e_lnext,CV_NEXT_AROUND_LEFT);
draw_edge(e_Onext,img,"third");
}else if(loc==CV_PTLOC_ON_EDGE)
{
cout<<"点落在边缘上"<<endl;
}else if(loc==CV_PTLOC_VERTEX)
{
cout<<"和顶点重合"<<endl;
}else
{
cout<<"输入变量无效"<<endl;
}
cvShowImage( win, img );//
cvWaitKey(0);
cvReleaseMemStorage( &storage );
cvReleaseImage(&img);
cvDestroyWindow( win );
}
int main( int argc, char** argv )
{
(void)argc; (void)argv;
help();
run();
return 0;
}
#ifdef _EiC
main( 1, "delaunay.c" );
#endif
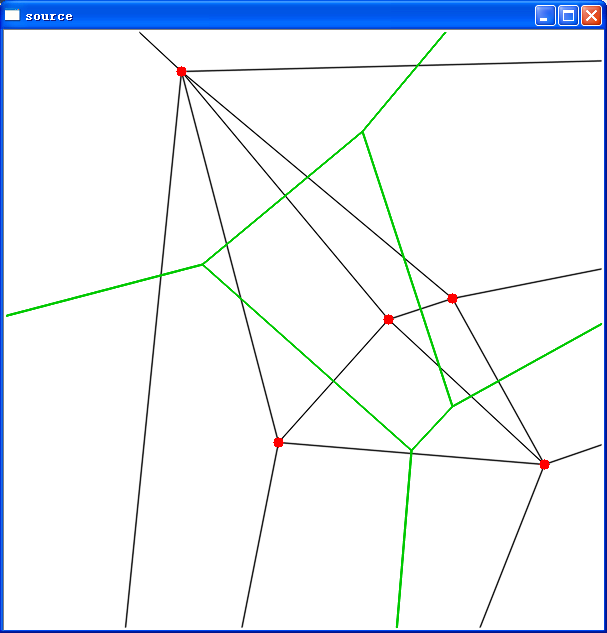
执行效果:
上图中我们选择了图像的中心点,图像大小为600×600,故中心点为300×300,我们通过函数cvSubdiv2DLocate()得知该点落在了面内,然后我们该函数得到该面的一个边缘,我们有了边缘信息,如果我们帮它当做程序1上的参考图中的e,那么我就可以获得参考图中的所有边的信息,我们也可以根据这些边的信息获取的这些边的端点。
并注意一下控制台的输出信息:即first边的方向向下,second为方向向上,third是方向向下。
程序三:
#include <opencv2/legacy/legacy.hpp>
#include <opencv2/opencv.hpp>
#include <opencv2/nonfree/nonfree.hpp>
#include <opencv2/nonfree/features2d.hpp>
#include <atlstr.h> // use STL string instead, although not as convenient...
#include <atltrace.h>
#include <iostream>
#include <fstream>
#include <string>
#include<time.h>

using namespace std;
using namespace cv;
/*
pts,要剖分的散点集,in
img,剖分的画布,in
tri,存储三个表示顶点变换的正数,out
*/

// used for doing delaunay trianglation with opencv function
//该函数用来防止多次重画并消去虚拟三角形的 顶点
bool isGoodTri( Vec3i &v, vector<Vec3i> & tri )
{
    int a = v[0], b = v[1], c = v[2];
    v[0] = min(a,min(b,c));//v[0]找到点插入的先后顺序(0....N-1,N为点的个数)的最小值
    v[2] = max(a,max(b,c));//v[2]存储最大值.
    v[1] = a+b+c-v[0]-v[2];//v[1]为中间值
    if (v[0] == -1) return false;

    vector<Vec3i>::iterator iter = tri.begin();//开始时为空
    for(;iter!=tri.end();iter++)
    {
        Vec3i &check = *iter;//如果当前待压入的和存储的重复了,则停止返回false。
        if (check[0]==v[0] &&
            check[1]==v[1] &&
            check[2]==v[2])
        {
            break;
        }
    }
    if (iter == tri.end())
    {
        tri.push_back(v);
        return true;
    }
    return false;
}
/*
pts,要剖分的散点集,in
img,剖分的画布,in
tri,存储三个表示顶点变换的正数,out
*/
void TriSubDiv( vector<Point2f> &pts, Mat &img, vector<Vec3i> &tri )
{
    CvSubdiv2D* subdiv;
    CvMemStorage* storage = cvCreateMemStorage(0); //创建存储器
    Rect rc = Rect(0,0, img.cols, img.rows);//矩形是图像的大小

    subdiv = cvCreateSubdiv2D( CV_SEQ_KIND_SUBDIV2D, sizeof(*subdiv),
        sizeof(CvSubdiv2DPoint),
        sizeof(CvQuadEdge2D),
        storage );//为剖分数据分配空间
    cvInitSubdivDelaunay2D( subdiv, rc );
    for (size_t i = 0; i < pts.size(); i++)
    {
        CvSubdiv2DPoint *pt = cvSubdivDelaunay2DInsert( subdiv, pts[i] );//利用插入法进行剖分
        pt->id = i;//为每一个顶点分配一个id

    }

    CvSeqReader reader;//利用CvSeqReader遍历
    int total = subdiv->edges->total;//边的总数
    int elem_size = subdiv->edges->elem_size;//边的大小

    cvStartReadSeq( (CvSeq*)(subdiv->edges), &reader, 0 );
    Point buf[3];
    const Point *pBuf = buf;
    Vec3i verticesIdx;
    Mat imgShow = img.clone();

    srand( (unsigned)time( NULL ) );
    for( int i = 0; i < total; i++ )
    {
        CvQuadEdge2D* edge = (CvQuadEdge2D*)(reader.ptr);

        if( CV_IS_SET_ELEM( edge ))
        {
            CvSubdiv2DEdge t = (CvSubdiv2DEdge)edge;
            int iPointNum = 3;
            Scalar color = CV_RGB(rand()&255,rand()&255,rand()&255);
            //Scalar color=CV_RGB(255,0,0);
            //bool isNeg = false;
            int j;
            for(j = 0; j < iPointNum; j++ )
            {
                CvSubdiv2DPoint* pt = cvSubdiv2DEdgeOrg( t );//获取t边的源点
                if( !pt ) break;
                buf[j] = pt->pt;//将点存储起来
                //if (pt->id == -1) isNeg = true;
                verticesIdx[j] = pt->id;//获取顶点的Id号,将三个点的id存储到verticesIdx中
                t = cvSubdiv2DGetEdge( t, CV_NEXT_AROUND_LEFT );//获取下一条边
            }
            if (j != iPointNum) continue;
            if (isGoodTri(verticesIdx, tri))
            {
                //tri.push_back(verticesIdx);
                polylines( imgShow, &pBuf, &iPointNum,
                    1, true, color,
                    1, CV_AA, 0);//画出三条边
                //printf("(%d, %d)-(%d, %d)-(%d, %d)\n", buf[0].x, buf[0].y, buf[1].x, buf[1].y, buf[2].x, buf[2].y);
                //printf("%d\t%d\t%d\n", verticesIdx[0], verticesIdx[1], verticesIdx[2]);
                //imshow("Delaunay", imgShow);
                //waitKey();
            }

            t = (CvSubdiv2DEdge)edge+2;//相反边缘 reversed e

            for(j = 0; j < iPointNum; j++ )
            {
                CvSubdiv2DPoint* pt = cvSubdiv2DEdgeOrg( t );
                if( !pt ) break;
                buf[j] = pt->pt;
                verticesIdx[j] = pt->id;
                t = cvSubdiv2DGetEdge( t, CV_NEXT_AROUND_LEFT );
            }
            if (j != iPointNum) continue;
            if (isGoodTri(verticesIdx, tri))
            {
                //tri.push_back(verticesIdx);
                polylines( imgShow, &pBuf, &iPointNum,
                    1, true, color,
                    1, CV_AA, 0);
                //printf("(%d, %d)-(%d, %d)-(%d, %d)\n", buf[0].x, buf[0].y, buf[1].x, buf[1].y, buf[2].x, buf[2].y);
                //printf("%d\t%d\t%d\n", verticesIdx[0], verticesIdx[1], verticesIdx[2]);
                //imshow("Delaunay", imgShow);
                //waitKey();
        }

        }

        CV_NEXT_SEQ_ELEM( elem_size, reader );

    }

    //RemoveDuplicate(tri);
    char title[100];
    sprintf_s(title, 100, "Delaunay: %d Triangles", tri.size());//tri存储的为3个顶点为一个vec3i,故tri.size()表示三角形的个数。
    imshow(title, imgShow);
    waitKey();
}

void main(int argc, char* argv[])

{
    Mat imgL(600,600,CV_8UC3);
    /************************************************************************/
    /* Delaunay triangulation                                               */
    /************************************************************************/
    cout<<"doing triangulation..."<<endl;
    vector<Vec3i> tri;

    vector<Point2f> vec_points;
    for(int  i = 0; i < 60; i++ )
    {
        Point2f fp = cvPoint2D32f( (float)(rand()%(imgL.cols-10)),//使点约束在距离边框10像素之内。
            (float)(rand()%(imgL.rows-10)));
        vec_points.push_back(fp);
    }

    TriSubDiv(vec_points, imgL, tri);


}
执行结果:
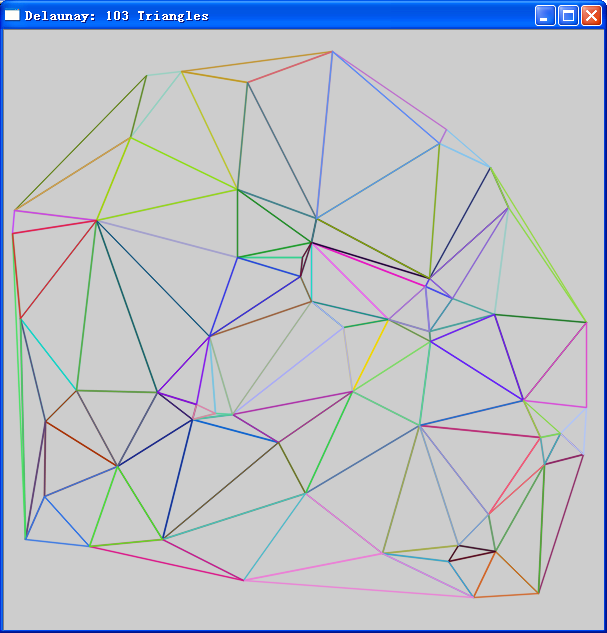
上程序中,通过isGoodTri()函数可以有效地防止重画并且消除虚拟三角形的顶点。
我要说的:
1、程序的关键是通过上面**号强调的利用CvSeqReader遍历所有的Delaunay或者Voronoi.
2、Delaunay或者Voronoi之间的桥梁就是通过函数,cvSubdiv2DRotateEdge()实现边的旋转(切换)。
3、这个Delaunay是个有向图,还是双向的。具体怎么实现的,没有较深的数据结构为基础是很难理解的,至少现在我还不是很懂具体的实现,关于它的使用还是摸索阶段。OpenCV水很深,如果这东西只是为我们用,或者了解,而不是研究,我们没有必要纠结的太深。
4、文章中的错误,还请指正,一起学习。