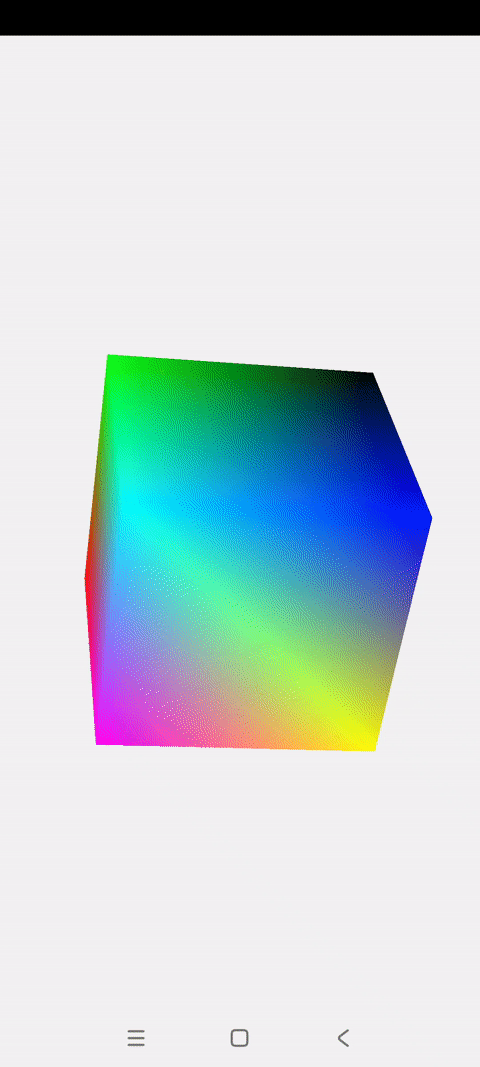
效果展示
混色旋转的3D立方体
一.概述
之前关于OpenGLES实战开发的博文,不论是实现相机滤镜还是绘制图形,都是在2D纬度
这篇博文开始,将会使用OpenGLES进入3D世界
本篇博文会实现一个颜色渐变、旋转的3D立方体
动态3D图形的绘制,需要具备一些基础的线性代数(向量、矩阵)和空间坐标系转换相关知识,这里就不再做理论科普,需要自己先行学习,具体可以参考OpenGL官网的如下三章,讲解得十分详细:
二.GLRender:变量定义
2.1 常规变量定义
//shader程序/渲染器
private int shaderProgram;

private int vPosition;
private int aColor;
private int mvpMatrix;

//suface宽高比
private float ratio;
2.2 定义顶点、颜色、索引数组和缓冲
本次立方体的绘制,先定义顶点、颜色和索引数组,然后通过直接绘制索引缓冲来绘制立方体
三个数组及缓冲定义如下:
    private FloatBuffer vertexBuffer;
    private FloatBuffer colorBuffer;
    private ShortBuffer indexBuffer;

    private float vertexData[] = {
            -1.0f, 1.0f, 1.0f,    //正面左上0
            -1.0f, -1.0f, 1.0f,   //正面左下1
            1.0f, -1.0f, 1.0f,    //正面右下2
            1.0f, 1.0f, 1.0f,     //正面右上3
            -1.0f, 1.0f, -1.0f,   //反面左上4
            -1.0f, -1.0f, -1.0f,  //反面左下5
            1.0f, -1.0f, -1.0f,   //反面右下6
            1.0f, 1.0f, -1.0f,    //反面右上7
    };

    //八个顶点的颜色,与顶点坐标一一对应
    private float colorData[] = {
            1.0f, 1.0f, 0.0f,  // v0 Yellow
            1.0f, 0.0f, 1.0f,  // v1 Magenta 粉红
            1.0f, 0.0f, 0.0f,  // v2 Red
            1.0f, 1.0f, 1.0f,  // v3 White
            0.0f, 0.0f, 1.0f,  // v4 Blue
            0.0f, 1.0f, 1.0f,  // v5 Cyan 蓝绿
            0.0f, 1.0f, 0.0f,  // v6 Green
            0.0f, 0.0f, 0.0f,   // v7 Black
    };

    private short indexData[] = {
            6, 7, 4, 6, 4, 5,    //后面
            6, 3, 7, 6, 2, 3,    //右面
            6, 5, 1, 6, 1, 2,    //下面
            0, 3, 2, 0, 2, 1,    //正面
            0, 1, 5, 0, 5, 4,    //左面
            0, 7, 3, 0, 4, 7,    //上面
    };
2.3 定义MVP矩阵
    //MVP矩阵
    private float[] mMVPMatrix = new float[16];
三.GLRender:着色器、内存分配等
3.1 着色器创建、链接、使用
3.2 着色器属性获取、赋值
3.3 三个缓冲内存分配
这几个部分的代码实现与上一篇2D圆绘制基本一致
可以参考上一篇博文:《OpenGLES:绘制一个颜色渐变的圆》
不再重复展示代码
四.GLRender:绘制
绘制流程与之前2D的基本一致,有两点不太一样要注意
4.1 MVP矩阵赋值
//填充MVP矩阵
mMVPMatrix = TransformUtils.getCubeMVPMatrix(ratio);
//设置MVP变换矩阵到着色器程序/渲染器
glUniformMatrix4fv(mvpMatrix, 1, false, mMVPMatrix, 0);
//计算MVP变换矩阵
public static float[] getCubeMVPMatrix(float ratio) {
//初始化modelMatrix, viewMatrix, projectionMatrix
float[] modelMatrix = getIdentityMatrix(16, 0); //模型变换矩阵
float[] viewMatrix = getIdentityMatrix(16, 0); //观测变换矩阵/相机矩阵
float[] projectionMatrix = getIdentityMatrix(16, 0); //投影变换矩阵
//获取modelMatrix, viewMatrix, projectionMatrix
mCubeRotateAgree = (mCubeRotateAgree + 1) % 360;
Matrix.rotateM(modelMatrix, 0, mCubeRotateAgree, -1, -1, 1); //获取模型旋转变换矩阵
Matrix.setLookAtM(viewMatrix, 0, 0, 5, 10, 0, 0, 0, 0, 1, 0); //获取观测变换矩阵,设置相机位置
Matrix.frustumM(projectionMatrix, 0, -ratio, ratio, -1, 1, 3, 20); //获取透视投影变换矩阵,正交投影:Matrix.orthoM(...)
//计算MVP变换矩阵: mvpMatrix = projectionMatrix * viewMatrix * modelMatrix
float[] tempMatrix = new float[16];
float[] mvpMatrix = new float[16];
Matrix.multiplyMM(tempMatrix, 0, viewMatrix, 0, modelMatrix, 0);
Matrix.multiplyMM(mvpMatrix, 0, projectionMatrix, 0, tempMatrix, 0);
return mvpMatrix;
}4.2 绘制索引缓冲
//索引法绘制正方体
glDrawElements(GL_TRIANGLES, indexData.length, GL_UNSIGNED_SHORT, indexBuffer);
五.着色器代码
着色器代码与上一篇2D圆绘制其实也是相同的
再展示一遍以示关键点
如下:
(1).cube_vertex_shader.glsl
#version 300 es

layout (location = 0) in vec4 vPosition;
layout (location = 1) in vec4 aColor;

uniform mat4 mvpMatrix;

out vec4 vColor;

void main() {
    gl_Position = mvpMatrix * vPosition;
    vColor = aColor;
}
(2).cube_fragtment_shader.glsl
#version 300 es
#extension GL_OES_EGL_image_external_essl3 : require
precision mediump float;

in vec4 vColor;

out vec4 outColor;

void main(){
    outColor = vColor;
}
六.结束语
混色旋转3D立方体的实现过程到此讲解结束
最终实现效果如博文开始的效果展示