PaddleOCR Linux-centos安装与部署
-
- 1. **运行环境准备**
- 2. **centos下准备好docker工具**
-
- **2.1** **备份之前的yum源文件**
- **2.2** **更换yum源为阿里云**
- **2.3** **清除缓存并生成新的缓存**
- **2.4测试发现还是报错**
- **2.5** **添加仓库**
- **2.6 IF ERROR:** **yum-config-manager: command not found**
- **2.7 再次测试,发现OK**
- **2.8 yum install docker-ce接下来就是yum来安装docker完成**
- **2.9 启动docker服务**
- **2.10 查看docker版本,检查docker是否安装成功**
- **2.11 配置docker服务开机自启动**
- **3.Docker环境配置**
- **4.安装最新PaddlePaddle(2.4.2)**
- 5. **安装paddlehub(2.2.0)**
- **6. 下载轻量的推理模型**
- **7.** **PaddleHub Server** **服务部署**
- 8. **部署** **web** **服务程序**
- **9.** **Postman工具调用测试**\*\*\*\*
1. 运行环境准备
本人环境为阿里云服务器centos 7.6(全新镜像系统)从0开始部署PaddleOCR
0基础也可搭建
搭建时间:2023-6-7
1.1 参考资料
l 手把手0基础Centos下安装与部署paddleOcr 教程
l PaddleOCR基于PaddleHub Serving的服务部署(docker环境)
l 新手Docker安装PaddleOCR快速指导(非长期有效具体看更新时间) (ziyoukaifa.com)
1.2 PaddleOCR的环境
推荐环境:
PaddlePaddle >= 2.1.2

Python 3.7

CUDA10.1 / CUDA10.2

CUDNN 7.6
2. centos下准备好docker工具
可以自己选择一个稳定的版本安装,或者不指定版本,直接安装最新版本
[root\@PerfectWing \~]# yum list docker-ce --showduplicates | sort -r
错误日志:Error: No matching Packages to list

Loaded plugins: fastestmirror

Determining fastest mirrors

**(** **没有错误则跳过** **)**
2.1 备份之前的yum源文件
[root\@PerfectWing \~]# cd /etc/yum.repos.d/
[root\@PerfectWing yum.repos.d]# mv CentOS-Base.repo CentOS-Base.repo_bak
2.2 更换yum源为阿里云
[root\@PerfectWing yum.repos.d]# wget -O /etc/yum.repos.d/CentOS-Base.repo http://mirrors.aliyun.com/repo/Centos-7.repo
2.3 清除缓存并生成新的缓存
[root\@PerfectWing yum.repos.d]# yum clean all
[root\@PerfectWing yum.repos.d]# yum makecache
2.4测试发现还是报错
[root\@PerfectWing \~]# yum list docker-ce --showduplicates | sort -r
Error: No matching Packages to list

 \* updates: mirrors.bfsu.edu.cn

Loading mirror speeds from cached hostfile

Loaded plugins: fastestmirror, langpacks

 \* extras: mirrors.bfsu.edu.cn

 \* base: mirrors.bfsu.edu.cn
2.5 添加仓库
[root\@PerfectWing \~]# yum-config-manager --add-repo http://mirrors.aliyun.com/docker-ce/linux/centos/docker-ce.repo
2.6 IF ERROR: yum-config-manager: command not found
[root\@PerfectWing \~]# yum -y install yum-utils
[root\@PerfectWing \~]# yum clean all
[root\@PerfectWing \~]# yum makecache
( 没有错误则跳过这一步 )
2.7 再次测试,发现OK
[root\@PerfectWing \~]# yum list docker-ce --showduplicates | sort -r
 \* updates: mirrors.cloud.aliyuncs.com

Loading mirror speeds from cached hostfile

Loaded plugins: fastestmirror

 \* extras: mirrors.cloud.aliyuncs.com

               docker-ce-stable

docker-ce.x86\_64            3:20.10.0-3.el7                     docker-ce-stable

docker-ce.x86\_64            3:19.03.9-3.el7                     docker-ce-stable

docker-ce.x86\_64            3:19.03.8-3.el7                     docker-ce-stable

docker-ce.x86\_64            3:19.03.7-3.el7                     docker-ce-stable

docker-ce.x86\_64            3:19.03.6-3.el7                     docker-ce-stable

docker-ce.x86\_64            3:19.03.5-3.el7                     docker-ce-stable

docker-ce.x86\_64            3:19.03.4-3.el7                     docker-ce-stable

docker-ce.x86\_64            3:19.03.3-3.el7                     docker-ce-stable

docker-ce.x86\_64            3:19.03.2-3.el7                     docker-ce-stable

docker-ce.x86\_64            3:19.03.15-3.el7                    docker-ce-stable

docker-ce.x86\_64            3:19.03.14-3.el7                    docker-ce-stable

docker-ce.x86\_64            3:19.03.1-3.el7                     docker-ce-stable

docker-ce.x86\_64            3:19.03.13-3.el7                    docker-ce-stable

docker-ce.x86\_64            3:19.03.12-3.el7                    docker-ce-stable

docker-ce.x86\_64            3:19.03.11-3.el7                    docker-ce-stable

docker-ce.x86\_64            3:19.03.10-3.el7                    docker-ce-stable

docker-ce.x86\_64            3:19.03.0-3.el7                     docker-ce-stable

docker-ce.x86\_64            3:18.09.9-3.el7                     docker-ce-stable

docker-ce.x86\_64            3:18.09.8-3.el7                     docker-ce-stable

docker-ce.x86\_64            3:18.09.7-3.el7                     docker-ce-stable

docker-ce.x86\_64            3:18.09.6-3.el7                     docker-ce-stable

docker-ce.x86\_64            3:18.09.5-3.el7                     docker-ce-stable

docker-ce.x86\_64            3:18.09.4-3.el7                     docker-ce-stable

docker-ce.x86\_64            3:18.09.3-3.el7                     docker-ce-stable

docker-ce.x86\_64            3:18.09.2-3.el7                     docker-ce-stable

docker-ce.x86\_64            3:18.09.1-3.el7                     docker-ce-stable

docker-ce.x86\_64            3:18.09.0-3.el7                     docker-ce-stable

docker-ce.x86\_64            18.06.3.ce-3.el7                    docker-ce-stable

docker-ce.x86\_64            18.06.2.ce-3.el7                    docker-ce-stable

docker-ce.x86\_64            18.06.1.ce-3.el7                    docker-ce-stable

docker-ce.x86\_64            18.06.0.ce-3.el7                    docker-ce-stable

docker-ce.x86\_64            18.03.1.ce-1.el7.centos             docker-ce-stable

docker-ce.x86\_64            18.03.0.ce-1.el7.centos             docker-ce-stable

docker-ce.x86\_64            17.12.1.ce-1.el7.centos             docker-ce-stable

docker-ce.x86\_64            17.12.0.ce-1.el7.centos             docker-ce-stable

docker-ce.x86\_64            17.09.1.ce-1.el7.centos             docker-ce-stable

docker-ce.x86\_64            17.09.0.ce-1.el7.centos             docker-ce-stable

docker-ce.x86\_64            17.06.2.ce-1.el7.centos             docker-ce-stable

docker-ce.x86\_64            17.06.1.ce-1.el7.centos             docker-ce-stable

docker-ce.x86\_64            17.06.0.ce-1.el7.centos             docker-ce-stable

docker-ce.x86\_64            17.03.3.ce-1.el7                    docker-ce-stable

docker-ce.x86\_64            17.03.2.ce-1.el7.centos             docker-ce-stable

docker-ce.x86\_64            17.03.1.ce-1.el7.centos             docker-ce-stable

docker-ce.x86\_64            17.03.0.ce-1.el7.centos             docker-ce-stable

 \* base: mirrors.cloud.aliyuncs.com

Available Packages
2.8 yum install docker-ce接下来就是yum来安装docker完成
[root\@PerfectWing \~]# yum install docker-ce
2.9 启动docker服务
[root\@PerfectWing \~]# service docker start
2.10 查看docker版本,检查docker是否安装成功
[root\@PerfectWing \~]# docker --version
Docker version 24.0.2, build cb74dfc
2.11 配置docker服务开机自启动
[root\@PerfectWing \~]# systemctl enable docker

3.Docker环境配置
切换到工作目录下
mkdir /home/Projects
cd /home/Projects
首次运行需创建一个docker容器,再次运行时不需要运行当前命令
创建一个名字为ppocr的docker容器,并将当前目录映射到容器的/paddle目录下
3.1镜像下载
接下来docker就会自动开始下载镜像了,然后就是漫长的下载等待,大概下载时间会有10分钟左右
在CPU环境下使用docker,使用docker而不是nvidia-docker创建docker
sudo nvidia-docker run --name ppocr -v \$PWD:/paddle --shm-size=64G --network=host -it registry.baidubce.com/paddlepaddle/paddle:2.1.3-gpu-cuda10.2-cudnn7 /bin/bash
下载完毕后,会自动进入到镜像内部的shell里,进入下面这样的界面中。
我们先直接输入exit退出

exit
3.2查看docker中的运行进程
[root\@PerfectWing Projects]# docker ps
3.3启动ppocr这个容器
[root\@PerfectWing Projects]# docker start ppocr

3.4进入ppocr容器
sudo docker container exec -it ppocr /bin/bash

3.5 检查docker内的python3以及pip3版本
python>=3.7.0

4.安装最新PaddlePaddle(2.4.2)
python3 -m pip install paddlepaddle -i https://mirror.baidu.com/pypi/simple

4.1 安装PaddleOCR whl包
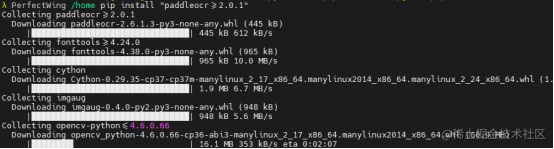
pip install “paddleocr>=2.0.1” # 推荐使用2.0.1+版本
这个包一般下载得会比较久
4.2 包版本依赖不兼容报错问题
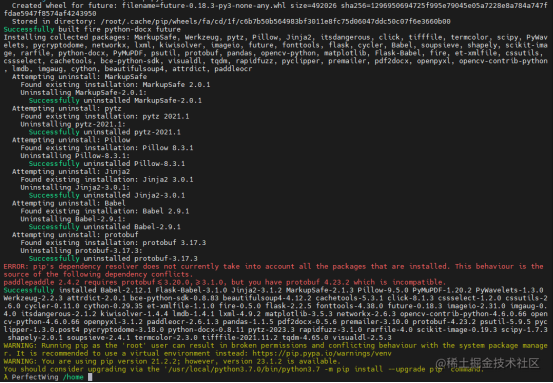
Paddlepaddle 2.4.2需要protobuf<=3.20.0,>=3.1.0,但你有protobuf 4.23.2,这是不兼容的。
4.2.1 重新换一个 protobuf 版本
λ PerfectWing /home pip uninstall protobuf
λ PerfectWing /home pip install protobuf==3.20.0

OK没有其它包不兼容了,如果还存在包兼容问题根据错误提示升级或降级对应包即可
4.3 clone PaddleOCR仓库代码
cd /home 切换回目录下
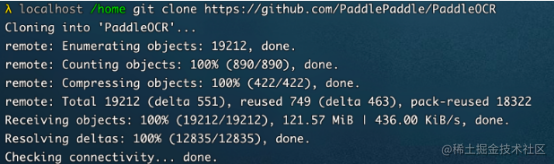
【推荐】git clone https://github.com/PaddlePaddle/PaddleOCR
如果无法访问github 的小伙伴们也可以通过gitee仓库里面将源码下载下来:
git clone https://gitee.com/paddlepaddle/PaddleOCR
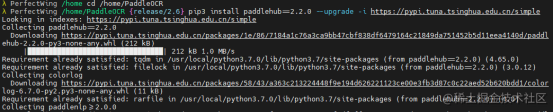
5. 安装paddlehub(2.2.0)
cd /home/PaddleOCR
**安装paddlehub **
pip3 install paddlehub==2.2.0 --upgrade -i https://pypi.tuna.tsinghua.edu.cn/simple
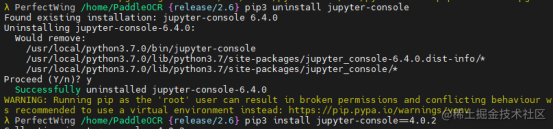
5.0.1 jupyter-console 包依赖冲突

错误:pip的依赖解析器目前没有考虑所有已安装的包。这种行为是下列依赖冲突的根源。Jupyter-console 6.4.0需要prompt-toolkit!=3.0.0,!=3.0.1,❤️.1.0,>=2.0.0,但您有不兼容的prompt-toolkit 1.0.18****
5.0.2 更换 Jupyter-console 版本
** 卸载Jupyter-console**
pip3 uninstall jupyter-console
pip3 install jupyter-console==4.0.2
5.1 安装requirements.txt 依赖
pip install -r requirements.txt -i https://pypi.douban.com/simple
6. 下载轻量的推理模型
安装服务模块前,需要准备推理模型并放到正确路径。我们将使用的是最新PP-OCRv3模型,默认模型路径为:****
检测模型:./inference/ch_PP-OCRv3_det_infer/
识别模型:./inference/ch_PP-OCRv3_rec_infer/
方向分类器:./inference/ch_ppocr_mobile_v2.0_cls_infer/
进入/home/PaddleOCR/deploy/hubserving/ocr_system下
cd /home/PaddleOCR/deploy/hubserving/ocr_system
# 下载并解压检测模型
wget https://paddleocr.bj.bcebos.com/PP-OCRv3/chinese/ch_PP-OCRv3_det_infer.tar && tar -xf ch_PP-OCRv3_det_infer.tar && rm -rf ch_PP-OCRv3_det_infer.tar
# 下载并解压识别模型
wget https://paddleocr.bj.bcebos.com/PP-OCRv3/chinese/ch_PP-OCRv3_rec_infer.tar && tar -xf ch_PP-OCRv3_rec_infer.tar && rm -rf ch_PP-OCRv3_rec_infer.tar
# 下载并解压方向分类器
wget https://paddleocr.bj.bcebos.com/dygraph_v2.0/ch/ch_ppocr_mobile_v2.0_cls_infer.tar && tar -xf ch_ppocr_mobile_v2.0_cls_infer.tar && rm -rf ch_ppocr_mobile_v2.0_cls_infer.tar
全部下载解压完后输ls查看目录确认

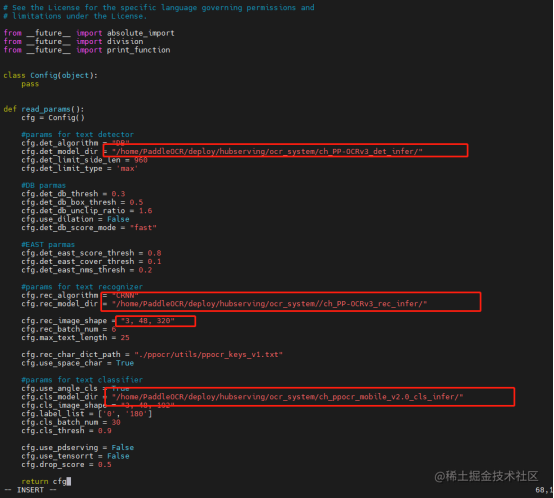
6.1 修改模型路径
vim params.py
修改三个dir,注意要绝对路径,以及rec_imgage_shape最新PP-OCR3为3.48.320
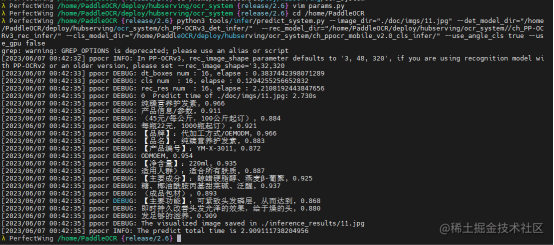
6.2 单张图片识别测试
回到cd /home/paddleOCR目录下
图片测试
用官方自带的图片来测试识别,官方自带图片目录为
/home/PaddleOCR/doc/imgs
测试命令:
python3 tools/infer/predict_system.py --image_dir="./doc/imgs/11.jpg" --det_model_dir="/home/PaddleOCR/deploy/hubserving/ocr_system/ch_PP-OCRv3_det_infer/" --rec_model_dir="/home/PaddleOCR/deploy/hubserving/ocr_system//ch_PP-OCRv3_rec_infer/" --cls_model_dir="/home/PaddleOCR/deploy/hubserving/ocr_system/ch_ppocr_mobile_v2.0_cls_infer/" --use_angle_cls true --use_gpu false

7. PaddleHub Server 服务部署
这种部署形式也是官方推荐的部署方式之一。
7.1 安装服务模块
PaddleOCR提供3种服务模块,根据需要安装所需模块
安装检测+识别串联服务模块即可
cd /home/PaddleOCR
安装检测服务模块:
hub install deploy/hubserving/ocr_det/
或,安装分类服务模块:
hub install deploy/hubserving/ocr_cls/
或,安装识别服务模块:
hub install deploy/hubserving/ocr_rec/
或,安装检测+识别串联服务模块:
hub install deploy/hubserving/ocr_system/
7.2 自定义修改服务模块(后续,现可跳过)
如果需要修改服务逻辑,你一般需要操作以下步骤(以修改ocr_system为例):
7.2.1 停止服务
hub serving stop --port/-p XXXX
7.2.2 修改参数
到相应的module.py和params.py等文件中根据实际需求修改代码。
例如,如果需要替换部署服务所用模型,则需要到params.py中修改模型路径参数det_model_dir和rec_model_dir,如果需要关闭文本方向分类器,则将参数use_angle_cls置为False,当然,同时可能还需要修改其他相关参数,请根据实际情况修改调试。 强烈建议修改后先直接运行module.py调试,能正确运行预测后再启动服务测试。
7.2.3 卸载旧服务包
hub uninstall ocr_system
7.2.4 安装修改后的新服务包
hub install deploy/hubserving/ocr_system/
7.2.5 重新启动服务
hub serving start -m ocr_system
7.3 hub 配置文件

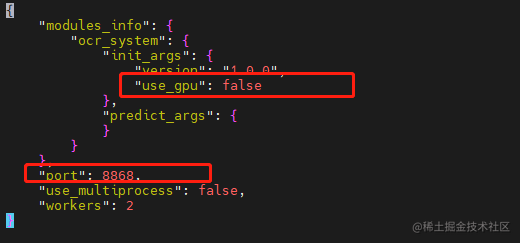
init_args中的可配参数与module.py中的_initialize函数接口一致。其中,当use_gpu为true时,表示使用GPU启动服务。
predict_args中的可配参数与module.py中的predict函数接口一致。
注意:
使用配置文件启动服务时,其他参数会被忽略。
如果使用GPU预测(即,use_gpu置为true),则需要在启动服务之前,设置CUDA_VISIBLE_DEVICES环境变量,如:export CUDA_VISIBLE_DEVICES=0,否则不用设置。
use_gpu不可与use_multiprocess同时为true
7.4 启动 hub 服务命令
hub serving start -c config.json
成功会出现以下说明,后续测试记得将8868端口放开

8. 部署 web 服务程序
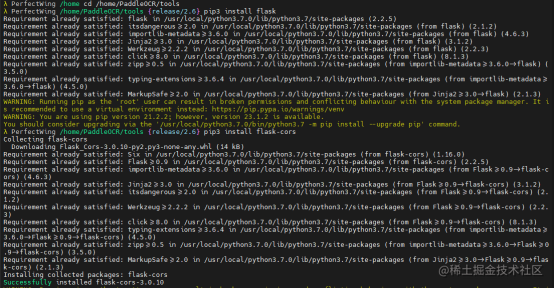
8.1 安装flask,flask-cors
# 下面使用flask 部署web框架
cd /home/PaddleOCR/tools
pip3 install flask
#安装flask-cors
pip3 install flask-cors
8.2 新建web服务程序
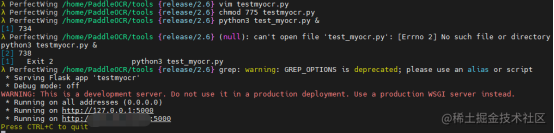
在 /home/PaddleOCR/tools 目录下新建一个新的py文件,文件名为testmyocr.py 并且给权限为 775

testmyocr.py的内容如下:
# Copyright (c) 2020 PaddlePaddle Authors. All Rights Reserved.


#


# Licensed under the Apache License, Version 2.0 (the "License");


# you may not use this file except in compliance with the License.


# You may obtain a copy of the License at


#


#     http://www.apache.org/licenses/LICENSE-2.0


#


# Unless required by applicable law or agreed to in writing, software


# distributed under the License is distributed on an "AS IS" BASIS,


# WITHOUT WARRANTIES OR CONDITIONS OF ANY KIND, either express or implied.


# See the License for the specific language governing permissions and


# limitations under the License.


import os


import sys


__dir__ = os.path.dirname(os.path.abspath(__file__))


sys.path.append(__dir__)


sys.path.append(os.path.abspath(os.path.join(__dir__, '..')))


from ppocr.utils.logging import get_logger


logger = get_logger()


import cv2


import numpy as np


import time


from PIL import Image


from ppocr.utils.utility import get_image_file_list


from tools.infer.utility import draw_ocr, draw_boxes


import requests


import json


import base64


from flask import Flask,request


from flask_cors import CORS


import requests


app = Flask(__name__)


CORS(app)  # 解决跨域问题


def cv2_to_base64(image):


    return base64.b64encode(image).decode('utf8')


def draw_server_result(image_file, res):


    img = cv2.imread(image_file)


    image = Image.fromarray(cv2.cvtColor(img, cv2.COLOR_BGR2RGB))


    if len(res) == 0:


        return np.array(image)


    keys = res[0].keys()


    if 'text_region' not in keys:  # for ocr_rec, draw function is invalid


        logger.info("draw function is invalid for ocr_rec!")


        return None


    elif 'text' not in keys:  # for ocr_det


        logger.info("draw text boxes only!")


        boxes = []


        for dno in range(len(res)):


            boxes.append(res[dno]['text_region'])


        boxes = np.array(boxes)


        draw_img = draw_boxes(image, boxes)


        return draw_img


    else:  # for ocr_system


        logger.info("draw boxes and texts!")


        boxes = []


        texts = []


        scores = []


        for dno in range(len(res)):


            boxes.append(res[dno]['text_region'])


            texts.append(res[dno]['text'])


            scores.append(res[dno]['confidence'])


        boxes = np.array(boxes)


        scores = np.array(scores)


        draw_img = draw_ocr(


            image, boxes, texts, scores, draw_txt=True, drop_score=0.5)


        return draw_img


@app.route("/test")


def test():


    return 'Hello World!'


@app.route("/myocr", methods=["POST"] )


def myocr():


    # 输入参数


    image_file = request.files['file']


    basepath = os.path.dirname(__file__)


    logger.info("{} basepath".format(basepath))


    savepath = os.path.join(basepath, image_file.filename)


    image_file.save(savepath)


    img = open(savepath, 'rb').read()


    if img is None:


        logger.info("error in loading image:{}".format(image_file))


    # 转为 base64


    data = {'images': [cv2_to_base64(img)]}


    # 发送请求


    url = "http://127.0.0.1:8868/predict/ocr_system"


    headers = {"Content-type": "application/json"}


    r = requests.post(url=url, headers=headers, data=json.dumps(data))


    # 返回结果


    res = r.json()["results"][0]


    logger.info(res)


    return  json.dumps(res)


if __name__ == '__main__':


    app.run(host='0.0.0.0', port=5000)
8.3 启动web服务
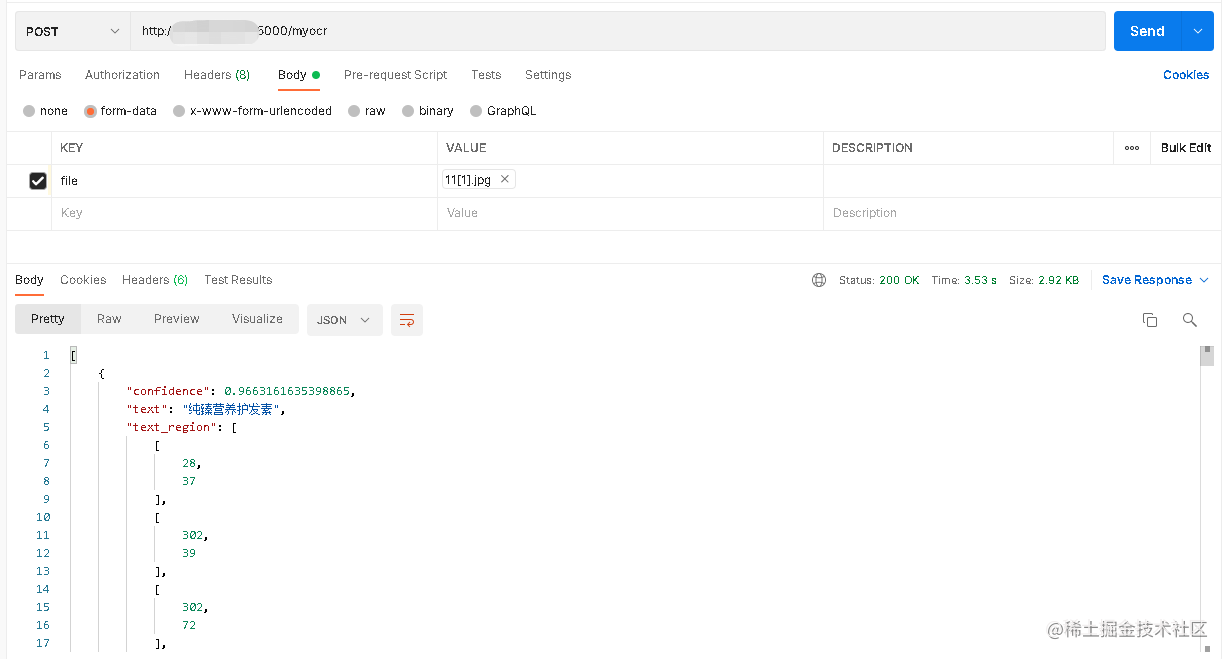
cd /home/PaddleOCR/tools 目录切换到tools下 python3 testmyocr.py & 启动web服务,启动成功会出现如下说明
9. Postman工具调用测试****
使用postman向 5000端口去发起请求,可以看到服务正常返回识别的结果