这个算是个记录吧,这个是黑龙江大学-马吉权老师的人工智能课,这个老师听说科研很好,但是他交的就是有点云里雾里,主要是概念,没有实际代码,令人感叹,不过没有期末考试,还挺好过的。
---------------------------------------------------------------------------------------------------------------------------------
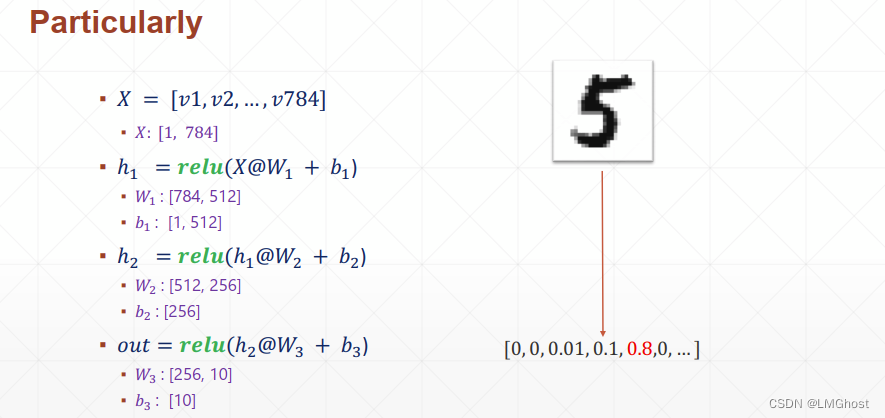
实验的主要内容就是将一个28*28的图化为[0-1,784]的值,前面是灰度值。

构筑网络
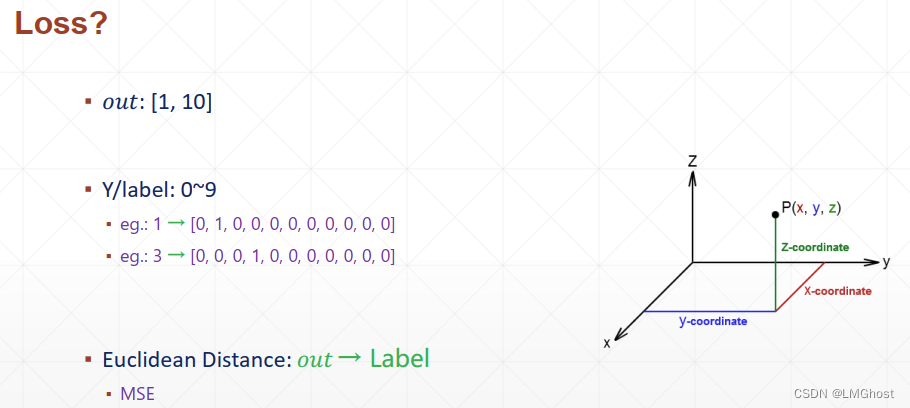
loss值
这个是老师给的代码
import  os
import  tensorflow as tf
from    tensorflow import keras
from    tensorflow.keras import layers, optimizers, datasets
import numpy as np

os.environ['TF_CPP_MIN_LOG_LEVEL']='2'

def load_minist_data(path='mnist.npz'):
  """Loads the MNIST dataset.

  Arguments:
      path: path where to cache the dataset locally
          (relative to ~/.keras/datasets).

  Returns:
      Tuple of Numpy arrays: `(x_train, y_train), (x_test, y_test)`.

  License:
      Yann LeCun and Corinna Cortes hold the copyright of MNIST dataset,
      which is a derivative work from original NIST datasets.
      MNIST dataset is made available under the terms of the
      [Creative Commons Attribution-Share Alike 3.0 license.](
      https://creativecommons.org/licenses/by-sa/3.0/)
  """

  path = "D:/E_Class/deep_learning/project_2/mnist.npz"
  with np.load(path) as f:
    x_train, y_train = f['x_train'], f['y_train']
    x_test, y_test = f['x_test'], f['y_test']

    return (x_train, y_train), (x_test, y_test)

#Load MNIST DATA from file "mnist.npz" , please add your code bellow:
(x, y), (x_val, y_val) = ___________________________________
#Convert data to tensor, and then make normalization for hand writing digit
x = tf.convert_to_tensor(x, dtype=tf.float32) / 255.
#Convert data to tensor, please add your code bellow:
y = _____________________(y, dtype=tf.int32)
#Here, y is a int value, please transfer it to one hot coding with "depth=10" using tesorflow command
#, please add your code bellow:
y = _____________________________________________
print(x.shape, y.shape)
train_dataset = tf.data.Dataset.from_tensor_slices((x, y))
#Please set the batch size, for instance 100 or 200, please add your code bellow:
train_dataset = train_dataset.batch(_______________________)

#请按照上面train_dataset的数据准备方法(tf.data.Dataset.from_tensor_slices),准备test_dataset,
#Please add your code bellow:
test_dataset = _________________________________________________

test_dataset = _________________________________________________


#Bellow is defination of hidden-layer in network, you have the chice to make dicision about the number
# of neurons, the activation is 'relu', please add your code bellow:
model = keras.Sequential([

    layers.Dense(_______________, activation='relu'),
    layers.Dense(__________________________________),
    layers.Dense(_______________, activation='softmax')])

optimizer = optimizers.SGD(learning_rate=0.001)


def train_epoch(epoch):

    # Step4.loop
    for step, (x, y) in enumerate(train_dataset):


        with tf.GradientTape() as tape:
            # [b, 28, 28] => [b, 784]
            x = tf.reshape(x, (-1, 28*28))
            # Step1. compute output
            # [b, 784] => [b, 10]
            out = model(x)
            # Step2. compute loss
            loss = tf.reduce_sum(tf.square(out - y)) / x.shape[0]

        # Step3. optimize and update w1, w2, w3, b1, b2, b3
        grads = tape.gradient(loss, model.trainable_variables)
        # w' = w - lr * grad
        optimizer.apply_gradients(zip(grads, model.trainable_variables))

        if step % 100 == 0:
            print(epoch, step, 'loss:', loss.numpy())

#在训练完成后,请利用已经得到的model验证在测试集上的结果,请仿照上面training_epoch的在下面写出你的具体测试代码
#并输出测试结果(预测值,groud truth),注意只是测试不需要计算loss和计算梯度
def test():
——————————————————————————————————————————————————————
——————————————————————————————————————————————————————
——————————————————————————————————————————————————————


def train():

    for epoch in range(30):

        train_epoch(epoch)
#30个epoch之后调用test_epoch,
    test()

#如果你学有余力,请利用我们给的hand writing digit image测试用例,试一试你训练的model(选做)
#注意你需要利用Python先读入test.jpg图像,然后把它转换为灰度图像,然后将图像由28*28转化为784长度的向量,
#然后送入模型,最后输出判别结果。
if __name__ == '__main__':
    train()
自己补完后
import os
from tkinter import *
import tensorflow as tf
from tensorflow.python import keras
from tensorflow.keras import *
import numpy as np
# import matplotlib.pyplot as plt
from PIL import Image as img
os.environ['TF_CPP_MIN_LOG_LEVEL'] = '2'  # 只显示WARNING ERROR

# print("tf.version", tf.__version__)
# # print("tf is using GPU", tf.test.is_gpu_available())
# print("tf is using GPU", tf.config.list_physical_devices(device_type='GPU'))
# print(tf.config.experimental.list_physical_devices(device_type='CPU'))
#
# physical_device = tf.config.experimental.list_physical_devices(device_type='GPU')
# tf.config.experimental.set_memory_growth(physical_device[0], True)
#
# print("tf is using GPU", tf.config.list_physical_devices(device_type='GPU'))

def load_minist_data():
    """Loads the MNIST dataset.

    Arguments:
        path: path where to cache the dataset locally
            (relative to ~/.keras/datasets).

    Returns:
        Tuple of Numpy arrays: `(x_train, y_train), (x_test, y_test)`.

    License:
        Yann LeCun and Corinna Cortes hold the copyright of MNIST dataset,
        which is a derivative work from original NIST datasets.
        MNIST dataset is made available under the terms of the
        [Creative Commons Attribution-Share Alike 3.0 license.](
        https://creativecommons.org/licenses/by-sa/3.0/)
    """

    path = "./mnist.npz"
    with np.load(path) as f:
        x_train, y_train = f['x_train'], f['y_train']
        x_test, y_test = f['x_test'], f['y_test']

        return (x_train, y_train), (x_test, y_test)


# Load MNIST DATA from file "mnist.npz" , please add your code bellow:
(x, y), (x_val, y_val) = datasets.mnist.load_data()
# Convert data to tensor, and then make normalization for hand writing digit
x = tf.convert_to_tensor(x, dtype=tf.float32) / 255.  # 归一化,0-1
# Convert data to tensor, please add your code bellow:
y = tf.convert_to_tensor(y, dtype=tf.int32)
# Here, y is a int value, please transfer it to one hot coding with "depth=10" using tesorflow command
# , please add your code bellow:
y = tf.one_hot(y, depth=10)
print(x.shape, y.shape)
train_dataset = tf.data.Dataset.from_tensor_slices((x, y))
# Please set the batch size, for instance 100 or 200, please add your code bellow:
train_dataset = train_dataset.batch(200)

# 请按照上面train_dataset的数据准备方法(tf.data.Dataset.from_tensor_slices),准备test_dataset,
# Please add your code bellow:
x_val = tf.convert_to_tensor(x_val, dtype=tf.float32) / 255.  # 灰度
y_val = tf.convert_to_tensor(y_val, dtype=tf.int32)
y_val = tf.one_hot(y_val, depth=10)  # (0,0,0,0,0,0,0,0,0,0)
print(x_val.shape, y_val.shape)
# plot_image(train_images[1])
test_dataset = tf.data.Dataset.from_tensor_slices((x_val, y_val))
test_dataset = train_dataset.batch(200)

# Bellow is defination of hidden-layer in network, you have the chice to make dicision about the number
# of neurons, the activation is 'relu', please add your code bellow:
model = Sequential([
    #连接层784-256
    layers.Dense(256, activation=tf.nn.relu),  # [b,784]=>[b.256]
    layers.Dense(128, activation=tf.nn.relu),  # [b,784]=>[b.128]
    layers.Dense(64, activation=tf.nn.relu), # [b,784]=>[b.64]
    layers.Dense(32, activation=tf.nn.relu),  # [b,64]=>[b.32]
    layers.Dense(10),  # [b,32]=>[b.10] 330=32*10+10

])
model.build(input_shape=[None, 28*28])
model.summary()
optimizer = optimizers.SGD(learning_rate=0.001)


def train_epoch(epoch):  # 1个epoch表示过了1遍训练集中的所有样本。

    # Step4.loop
    for step, (x, y) in enumerate(train_dataset):

        with tf.GradientTape() as tape:
            # [b, 28, 28] => [b, 784]
            x = tf.reshape(x, (-1, 28 * 28))
            # Step1. compute output
            # [b, 784] => [b, 10]
            out = model(x)
            # Step2. compute loss
            loss = tf.reduce_sum(tf.square(out - y)) / x.shape[0]

        # Step3. optimize and update w1, w2, w3, b1, b2, b3
        grads = tape.gradient(loss, model.trainable_variables)
        # w' = w - lr * grad
        optimizer.apply_gradients(zip(grads, model.trainable_variables))

        if step % 100 == 0:
            print(epoch, step, 'loss:', loss.numpy())

    model.save("1.h5")

# 在训练完成后,请利用已经得到的model验证在测试集上的结果,请仿照上面training_epoch的在下面写出你的具体测试代码
# 并输出测试结果(预测值,groud truth),注意只是测试不需要计算loss和计算梯度
def test():
    pass
    # test = tf.reshape(x_val, (10000, 28 * 28))  # 这里是将一组图像矩阵x重建为新的矩阵,该新矩阵的维数为(10000,28,28,1)
    # out = model(test)
    # np.set_printoptions(threshold=1000)  # 控制输出的值的个数为10001
    # print(np.argmax(out, axis=1))

    # image_raw_data_jpg = tf.io.gfile.GFile('1.png').read()
    # with tf.Session() as sess:
    #     img_data_jpg = tf.image.decode_jpeg(image_raw_data_jpg)  # 图像解码
    #     img_data_jpg = tf.image.convert_image_dtype(img_data_jpg, dtype=tf.uint8)  # 改变图像数据的类型

def model_use():

    IM = img.open(r"2.png")
    IM = IM.convert("L")
    im = np.array(IM)
    im = tf.convert_to_tensor(im, dtype=tf.float32) / 255
    im = tf.reshape(im, (-1, 28 * 28))
    result = model(im)
    result = np.argmax(result)
    print("Result:", result)
    # print("Result:6")

def train():
    for epoch in range(30):
        train_epoch(epoch)
    # 30个epoch之后调用test_epoch,
    # test()
    model_use()


# 如果你学有余力,请利用我们给的hand writing digit image测试用例,试一试你训练的model(选做)
# 注意你需要利用Python先读入test.jpg图像,然后把它转换为灰度图像,然后将图像由28*28转化为784长度的向量,
# 然后送入模型,最后输出判别结果。
if __name__ == '__main__':

    train()
    # use()
这个识别正确率不高,简单的几个还行,5和8一直都很难识别