Keras是一个基于python的的深度学习框架,比tensorflow更简单易用,适合入门学习,本篇文章主要介绍使用keras实现手写体识别任务。环境为python3+,Keras2.1,神经网络基础知识在此不做过多介绍。
1. 加载MNIST数据。
方式一:from keras.datasets import mnist
    (X_train, y_train), (X_test, y_test) = mnist.load_data()

    print("The MNIST database has a training set of %d examples." % len(X_train))
print("The MNIST database has a test set of %d examples." % len(X_test))方式二:方式一有可能加载失败,可以直接下载数据mnist.npz(文末有链接,可直接下载),放在当前目录下,使用numpy进行加载:
import numpy as np
f = np.load('mnist.npz')
x_train, y_train = f['x_train'], f['y_train']
x_test, y_test = f['x_test'], f['y_test']
f.close()
print('训练数据集样本数: %d ,标签个数 %d ' % (len(x_train), len(y_train)))
print('测试数据集样本数: %d ,标签个数  %d ' % (len(x_test), len(y_test)))

print(x_train.shape)
print(y_train[0])
输出如下:

2. 使用matplotlib查看前六张图片:
import matplotlib.pyplot as plt
%matplotlib inline
import matplotlib.cm as cm
import numpy as np

fig = plt.figure(figsize = (20, 20))
for i in range(6):
    ax = fig.add_subplot(1, 6,i + 1, xticks = [], yticks = [])
    ax.imshow(x_train[i], cmap = 'gray')
    ax.set_title(str(y_train[i]))
输出如下:

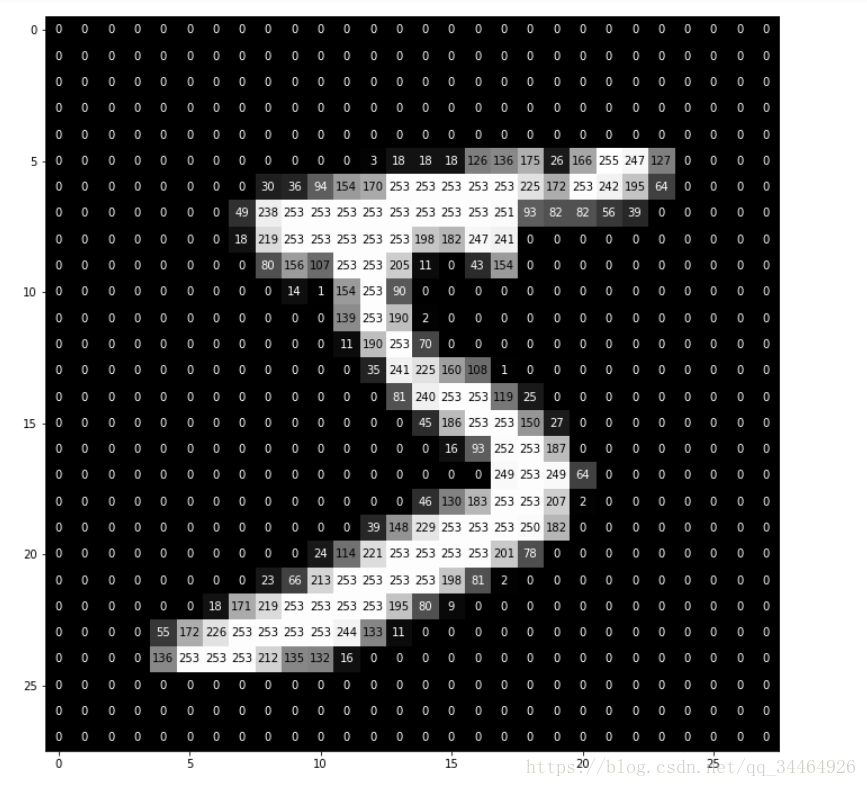
3. 每张图片都是28*28像素组成的,我们可以查看一张图片的像素构成细节:
def visualize_input(img, ax):
    ax.imshow(img, cmap='gray')
    width, height = img.shape
    thresh = img.max()/2.5
    for x in range(width):
        for y in range(height):
            ax.annotate(str(round(img[x][y],2)), xy=(y,x),
                        horizontalalignment='center',
                        verticalalignment='center',
                        color='white' if img[x][y]<thresh else 'black')

fig = plt.figure(figsize = (12,12))
ax = fig.add_subplot(111)
visualize_input(x_train[0], ax)
输出:
4. 特征值缩放:该示例中图像的每个像素点都是28 * 28像素的图片,每个像素的值在0-255之间。我们需要将训练数据和测试数据的输入特征值缩放到0-1之间(除以255),方便处理。
x_train = x_train.astype('float') / 255
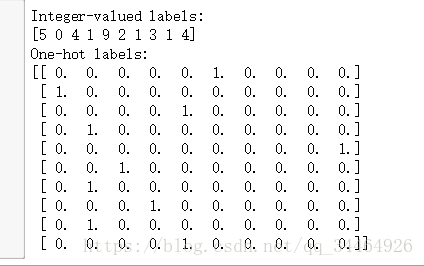
x_test = x_test.astype('float') / 2555. 对输出标签进行One-hot编码:
注意:注意:这段代码不能重复运行,因为后面运行的y_train已经不是最初的数据了。
from keras.utils import np_utils

print('Integer-valued labels:')
print(y_train[:10])

#标签进行one-hot编码
y_train = np_utils.to_categorical(y_train, 10)
y_test = np_utils.to_categorical(y_test, 10)

print('One-hot labels:')
print(y_train[:10])
输出:
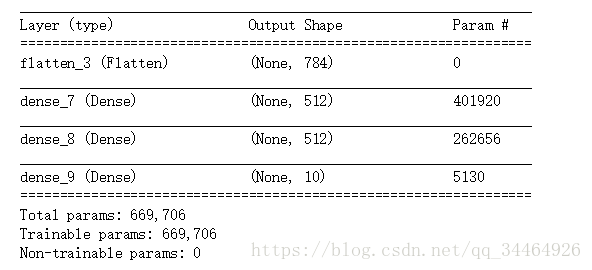
6. 定义神经网络模型:使用的网络模型架构如下:
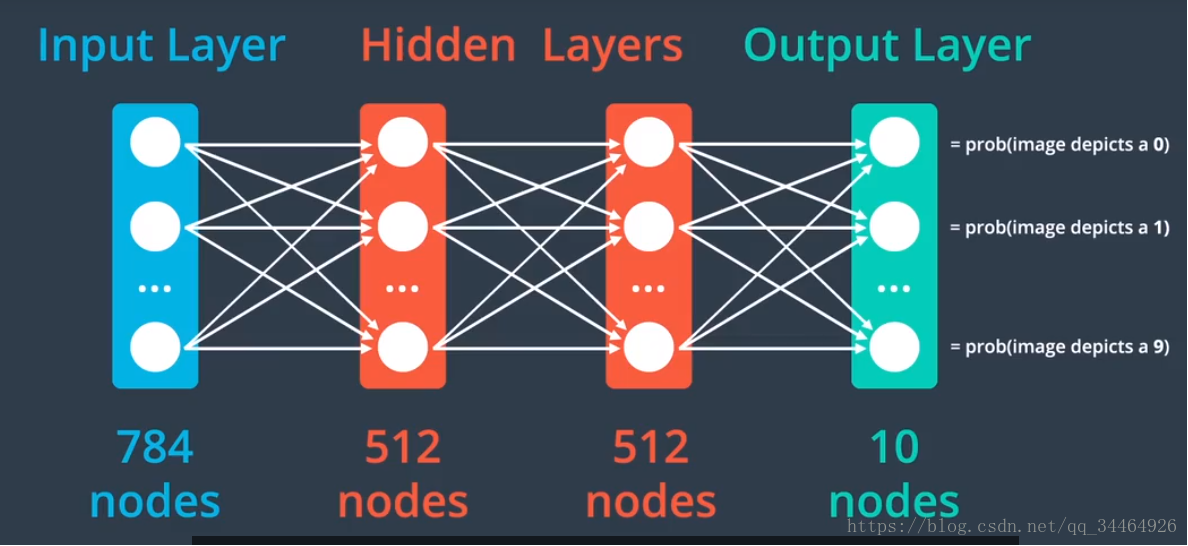
代码:
from keras.models import Sequential
from keras.layers import Dense,Dropout,Flatten

model = Sequential()
model.add(Flatten(input_shape = x_train.shape[1:]))
model.add(Dense(512, activation = 'relu'))
model.add(Dropout(0.2))
model.add(Dense(512, activation = 'relu'))
model.add(Dropout(0.2))
model.add(Dense(10, activation = 'softmax'))
输出:
7. 编译模型:
model.compile(loss = 'categorical_crossentropy', optimizer='rmsprop', metrics=['accuracy'])score = model.evaluate(x_test, y_test, verbose=0)
accuracy = 100*score[1]
print('Test accuracy: %.4f%%' % accuracy)输出:
Test accuracy: 11.0700%
可以看到此时模型在测试集上的准确率只有11.0700%
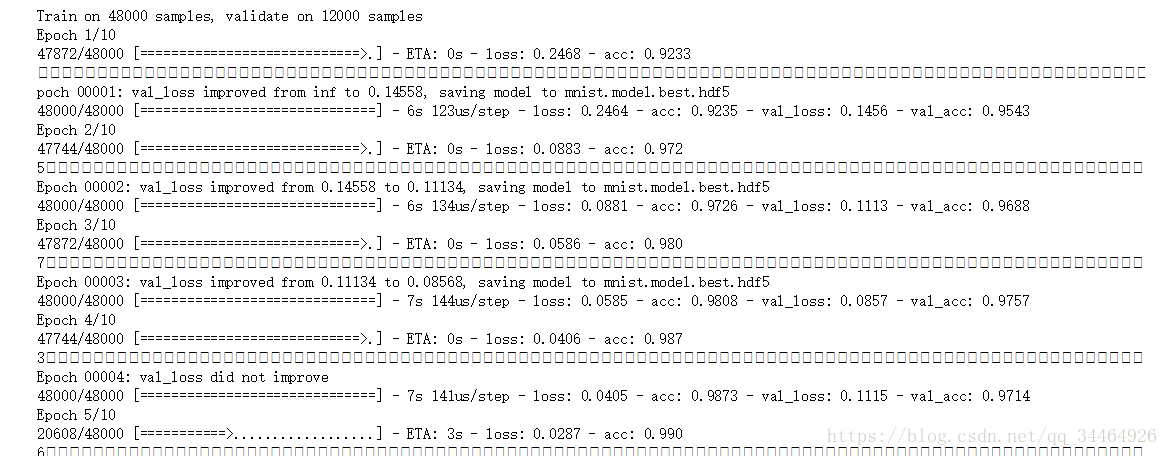
9. 开始迭代训练模型:
from keras.callbacks import ModelCheckpoint

checkpointer = ModelCheckpoint(filepath = 'mnist.model.best.hdf5',verbose=1, save_best_only=True)
hist = model.fit(x_train, y_train, batch_size=128, epochs=10,
          validation_split=0.2, callbacks=[checkpointer],
          verbose=1, shuffle=True)
输出:
10. 加载训练好的模型,并在测试集上进行测试准确率:
model.load_weights('mnist.model.best.hdf5')

score = model.evaluate(x_test, y_test, verbose=0)
accuracy = 100 * score[1]
print('Test accuracy: %.4f%%' % accuracy)
输出:
Test accuracy: 97.8800%
可以看到模型在测试集上准确率达到了97.8800%。
对于第9步训练模型方法model.fit()方法的参数解释:
a. validation_split=0.2参数代表的意思是将原来训练集中20%的数据拿出来作为交叉验证数据集,验证集的数据不参与反向传播更新权重,但是它能提供判断模型是否过拟合以及帮助选择最好的模型。
b. ModelCheckpoint类允许我们在每个epoch之后保存模型权重,用于比较得到最好的模型,filepath参数指定了权重的保存位置,通过将save_best_only参数设置为True,可以告诉模型仅保存权重,以让验证集达到最佳准确率,verbose设为1表示训练过程中的文本输出将告诉你权重文件何时更新了。
c. model.load_weights('mnist.model.best.hdf5') 可以加载达到最佳验证准确率的权重。
附: 代码以及数据文件地址:https://github.com/liujiao111/deep-learning/tree/master/cnn-keras-mnist-mlp,如果有错误的地方欢迎指正,谢谢