目录
一.后端准备
1.1. 应用配置
实现导入的引用,在项目的 pom.xml 中进行引用配置
我的引用配置如下 :
pom.xml
<?xml version="1.0" encoding="UTF-8"?>
<project xmlns="http://maven.apache.org/POM/4.0.0" xmlns:xsi="http://www.w3.org/2001/XMLSchema-instance"
         xsi:schemaLocation="http://maven.apache.org/POM/4.0.0 https://maven.apache.org/xsd/maven-4.0.0.xsd">
    <modelVersion>4.0.0</modelVersion>
    <parent>
        <groupId>org.springframework.boot</groupId>
        <artifactId>spring-boot-starter-parent</artifactId>
        <version>2.6.2</version>
        <relativePath/> <!-- lookup parent from repository -->
    </parent>
    <groupId>com.junlinyi</groupId>
    <artifactId>minoa</artifactId>
    <version>0.0.1-SNAPSHOT</version>
    <name>minoa</name>
    <description>Demo project for Spring Boot</description>
    <properties>
        <java.version>1.8</java.version>
        <fastjson.version>1.2.70</fastjson.version>
        <jackson.version>2.9.8</jackson.version>
    </properties>
    <dependencies>
        <dependency>
            <groupId>org.springframework.boot</groupId>
            <artifactId>spring-boot-starter-jdbc</artifactId>
        </dependency>
        <dependency>
            <groupId>org.springframework.boot</groupId>
            <artifactId>spring-boot-starter-web</artifactId>
        </dependency>

        <dependency>
            <groupId>org.mybatis.spring.boot</groupId>
            <artifactId>mybatis-spring-boot-starter</artifactId>
            <version>2.2.1</version>
        </dependency>

        <dependency>
            <groupId>mysql</groupId>
            <artifactId>mysql-connector-java</artifactId>
            <version>5.1.44</version>
            <scope>runtime</scope>
        </dependency>
        <dependency>
            <groupId>org.projectlombok</groupId>
            <artifactId>lombok</artifactId>
            <optional>true</optional>
        </dependency>

        <dependency>
            <groupId>com.alibaba</groupId>
            <artifactId>fastjson</artifactId>
            <version>${fastjson.version}</version>
        </dependency>
    </dependencies>

    <build>
        <plugins>
            <plugin>
                <groupId>org.springframework.boot</groupId>
                <artifactId>spring-boot-maven-plugin</artifactId>
                <configuration>
                    <excludes>
                        <exclude>
                            <groupId>org.projectlombok</groupId>
                            <artifactId>lombok</artifactId>
                        </exclude>
                    </excludes>
                </configuration>
            </plugin>

            <plugin>
                <groupId>org.mybatis.generator</groupId>
                <artifactId>mybatis-generator-maven-plugin</artifactId>
                <version>1.3.2</version>
                <dependencies>
                    <!--使用Mybatis-generator插件不能使用太高版本的mysql驱动 -->
                    <dependency>
                        <groupId>mysql</groupId>
                        <artifactId>mysql-connector-java</artifactId>
                        <version>${mysql.version}</version>
                    </dependency>
                </dependencies>
                <configuration>
                    <overwrite>true</overwrite>
                </configuration>
            </plugin>
        </plugins>
    </build>

</project>
当然,可以根据自己有更多需求进行应用配置的增加。
1.2. 数据源配置
在后端项目中进行数据库的路径进行配置
appliation.yml
spring:
  datasource:
    #type连接池类型 DBCP,C3P0,Hikari,Druid,默认为Hikari
    type: com.zaxxer.hikari.HikariDataSource
    driver-class-name: com.mysql.jdbc.Driver
    url: jdbc:mysql://localhost:3306/mybatis_oapro?useUnicode=true&characterEncoding=UTF-8&useSSL=false
    username: root
    password: 123456
mybatis:
  mapper-locations: classpath*:mapper/*.xml #指定mapper文件位置
  type-aliases-package: com.junlinyi.minoa.model #指定自动生成别名所在包

logging:
  level:
    root: info
    com.junlinyi.minoa.mapper: debug
还有生成mapper接口,model实体类,mapper映射文件已是很轻松的操作。
二、数据库
2.1. 创建
根据后端的数据源的配置进行创建数据库。
数据库的创建只需要根据以下图中输入填写即可:

2.2.数据表
在后台需要准备一些数据表,并且提供一定的数据。
以下是我创建的数据表,可以依据进行参考来创建
t_oa_data_dict
结构:

t_oa_data_item
结构:

t_oa_meeting_feedback
结构:

t_oa_meeting_info
结构:

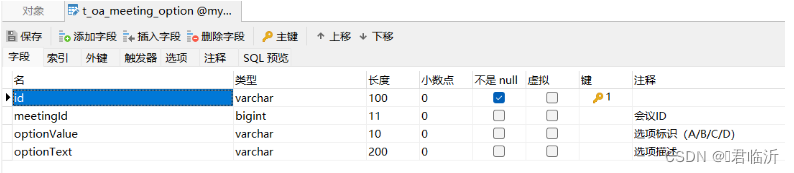
t_oa_meeting_option
结构:
t_oa_meeting_room
结构:

t_oa_meeting_vote
结构:

t_oa_permission
结构:

t_oa_role
结构:

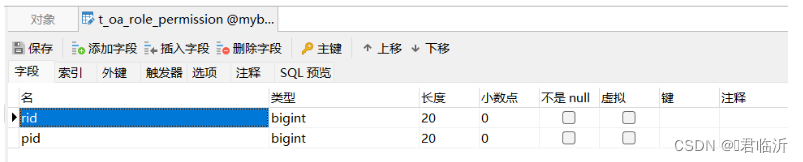
t_oa_role_permission
结构:
t_oa_user
结构:

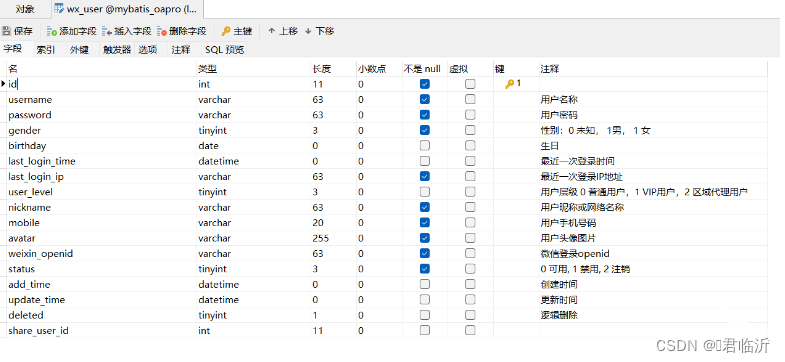
wx_user
结构:
以上的数据表的设计呢,相对来是比较简洁具体,没有太多的很多设计。
并且需要在以上的表格中增加一些数据,进行之后前端的显示。
2.3.数据测试
在以上完成之后呢,确保配置及应用的完成,在后端开启服务,并且在浏览器中进行输入后端的数据请求地址,是否可以在后端查询到数据库中数据。
请求地址是根据自己的配置来进行输入服务的,如果可以在浏览器中进行数据的查看,说明已经完成,后端及数据库的配置及编写。
如图所示 :

三、前端
在微信小程序开发中,后台数据交互是非常重要的一部分。通过后台数据交互,可以实现小程序与服务器之间的数据传输和交互。
一般情况下,后台数据交互可以通过以下几种方式实现:
- 使用微信提供的wx.request()方法进行网络请求。通过该方法,可以向服务器发送请求并获取返回的数据。可以使用GET、POST等不同的请求方式,传递参数并处理返回的数据。
- 使用微信提供的wx.uploadFile()方法进行文件上传。该方法可以将本地文件上传到服务器,并获取服务器返回的数据。
- 使用WebSocket进行实时数据传输。WebSocket是一种在单个TCP连接上进行全双工通信的协议,可以实现实时的数据传输。
在后台数据交互的过程中,可以使用wxs(WeixinScript)进行数据处理和逻辑控制。wxs是一种类似于JavaScript的脚本语言,它可以在.wxml文件中嵌入,并通过数据绑定和事件绑定实现动态效果。
前端的小程序代码呢,是基于我博客中的代码进行完善 :
3.1.请求方法整合
在前端的项目的 utils/util.js 中,封装小程序端的的 request 请求方法,让代码减少重复性
util.js
const formatTime = date => {
  const year = date.getFullYear()
  const month = date.getMonth() + 1
  const day = date.getDate()
  const hour = date.getHours()
  const minute = date.getMinutes()
  const second = date.getSeconds()

  return `${[year, month, day].map(formatNumber).join('/')} ${[hour, minute, second].map(formatNumber).join(':')}`
}

const formatNumber = n => {
  n = n.toString()
  return n[1] ? n : `0${n}`
}


/**
 * 封装微信的request请求
 */
function request(url, data = {}, method = "GET") {
  return new Promise(function (resolve, reject) {
    wx.request({
      url: url,
      data: data,
      method: method,
      header: {
        'Content-Type': 'application/json',
      },
      success: function (res) {
        if (res.statusCode == 200) {
            resolve(res.data);//会把进行中改变成已成功
        } else {
          reject(res.errMsg);//会把进行中改变成已失败
        }
      },
      fail: function (err) {
        reject(err)
      }
    })
  });
}

module.exports = {
  formatTime,
  request
}
3.2.数据请求
完善前端项目中的首页 页面的 index.js ,进行数据访问后端,并且显示。
// index.js
// 获取应用实例
const app = getApp()
const api = require("../../config/app")
//应用请求的sj文件
const util = require("../../utils/util")
Page({
  //初始化数据
  data: {
    "images":[
      {
        "img": "https://cdn-we-retail.ym.tencent.com/tsr/home/v2/banner1.png",
        "text": "1"
      },
      {
        "img": "https://cdn-we-retail.ym.tencent.com/tsr/home/v2/banner2.png",
        "text": "2"
      },
      {
        "img": "https://cdn-we-retail.ym.tencent.com/tsr/home/v2/banner3.png",
        "text": "3"
      },
      {
        "img": "https://cdn-we-retail.ym.tencent.com/tsr/home/v2/banner4.png",
        "text": "4"
      },
      {
        "img": "https://cdn-we-retail.ym.tencent.com/tsr/home/v2/banner5.png",
        "text": "5"
      },
      {
        "img": "https://cdn-we-retail.ym.tencent.com/tsr/home/v2/banner6.png",
        "text": "6"
      }
    ]
  },
  // 事件处理函数
  // 获取轮播图的方法
  // loadSwiperImgs(){
  //   let that=this;
  //   wx.request({
  //       url: api.SwiperImgs,
  //       dataType: 'json',
  //       success(res) {
  //         // console.log(res)
  //         that.setData({
  //             imgSrcs:this.images
  //         })
  //       }
  //     })
  // },
//  获取首页会议信息的方法
  loadMeetingInfos(){
    let that=this;
    // wx.request({
    //     url: api.IndexUrl,
    //     dataType: 'json',
    //     success(res) {
    //       console.log(res)
    //       that.setData({
    //           lists:res.data.data.infoList
    //       })
    //     }
    //   })
      util.request(api.IndexUrl).then(res=>{
        console.log(res)
        this.setData({
          lists:res.data.infoList
        })
      }).catch(res=>{
          console.log('服器没有开启,使用模拟数据!')
      })

  },
  onLoad() {
    if (wx.getUserProfile) {
      this.setData({
        canIUseGetUserProfile: true
      })
    }
    // this.loadSwiperImgs();
    this.loadMeetingInfos();
  },
  getUserProfile(e) {
    // 推荐使用wx.getUserProfile获取用户信息,开发者每次通过该接口获取用户个人信息均需用户确认,开发者妥善保管用户快速填写的头像昵称,避免重复弹窗
    wx.getUserProfile({
      desc: '展示用户信息', // 声明获取用户个人信息后的用途,后续会展示在弹窗中,请谨慎填写
      success: (res) => {
        // console.log(res)
        this.setData({
          userInfo: res.userInfo,
          hasUserInfo: true
        })
      }
    })
  },
  getUserInfo(e) {
    // 不推荐使用getUserInfo获取用户信息,预计自2021年4月13日起,getUserInfo将不再弹出弹窗,并直接返回匿名的用户个人信息
    // console.log(e)
    this.setData({
      userInfo: e.detail.userInfo,
      hasUserInfo: true
    })
  }
})
3.3.WXS的使用
- WXS 代码可以编写在 wxml 文件中的
<wxs>标签内,或以.wxs为后缀名的文件内。- 在wxs中,可以使用一些内置的方法和对象来实现数据处理,如Math、Date等。同时,也可以使用一些自定义的函数和变量来实现特定的业务逻辑。
- 通过后台数据交互和wxs应用,可以实现小程序的数据展示、数据操作和业务逻辑的实现。同时,也可以提高小程序的性能和用户体验。
根据微信小程序的官网,在微信开发者工具里面,右键可以直接创建
.wxs文件,在其中直接编写 WXS 脚本。
比如我们在项目中的utils文件中创建 .wxs 文件,名为: tools.wxs
function getState(state){
  // 状态:0取消会议1待审核2驳回3待开4进行中5开启投票6结束会议,默认值为1
  if(state == 0 ){
      return '取消会议';
  }else if(state == 1 ){
      return '待审核';
  }else if(state == 2 ){
      return '驳回';
  }else if(state == 3 ){
      return '待开';
  }else if(state == 4 ){
      return '进行中';
  }else if(state == 5 ){
      return '开启投票';
  }else if(state == 6 ){
      return '结束会议';
  }

  return '其它';

}
var getNumber = function(canyuze,liexize,zhuchiren) {
  var s = canyuze+','+liexize+','+zhuchiren;
  var array = s.split(',');
  var len = array.length;
  return len;
}
function formatDate(ts, option) {
  var date = getDate(ts)
  var year = date.getFullYear()
  var month = date.getMonth() + 1
  var day = date.getDate()
  var week = date.getDay()
  var hour = date.getHours()
  var minute = date.getMinutes()
  var second = date.getSeconds()

  //获取 年月日
  if (option == 'YY-MM-DD') return [year, month, day].map(formatNumber).join('-')

  //获取 年月
  if (option == 'YY-MM') return [year, month].map(formatNumber).join('-')

  //获取 年
  if (option == 'YY') return [year].map(formatNumber).toString()

  //获取 月
  if (option == 'MM') return  [mont].map(formatNumber).toString()

  //获取 日
  if (option == 'DD') return [day].map(formatNumber).toString()

  //获取 年月日 周一 至 周日
  if (option == 'YY-MM-DD Week')  return [year, month, day].map(formatNumber).join('-') + ' ' + getWeek(week)

  //获取 月日 周一 至 周日
  if (option == 'MM-DD Week')  return [month, day].map(formatNumber).join('-') + ' ' + getWeek(week)

  //获取 周一 至 周日
  if (option == 'Week')  return getWeek(week)

  //获取 时分秒
  if (option == 'hh-mm-ss') return [hour, minute, second].map(formatNumber).join(':')

  //获取 时分
  if (option == 'hh-mm') return [hour, minute].map(formatNumber).join(':')

  //获取 分秒
  if (option == 'mm-dd') return [minute, second].map(formatNumber).join(':')

  //获取 时
  if (option == 'hh')  return [hour].map(formatNumber).toString()

  //获取 分
  if (option == 'mm')  return [minute].map(formatNumber).toString()

  //获取 秒
  if (option == 'ss') return [second].map(formatNumber).toString()

  //默认 时分秒 年月日
  return [year, month, day].map(formatNumber).join('-') + ' ' + [hour, minute, second].map(formatNumber).join(':')
}
function formatNumber(n) {
  n = n.toString()
  return n[1] ? n : '0' + n
}

function getWeek(n) {
  switch(n) {
      case 1:
      return '星期一'
      case 2:
      return '星期二'
      case 3:
      return '星期三'
      case 4:
      return '星期四'
      case 5:
      return '星期五'
      case 6:
      return '星期六'
      case 7:
      return '星期日'
  }
}
module.exports = {
  getState: getState,
  getNumber: getNumber,
  formatDate:formatDate
};
该文件是完善效果会议信息中的,人员数量,及时间的一个完善,更美化的显示。
3.4.样式美化
在 index.wxss 中进一步的效果美化。
/**index.wxss**/
.swiper-item {
  height: 300rpx;
  width: 100%;
  border-radius: 10rpx;
}
.mobi-title {
  font-size: 12pt;
  color: #777;
  line-height: 110%;
  font-weight: bold;
  width: 100%;
  padding: 15rpx;
  background-color: #f3f3f3;
}

.mobi-icon {
  padding: 0rpx 3rpx;
  border-radius: 3rpx;
  background-color: #ff7777;
  position: relative;
  margin-right: 10rpx;
}

/*list*/
.list {
  display: flex;
  flex-direction: row;
  width: 100%;
  padding: 0 20rpx 0 0;
  border-top: 1px solid #eeeeee;
  background-color: #fff;
  margin-bottom: 5rpx;
  /* border-radius: 20rpx;
  box-shadow: 0px 0px 10px 6px rgba(0,0,0,0.1); */
}

.list-img {
  display: flex;
  margin: 10rpx 10rpx;
  width: 150rpx;
  height: 220rpx;
  justify-content: center;
  align-items: center;
}

.list-img .video-img {
  border-radius: 4px;
  width: 130rpx;
  height: 140rpx;
}

.list-detail {
  margin: 10rpx 10rpx;
  display: flex;
  flex-direction: column;
  width: 600rpx;
  height: 220rpx;
}

.list-title text {
  font-size: 11pt;
  color: #333;
  font-weight: bold;
}

.list-detail .list-tag {
  display: flex;
  height: 70rpx;
}

.list-tag .state {
  font-size: 9pt;
  color: #81aaf7;
  width: 120rpx;
  border: 1px solid #93b9ff;
  border-radius: 2px;
  margin: 10rpx 0rpx;
  display: flex;
  justify-content: center;
  align-items: center;
}

.list-tag .join {
  font-size: 11pt;
  color: #bbb;
  margin-left: 20rpx;
  display: flex;
  justify-content: center;
  align-items: center;
}

.list-tag .list-num {
  font-size: 11pt;
  color: #ff6666;
}

.list-info {
  font-size: 9pt;
  color: #bbb;
  margin-top: 20rpx;
}
.bottom-line{
  display: flex;
  height: 60rpx;
  justify-content: center;
  align-items: center;
  background-color: #f3f3f3;
}
.bottom-line text{
  font-size: 9pt;
  color: #666;
}
3.5. 页面
再修改首页页面中的 index.wxml 文件
<!--index.wxml-->
<view>
    <swiper autoplay="true" indicator-dots="true" indicator-color="#fff" indicator-active-color="#00f">
        <block wx:for="{

   {images}}" wx:key="text">
            <swiper-item>
                <view>
                    <image src="{

   {item.img}}" class="swiper-item" />
                </view>
            </swiper-item>
        </block>
    </swiper>
</view>
<view class="mobi-title">
    <text class="mobi-icon"></text>
    <text>会议信息</text>
</view>
<wxs src="../../utils/tools.wxs" module="tools" />
<block wx:for-items="{

   {lists}}" wx:for-item="item" wx:key="item.id">
    <view class="list" data-id="{

   {item.id}}">
        <view class="list-img">
            <image class="video-img" mode="scaleToFill" src="{

   {item.remark}}"></image>
        </view>
        <view class="list-detail">
            <view class="list-title"><text>{

   {item.title}}</text></view>
            <view class="list-tag">
                <view class="state">{

   {tools.getState(item.state)}}</view>
                <view class="join"><text class="list-num">{

   {tools.getNumber(item.canyuze,item.liexize,item.zhuchiren)}} </text>人报名</view>
            </view>
            <view class="list-info"><text>{

   {item.location}}</text> | <text>{

   {tools.formatDate(item.starttime)}}</text></view>
        </view>
    </view>
</block>
<view class="section bottom-line">
		<text>到底啦</text>
</view>
后台的服务开起后,可以在模拟器中可以看到的效果 :
