vue3 + vite3 addRoute 实现权限控制
1、前言
在权限系统开发中,根据后端返回的菜单列表动态添加路由是非常常见的需求,它可以实现根据用户权限动态加载可访问的页面。本篇文章我们将重点介绍动态添加路由的全过程。
2、静态路由
静态路由,也叫常量路由,即所有角色都可以访问到的路由界面。如: login、 404等。
export const constantRoute = [
	{


	    path: '/login',
	    component: () => import('@/views/login/index.vue'),
	    name: 'Login',
	    meta: {


	        title: '登录', //菜单标题
	        hidden: true, //代表路由标题在菜单中是否隐藏  true:隐藏 false:不隐藏
	        icon: 'Promotion',
	    },
	},
	{


	    path: '/',
	    component: () => import('@/layout/index.vue'),
	    name: '/',
	    meta: {


	        title: '',
	        hidden: false,

	    },
	    redirect: '/home',
	    children: [{


	        path: '/home',
	        component: () => import('@/views/home/index.vue'),
	        meta: {


	            title: '项目总览',
	            hidden: false,
	            icon: 'HomeFilled',
	        },
	    },],
	},
	{


	    path: '/user',
	    component: () => import('@/views/user/index.vue'),
	    name: 'User',
	    meta: {


	        title: '个人中心',
	        hidden: true,
	    },
	},
	{


	    path: '/404',
	    component: () => import('@/views/404/index.vue'),
	    name: '404',
	    meta: {


	        title: '找不到数据',
	        hidden: true,
	    },
	},
]
3、动态路由
即不同角色所拥有的权限路由,一般登录成功后,向后端发送请求,由服务器返回对应的权限,然后进行筛选过滤。
export const asyncRoute = [
    {


        path: '/management-project',
        component: () => import('@/layout/index.vue'),
        name: 'Management-project',
        meta: {


            title: '',
            icon: 'Grid'
        },
        redirect: '/management-project',
        children: [{


            path: '/management-project',
            component: () => import('@/views/project/index.vue'),
            name: 'Management-project',
            meta: {


                title: '项目管理',
                icon: 'Grid'
            },
        },],
    },

    {


        path: '/measurement-management',
        component: () => import('@/layout/index.vue'),
        name: 'Measurement-management',
        meta: {


            title: '测算管理',
            icon: 'Document'
        },
        redirect: '/measurement-management/common',
        children: [
            {


                path: '/measurement-management/common',
                component: () => import('@/views/measurement/common.vue'),
                name: 'Common',
                meta: {


                    title: '通用测算',
                    icon: 'Reading'
                },
            },
            {


                path: '/measurement-management/project',
                component: () => import('@/views/measurement/project.vue'),
                name: 'Project',
                meta: {


                    title: '项目测算',
                    icon: 'Folder'
                },
            },
        ]
    },
    {


        path: '/collection-management',
        component: () => import('@/layout/index.vue'),
        name: 'Collection-management',
        meta: {


            title: '收资管理',
            icon: 'Management'
        },
        redirect: '/collection-management/early-stage',
        children: [{


            path: '/collection-management/early-stage',
            component: () => import('@/views/collection-management/earlyStage.vue'),
            name: 'Early-stage',
            meta: {


                title: '前期收资',
                icon: 'List'
            },
        },
        {


            path: '/collection-management/scene',
            component: () => import('@/views/collection-management/scene.vue'),
            name: 'Scene',
            meta: {


                title: '现场踏勘',
                icon: 'View'
            },
        },
        {


            path: '/collection-management/later-stage',
            component: () => import('@/views/collection-management/laterStage.vue'),
            name: 'Later-stage',
            meta: {


                title: '后期收资',
                icon: 'List'
            },
        },
        ]
    },

    {


        path: '/audit-project',
        component: () => import('@/layout/index.vue'),
        name: 'Audit-project',
        meta: {


            title: '',
            icon: 'Checked'
        },
        redirect: '/audit-project',
        children: [{


            path: '/audit-project',
            component: () => import('@/views/audit/index.vue'),
            name: 'Audit-project',
            meta: {


                title: '项目审核',
                icon: 'Checked'
            },
        },],
    },
    {


        path: '/audit-project/profile',
        component: () => import('@/layout/index.vue'),
        name: 'Profile',
        meta: {


            title: '',
            hidden: false,
        },
        redirect: '/audit-project/profile',
        children: [{


            path: '/audit-project/profile',
            component: () => import('@/views/audit/profile/index.vue'),
            name: 'Profile',
            meta: {


                title: '投资评审报告',
                hidden: true,
                icon: 'Notebook'
            },
        },],
    },
]

//任意路由
export const anyRoute = {


    //任意路由
    path: '/:pathMatch(.*)*',
    redirect: '/404',
    name: 'Any',
    meta: {


        title: '任意路由',
        hidden: true,
        icon: 'DataLine',
    },
}
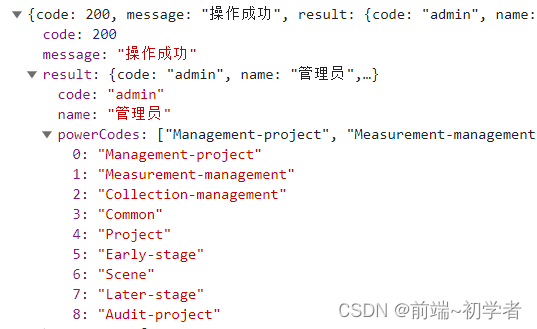
用户登录成功之后,后端会根据其角色返回对应的路由信息,如图所示:
获取到后端返回的的路由信息之后,我们可以通过pinia状态管理工具进行管理,在store/mudules.user.js中进行定义。
// 管理用户数据
import {


  defineStore
} from 'pinia'

import {


  loginAPI,
  userInfoAPI,
  logoutAPI,
  roleDetail
} from '@/api/user'
import {


  SET_TOKEN,
  GET_TOKEN,
  REMOVE_TOKEN
} from '@/utils/token'
//引入路由(常量路由)
import {


  constantRoute,
  asyncRoute,
  anyRoute
} from '@/router/routes'
//引入深拷贝方法
import cloneDeep from 'lodash/cloneDeep'
import router from '@/router'
//用于过滤当前用户需要展示的异步路由
function filterAsyncRoute (asyncRoute, routes) {


  return asyncRoute.filter((item) => {
    if (routes.includes(item.name)) {


      if (item.children && item.children.length > 0) {


        item.children = filterAsyncRoute(item.children, routes)
      }
      return true
    }
  })
}

export const useUserStore = defineStore('userStore', {


  // 1.定义管理用户数据的state
  state: () => {


    return {


      token: GET_TOKEN(), // 用户唯一标识token
      menuRoutes: constantRoute, // 仓库存储生成菜单路由
      username: '', // 用户名
    }
  },
  //异步|逻辑的地方
  actions: {


    // 用户登录的方法
    async userLogin (data) {


      const res = await loginAPI(data)
      console.log(res)
      if (res.code === 200) {


        // pinia仓库存储token
        this.token = res.result.token
        // 本地持久化存储token
        SET_TOKEN(res.result.token)
        // 保证当前async函数返回是一个成功的promise
        return 'ok'
      } else {


        return Promise.reject(new Error(res.result.message))
      }
    },
    // 2.定义获取接口数据的action函数
    async userInfo () {


      const res = await userInfoAPI()
      console.log(res)
      //如果获取用户信息成功,存储一下用户信息
      if (res.code == 200) {


        this.username = res.result.realname
        // 获取用户角色
        const roleData = await roleDetail({

     roleCode: res.result.roleCode })
        console.log(roleData)
        if (roleData.code === 200) {


          //计算当前用户需要展示的异步路由
          const userAsyncRoute = filterAsyncRoute(
            cloneDeep(asyncRoute),
            roleData.result.powerCodes,
          )
          //菜单需要的数据整理完毕
          this.menuRoutes = [...constantRoute, ...userAsyncRoute, anyRoute]
          console.log(this.menuRoutes)
          console.log(userAsyncRoute)
          console.log(anyRoute);
          //目前路由器管理的只有常量路由:用户计算完毕异步路由、任意路由动态追加
          ;[...userAsyncRoute, anyRoute].forEach((route) => {
            router.addRoute(route)
          })
        }
        return 'ok'
      } else {
        return Promise.reject(new Error(result.message))
      }
    },
    //退出登录
    async userLogout () {


      //退出登录请求
      const res = await logoutAPI()
      console.log(res)
      if (res.code == 200) {


        this.token = ''
        this.username = ''
        REMOVE_TOKEN()
        localStorage.removeItem('username')
        return 'ok'
      } else {


        return Promise.reject(new Error(res.msg))
      }
    },
  }
})
4、在组建中使用路由
layout/index.vue文件
<template>
  <div class="layout-container">
    <!-- 左侧菜单 -->
    <div class="layout-slider">
      <Logo></Logo>
      <!-- 展示菜单 -->
      <!-- 滚动组件 -->
      <el-scrollbar class="scrollbar">
        <!-- 菜单组件 -->
        <el-menu :collapse="layoutSettingStore.fold ? true : false" :default-active="$route.path"
          background-color="#001529" active-text-color="#409EFF" text-color="white">
          <!-- 根据路由动态生成菜单 -->
          <Menu :menuList="userStore.menuRoutes"></Menu>
        </el-menu>
      </el-scrollbar>
    </div>
    <!-- 顶部导航 -->
    <div class="layout-tabbar" :class="{ fold: layoutSettingStore.fold ? true : false }">
      <Tabbar></Tabbar>
    </div>
    <!-- 内容展示区域 -->
    <div class="layout-main" :class="{ fold: layoutSettingStore.fold ? true : false }">
      <Main></Main>
    </div>
  </div>
</template>

<script  setup>
import {

     useRouter } from 'vue-router'
//引入左侧菜单logo子组件
import Logo from './logo/index.vue'
//引入菜单组件
import Menu from './menu/index.vue'
// 引入顶部导航
import Tabbar from './tabbar/index.vue'
//右侧内容展示区域
import Main from './main/index.vue'
// 获取用户相关的小仓库
import {

     useUserStore } from '@/store/modules/user'
import {

     useLayoutSettingStore } from '@/store/modules/setting'
const userStore = useUserStore()

const layoutSettingStore = useLayoutSettingStore()
// 获取路由对象
const $route = useRouter()
</script>

<script >
export default {


  name: 'Layout',
}
</script>
<style lang="scss" scoped>
.layout-container {


  width: 100%;
  height: 100vh;

  .layout-slider {


    color: white;
    width: $base-menu-width;
    height: 100vh;
    background: $base-menu-background;
    transition: all 0.3s;

    .scrollbar {


      width: 100%;
      height: calc(100vh - $base-menu-logo-height);

      .el-menu {


        border-right: none;
      }
    }
  }

  .layout-tabbar {


    position: fixed;
    top: 0;
    left: $base-menu-width;
    width: calc(100% - 260px);
    height: $base-tabbar-height;
    transition: all 0.3s;

    &.fold {


      width: calc(100vw - 50px);
      left: $base-menu-min-width;
    }
  }

  .layout-main {


    position: absolute;
    top: $base-tabbar-height;
    left: $base-menu-width;
    width: calc(100% - 260px);
    height: calc(100vh - 50px);
    background: #eceaec;
    padding: 10px;
    overflow: auto;
    transition: all 0.3s;

    &.fold {


      width: calc(100vw - 50px);
      left: $base-menu-min-width;
    }
  }
}
</style>
layout/menu/index.vue文件
<template>
  <template v-for="item in menuList" :key="item.path">
    <!-- 没有子路由 -->
    <template v-if="!item.children">
      <el-menu-item
        :index="item.path"
        v-if="!item.meta.hidden"
        @click="goRoute"
      >
        <el-icon>
          <component :is="item.meta.icon"></component>
        </el-icon>
        <template #title>
          <span>{

    {

     item.meta.title }}</span>
        </template>
      </el-menu-item>
    </template>
    <!-- 有且只有一个子路由 -->
    <template v-if="item.children && item.children.length == 1">
      <el-menu-item
        :index="item.children[0].path"
        v-if="!item.children[0].meta.hidden"
        @click="goRoute"
      >
        <el-icon>
          <component :is="item.children[0].meta.icon"></component>
        </el-icon>
        <template #title>
          <span>{

    {

     item.children[0].meta.title }}</span>
        </template>
      </el-menu-item>
    </template>
    <!-- 有大于一个子路由 -->
    <el-sub-menu
      :index="item.path"
      v-if="item.children && item.children.length > 1"
    >
      <template #title>
        <el-icon>
          <component :is="item.meta.icon"></component>
        </el-icon>
        <span>{

    {

     item.meta.title }}</span>
      </template>
      <Menu :menuList="item.children"></Menu>
    </el-sub-menu>
  </template>
</template>

<script  setup>
import {

     useRouter } from 'vue-router'
// 获取路由器对象
const router = useRouter()
// 获取父组件传递的路由
defineProps(['menuList'])

// 点击菜单的回调函数
const goRoute = (vc) => {


  router.push(vc.index)
}
</script>
<script >
export default {


  name: 'Menu',
}
</script>
<style lang="scss" scoped></style>
5、注意事项
由于pinia中的数据是非持久性缓存的,所以一刷新数据就会丢失。
解决方案:使用pinia的持久性插件或者路由鉴权的同时,在路由前置导航守卫,每次跳转的时候,判断pinia中是否存储了用户信息,如果没有,重新调用getUserInfo方法,获取用户信息。
首先在根目录下定义一个permission.js文件:
//路由鉴权:鉴权,项目当中路由能不能被的权限的设置(某一个路由什么条件下可以访问、什么条件下不可以访问)
import router from '@/router'
import setting from './setting'
//@ts-ignore
import nprogress from 'nprogress'
//引入进度条样式
import 'nprogress/nprogress.css'
nprogress.configure({


    showSpinner: false
})
//获取用户相关的小仓库内部token数据,去判断用户是否登录成功
import {


    useUserStore
} from './store/modules/user'
import pinia from './store'
const userStore = useUserStore(pinia)
//全局守卫:项目当中任意路由切换都会触发的钩子
//全局前置守卫
router.beforeEach(async (to, from, next) => {


    document.title = `${

     setting.title} - ${

     to.meta.title}`
    //to:你将要访问那个路由
    //from:你从来个路由而来
    //next:路由的放行函数
    nprogress.start()
    //获取token,去判断用户登录、还是未登录
    // const token = localStorage.getItem("TOKEN")
    const token = userStore.token
    console.log(token)
    //获取用户名字
    const username = userStore.username
    console.log(username)
    //用户登录判断
    if (token) {


        //登录成功,访问login,不能访问,指向首页
        if (to.path == '/login') {


            next({


                path: '/'
            })
        } else {


            //登录成功访问其余六个路由(登录排除)
            //有用户信息
            if (username) {


                //放行
                next()
            } else {


                //如果没有用户信息,在守卫这里发请求获取到了用户信息再放行
                try {


                    //获取用户信息
                    await userStore.userInfo()
                    //放行
                    //万一:刷新的时候是异步路由,有可能获取到用户信息、异步路由还没有加载完毕,出现空白的效果
                    next({

     ...to })
                } catch (error) {


                    //token过期:获取不到用户信息了
                    //用户手动修改本地存储token
                    //退出登录->用户相关的数据清空
                    await userStore.userLogout()
                    next({


                        path: '/login',
                    })
                }
            }
        }
    } else {


        //用户未登录判断
        if (to.path == '/login') {


            next()
        } else {


            next({


                path: '/login',
            })
        }
    }
})
//全局后置守卫
router.afterEach((to, from) => {


    nprogress.done()
})
在main.js中引入:
//引入路由鉴权文件
import './permission'
BUG:如果我们在动态路由页面进行刷新,会导致白屏
原因:刷新页面的时候,触发了路由前置导航守卫,获取用户信息,如果获取到了,就放行。但是放行的时候,动态路由还没有加载完成! 得确保获取完用户信息且全部路由组件渲染完毕
解决办法:next({...to})