【三维重建】【深度学习】windows10下instant-nsr-pl官方代码Pytorch实现
提示:基于 Instant-NGP 和 Pytorch-Lightning 框架的神经表面重建
文章目录
前言
NeRF是由加利福尼亚大学伯克利分校的Mildenhall, Beni等人在《NeRF: Representing Scenes as Neural Radiance Fields for View Synthesis【ECCV 2020】》【论文地址】一文中提出了一种5D的神经辐射场来作为复杂场景的隐式表示,其输⼊稀疏的多⻆度带pose的图像训练得到⼀个神经辐射场模型。简单来说就是通过输入同一场景不同视角下的二维图片和相机位姿,对场景进行三维隐式建模,并通过体素渲染方程实现了合成任意新视角下的场景图片。
NeuS是由香港大学的Wang, P等人在《NeuS: Learning Neural Implicit Surfaces by Volume Rendering for Multi-view Reconstruction【NeurIPS 2021】》【论文地址】一文中提出了一种新的神经表面重建方法,用于从2D图像输入中高保真地重建对象和场景。简单来说,提出了一种新的一阶近似无偏差的公式,从而即使没有掩模监督,也能进行更精确的表面重建。
在详细解析instant-nsr-pl网络之前,首要任务是明白原始NeRF和NeuS的原理和代码解析,并完成模型训练和测试工作,展开后续工作才有意义。
【训练自己的数据集】
instant-nsr-pl模型运行
下载源码并安装环境
在win10环境下装anaconda环境,方便搭建专用于instant-nsr-pl模型的虚拟环境。
【pytorch代码原始参考教程】
【pytorch代码推荐参考教程(Windows下)】
安装GPU版本的pytorch教程,pytorch-gpu版本需要根据个人计算机去安装相应版本。
# 创建虚拟环境
conda create -n instant-nsr-pl python=3.8
# 查看新环境是否安装成功
conda env list
# 激活环境
activate instant-nsr-pl
# windows一定要通过网站直接下载
# 下载githup源代码到合适文件夹,并cd到代码文件夹内(科学上网)
git clone https://github.com/bennyguo/instant-nsr-pl.git
# 具体看个人下载的位置xxxxx/instant-nsr-pl
cd instant-nsr-pl
# 安装pytorch包
pip3 install torch torchvision torchaudio --index-url https://download.pytorch.org/whl/cu118
# 通过清华源,安装其他包
pip install -i https://pypi.tuna.tsinghua.edu.cn/simple -r requirements.txt
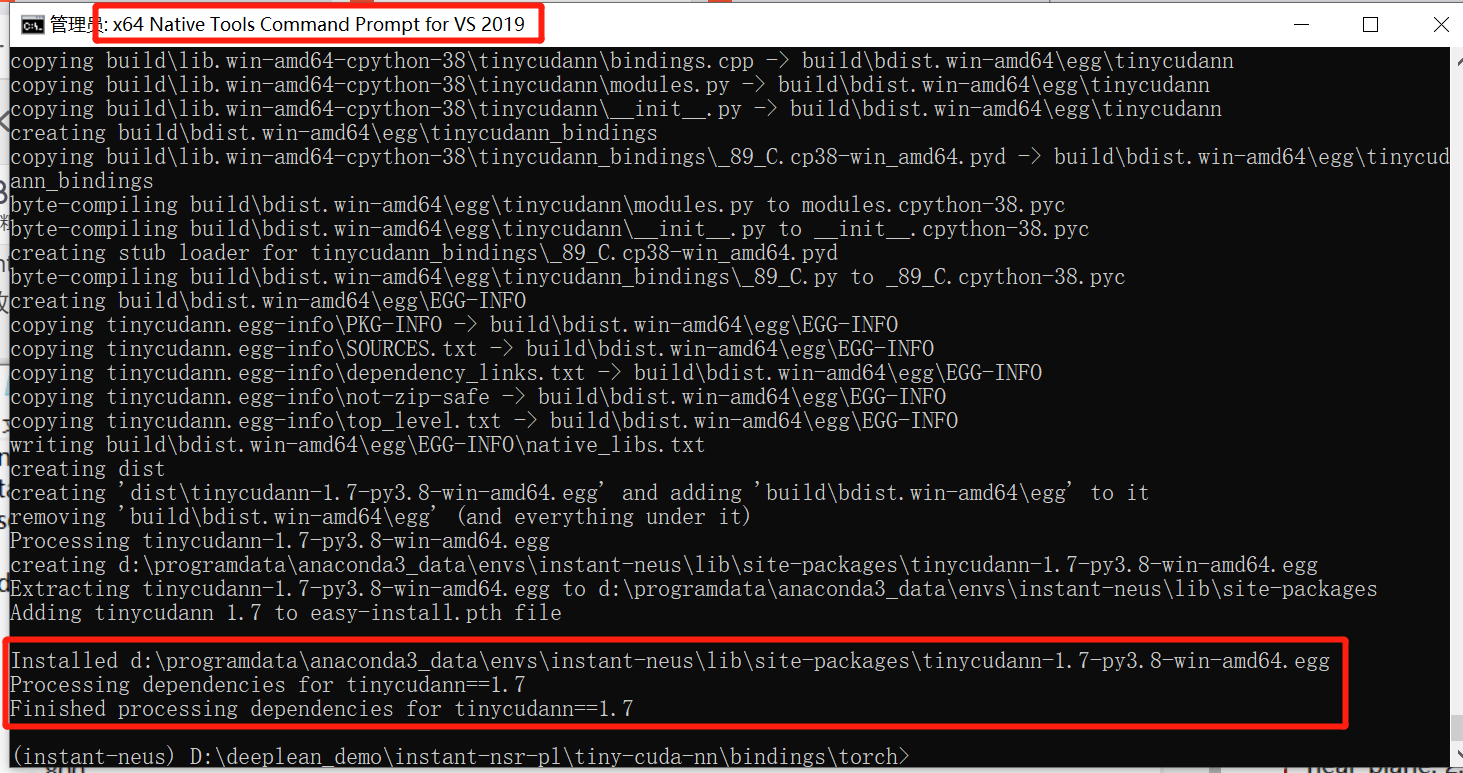
安装tiny-cuda-nn比较特殊,需要安装vs2019或者vs2022,注意:需要管理员方式打开"x64 Native Tools Command Prompt for VS 2019"执行指令,不要搞混成x86的,会报奇怪的错误!
# 个人将tiny-cuda-nn下载在xxxxx/instant-nsr-pl的目录下
cd instant-nsr-pl
git clone --recursive https://github.com/nvlabs/tiny-cuda-nn
cd tiny-cuda-nn/bindings/torch
# 同样需要激活环境
activate instant-nsr-pl
# 安装
python setup.py install
git下载总失败的话,可以尝试【tiny-cuda-nn详细教程】方法,成功安装tiny-cuda-nn。
注意安装tiny-cuda-nn时候,对应的cuda是物理机器上实际安装的cuda版本(环境变量里配置的cuda),不是虚拟环境中的cuda版本。因此假设物理和虚拟的俩个版本cuda不一致,即使tiny-cuda-nn安装成功,在后续执行训练指令时候也会报错。
# 查看所有安装的包
pip list
conda list
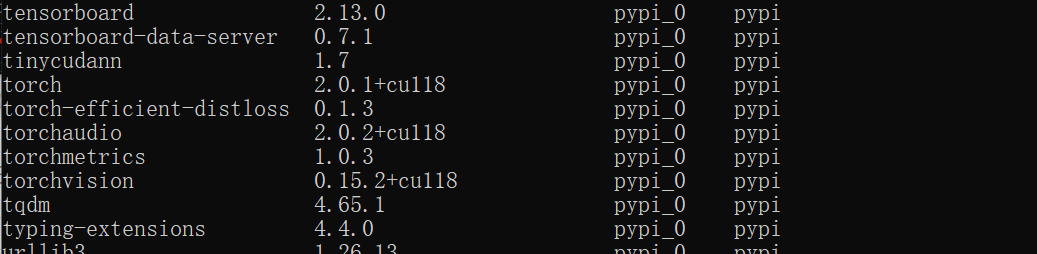
最终的安装的所有包。
检查torch版,已经安装torch-gpu版本。
# 查看pytorch版本
import torch
print(torch.__version__)
# 查看cuda版本
print(torch.version.cuda)
# 查看cuda是否可用
print(torch.cuda.is_available())
# 查看可用cuda数量
print(torch.cuda.device_count())

训练instant-nsr-pl
1.下载数据集:【谷歌云盘(下载地址)】根据配置文件中数据指定的存放路径,在instant-NeuS工程内创建load/文件夹,把下载的开源数据解压放到load/文件夹下。

2.训练NeRF:
# 训练bmvs_clock数据集
python launch.py --config configs/nerf-blender.yaml --gpu 0 --train dataset.scene=lego tag=lego
训练完成后的结果保存在exp目录中的对应数据文件夹下。

博主将视频转为了GIF方便展示:

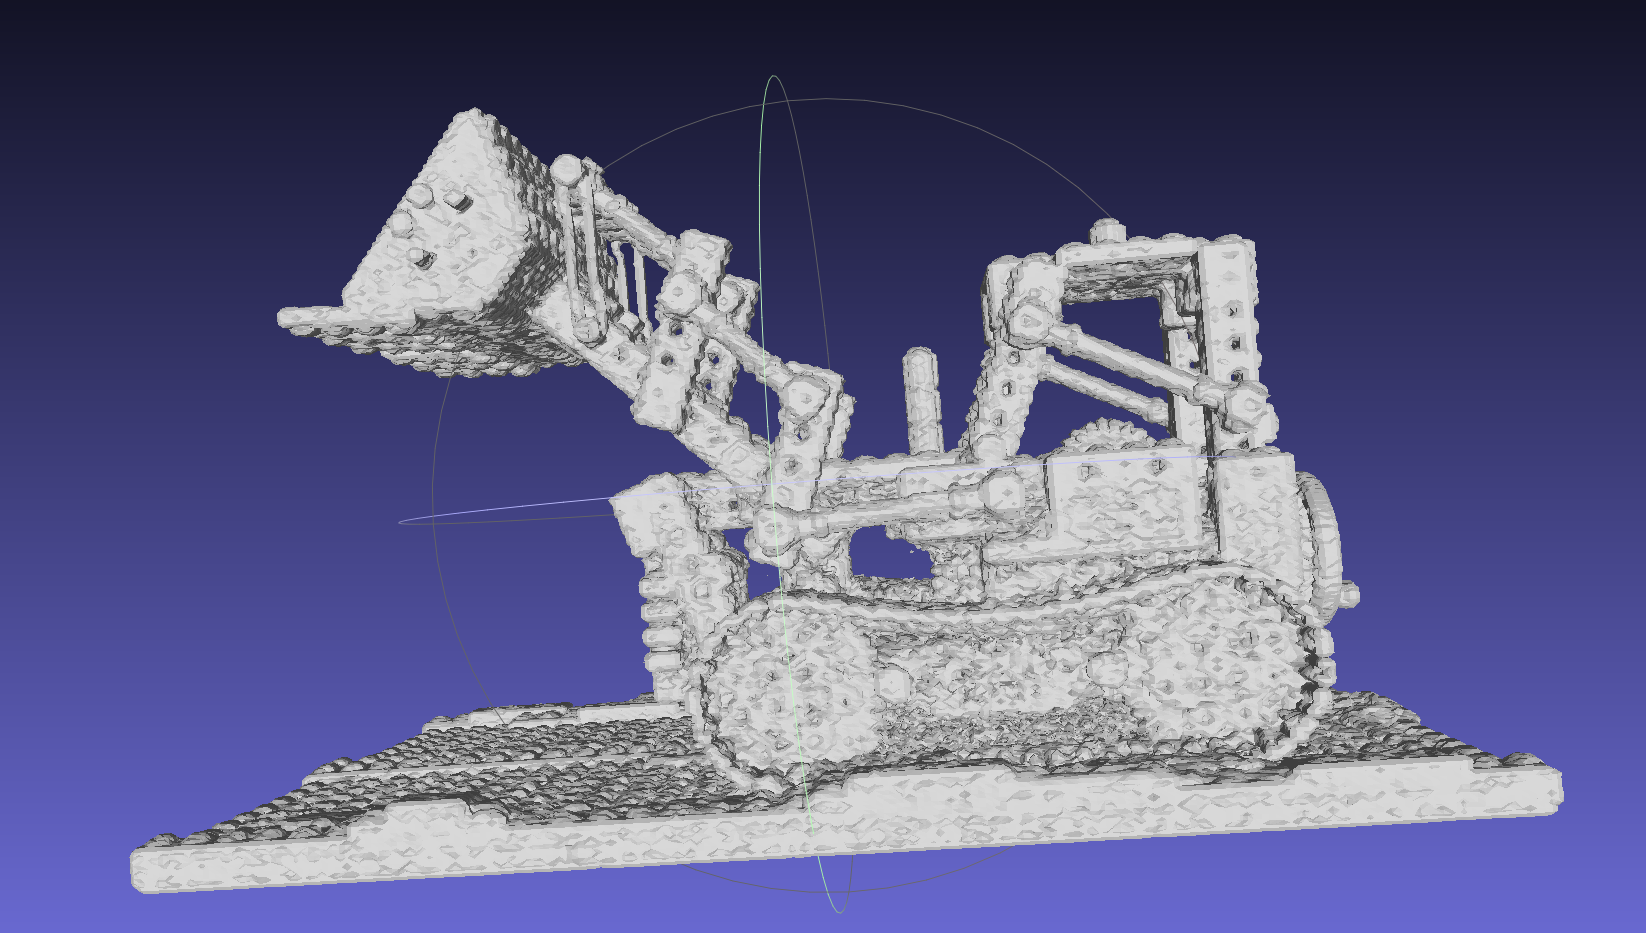
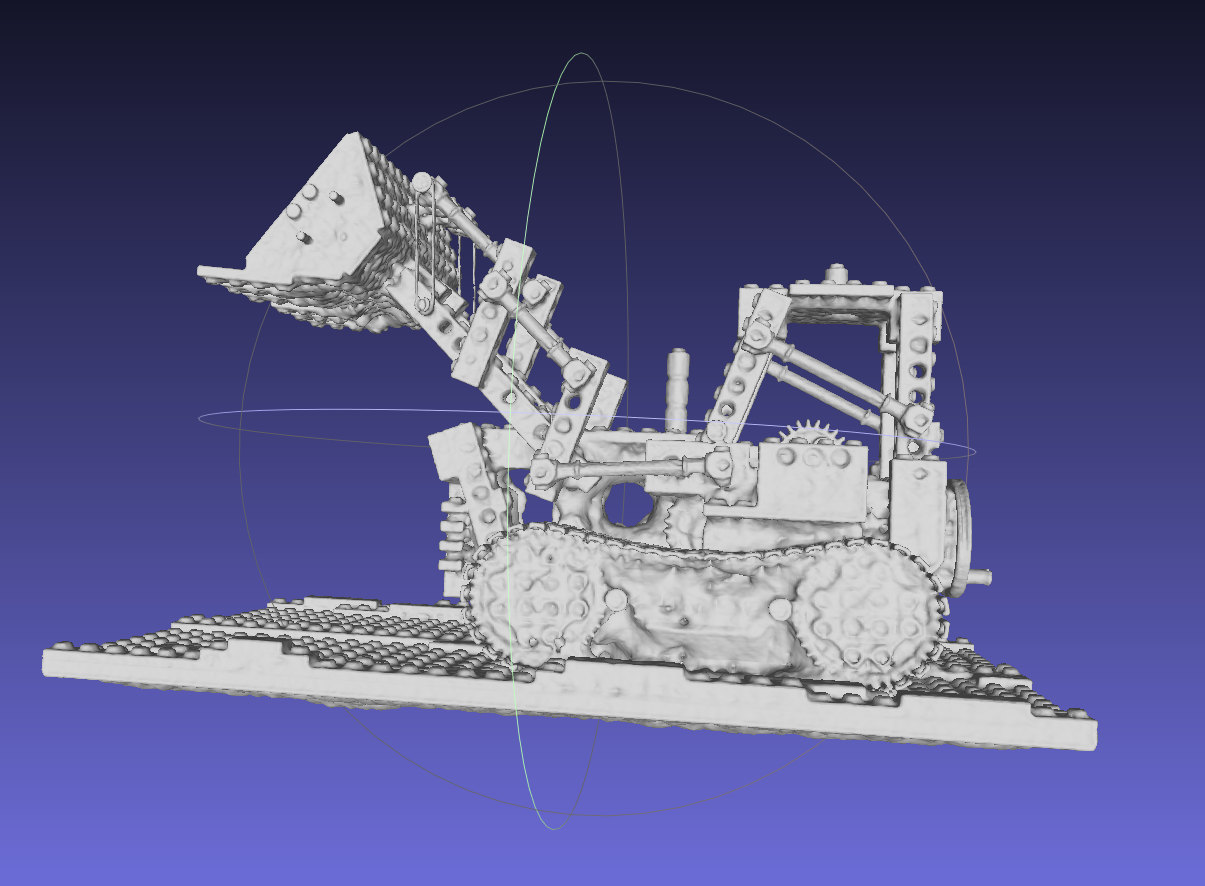
用meshlab查看模型:
打开nerf-blender.yaml,将model下–>mlp_network_config–>otype的FullyFusedMLP改成VanillaMLP才会有ply模型,否则ply文件就是0bit的空文件。
3.训练NeuS:
# 带有mask
python launch.py --config configs/neus-blender.yaml --gpu 0 --train dataset.scene=lego tag=lego
# 没有mask
python launch.py --config configs/neus-blender.yaml --gpu 0 --train dataset.scene=lego tag=lego system.loss.lambda_mask=0.0
带有mask
视角展示(GIF文件也很大,超过博客文件所规定的大小):

用meshlab查看模型:

没有mask(感觉都差不多)
视角展示:

用meshlab查看模型:
可能出现的问题
-
"ImportError: cannot import name ‘_compare_version’ from ‘torchmetrics.utilities.imports’ ",需要降级一下torchmetrics包:

pip install -i https://pypi.tuna.tsinghua.edu.cn/simple torchmetrics==0.11.1 -
"The provided lr scheduler
MultiStepLRdoesn’t follow PyTorch’s LRScheduler API. You should override theLightningModule.lr_scheduler_stephook with your own logic if you are using a custom LR scheduler. " ,这是torch 2.0会出现的错误,修改(依赖包源码)instant-neus\Lib\site-packages\pytorch_lightning\utilities\types.py内容:

LRSchedulerTypeTuple = (torch.optim.lr_scheduler._LRScheduler, torch.optim.lr_scheduler.ReduceLROnPlateau) 修改为 LRSchedulerTypeTuple = (torch.optim.lr_scheduler.LRScheduler, torch.optim.lr_scheduler.ReduceLROnPlateau) -
"subprocess.CalledProcessError: Command ‘[‘where’, ‘cl’]’ returned non-zero exit status 1. ",设置cl.exe环境变量:

根据自己的安装路径配置环境:# 在环境变量中Path添加路径(博主的): C:\Program Files (x86)\Microsoft Visual Studio\2019\Community\VC\Tools\MSVC\14.29.30133\bin\Hostx64\x64; C:\Program Files (x86)\Microsoft Visual Studio\2019\Community\Common7\IDE # 在环境变量中新建INCLUDE变量,再添加(英文分号隔开): C:\Program Files (x86)\Microsoft Visual Studio\2019\Community\Common7\IDE; C:\Program Files (x86)\Windows Kits\10\Include\10.0.19041.0\ucrt; C:\Program Files (x86)\Windows Kits\10\Include\10.0.19041.0\um; C:\Program Files (x86)\Windows Kits\10\Include\10.0.19041.0\shared # 在环境变量中新建LIB变量,再添加(英文分号隔开): C:\Windows Kits\10\Include\10.0.19041.0\shared C:\Program Files (x86)\Windows Kits\10\Lib\10.0.19041.0\ucrt\x64; C:\Program Files (x86)\Windows Kits\10\Lib\10.0.22000.0\um\x64
在cmd上输入cl验证是否配置成功:

-
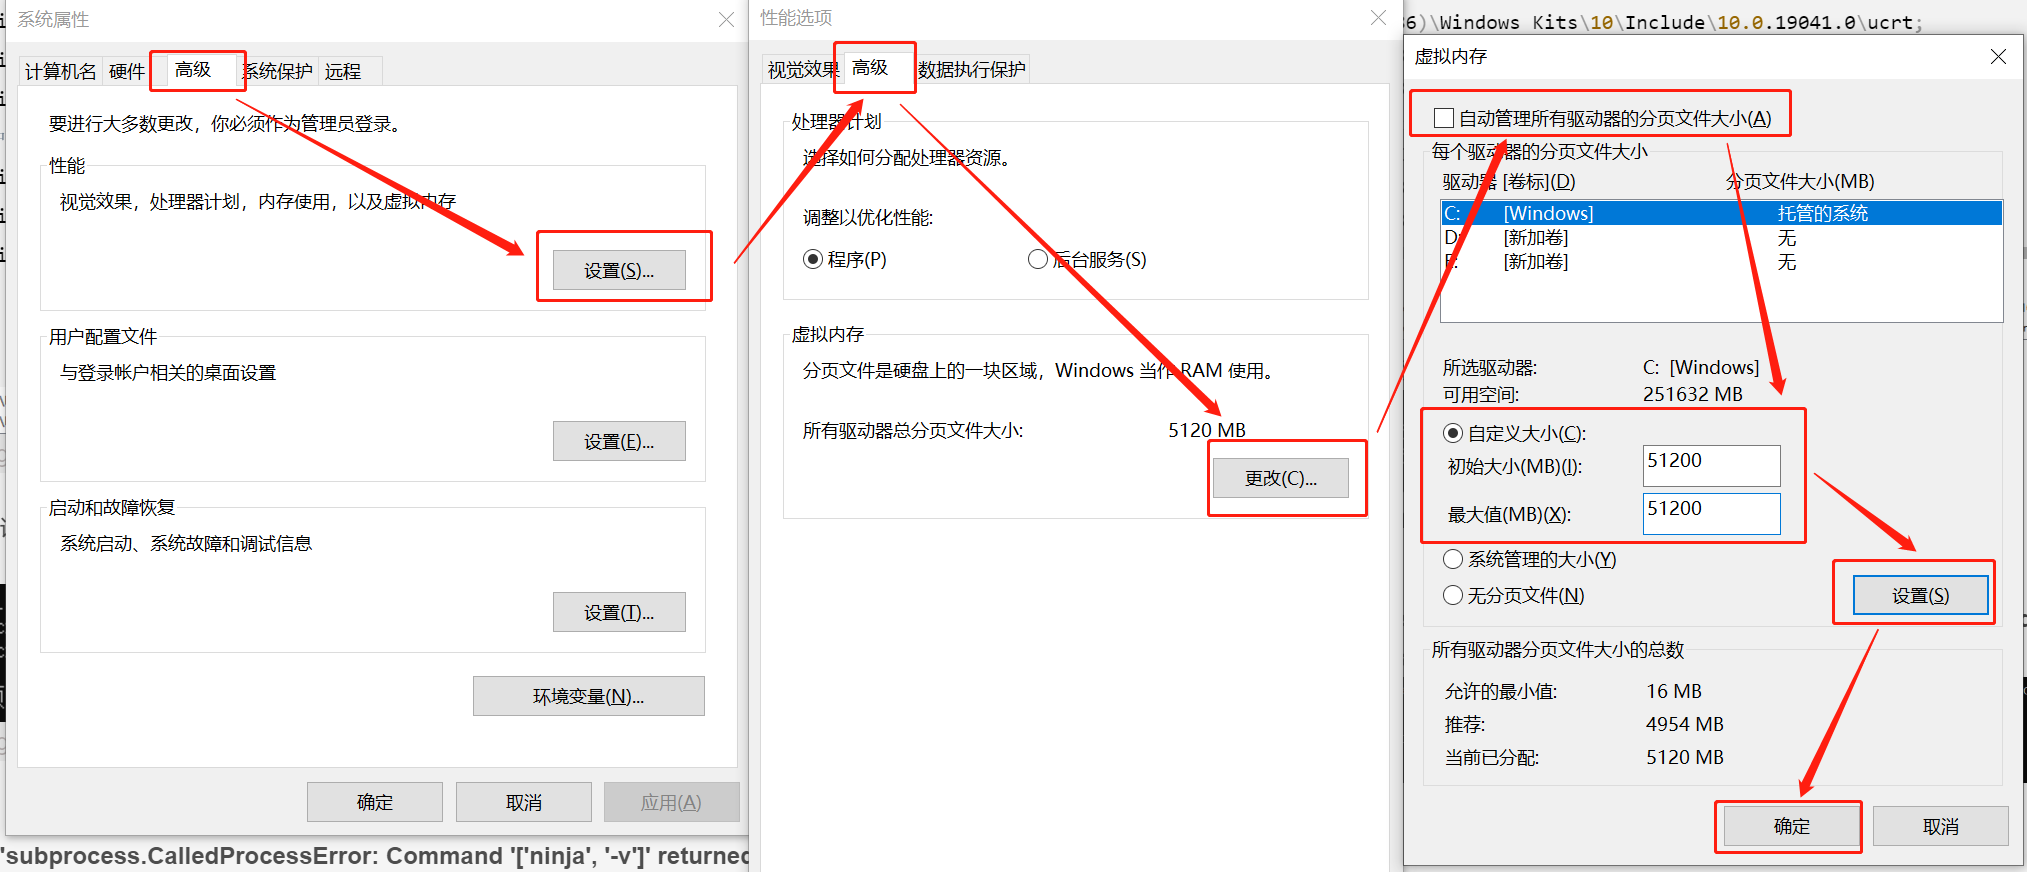
前面是提示:"subprocess.CalledProcessError: Command ‘[‘ninja’, ‘-v’]’ returned non-zero exit status 1. “,后面出现"ninja: build stopped: subcommand failed.”,增大虚拟内存:

在系统设置中修改虚拟内存的大小,然后重启主机激活:
-
前面是提示:“OSError: [WinError 1455] 页面文件太小,无法完成操作”,同样是增大虚拟内存,或者之前增加的虚拟内存不够:

-
“include/tiny-cuda-nn/cutlass_matmul.h:332 status failed with error Error Internal”,将配置yaml文件中的FullyFusedMLP全部(或部分)替换为VanillaMLP即可,因为博主在不同的主机上情况不一样,很奇怪。
总结
尽可能简单、详细的介绍instant-nsr-pl的安装流程以及解决了安装过程中可能存在的问题。后续会根据自己学到的知识结合个人理解讲解instant-nsr-pl的原理和代码。