本博客还有多个超详细综述,感兴趣的朋友可以移步:
卷积神经网络:卷积神经网络超详细介绍
目标检测:目标检测超详细介绍
语义分割:语义分割超详细介绍
数据增强:一文看懂计算机视觉中的数据增强
损失函数:分类检测分割中的损失函数和评价指标
Transformer:A Survey of Visual Transformers
机器学习实战系列:决策树
YOLO 系列:v1、v2、v3、v4、scaled-v4、v5、v6、v7、yolof、yolox、yolos、yolop
文章目录
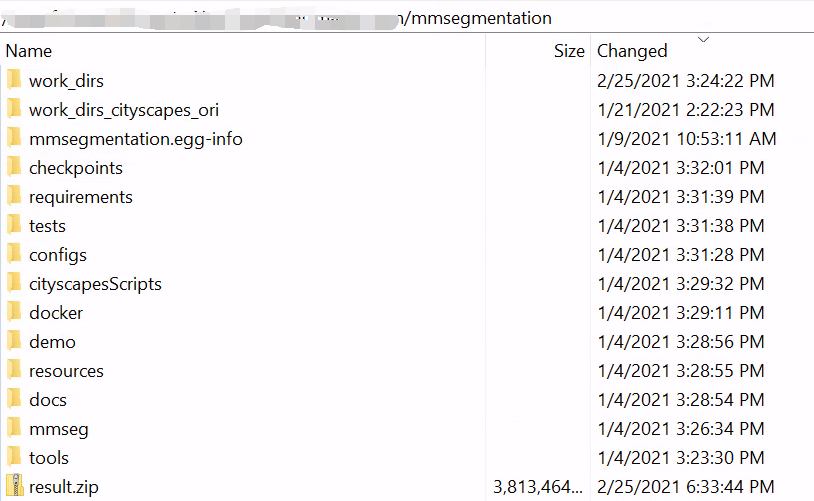
一、mmsegmentation简介
github 链接:https://github.com/open-mmlab/mmsegmentation
二、Cityscape数据集简介
2.1 数据结构
1、数据集结构:
- Images_base: leftImg8bit (5030items, totalling 11.6GB, factually 5000items)
- Annotations_base: gtFine (30030 items, totalling 1.1GB)
2、图片数量
-
5000张精细标注
- 2975张训练图,500张训练图,1525张测试图
-
20000张粗糙标注(使用多边形覆盖单个对象)
3、图像大小:
- 1024x2048
4、数据场景:
- 50个不同城市的街景
- train/val/test的城市都不同
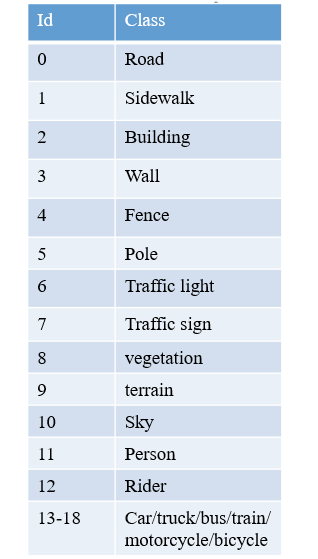
5、类别定义:

- *:是针对单个实例进行标注的,如果同一类别的多个物体交叉分布,也即实例边界不明显,这些物体组成一个单一实例的group,如 car/bicycle group.
- +: 表示的label目前还没有包含在任何的评估项中,treated as void;所以去掉这些label,一般我们说CityScapes包含19类。
6、标注方式
Cityscape有自己的标注方法:cityscapescripts
https://github.com/mcordts/cityscapesScripts/tree/master/cityscapesscripts
注:在训练之前,一定要看一下trainlabelid.png里边是不是19个类,最好用cityscapesscripts/helpers/labels.py重新生成一遍会比较保险。

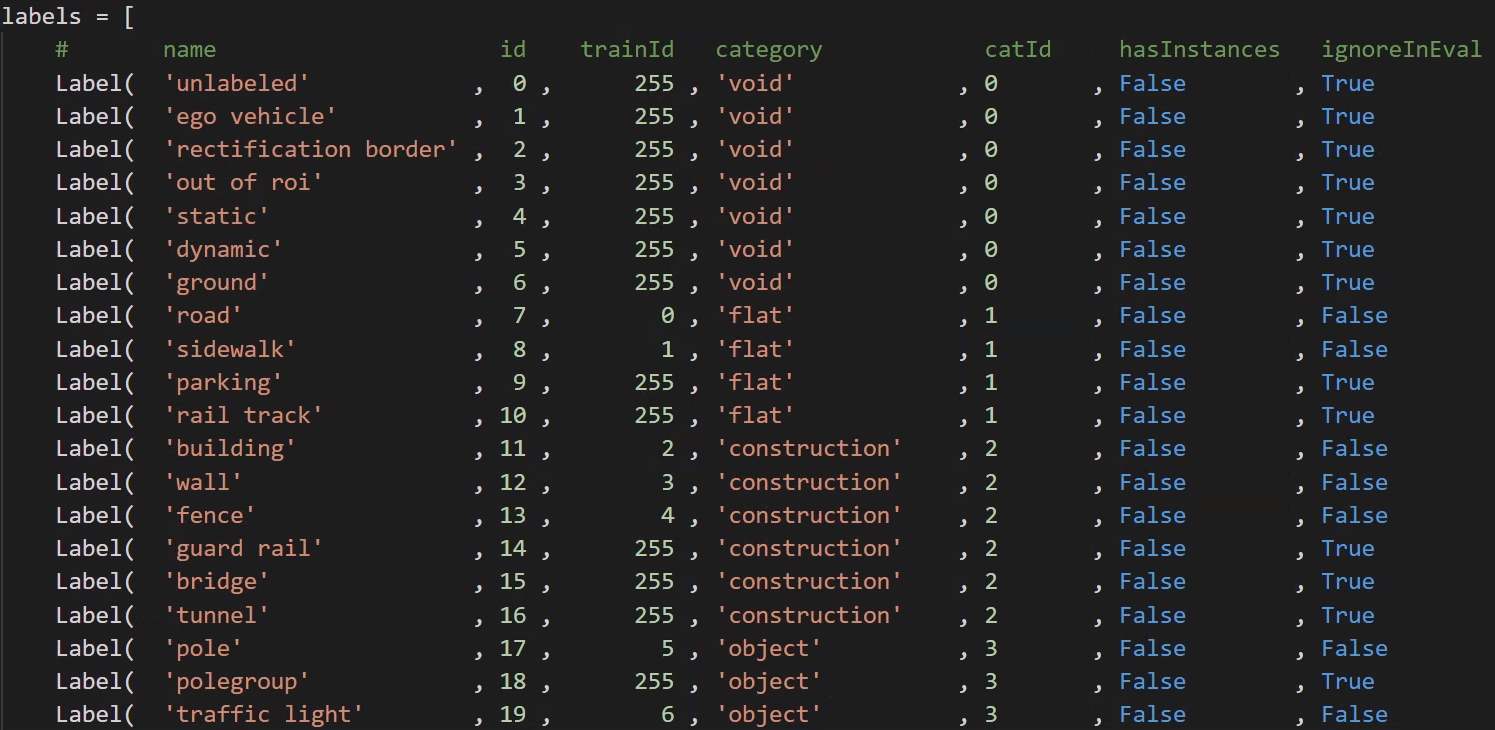
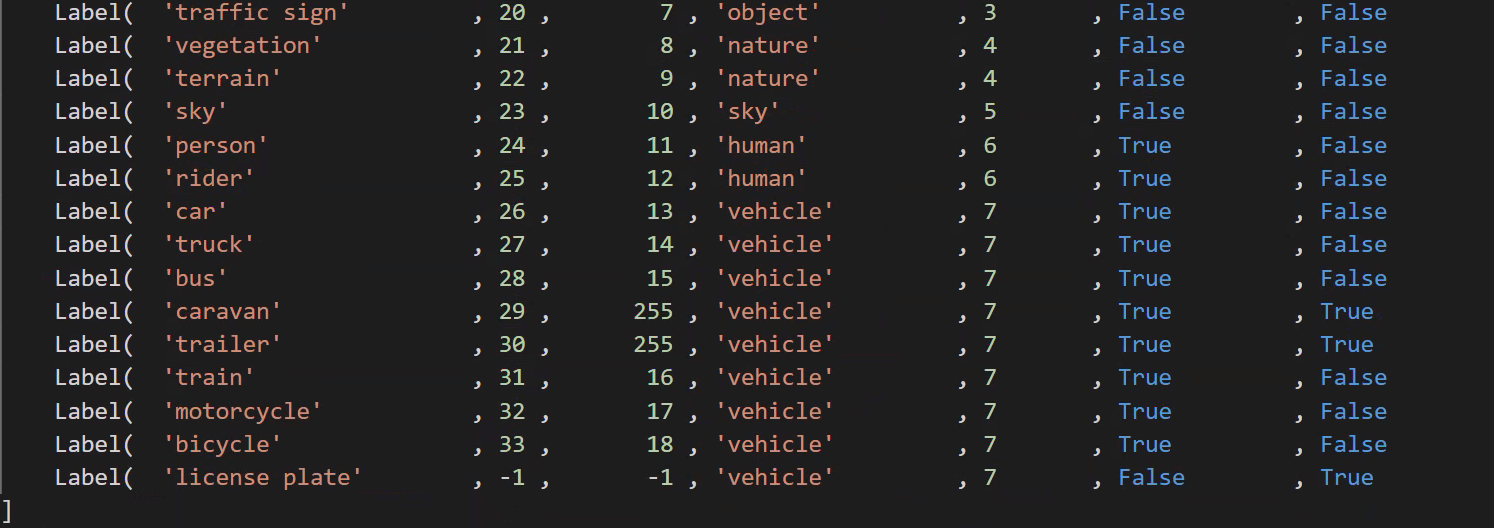
cityscapesScripts/helpers/labels.py文件中定义了不同类别和Id值的对应方式,颜色等,如下图:
- 总类别:34类
- 现可用类别:19类
- 标注文件类型:CityScapes 的 label 不是集中在一个json,而是每张图片对应了4个label文件。
-
color.png: 每个颜色对应一个类别

-
instanceIds.png:用于实例分割

-
labelIds.png:标注label,共34类(0-33),背景为0

-
TrainLabelId.png:训练用的label,(19个训练的类别+1个ignore),将不参与训练的像素值置为255,其余参与训练的类别像素值为0-18

-
polygons.json
-
- _gtFine_polygons.json存储的是各个类和相应的区域(用多边形顶点的位置表示区域的边界);
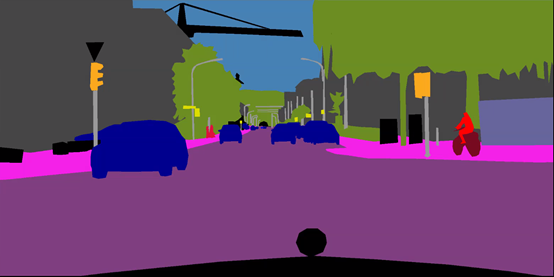
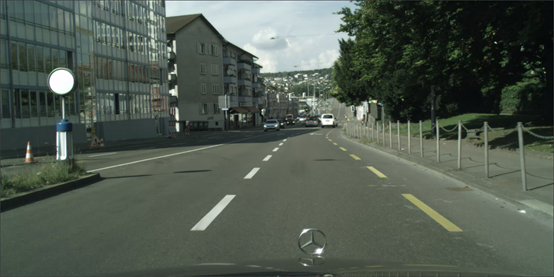
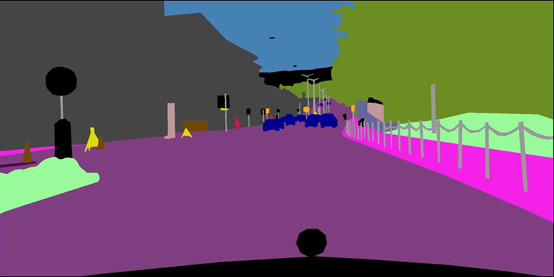
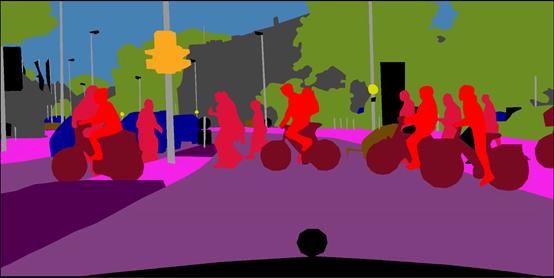
2.2 标注样例


三、把自己的数据集变成Cityscape格式
3.1 将用labelme标好的数据转换为训练可用数据
from pathlib import Path
import os
import glob
import cv2
import png
import numpy as np
import shutil
from PIL import Image


# set add_4 and add_15 folder
seg_folder = Path('./20210311_ground_mask_part1/')

seg_folder_TrainID = Path(os.path.join(seg_folder,"TrainID"))
seg_folder_img = Path(os.path.join(seg_folder,"img"))
seg_folder_LabelID = Path(os.path.join(seg_folder,"LabelID"))
seg_folder_color = Path(os.path.join(seg_folder,"color"))

if not seg_folder_img.exists():
    os.mkdir(seg_folder_img)
if not seg_folder_LabelID.exists():
    os.mkdir(seg_folder_LabelID)
if not seg_folder_TrainID.exists():
    os.mkdir(seg_folder_TrainID)
if not seg_folder_color.exists():
    os.mkdir(seg_folder_color)

LabelID_glob = glob.glob('./20210311_ground_mask_part1/20210222_TJP_freespace_ss/20210222_TJP_freespace_ss_label/*.png')
TrainID_glob = glob.glob('./20210311_ground_mask_part1/20210222_TJP_freespace_ss/20210222_TJP_freespace_ss_label/*.png')
Img_glob = glob.glob('./20210311_ground_mask_part1/20210222_TJP_freespace_ss/20210222_TJP_freespace_ss_extract/*.jpg')
Color_glob = glob.glob('./20210311_ground_mask_part1/20210222_TJP_freespace_ss/20210222_TJP_freespace_ss_label/*.png')
# assert(len(LabelID_glob)==len(Img_glob))

print("len for lable glob",len(LabelID_glob))

# ******************* TrainID process ****************************
print("begin to process TrainID")
for k in range(len(LabelID_glob)):
    transfer_ori = Image.open(TrainID_glob[k])
    transfer_ground = np.array(transfer_ori)
    transfer_ground[transfer_ground == 0] = 255  # ignore
    transfer_ground[transfer_ground == 1] = 0   # freespace
    transfer_ground[transfer_ground == 2] = 1  # white solid lane line
    transfer_ground[transfer_ground == 3] = 2  # white dotted lane line
    # transfer_ground[transfer_ground == 4] = 3  # yellow solid lane line
    # transfer_ground[transfer_ground == 5] = 4  # yellow dotted lane line
    transfer_ground[transfer_ground == 6] = 3  # arrow
    transfer_ground[transfer_ground == 7] = 4  # diamond_sign
    transfer_ground[transfer_ground == 8] = 5  # zebra crossing
    transfer_ground[transfer_ground == 9] = 6  # stop line
    transfer_ground_img = Image.fromarray(transfer_ground)
    transfer_ground_img = transfer_ground_img.resize((2048, 1024))
    transfer_ori_path = os.path.join(seg_folder_TrainID,TrainID_glob[k].split('/')[-1].split('\\')[1])
    transfer_ground_img.save(transfer_ori_path)
    print("the {0} th TrainID img has been processed and save in folder".format(k))
#
# # ******************* LableID process ****************************
print("begin to process LableID")
for k in range(len(LabelID_glob)):
    transfer_ori = Image.open(TrainID_glob[k])
    transfer_ground = np.array(transfer_ori)
    transfer_ground[transfer_ground == 0] = 0  # ignore
    transfer_ground[transfer_ground == 1] = 1  # freespace
    transfer_ground[transfer_ground == 2] = 2  # white solid lane line
    transfer_ground[transfer_ground == 3] = 3  # white dotted lane line
    # transfer_ground[transfer_ground == 4] = 4  # yellow solid lane line
    # transfer_ground[transfer_ground == 5] = 5  # yellow dotted lane line
    transfer_ground[transfer_ground == 6] = 4  # arrow
    transfer_ground[transfer_ground == 7] = 5  # diamond_sign
    transfer_ground[transfer_ground == 8] = 6  # zebra crossing
    transfer_ground[transfer_ground == 9] = 7  # stop line

    transfer_ground_img = Image.fromarray(transfer_ground)
    transfer_ground_img = transfer_ground_img.resize((2048, 1024))
    transfer_ori_path = os.path.join(seg_folder_TrainID, TrainID_glob[k].split('/')[-1].split('\\')[1])
    transfer_ground_img.save(transfer_ori_path)
    print("the {0} th LabelID img has been processed and save in folder".format(k))


# # ******************** resize img ***********************************
for k in range(len(Img_glob)):
    print("copy the {0}th img to add img folder".format(k))
    src_img = Image.open(Img_glob[k])
    src_img = src_img.resize((2048, 1024))
    src_img_save_path = os.path.join(seg_folder_img,Img_glob[k].split('/')[-1].split('\\')[1].split('.')[0])
    src_img.save(src_img_save_path+'.png')
#
# ## ********************* resize color png *****************************
for k in range(len(Color_glob)):
    print("copy the {0}th img to color folder".format(k))
    src_img = Image.open(Color_glob[k])
    src_img = src_img.resize((2048,1024))
    color_img_save_path = os.path.join(seg_folder_color,Color_glob[k].split('/')[-1].split('\\')[1].split('.')[0])
    src_img.save(color_img_save_path+'.png')
3.2 重命名
import os
import glob
import shutil
from pathlib import Path


img_path = './img/'
TrainID_path = './TrainID/'
LabelID_path = './LabelID/'
color_path = './color/'
gtFine_path = './gtFine/'
leftImg8bit_path = './leftImg8bit/'

if not Path(gtFine_path).exists():
    os.mkdir(gtFine_path)
if not Path(leftImg8bit_path).exists():
    os.mkdir(leftImg8bit_path)

img_files = os.listdir(img_path)
TrainID_files = os.listdir(TrainID_path)
LabelID_files = os.listdir(LabelID_path)
color_files = os.listdir(color_path)

m = 0
for file in color_files:
    #import pdb;pdb.set_trace()

    old = color_path + os.sep + color_files[m]
    filename = os.path.splitext(file)[0]

    new = gtFine_path + 'part1_' + filename + '_gtFine_color.png'
    shutil.move(old, new)
    print('rename {}th color files'.format(m))
    m+=1

i = 0
for file in img_files:
    #import pdb;pdb.set_trace()

    old = img_path + os.sep + img_files[i]
    filename = os.path.splitext(file)[0]

    new = leftImg8bit_path+ 'part1_' + filename + '_leftImg8bit.png'
    shutil.move(old, new)
    print('rename {}th img files'.format(i))
    i+=1
j = 0
for file in TrainID_files:
    # import pdb;pdb.set_trace()

    old = TrainID_path + os.sep + TrainID_files[j]
    filename = os.path.splitext(file)[0]

    new = gtFine_path + 'part1_' + filename + '_gtFine_labelTrainIds.png'
    shutil.move(old, new)
    print('rename {}th trainid files'.format(j))
    j += 1
k = 0
for file in LabelID_files:
    # import pdb;pdb.set_trace()

    old = LabelID_path + os.sep + LabelID_files[k]
    filename = os.path.splitext(file)[0]

    new = gtFine_path + 'part1_' + filename + '_gtFine_labelIds.png'
    shutil.move(old, new)
    print('rename {}th labelid files'.format(k))
    k += 1
-
color

-
labeltrainid

-
labelid

3.3 xml转json
import json
import xmltodict
import glob
import os

xml_list = glob.glob('./20210222_TJP_freespace_ss_xml/*.xml') #xml文件的路径


'''json to xml'''
def json_to_xml(json_str):
    # xmltodict库的unparse()json转xml
    # 参数pretty 是格式化xml
    xml_str = xmltodict.unparse(json_str, pretty=1, root='shapes')
    return xml_str

'''xml to json'''
def xml_to_json(xml_str):
    # parse是的xml解析器
    xml_parse = xmltodict.parse(xml_str)
    # json库dumps()是将dict转化成json格式,loads()是将json转化成dict格式。
    # dumps()方法的ident=1,格式化json
    json_str = json.dumps(xml_parse, indent=1)
    return json_str


for xml_path in xml_list:

    if os.path.exists(xml_path):
        with open(xml_path, 'r') as f1:
            xmlfile = f1.read()
            print('---------xml文件-----------')
            print(xmlfile)
            print('---------json文件----------')
            print(xml_to_json(xmlfile))
        with open(xml_path[:-3]+'json','w') as newfile:
            newfile.write(xml_to_json(xmlfile))
            print('--------写入json文件--------')
            print('写入xml.json文件成功')
四、训练和测试
4.1 改数据集路径名称等
注意:首先编译路径 python setup.py develop
1、修改数据集路径
mmseg/datasets/cityscapes.py

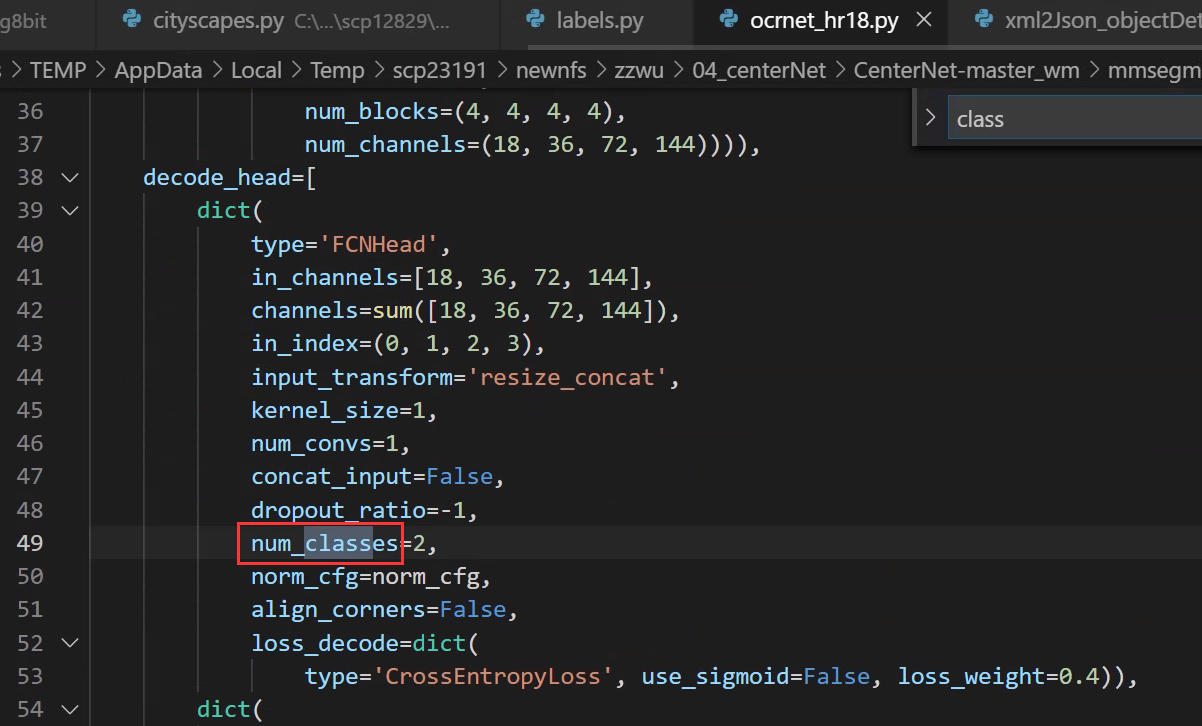
2、修改类别数量
config/_base_/ocrnet_hr18.py
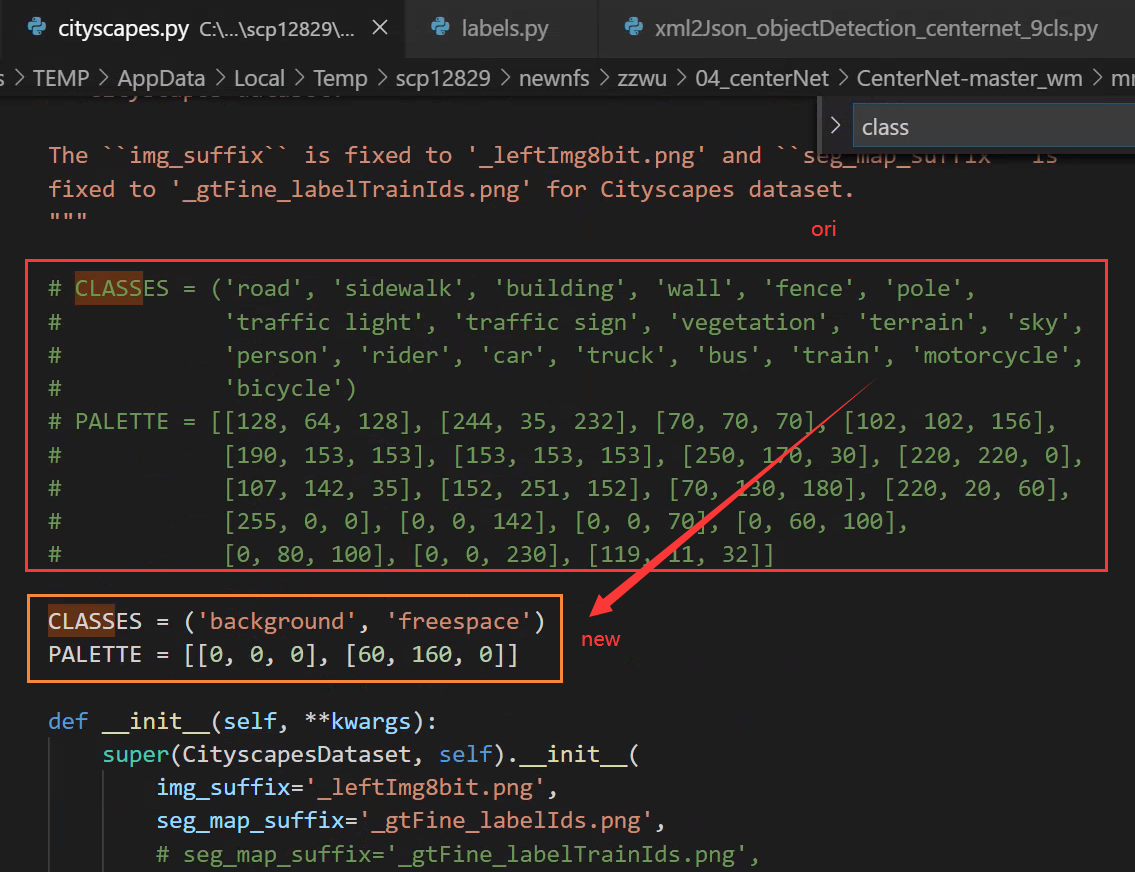
mmseg/datasets/cityscapes.py
mmseg/core/class_names.py

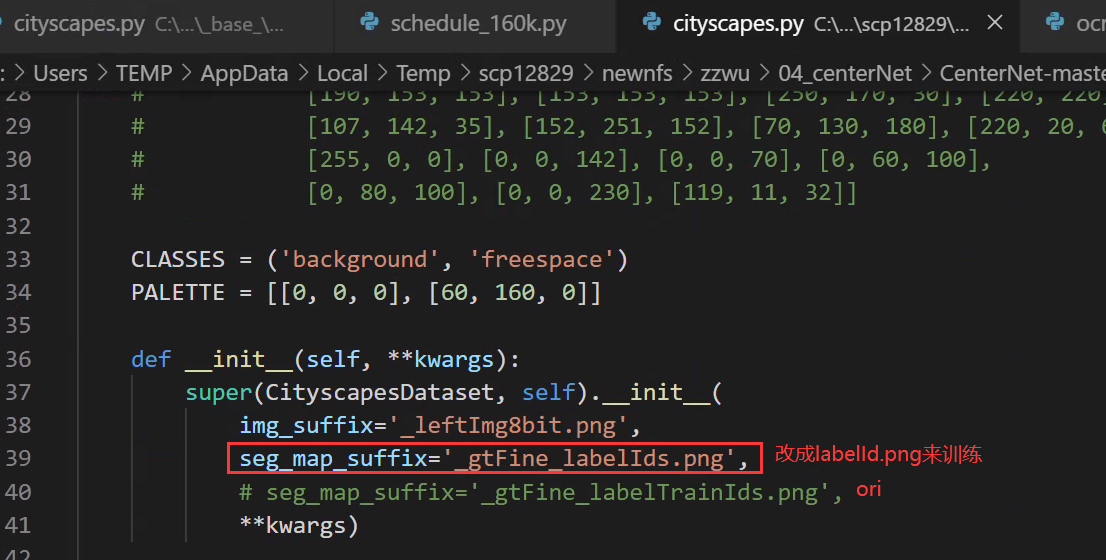
3、使用labelid.png作为训练的label,即训练freespace和background两个类别:
如果只训练freespace这一类,而把background按照通常的方法作为ignore不参与训练的话,可视化的时候就会发现背景全部学成了freespace这一个类,因为分割中的忽略其实是不关注的像素点,也就是说没有人关心它们被预测成了什么类别,但如果图像中有大面积的ignore,也就是有大面积的错类别,这样的模型是无法使用的,所以这里使用labelid.png作为训练的label,即训练freespace和background两个类别,这样训练的效果会很好。
mmseg/datasets/cityscapes.py
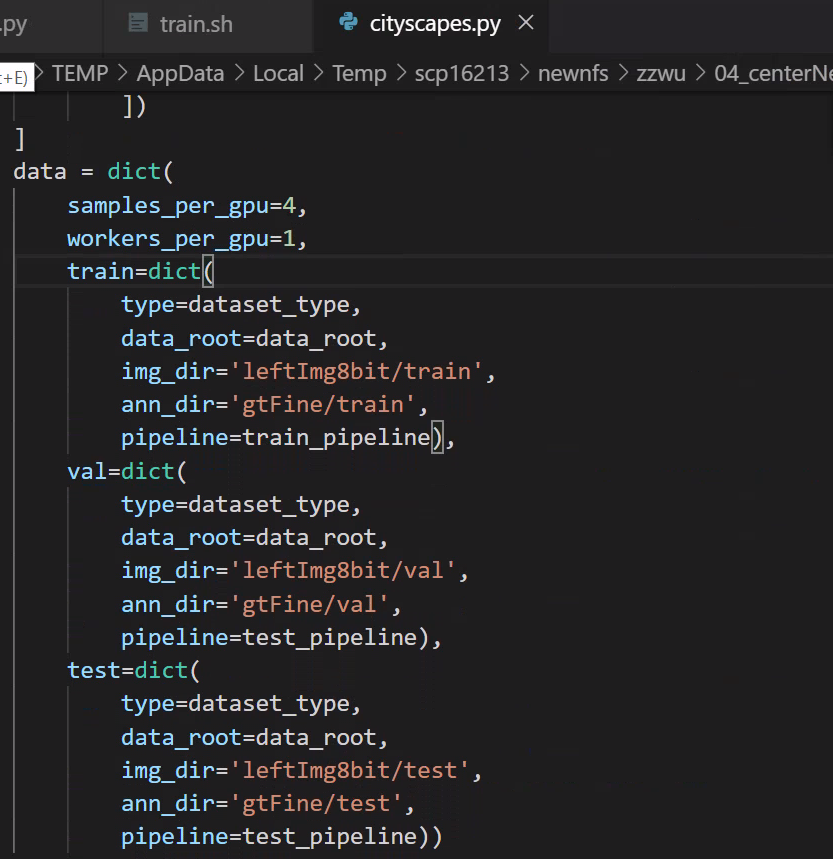
4、修改训练、测试、验证数据
mmseg/datasets/cityscapes.py
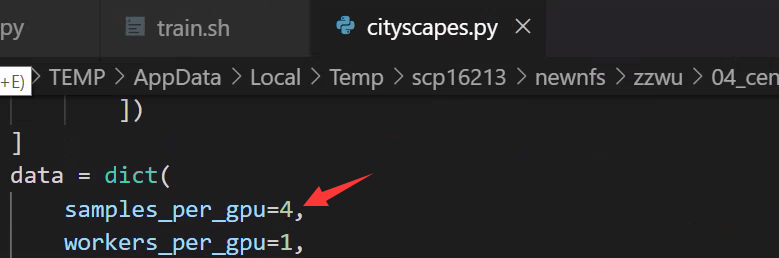
5、修改每个GPU的样本数量(batch)
configs/_base_/datasets/cityscapes.py
6、分布式训练/非分布式训练的 BN 修改
config/_base_/models/ocrnet_hr18.py

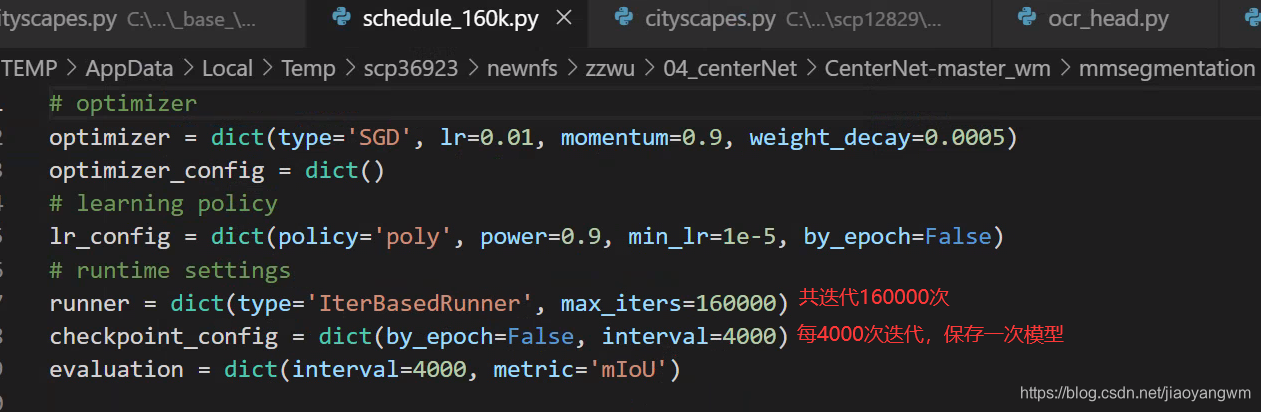
7、修改迭代次数和保存模型的间隔
config/_base_/schedules/schedule_160k.py
8、在哪里看每次训练的数据:
mmseg/datasets/builder.py
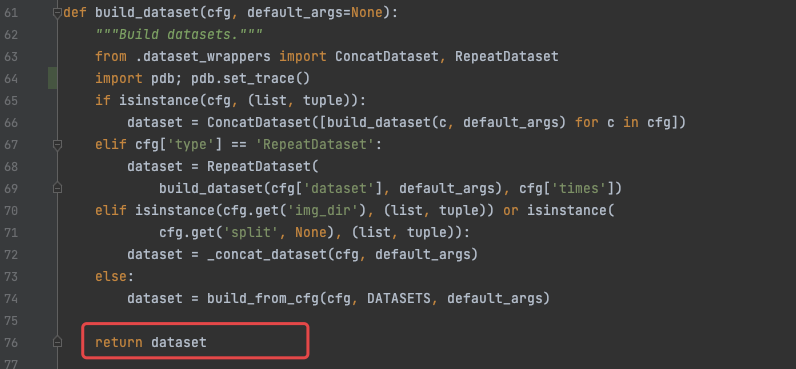

datasets[0].keys()
>>>
dict_keys(['img_metas', 'img', 'gt_semantic_seg'])
4.2 训练
1、单卡训练
python tools/train.py ${

    CONFIG_FILE} [optional arguments]
2、多卡训练
./tools/dist_train.sh ${

    CONFIG_FILE} ${

    GPU_NUM} [optional arguments]
python -m torch.distributed.launch --nproc_per_node=2 --master_port=29003 tools/train.py --config configs/ocrnet/ocrnet_hr18s_512x1024_40k_cityscapes.py --launcher pytorch --work_dir work_dir
如果报错如下,解决方法:修改master_port 的值即可
subprocess.CalledProcessError: Command '[xxx]' returned non-zero exit status 1.
Optional arguments are:
--no-validate (not suggested): By default, the codebase will perform evaluation at every k iterations during the training. To disable this behavior, use --no-validate.
--work-dir ${

    WORK_DIR}: Override the working directory specified in the config file.
--resume-from ${

    CHECKPOINT_FILE}: Resume from a previous checkpoint file (to continue the training process).
--load-from ${

    CHECKPOINT_FILE}: Load weights from a checkpoint file (to start finetuning for another task).
Difference between resume-from and load-from:
resume-from loads both the model weights and optimizer state including the iteration number.
load-from loads only the model weights, starts the training from iteration 0.
4.3 测试
# single-gpu testing
python tools/test.py ${

    CONFIG_FILE} ${

    CHECKPOINT_FILE} [--out ${

    RESULT_FILE}] [--eval ${

    EVAL_METRICS}] [--show]

# save test result at dir
python tools/test.py ${

    CONFIG_FILE} ${

    CHECKPOINT_FILE} [--out ${

    RESULT_FILE}] [--show-dir result]

# multi-gpu testing
./tools/dist_test.sh ${

    CONFIG_FILE} ${

    CHECKPOINT_FILE} ${

    GPU_NUM} [--out ${

    RESULT_FILE}] [--eval ${

    EVAL_METRICS}]
Optional arguments:

RESULT_FILE: Filename of the output results in pickle format. If not specified, the results will not be saved to a file.
EVAL_METRICS: Items to be evaluated on the results. Allowed values depend on the dataset, e.g., mIoU is available for all dataset. Cityscapes could be evaluated by cityscapes as well as standard mIoU metrics.
--show: If specified, segmentation results will be plotted on the images and shown in a new window. It is only applicable to single GPU testing and used for debugging and visualization. Please make sure that GUI is available in your environment, otherwise you may encounter the error like cannot connect to X server.
--show-dir: If specified, segmentation results will be plotted on the images and saved to the specified directory. It is only applicable to single GPU testing and used for debugging and visualization. You do NOT need a GUI available in your environment for using this option.
Examples:
Assume that you have already downloaded the checkpoints to the directory checkpoints/.
- Test PSPNet and visualize the results. Press any key for the next image.
python tools/test.py configs/pspnet/pspnet_r50-d8_512x1024_40k_cityscapes.py \
    checkpoints/pspnet_r50-d8_512x1024_40k_cityscapes_20200605_003338-2966598c.pth \
    --show
- Test PSPNet and save the painted images for latter visualization.
python tools/test.py configs/pspnet/pspnet_r50-d8_512x1024_40k_cityscapes.py \
    checkpoints/pspnet_r50-d8_512x1024_40k_cityscapes_20200605_003338-2966598c.pth \
    --show-dir psp_r50_512x1024_40ki_cityscapes_results
- Test PSPNet on PASCAL VOC (without saving the test results) and evaluate the mIoU.
python tools/test.py configs/pspnet/pspnet_r50-d8_512x1024_20k_voc12aug.py \
    checkpoints/pspnet_r50-d8_512x1024_20k_voc12aug_20200605_003338-c57ef100.pth \
    --eval mAP
- Test PSPNet with 4 GPUs, and evaluate the standard mIoU and cityscapes metric.
./tools/dist_test.sh configs/pspnet/pspnet_r50-d8_512x1024_40k_cityscapes.py \
    checkpoints/pspnet_r50-d8_512x1024_40k_cityscapes_20200605_003338-2966598c.pth \
    4 --out results.pkl --eval mIoU cityscapes
Note: There is some gap (~0.1%) between cityscapes mIoU and our mIoU. The reason is that cityscapes average each class with class size by default. We use the simple version without average for all datasets.
- Test PSPNet on cityscapes test split with 4 GPUs, and generate the png files to be submit to the official evaluation server.
First, add following to config file configs/pspnet/pspnet_r50-d8_512x1024_40k_cityscapes.py,
data = dict(
    test=dict(
        img_dir='leftImg8bit/test',
        ann_dir='gtFine/test'))
Then run test.
./tools/dist_test.sh configs/pspnet/pspnet_r50-d8_512x1024_40k_cityscapes.py \
    checkpoints/pspnet_r50-d8_512x1024_40k_cityscapes_20200605_003338-2966598c.pth \
    4 --format-only --eval-options "imgfile_prefix=./pspnet_test_results"
You will get png files under ./pspnet_test_results directory. You may run zip -r results.zip pspnet_test_results/ and submit the zip file to evaluation server.
4.4 demo
python demo/image_demo.py ${

    IMAGE_FILE} ${

    CONFIG_FILE} ${

    CHECKPOINT_FILE} [--device ${

    DEVICE_NAME}] [--palette-thr ${

    PALETTE}]
# example
python demo/image_demo.py demo/demo.jpg configs/pspnet/pspnet_r50-d8_512x1024_40k_cityscapes.py \
    checkpoints/pspnet_r50-d8_512x1024_40k_cityscapes_20200605_003338-2966598c.pth --device cuda:0 --palette cityscapes
注:如果用相同的config训练多次,可以通过改config/hr.py的名字来把结果放到不同的 work-dir 中。
五、训练技巧
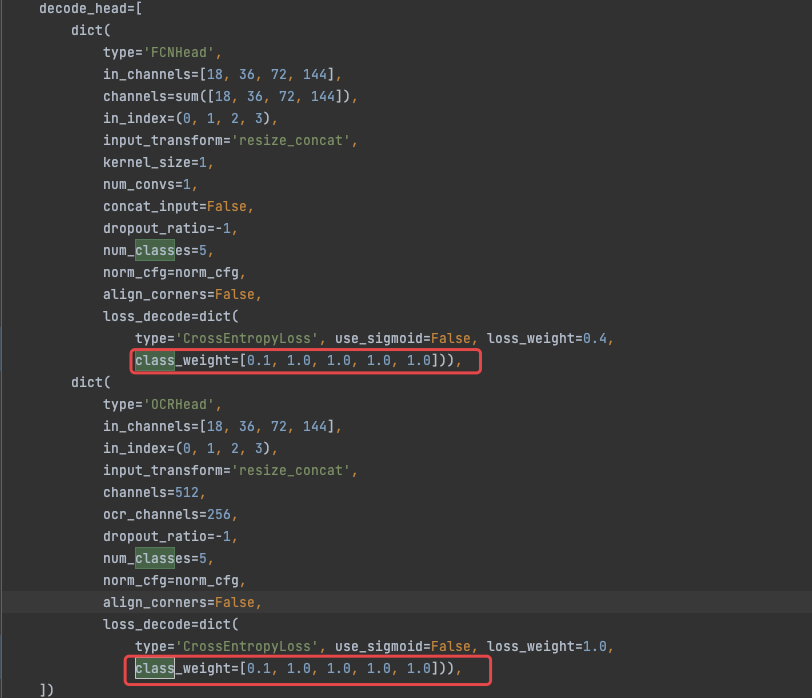
5.1 不同类别的 loss 权重设置
/configs/_base_/models/ocrnet_hr18.py