1. 全局解释器锁 GIL
1. gil  全称 global interpreter lock
2. python 中一个线程 对应 c语言中一个线程
3. gil使得同一时刻只有一个线程在cpu上执行字节码,无法将多个线程映射到多个cpu上
4. gil会根据执行的字节码行数以及时间片 释放gil
5. gil在遇到io操作的时候会主动释放
import threading
total = 0
def add():
# 1. dosomething1
# 2. io操作
# 3. dosomething3
global total
for i in range(1000000):
t = total + 1
total = t
def desc():
global total
for i in range(1000000):
t = total - 1
total = t
thread1 = threading.Thread(target=add)
thread2 = threading.Thread(target=desc)
thread1.start()
thread2.start()
thread1.join()
thread2.join()
print(total)
每次运行结果都会不同:
-147368
-13294
-180734
-59620
306061
原因就是:gil会根据执行的字节码行数以及时间片 释放gil, 比如:在add函数total = t的时候, 可能给total赋的值是desc函数total =t 的结果, 这样 total的结果始终是错乱的。
2. 多线程编程threading
函数的方式使用多线程:
有两个需求一并实现:
1.  主线程退出时, 子线程会被kill掉
2.  主线程等待子线程执行完成
import time
import threading
# 动态建立thread 或 线程池 函数的方法适用
def get_detail_html(url):
print('get detail html started')
time.sleep(2)
print('get detail html end')
def get_detail_url(url):
print('get detail url started')
time.sleep(2)
print('get detail url end')
if __name__ == '__main__':
thread1 = threading.Thread(target=get_detail_html, args=('',))
thread2 = threading.Thread(target=get_detail_url, args=('',))
thread1.setDaemon(True) # 主线程退出时, 子线程kill掉 setDaemon设置守护线程
thread2.setDaemon(True)
start_time = time.time()
thread1.start()
thread2.start()
thread1.join() # 主线程阻塞, 直到子线程执行完成
thread2.join()
print('last time: {}'.format(time.time()-start_time)) # 打印子线程执行所用时间
结果为:
get detail html started
get detail url started
get detail html end
get detail url end
last time: 2.0045289993286133
类继承的方式使用多线程:
代码:
import time
import threading

# 大部分情况使用   适合复杂逻辑
class GetDetailHtml(threading.Thread):
    def __init__(self, name):
        super().__init__(name=name)

    def run(self):
        print('get detail html started')
        time.sleep(2)
        print('get detail html end')


class GetDetailUrl(threading.Thread):
    def __init__(self, name):
        super().__init__(name=name)

    def run(self):
        print('get detail url started')
        time.sleep(2)
        print('get detail url end')


if __name__ == '__main__':
    thread1 = GetDetailHtml('get detail html')
    thread2 = GetDetailUrl('get detail url')
    thread1.setDaemon(True)  # 主线程退出时, 子线程kill掉    setDaemon设置守护线程
    thread2.setDaemon(True)
    start_time = time.time()
    thread1.start()
    thread2.start()

    thread1.join()   # 主线程阻塞, 直到子线程执行完成
    thread2.join()

    print('last time: {}'.format(time.time()-start_time))
适用情形:
'函数形式的多线程编码':   动态建立thread 或 线程池  的时候适用
'类继承形式的多线程编码':  大部分情况使用   特别适合复杂逻辑
3. 线程间通信 - 共享变量和Queue
线程间的通讯方式
模仿爬虫的逻辑 写一段说明线程共享全局变量的代码:
import time
import threading

detail_url_list = []


def get_detail_html(detail_url_list):
    # 爬取网站详情页
    while True:
        if len(detail_url_list) > 0:
            url = detail_url_list.pop()   # 取出存好url
            print('get detail html started: {}'.format(url))
            time.sleep(2)
            print('get detail html end')


def get_detail_url(detail_url_list):
    # 爬取网站的文章列表
    while True:
        for i in range(20):    # 生成url
            detail_url_list.append('http://projectsedu.com/{id}'.format(id=1))
        print('get detail url started')
        time.sleep(2)
        print('get detail url end')


if __name__ == '__main__':
    thread_detail_url1 = threading.Thread(
        target=get_detail_url, args=(detail_url_list,))
    for i in range(20):    # 每一个生成的url  都对应一个get_detail_html线程来处理
        html_thread = threading.Thread(
            target=get_detail_html, args=(detail_url_list,))
        html_thread.start()
    thread_detail_url1.start()  # 开始生成url
queue的所有操作都是线程安全的
依然以爬虫逻辑来写一段代码 对queue的简单使用举例:
from queue import Queue

import time
import threading


def get_detail_html(queue):
    while True:
        # 爬取网站详情页
        url = queue.get()   # queue如果为空  会阻塞在这里
        print('get detail html started: {}'.format(url))
        time.sleep(2)
        print('get detail html end')
        # 从queue的角度阻塞 主线程, 每次queue.get  后的逻辑运行完,就写一下 task_done
        thread_detail_queue.task_done()


def get_detail_url(queue):
    # 爬取网站的文章列表

    for i in range(20):  # 出来一个url  就开一个get_detail_html线程来处理
        queue.put('http://projectsedu.com/{id}'.format(id=i))
    print('get detail url started')
    time.sleep(2)
    print('get detail url end')


if __name__ == '__main__':
    thread_detail_queue = Queue(maxsize=1000)
    thread_detail_url1 = threading.Thread(
        target=get_detail_url, args=(thread_detail_queue,))
    thread_detail_url1.setDaemon(True)   # 主线程结束  子线程结束
    for i in range(20):
        html_thread = threading.Thread(
            target=get_detail_html, args=(thread_detail_queue,))
        html_thread.setDaemon(True)     # 主线程结束  子线程结束
        html_thread.start()

    thread_detail_url1.start()

    start_time = time.time()

    thread_detail_queue.join()    # 阻塞主线程  直到queue中的每一个都被get  并task_done

    print("spend {} s".format(time.time() - start_time))
4. 线程同步 -lock、RLock
在 第一节全局解释器锁 GIL 中的代码中, 最后运行出来的结果 是杂乱不确定的。 现在我们可以通过 给线程加锁的方式 使线程同步。
import threading
from threading import Lock
total = 0
lock = Lock()    # 实例化锁


# 给存在竞争关系的代码段上锁
def add():
    global total, lock
    for _ in range(1000000):
        lock.acquire()    # 获取锁
        t = total + 1
        total = t
        lock.release()    # 释放锁


def desc():
    global total, lock
    for _ in range(1000000):
        lock.acquire()    # 获取锁
        t = total - 1
        total = t
        lock.release()    # 释放锁


thread1 = threading.Thread(target=add)
thread2 = threading.Thread(target=desc)
thread1.start()
thread2.start()


thread1.join()
thread2.join()
print(total)
运行结果永远为0
什么原因导致死锁? 我们代码举例:
# 修改add函数
def add():
    global total, lock
    for _ in range(1000000):
        lock.acquire()    # 获取锁
        t = total + 1
        total = t
        # lock.release()    # 没释放锁
这样运行的程序,就会卡住。 因为别的线程锁 只有在add函数中的锁释放了, 才会在自己中进行加 锁 和放锁操作,所以锁一旦没释放, 别的线程就会卡住一直等下去。。
死锁举例(伪代码):
func1中:
acquire(a)
release(a)
acquire(b)
release(b)


func2中:
acquire(b)
release(b)
acquire(a)
release(a)
func1中 会等b处于release 才会运行, func2中 会等a处于release 才会运行。 这样func1 与func2相互循环锁住。这就是死锁
要想在同一个线程中, 一把锁 可以多次acquire, 可以使用Rlock。
(注意:release次数与acquire次数要一致)
from threading import Rlock

total = 0
lock = Rlock()

def add():
    global lock
    global total
    for i in range(10000):
    lock.acquire()
    total += 100
    lock.acquire()
    total += 1
    lock.release()
    lock.release()
效果:total+=1 不需要等 total+=100的锁release了才执行
5. 线程同步 - Condition 使用
需求: 模拟天猫精灵和小爱同学的对话
如果我们用线程锁的来实现话,会出现问题:
import threading

class XiaoAi(threading.Thread):
    def __init__(self, lock):
        super().__init__(name='小爱')
        self.lock = lock

    def run(self):
        self.lock.acquire()
        print("{}: 在".format(self.name))
        self.lock.release()

        self.lock.acquire()
        print("{}:好啊".format(self.name))
        self.lock.release()


class TianMao(threading.Thread):
    def __init__(self, lock):
        super().__init__(name='天猫精灵')
        self.lock = lock

    def run(self):
        self.lock.acquire()
        print("{}: 小爱同学".format(self.name))
        self.lock.release()

        self.lock.acquire()
        print("{}:我们来对古诗吧".format(self.name))
        self.lock.release()


if __name__ == '__main__':
    lock = threading.Lock()
    xiaoai = XiaoAi(lock)
    tianmao = TianMao(lock)

    xiaoai.start()
    tianmao.start()
得到结果:
小爱: 在
小爱:好啊
天猫精灵: 小爱同学
天猫精灵:我们来对古诗吧
但我们想要的是 小爱说一句,天猫精灵说一句。这就需要使用condition了。
主要用法 :
with Condition(或者Condition.acquire 与Condition.release成对出现)
Condition.wait()
Condition.notify()
代码:
class XiaoAi(threading.Thread):
    def __init__(self, Cond):
        super().__init__(name='小爱')
        self.Cond = Cond

    def run(self):
        with self.Cond:
            self.Cond.wait()
            print("{}: 在".format(self.name))
            self.Cond.notify()

            self.Cond.wait()
            print("{}: 好啊".format(self.name))
            self.Cond.notify()

            self.Cond.wait()
            print("{}: 居住长江尾".format(self.name))
            self.Cond.notify()


class TianMao(threading.Thread):
    def __init__(self, Cond):
        super().__init__(name='天猫精灵')
        self.Cond = Cond

    def run(self):
        with self.Cond:
            print("{}: 小爱同学".format(self.name))
            self.Cond.notify()
            self.Cond.wait()

            print("{}: 我们来对古诗吧".format(self.name))
            self.Cond.notify()
            self.Cond.wait()

            print("{}: 我在长江头".format(self.name))
            self.Cond.notify()
            self.Cond.wait()


if __name__ == '__main__':
    Cond = threading.Condition()
    xiaoai = XiaoAi(Cond)
    tianmao = TianMao(Cond)

    xiaoai.start()
    tianmao.start()
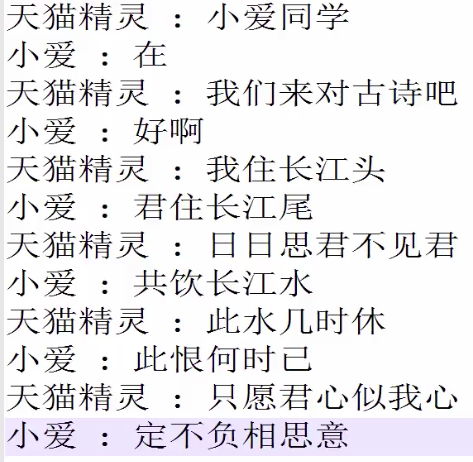
结果:
天猫精灵: 小爱同学
小爱: 在
天猫精灵: 我们来对古诗吧
小爱: 好啊
天猫精灵: 我在长江头
小爱: 居住长江尾
满足要求。
使用Condition的注意点:
先wait的 那个线程必须先 start, 先notify的线程 后start:
如果xiaoai.start()与tianmao.start()调换顺序,会发现程序卡住无法执行
原因是tianmao进行notify的时候,没有线程使用wait来接收。
6. 线程同步 - Semaphore 的使用
Semaphore 用来控制线程并发数量
使用方法(爬虫逻辑为例):
import threading
import time


class HtmlSpider(threading.Thread):
    def __init__(self, url, sem):
        super().__init__()
        self.url = url
        self.sem = sem

    def run(self):
        time.sleep(2)
        print('got html text success')
        self.sem.release()      # 线程执行完 就release


class UrlProducer(threading.Thread):
    def __init__(self, sem):
        super().__init__()
        self.sem = sem

    def run(self):
        for i in range(20):
            self.sem.acquire()    # 每个线程执行前acquire
            html_thread = HtmlSpider('https://baidu.com/{}'.format(i), sem)
            html_thread.start()


if __name__ == '__main__':
    # Semaphore可以看作是queue
    # acquire就是放queue中放线程,
    # release就是取出线程。
    # 只有在queue中的线程才会去执行,其他的线程都处于等待状态。
    sem = threading.Semaphore(3)
    url_producer = UrlProducer(sem)
    url_producer.start()
结果: 每2秒,打印三句'got html text success'
7. ThreadPoolExecutor线程池
线程池的作用:
1.主线程中获取某一个线程的状态 或者某个任务的状态
2.当一个线程完成后, 主线程能立马知道
3.futures 这个包可以让多线程和多进程编程接口一致
4.可以控制线程并发数目from concurrent.futures import ThreadPoolExecutor
import time
def get_html(times):
time.sleep(times)
print('get page {} success'.format(times))
return times
# 通过submit函数提交执行的函数到线程中, submit是立即返回对象的
executor = ThreadPoolExecutor(max_workers=2) # max_workers控制线程并发数目
task1 = executor.submit(get_html, (3)) # submit 传入要执行的线程函数以及函数参数
task2 = executor.submit(get_html, (2))
print(task1.done()) # done判断任务是否完成, 不会阻塞主线程。
time.sleep(4) # 等待4秒, 确认task1完成
print(task1.done())
print(task1.result()) # 得到线程中 return 的结果, 会阻塞主线程
结果:
False               # 第一个print(task1.done())的结果
get page 2 success  # 线程task2中的print结果
get page 3 success  # 线程task1中的print结果
True                # 第二个print(task1.done())的结果,这里表示task1执行完成
3 # print(task1.result())的结果代码举例:
executor = ThreadPoolExecutor(max_workers=1)  # max_workers改为1
task1 = executor.submit(get_html, (3))
task2 = executor.submit(get_html, (2))

task2.cancal()  # cancal取消线程任务
注意点:
*取消线程必须在线程开始前
    比如:上面代码中 使用task1.cancal()就会失败,因为task1已经开始执行。
再比如: max_workers改为2,task2.cancal()也会失败, 因task1 和 task2都开始执行了特点:
1.得到的 return值 按完成时间的先后 排列
2.对as_completed得到的返回值 再进行result方法,才能得到线程的return值
代码:
from concurrent.futures import ThreadPoolExecutor, as_completed
import time

def get_html(times):
    time.sleep(times)
    print('get page {} success'.format(times))
    return times

executor = ThreadPoolExecutor(max_workers=2)

urls = [3, 2, 1]

# 包含所有线程的列表,作为as_completed的传入参数
all_task = [executor.submit(get_html, (url)) for url in urls]

# 按时间得到future
for future in as_completed(all_task):
    data = future.result()
    print('get {} page success'.format(data))
结果:
get page 2 success    # 线程中的打印结果
get 2 page success    # 按完成的时间先后  得到结果。
get page 3 success    # 线程中的打印结果
get 3 page success
get page 1 success    # 线程中的打印结果
get 1 page success # 需要1s就可执行完成的排在最后,是因为max_workers=2特点:
1.得到的return值,按执行顺序返回,与完成的先后无关。
2.map方法直接返回 线程的 return值
代码:
from concurrent.futures import ThreadPoolExecutor, as_completed
import time

# 线程池
# 主线程中获取某一个线程的状态 或者某个任务的状态
# 当一个线程完成后, 主线程能立马知道
# futures 这个包可以让多线程和多进程编程接口一致


def get_html(times):
    time.sleep(times)
    print('get page {} success'.format(times))
    return times


executor = ThreadPoolExecutor(max_workers=2)

urls = [3, 2, 1]

# map的方法直接得到返回值data
# data的顺序与urls中的顺序一致
for data in executor.map(get_html, urls):
    print('get {} page success'.format(data))
结果:
get page 2 success  # 线程中的print
get page 3 success
get page 1 success
get 3 page success  # 线程都结束后,在按线程的先后执行顺序,print
get 2 page success
get 1 page success代码(在as_completed代码中加入wait):
from concurrent.futures import ThreadPoolExecutor, as_completed, wait, FIRST_COMPLETED, ALL_COMPLETED
import time

def get_html(times):
    time.sleep(times)
    print('get page {} success'.format(times))
    return times


executor = ThreadPoolExecutor(max_workers=2)
urls = [3, 2, 1]
all_task = [executor.submit(get_html, (url)) for url in urls]

# return_when为ALL_COMPLETED,表示等所有线程结束,主线程才会继续
# return_when为FIRST_COMPLETED,表示第一个线程结束,主线程继续
# FIRST_COMPLETED,ALL_COMPLETED得 通过from concurrent.futures import得到
# wait(all_task)  默认renturn_when=ALL_COMPLETED
wait(all_task, return_when=ALL_COMPLETED)
print('main')

for future in as_completed(all_task):
    data = future.result()
    print('get {} page success'.format(data))
结果(与as_completed的代码执行结果进行比较,可以明显看出wait的作用):
get page 2 success
get page 3 success
get page 1 success          # 子线程打印结束
main                        # 主线程打印
get 1 page success          # 开始打印子线程的return结果
get 3 page success
get 2 page success
8. 多进程与多线程的对比(ProcessPoolExecutor的使用)
对比:
1.对于耗cpu的操作, 多进程编程,
2.对io操作来说, 使用多线程编程。
3.进程切换 代价比较大, 能多线程搞定的不要用多进程使用线程计算斐波那契:
from concurrent.futures import ThreadPoolExecutor, as_completed
from concurrent.futures import ProcessPoolExecutor   # 进程池
import time

# 斐波那契函数
def fib(n):
    if n <= 2:
        return 1
    return fib(n-1) + fib(n-2)


if __name__ == '__main__':
    # 翻看ThreadPoolExecutor的源码__enter__  和 __exit__ ,__exit__中对线程池进行了shutdown关闭操作
    # 以后 尽量都用 with语句来实例化 进程池和线程池
    with ThreadPoolExecutor(3) as executor:
        all_task = [executor.submit(fib, (num)) for num in range(25, 35)]
        start_time = time.time()

        for future in as_completed(all_task):
            data = future.result()
            print('exe result {}'.format(data))

        print('last time is:{}'.format(time.time()-start_time))
结果花了3秒多:
exe result 75025
exe result 121393
exe result 196418
exe result 317811
exe result 514229
exe result 832040
exe result 1346269
exe result 2178309
exe result 3524578
exe result 5702887
last time is:3.2731590270996094
改为用进程,进程池ProcessPoolExecutor与线程池用法一样。
所以代码只需稍作修改, ThreadPoolExecutor(3)改为ProcessPoolExecutor(3):
if __name__ == '__main__':
    with ProcessPoolExecutor(3) as executor:
        all_task = [executor.submit(fib, (num)) for num in range(25, 35)]
        start_time = time.time()

        for future in as_completed(all_task):
            data = future.result()
            print('exe result {}'.format(data))

        print('last time is:{}'.format(time.time()-start_time))
结果比用线程快:
exe result 75025
exe result 121393
exe result 196418
exe result 317811
exe result 514229
exe result 832040
exe result 1346269
exe result 2178309
exe result 3524578
exe result 5702887
last time is:2.1441421508789062def random_sleep(n):
time.sleep(n)
return n
if __name__ == '__main__':
with ThreadPoolExecutor(100) as executor:
all_task = [executor.submit(random_sleep, (num))
for num in [1]*400]
start_time = time.time()
for future in as_completed(all_task):
data = future.result()
# print('exe result {}'.format(data))
print('last time is:{}'.format(time.time()-start_time))
耗时:
last time is:4.01451301574707上面代码中 ThreadPoolExecutor 改为 ProcessPoolExecutor
耗时:
last time is:4.04513192176818859. multiprocessing 多进程编程
接下来主要的讲解是关于使用multiprocessing模块进行多进程编程编程的方法。但是有一点必须指出,多数情况下, 我们更推荐使用from concurrent.futures import ProcessPoolExecutor来进行多进程编程, 因为它封装得很方便易于使用, 而multiprocessing更加底层,非常灵活。
1. 先来看个例子来引出多进程:
import os
import time
# fork 只能在linux/unix中运行,会返回两次.
# fork 作用拷贝主进程,创建一个子进程。子进程会运行一遍 fork语句后面的代码
pid = os.fork()
print('cannon')
if pid == 0:
    print('子进程:{}    父进程:{}'.format(os.getppid(), os.getppid()))
else:
    print('我是父进程:{}'.format(pid))

time.sleep(2)
结果:
cannon
我是父进程:19230
cannon
子进程:19229    父进程:19229
从结果可以看出, os.fork()后面的内容执行了两次, 一次是主进程执行的,一次是子进程执行的, 非常神奇。
2. multiprocessing创建一个子进程
以代码说明用法:
import multiprocessing


def get_html(n):
    time.sleep(n)
    return n


if __name__ == '__main__':   # 这一步如果在windows中,不可少
    progress = multiprocessing.Process(target=get_html, args=(2,))
    print(progress.pid)  # 比线程多的 一个属性pid  不过要在进程start之后才会有
    progress.start()
    print(progress.pid)  # 比线程多的 一个属性pid  不过要在进程start之后才会有
    progress.join()
    print('main progress end')
结果:
None
22515
main progress end
我们也可以创建类,继承multiprocessing.Process, 然后改写run函数来创建一个子进程。 就和线程中类继承Threading.Thread一样。
3. multiprocessing.Pool创建进程池
方法一:
def get_html(n):
    time.sleep(n)
    return n


if __name__ == '__main__':   # 这一步如果在windows中,不可少
    # 参数传入想要创建的子进程数,默认为os.cpu_count()电脑cpu数目
    pool = multiprocessing.Pool(multiprocessing.cpu_count())
    result = pool.apply_async(get_html, args=(3,))
    pool.close()   # close不能漏, 进程的join前 必须先close,否则会报错
    pool.join()
方法二:
if __name__ == '__main__':   # 这一步如果在windows中,不可少
    pool = multiprocessing.Pool(multiprocessing.cpu_count())

    # imap
    for result in pool.imap(get_html, [1, 5, 3]):
        print('{} sleep success'.format(result))
结果(可以看到按进程执行的先后顺序返回):
1 sleep success
5 sleep success
3 sleep success
imap是把子进程的return值按进程执行先后 返回, 如果想按子进程完成先后返回,可以使用imap_unordered
if __name__ == '__main__':   # 这一步如果在windows中,不可少
    pool = multiprocessing.Pool(multiprocessing.cpu_count())

    # imap_unordered
    for result in pool.imap_unordered(get_html, [1, 5, 3]):
        print('{} sleep success'.format(result))
结果(可以看到是按进程结束的先后返回result):
1 sleep success
3 sleep success
5 sleep success
10. 进程间的通信 - Queue、Pipe、Manager
1. 进程中使用Queue 需要from multiprocessing import Queue 而不是from queue import,用法与在线程中用法一致
from multiprocessing import Process, Queue   # Queue不再是从queue导入了
import time


def producer(queue):
    queue.put('a')
    time.sleep(2)


def consumer(queue):
    time.sleep(2)
    data = queue.get()
    print(data)


if __name__ == '__main__':
    queue = Queue(10)
    my_producer = Process(target=producer, args=(queue,))
    my_consumer = Process(target=consumer, args=(queue,))
    my_producer.start()
    my_consumer.start()
    my_consumer.join()
    my_producer.join()
2. 共享全局变量 只能在多线程中中使用,在多进程中中无效
from multiprocessing import Process
import time

a = 1


def producer():
    global a
    a += 100
    time.sleep(2)


def consumer():
    global a
    time.sleep(2)

    print(a)


if __name__ == '__main__':
    my_producer = Process(target=producer)
    my_consumer = Process(target=consumer)
    my_producer.start()
    my_consumer.start()
    my_consumer.join()
    my_producer.join()
结果:1 (说明a+=100没有作用)
3. multiprocessing中的Queue无法在pool中使用,需要使用Manager中的Queue代替。(线程中使用queue的Queue就行)
from multiprocessing import Process, Pool, Manager
import time


def producer(queue):
    queue.put('a')
    time.sleep(2)


def consumer(queue):
    time.sleep(2)
    data = queue.get()
    print(data)


if __name__ == '__main__':
    queue = Manager().Queue(10)   # pool中使用Manager().Queue
    pool = Pool(2)

    pool.apply_async(producer, args=(queue,))
    pool.apply_async(consumer, args=(queue,))

    pool.close()
    pool.join()
结果:a (没有问题)
4. Pipe(简化版的Queue)
特点(只有两个进程通信优先使用pipe):
1. pipe只能作用用于两个进程
2. 性能高于Queue
用法:
from multiprocessing import Process, Pipe
import time


def producer(pipe):
    pipe.send('cannon')


def consumer(pipe):
    print(pipe.recv())


if __name__ == '__main__':
    # pipe只能作用于两个进程间
    recevie_pipe, send_pipe = Pipe()
    my_producer = Process(target=producer, args=(send_pipe, ))
    my_consumer = Process(target=consumer, args=(recevie_pipe, ))

    my_producer.start()
    my_consumer.start()

    my_consumer.join()
    my_producer.join()
结果: cannon (没问题)
5. 通过Manager实现进程间共享变量
之前说过进程间不能共享全局变量,但通过Manager可以实现这一点 以Manager().dict为例,实现共享字典变量
from multiprocessing import Process, Manager

def add_data(p_dict, key, value):
    p_dict[key] = value


if __name__ == '__main__':
    progress_dict = Manager().dict()    # 字典类型

    first_progress = Process(target=add_data, args=(
        progress_dict, 'cannon1', 'value1'))
    second_progress = Process(target=add_data, args=(
        progress_dict, 'cannon2', 'value2'))

    first_progress.start()
    second_progress.start()
    first_progress.join()
    second_progress.join()

    print(progress_dict)
结果(实现了进程间共享变量):
{'cannon1': 'value1', 'cannon2': 'value2'}