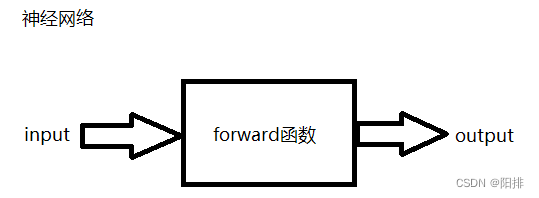
1 神经网络框架
1.1 Module类的使用
NN (Neural network): 神经网络
Containers: 容器
Convolution Layers: 卷积层
Pooling Layers: 池化层
Padding Layers: 填充层
Non-linear Activations (weighted sum, nonlinearity):非线性激活
Non-linear Activations (other):非线性激活
Normalization Layers:归一化层
Recurrent Layers:递归层
Transformer Layers:变换层
Linear Layers:线性层
Dropout Layers:舍弃层
Loss Functions:损失函数
…
Containers 包括:
(1)Module:所有神经网络的基类
https://pytorch.org/docs/stable/generated/torch.nn.Module.html#torch.nn.Module
Class torch.nn.Module(*args, **kwargs)
import torch.nn as nn
import torch.nn.functional as F

class Model(nn.Module):
    def __init__(self):
        super().__init__()
        self.conv1 = nn.Conv2d(1, 20, 5)
        self.conv2 = nn.Conv2d(20, 20, 5)

    def forward(self, inputX):
        x = F.relu(self.conv1(inputX))
        return F.relu(self.conv2(inputX))
forward函数内:relu()为激活函数,conv为卷积函数。输入inputX-> 卷积-> 非线性处理(relu)-> 卷积 ->非线性(relu)。
python代码:
from torch import nn
import torch


class MyNN(nn.Module):
    def __init__(self):
        super().__init__()

    def forward(self, inputX):
        outputX = inputX + 1
        return outputX

mynn = MyNN()
x = torch.tensor(1.0)
output = mynn(x)
print(output)
输出结果:
tensor(2.)
2 卷积层 Convolution Layers
2.1 二维卷积计算
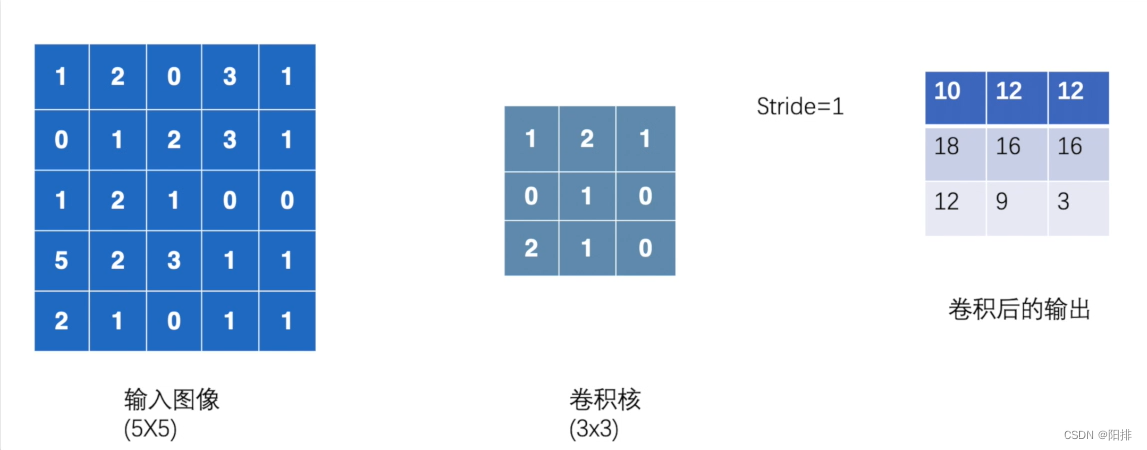
二维卷积 conv2d()
输入和输出的矩阵类型都需要(N, C_{in}, H_{in}, W_{in})
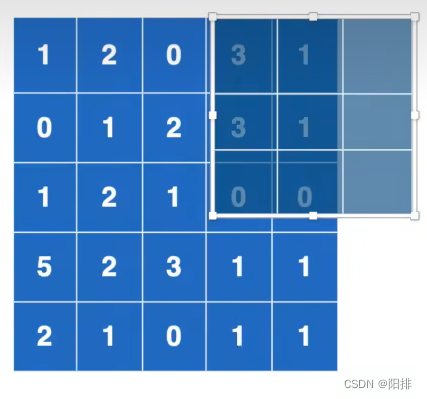
输入图像1024x800,卷积核3x3,每次9个元素相乘后相加,不断向右移动并计算,移动到最右侧之后;然后向下移动并计算,移动到最下侧之后,完成卷积计算。
import torch
import torch.nn.functional as F

input = torch.tensor([[1, 2, 0, 3, 1],
                      [0, 1, 2, 3, 1],
                      [1, 2, 1, 0, 0],
                      [5, 2, 3, 1, 1],
                      [2, 1, 0, 1, 1]])
kernel = torch.tensor([[1, 2, 1],
                       [0, 1, 0],
                       [2, 1, 0]])
input = torch.reshape(input, (1, 1, 5, 5))
kernel = torch.reshape(kernel, (1, 1, 3, 3))

print("input:")
print(input)
print("kernel:")
print(kernel)

output = F.conv2d(input, kernel, stride=1)
print("output:")
print(output)
输出结果:
input:
tensor([[[[1, 2, 0, 3, 1],
          [0, 1, 2, 3, 1],
          [1, 2, 1, 0, 0],
          [5, 2, 3, 1, 1],
          [2, 1, 0, 1, 1]]]])
kernel:
tensor([[[[1, 2, 1],
          [0, 1, 0],
          [2, 1, 0]]]])
output:
tensor([[[[10, 12, 12],
          [18, 16, 16],
          [13,  9,  3]]]])
如果将步进stride修改为2。
output2 = F.conv2d(input, kernel, stride=2)
print("output2:")
print(output2)
输出结果为:
output2:
tensor([[[[10, 12],
          [13,  3]]]])
padding填充,将原图像的四周填充一圈0,这样的话,卷积计算的结果维度就会更大。
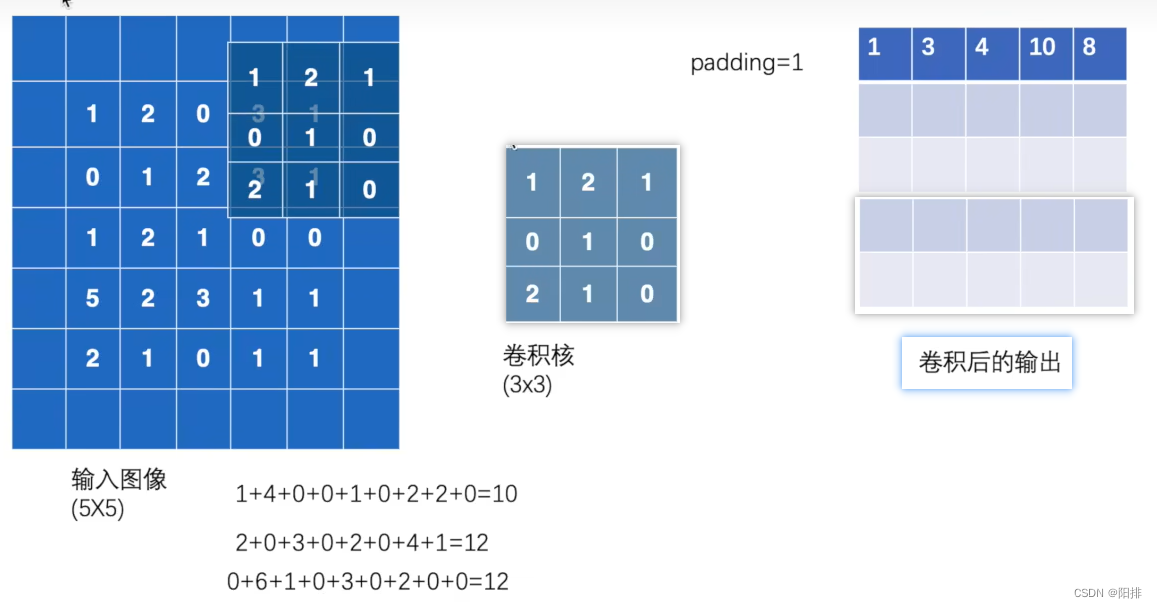
output3 = F.conv2d(input, kernel, stride=1, padding=1)
print("output3:")
print(output3)
输出的结果:
tensor([[[[ 1,  3,  4, 10,  8],
          [ 5, 10, 12, 12,  6],
          [ 7, 18, 16, 16,  8],
          [11, 13,  9,  3,  4],
          [14, 13,  9,  7,  4]]]])
2.2 图像卷积操作
学习链接:
https://pytorch.org/docs/stable/generated/torch.nn.Conv2d.html#torch.nn.Conv2d
CLASS torch.nn.Conv2d(in_channels, out_channels, kernel_size, stride=1, padding=0, dilation=1, groups=1, bias=True, padding_mode=‘zeros’, device=None, dtype=None)
- in_channels (int) – 输入图像通道数
- out_channels (int) – 输出图像通道数
- kernel_size (int or tuple) – 卷积核大小
- stride (int or tuple, optional) – 卷积步长(默认为1)。
- padding (int, tuple or str, optional) – 添加到输入图像四周的边长(默认为1)
- padding_mode (str, optional) – 边长类型:‘zeros’, ‘reflect’, ‘replicate’ or ‘circular’。默认为: ‘zeros’
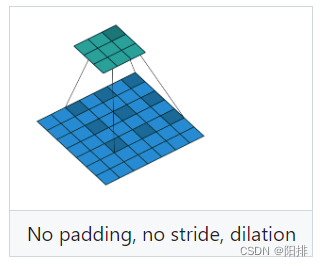
- dilation (int or tuple, optional) – 卷积核之间的间距(默认为1),空洞卷积。
*groups (int, optional) – 从输入通道到输出通道的阻塞连接数(默认为1)。 - bias (bool, optional) – 如果为 True, 在输出中添加一个可学习的偏差(默认为True)。
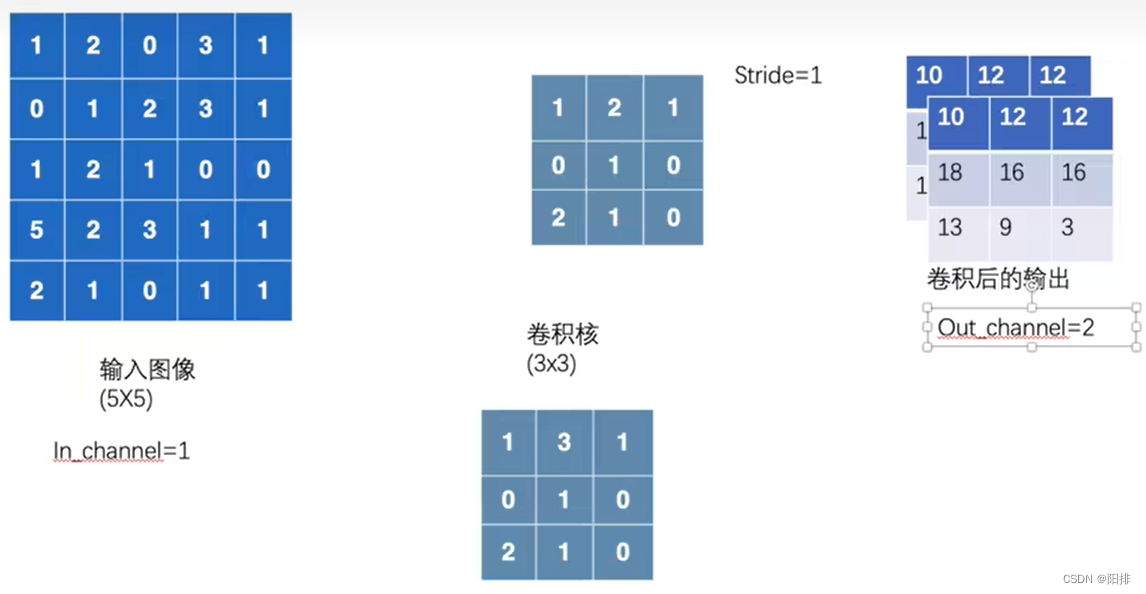
如果in_channel=1,out_channel=2,则会使用两个卷积核对输入图像进行计算,输出两个通道的数据:
卷积公式:

二维卷积动图:
https://github.com/vdumoulin/conv_arithmetic/blob/master/README.md
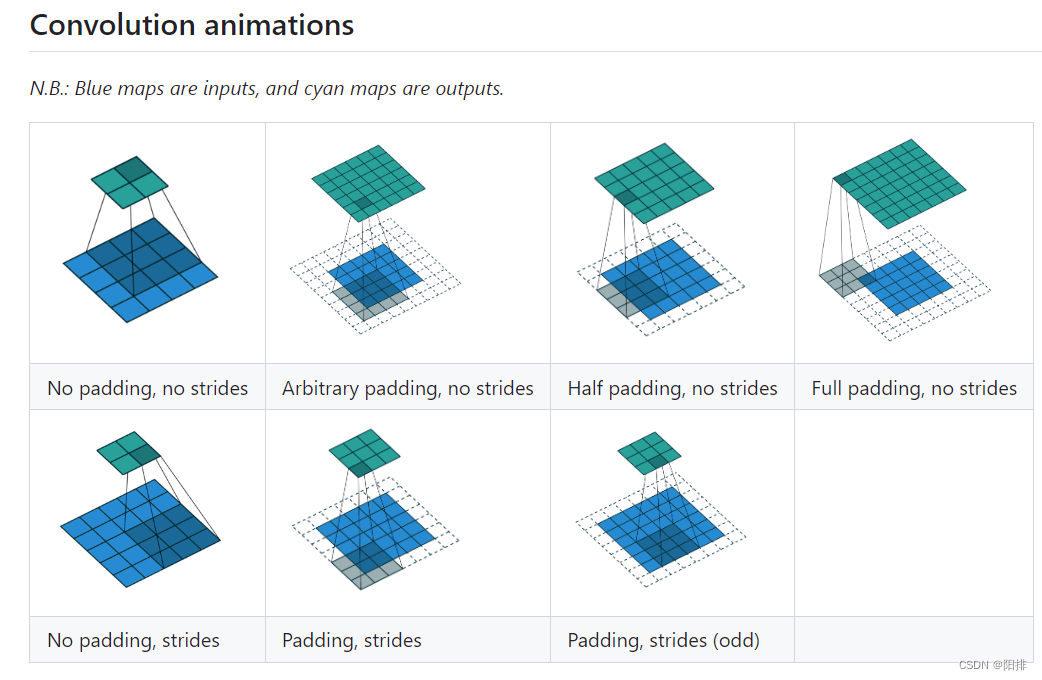
当dilation=2时,卷积的方法:
图像二维卷积python代码:
import torch
import torchvision
from torch import nn
from torch.nn import Conv2d
from torch.utils.data import DataLoader
from torch.utils.tensorboard import SummaryWriter
dataset = torchvision.datasets.CIFAR10(root="G:\\Anaconda\\pycharm_pytorch\\learning_project\\dataset_CIFAR10",
train=False,
transform=torchvision.transforms.ToTensor(),
download=False)
dataloader = DataLoader(dataset, batch_size=64)
class MyNN(nn.Module):
def __init__(self):
super(MyNN, self).__init__()
self.conv1 = Conv2d(in_channels=3, out_channels=6, kernel_size=3, stride=1, padding=0)
def forward(self, x):
x = self.conv1(x)
return x
myNN = MyNN()
print(myNN)
writer = SummaryWriter("G:/Anaconda/pycharm_pytorch/learning_project/logs")
step = 0
for data in dataloader:
imgs, targets = data
output = myNN(imgs)
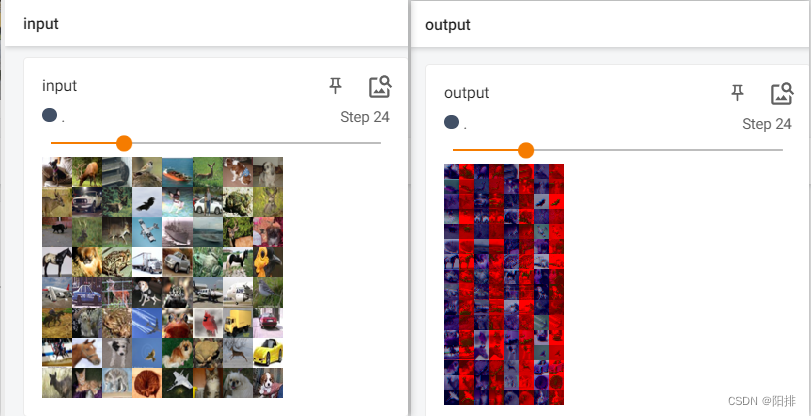
print(imgs.shape) # torch.Size([64, 3, 32, 32])
print(output.shape) # torch.Size([64, 6, 30, 30])
writer.add_images("input", imgs, step)
# torch.Size([64, 6, 30, 30]) -> # torch.Size([xxx, 3, 30, 30])
output = torch.reshape(output, (-1, 3, 30, 30))
writer.add_images("output", output, step)
step = step + 1
writer.close()
代码运行后,终端输入tensorboard --logdir=logs,打开tensorboard。
能够看到output图片为卷积后的部分通道。
3 池化层 Pooling Layers
学习链接:
https://pytorch.org/docs/stable/nn.html#pooling-layers
池化层的作用:(1)下采样(downsampling),降低数据维度,减少网络前向运算消耗的内存大小;(2)保持输入特征,扩大网络模型的感知野;(3)防止过拟合或欠拟合。
3.1 最大池化MaxPool2d
在由几个输入平面组成的输入信号上应用2D最大池化。
CLASS torch.nn.MaxPool2d(kernel_size, stride=None, padding=0, dilation=1, return_indices=False, ceil_mode=False)
- kernel_size (Union[int, Tuple[int, int]]) – 池化窗口的最大尺寸。
- stride (Union[int, Tuple[int, int]]) – 池化窗口的步长(默认值为kernel_size)。
- padding (Union[int, Tuple[int, int]]) – 两边隐式地添加负无穷内边距。
- dilation (Union[int, Tuple[int, int]]) – 一个参数,控制窗口中元素的步长。
- return_indices (bool) – 如果为True,将返回最大索引以及输出。在torch.nn.MaxUnpool2d之后有用。
- ceil_mode (bool) – 当为True时,将使用ceil而不是floor来计算输出形状。
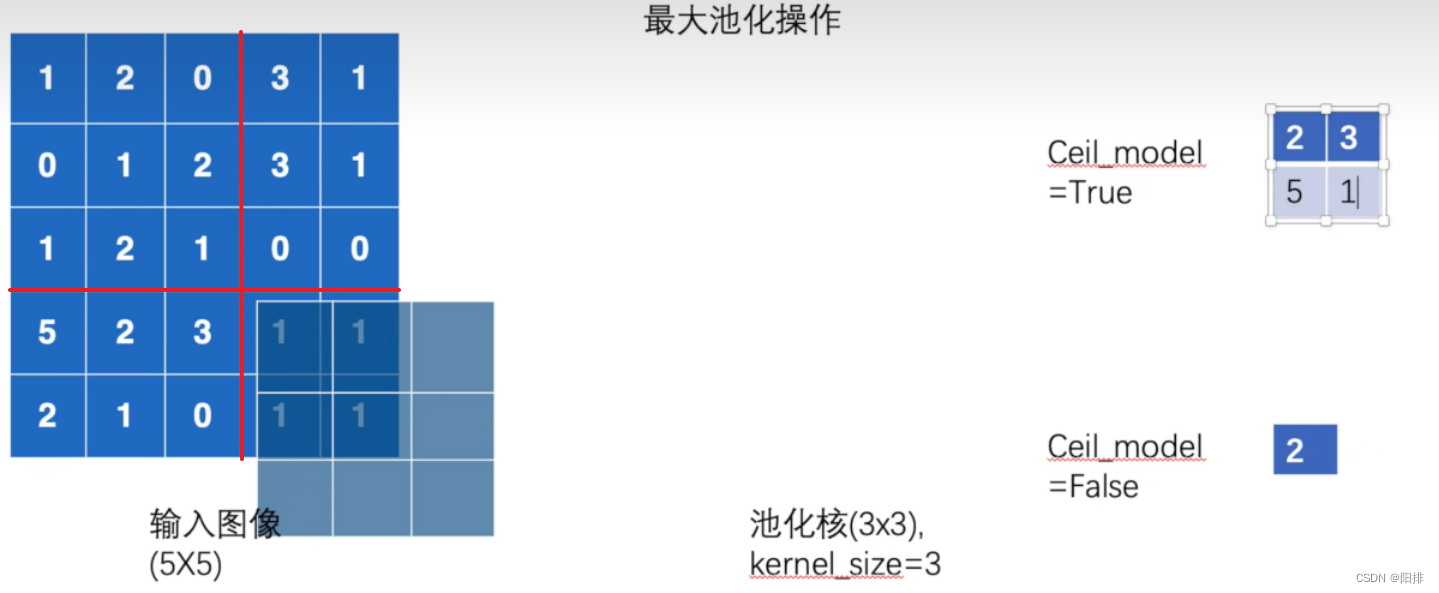
ceil表示ceiling模式(天花板),floor表示floor模式(地板)。如果为Ceil表示取整数时,向上取整;floor表示取整数时,向下取整。

在二维卷积中表示,当出现以下的情况,ceil_mode为True时,需要保留剩下的6个数的卷积;如果ceil_mode为False时,不需要保留此次卷积。
池化操作与卷积操作不同,池化的补偿就是池化核的大小,池化操作得到的输出结果如下图右侧所示,ceil_mode的True和False得到的结果大小不同。
最大池化python代码:
import torch
from torch import nn
from torch.nn import MaxPool2d

input = torch.tensor([[1, 2, 0, 3, 1],
                     [0, 1, 2, 3, 1],
                     [1, 2, 1, 0, 0],
                     [5, 2, 3, 1, 1],
                     [2, 1, 0, 1, 1]], dtype=torch.float32)

input = torch.reshape(input, (-1, 1, 5, 5))
print(input)

class MYNN(nn.Module):
    def __init__(self):
        super(MYNN,self).__init__()
        self.maxpool1 = MaxPool2d(kernel_size=3,ceil_mode=True)
        self.maxpool2 = MaxPool2d(kernel_size=3, ceil_mode=False)

    def forward(self, input):
        output1 = self.maxpool1(input)
        output2 = self.maxpool2(input)
        return output1, output2

mynn = MYNN()
output1, output2 = mynn(input)
print(output1)
print(output2)
运行脚本得到输出结果:
tensor([[[[1., 2., 0., 3., 1.],
          [0., 1., 2., 3., 1.],
          [1., 2., 1., 0., 0.],
          [5., 2., 3., 1., 1.],
          [2., 1., 0., 1., 1.]]]])
tensor([[[[2., 3.],
          [5., 1.]]]])
tensor([[[[2.]]]])
3.2 图像池化操作
python代码:
import torch
import torchvision
from torch import nn
from torch.nn import MaxPool2d
from torch.utils.data import DataLoader
from torch.utils.tensorboard import SummaryWriter

dataset = torchvision.datasets.CIFAR10(root="G:\\Anaconda\\pycharm_pytorch\\learning_project\\dataset_CIFAR10",
                                       train=False,
                                       transform=torchvision.transforms.ToTensor(),
                                       download=False)
dataloader = DataLoader(dataset, batch_size=64)


class MYNN(nn.Module):
    def __init__(self):
        super(MYNN,self).__init__()
        self.maxpool = MaxPool2d(kernel_size=3, ceil_mode=False)

    def forward(self, input):
        output = self.maxpool(input)
        return output


mynn = MYNN()
writer = SummaryWriter("G:/Anaconda/pycharm_pytorch/learning_project/logs_maxpool")
step = 0
for data in dataloader:
    imgs, targets = data
    writer.add_images("input", imgs, step)
    # torch.Size([64, 6, 30, 30]) -> # torch.Size([xxx, 3, 30, 30])
    output = mynn(imgs)
    writer.add_images("output", output, step)
    step = step + 1

writer.close()
代码运行后,终端输入tensorboard --logdir=logs_maxpool,打开tensorboard。能够看到output图片为池化操作后的图像清晰度降低。

4 填充层 Padding Layers
学习链接:
https://pytorch.org/docs/stable/nn.html#padding-layers
主要使用的函数:
| 函数名 | 说明 |
|---|---|
| nn.ZeroPad2d | 用零填充输入张量(Tensor)边界。 |
| nn.ConstantPad2d | 用常数填充输入张量(Tensor)边界。 |
在其他的层内也能实现,因此可以不用这一层。
5 非线性激活 Non-linear Activations (weighted sum, nonlinearity)
给神经网络引入非线性特征。
| 函数名 | 说明 |
|---|---|
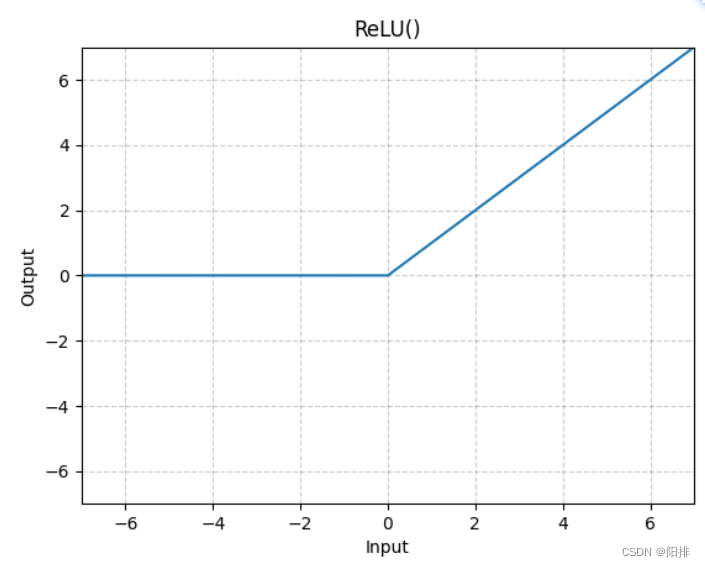
| nn.ReLU | 按元素应用修正线性单位函数。 |
| nn.Sigmoid | 应用针对元素的函数。 |
5.1 激活函数
5.1.1 ReLU
按元素应用修正线性单位函数:

CLASS torch.nn.ReLU(inplace=False)
参数:
- inplace (bool) – 是否可以选择现场进行操作(默认值False)。
Shape: - Input: (∗), ∗指的是任意数量的维度。
- Output: (∗), 与输入相同的shape。
5.1.2 Sigmod
应用元素函数:
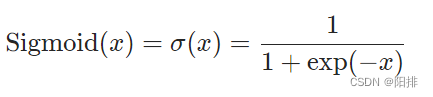
CLASS torch.nn.Sigmoid(*args, **kwargs)
Shape:
- Input: (∗),∗ 是指任意数量的维度。
- Output: (∗),与输入相同的shape。
5.2 数字代入激活函数测试
python代码:
import torch
from torch import nn
from torch.nn import ReLU
from torch.nn import Sigmoid

input = torch.tensor([[1, -0.5],
                      [-1, 3]])

output = torch.reshape(input, (-1, 1, 2, 2))
print(output)

class MYNN(nn.Module):
    def __init__(self):
        super(MYNN, self).__init__()
        self.relu1 = ReLU()
        self.sigmod1 = Sigmoid()

    def forward(self, input):
        output = self.relu1(input)
        output2 = self.sigmod1(input)
        return output, output2

mynn = MYNN()
output, output2 = mynn(input)
print(output)
print(output2)
运行结果:
tensor([[[[ 1.0000, -0.5000],
          [-1.0000,  3.0000]]]])
tensor([[1., 0.],
        [0., 3.]])
tensor([[0.7311, 0.3775],
        [0.2689, 0.9526]])
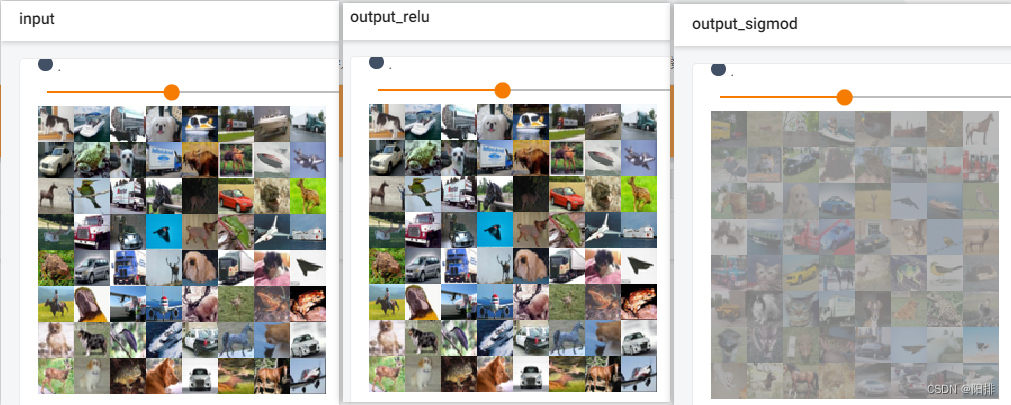
5.3 图像非线性激活操作
图像非线性激活操作的python代码:
# 使用数字显示relu和sigmod非线性激活函数的作用
import torch
import torchvision
from torch import nn
from torch.nn import ReLU
from torch.nn import Sigmoid
from torch.utils.data import DataLoader
from torch.utils.tensorboard import SummaryWriter

dataset = torchvision.datasets.CIFAR10(root="G:\\Anaconda\\pycharm_pytorch\\learning_project\\dataset_CIFAR10",
                                       train=False,
                                       transform=torchvision.transforms.ToTensor(),
                                       download=False)
dataloader = DataLoader(dataset, batch_size=64)

class MYNN(nn.Module):
    def __init__(self):
        super(MYNN, self).__init__()
        self.relu1 = ReLU()
        self.sigmod1 = Sigmoid()

    def forward(self, input):
        output_relu = self.relu1(input)
        output_sigmod = self.sigmod1(input)
        return output_relu, output_sigmod

mynn = MYNN()
writer = SummaryWriter("G:/Anaconda/pycharm_pytorch/learning_project/logs_relu")
step = 0
for data in dataloader:
    imgs, targets = data
    writer.add_images("input", imgs, step)
    output_relu, output_sigmod = mynn(imgs)
    writer.add_images("output_relu", output_relu, step)
    writer.add_images("output_sigmod", output_sigmod, step)
    step += 1
    print(step)

writer.close()
print("Done")
代码运行后,终端输入tensorboard --logdir=logs_relu,打开tensorboard。能够看到output图片为池化操作后的图像清晰度降低。
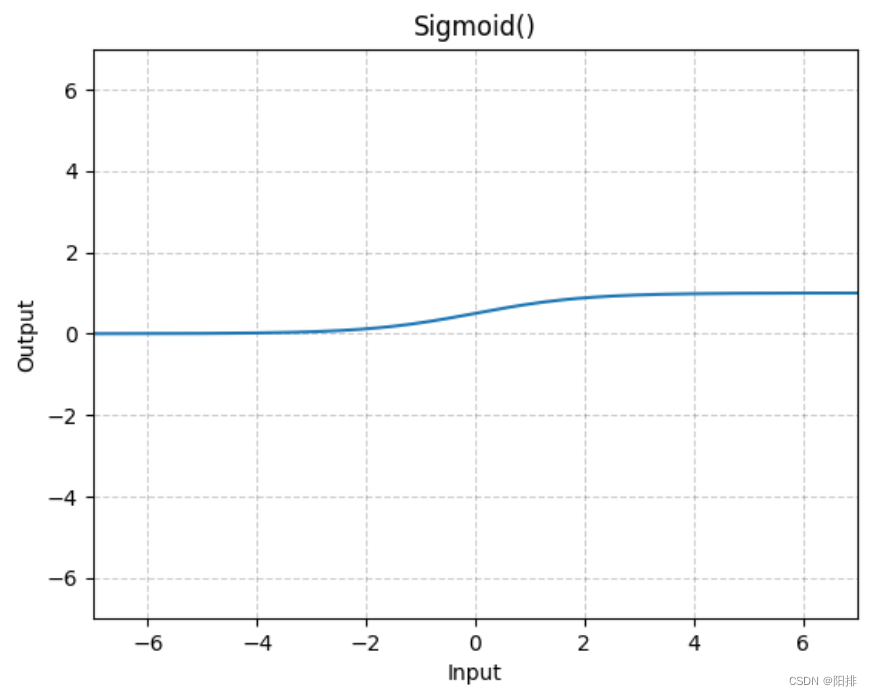
因为relu操作为将赋值修正为0,但图像都是0-255的值,所以input和output_relu没有区别;但是sigmod操作是将图像0-255的值按一定的指数比例修正,因此会产生灰度变化。
6 正则化层 Normalization Layers
学习链接:
https://pytorch.org/docs/stable/nn.html#normalization-layers
正则化,也称归一化,这一步能够加快神经网络学习速度。