Autograd 虽然提供了自动微分,但是如果用 autograd 自行搭建神经网络,也是比较麻烦的;
pytorch 提供了更高级的 API,即 torch.nn 模块,该模块构建于 Autograd 上,其中 nn.Module 是最重要的类,如下
class Module(object):
    r"""Base class for all neural network modules.
    Your models should also subclass this class.

        import torch.nn as nn
        import torch.nn.functional as F

        class Model(nn.Module):
            def __init__(self):
                super(Model, self).__init__()
                self.conv1 = nn.Conv2d(1, 20, 5)
                self.conv2 = nn.Conv2d(20, 20, 5)

            def forward(self, x):
                x = F.relu(self.conv1(x))
                return F.relu(self.conv2(x))
    """

    dump_patches = False
    _version = 1
    def __init__(self):
        torch._C._log_api_usage_once("python.nn_module")def forward(self, *input):
        raise NotImplementedError
    def register_buffer(self, name, tensor):def register_parameter(self, name, param):
从中可以看到构建网络的大致步骤
搭建网络流程
在 PyTorch 中搭建神经网络的基本步骤如下:
1. 网络需要继承自 nn.Module
2. 在构造函数中声明可学习参数
// 不需要学习的参数可声明,可不声明
3. 重写 forward 方法,记录前向计算过程
// 只要在 nn.Module 子类中构造了 forward 方法,backward 方法就会基于 Autograd 自动实现
以 LeNet 为例

代码如下
import torch as t
import torch.nn as nn
import torch.nn.functional as F


class Net(nn.Module):
    ### 必须1:构建网络需要继承 nn.Module
    def __init__(self):
        super(Net, self).__init__()

        ### 必须2:需要学习的参数必须放在 构造函数 中
        # 不需要学习的参数可放可不放
        ###输入 32x32 单通道
        self.conv1 = nn.Conv2d(1, 6, 5)         ###卷积层1: 1,输入通道数, 6,输出通道数,5,卷积核 size 5*5    输出 28x28 6通道
                                                ###后面接了2x2的池化,步长 2                                     输出 14x14 6通道
        self.conv2 = nn.Conv2d(6, 16, 5)        ###卷积层2:                                                    输出 10x10 16通道
                                                ###后面接了2x2的池化,步长 2                                     输出 5x5 16通道

        ### 全连接层  wx+b
        self.fc1 = nn.Linear(16*5*5, 120)       ###第一层全连接  120 自定义
        self.fc2 = nn.Linear(120, 84)           ### 第二层     84 自定义
        self.fc3 = nn.Linear(84, 10)            ### 第三层     10 个分类

    def forward(self, x):
        ### 必须3:构造 forward 前向计算函数
        ### 只要在 nn.Module 的子类中定义了 forward,backward 函数就会被自动实现(利用 Autograd)
        ### 卷积--激活--池化
        x = F.max_pool2d(F.relu(self.conv1(x)), (2, 2)) ###池化层1:
        x = F.max_pool2d(F.relu(self.conv2(x)), 2)
        print(x.size()[0])      # 1
        x = x.view(x.size()[0], -1)     # -1 表示自适应,拉伸成 1 维
        x = F.relu(self.fc1(x))         # relu(wx+b)
        x = F.relu(self.fc2(x))
        x = self.fc3(x)
        return x

net = Net()
print(net)      ### 打印可学习参数名称列表
# Net(
#   (conv1): Conv2d(1, 6, kernel_size=(5, 5), stride=(1, 1))
#   (conv2): Conv2d(6, 16, kernel_size=(5, 5), stride=(1, 1))
#   (fc1): Linear(in_features=400, out_features=120, bias=True)
#   (fc2): Linear(in_features=120, out_features=84, bias=True)
#   (fc3): Linear(in_features=84, out_features=10, bias=True)
# )
网络的可学习参数通过 net.parameters() 获取,也可以通过 net.named_parameters 同时获取参数名称和参数值
params = list(net.parameters())     ### 可学习参数
# print(params)
print(net.named_parameters)         ### 可学习参数及其名称
for name, parameter in net.named_parameters():
    print(name, parameter.size())
API
nn 提供了构建神经网络的各种方法
loss function
均方差 nn.MSELoss
用法大致如下,其他函数也类似
predict = net(input)
criterion = nn.MSELoss()
loss = criterion(predict, label)
交叉熵 nn.CrossEntropyLoss
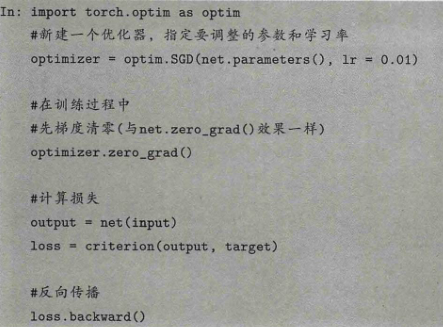
优化器
torch.optim 中实现了大多数的优化方法,如 SGD,Adam,RMSProp
用法如下
![]()
参考资料: