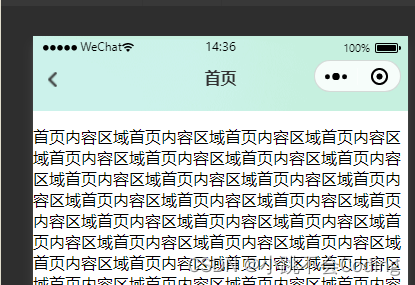
一、实现效果:
二、代码实现:
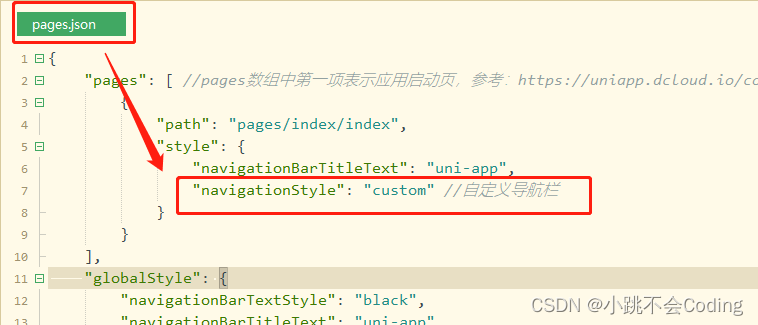
1.在pages.json文件中,单页面定义导航栏,添加以下代码:
"navigationStyle": "custom" //自定义导航栏
如图所示:
2.在components文件夹下,封装一个组件navBar.vue:
<template>
	<view class="prohibition">
		<view class="demo" :style="[{background},{color},{height},{paddingTop}]">
			<!-- 左侧 -->
			<view class="returnback" @click="returnBack">
				<image src="../static/images/[email protected]" mode=""></image>
			</view>
			<!-- 中间标题文字 -->
			<view class="title">
				{

    {

    title}}
			</view>
		</view>
	</view>
</template>

<script>
	export default {


		name: 'navbarny',
		data() {


			return {


				height: 0,
				paddingTop: 0,
				index: '',
			}
		},
		// props: ["title", "back"],
		props: {


			//接收的值
			// topArray: [],
			// index: '',

			title: {

     // 标题文字(默认为空)
				type: String,
				default: ''
			},
			color: {

     // 标题和返回按钮颜色(默认白色)
				type: String,
				default: '#333333'
			},
			//建议使用background  因为使用backgroundColor,会导致不识别渐变颜色
			background: {

     // 背景颜色(不传值默认透明)
				type: String,
				default: 'transparent'
			},
			back: {

     // 是否显示返回按钮(不传值默认不显示)
				type: Boolean,
				default: false
			},
		},
		mounted(){


			// this.cityname = uni.getStorageSync('citynames')
			// console.log('shi',this.cityname)
		},
		created() {


			const demo = uni.getMenuButtonBoundingClientRect()
			this.height = demo.height + "px"
			this.paddingTop = demo.top + "px"
		},
		methods: {


			bindPickerChange: function(e) {


				console.log('picker发送选择改变,携带值为', e.detail.value)
				this.index = e.detail.value
			},
			areaFun(){


				uni.navigateTo({


					url:'/pages/SelectArea/area'
				})
			},
			returnBack(){


				uni.navigateBack()
			}
		}
	}
</script>
<style lang="less">
	.demo {


		position: relative;
		//注意,建议使用相对定位,因为固定定位会脱离文档流,然后你还要去设置marginTop值
		// position: fixed;
		width: 100%;
		display: flex;
		align-items: center;
		justify-content: center;
		z-index: 100;
		padding-bottom: 10rpx;
		height: 70rpx !important;

		.returnback{


			position: absolute;
			bottom: 10rpx;
			left: 30rpx;
			height:60rpx;
			transform: rotate(-180deg);
			display: flex;
			align-items: center;

			image{


				width: 19rpx;
				height: 31rpx;
			}
		}

		.left {


			position: absolute;
			max-width: 280rpx;
			height: 60rpx;
			line-height: 44rpx;
			top: 0;
			bottom: 0;
			left: 70rpx;
			margin: auto;
			font-size: 24rpx;
			font-family: Microsoft YaHei UI;
			font-weight: 400;
			color: #fff;
			display: flex;
			align-items: center;
			image {


				width: 24rpx;
				height: 24rpx;
				margin-left: 7rpx;
			}
			.uni-input {


				max-width: 220rpx;
				overflow: hidden;
				white-space: nowrap;
				text-overflow: ellipsis;
			}
		}
		.title {


			font-size: 32rpx;
			font-weight: bold;
			font-stretch: normal;
			letter-spacing: r1px;
			color: #33333;
		}
	}
</style>
3.在页面中引用使用组件:(注:写在页面的最上面)
<navbar class="header" :title="title"></navbar>

<script>
	import navbar from '@/components/navBar.vue'
	export default {


		components: {


			navbar
		},
		data() {


			return {


				title: '首页',
			}
		},
	}
</script>

<style>
	.header{


		width: 100%;
		height: auto;
		position: fixed;
		top: 0;
		left: 0;
		height: 150rpx;
		background-image: url('../../static/images/bg@2x_01.png');
		background-size: 100% 100%;
		background-repeat: no-repeat;
		background-position: 0 0;
		z-index: 9999;
	}
</style>