1 微信小程序之顶部导航栏(无图标)
首先,顶部导航栏和底部导航栏可以出现在同一页面。底部导航栏在app.json中设置,顶部导航栏需要在当前页面js文件中设置。
底部导航栏设置 app.json
 "tabBar": {
    "list": [
      {
        "pagePath": "pages/day/day",
        "text": "日程",
        "iconPath": "imgs/day1.jpg",
        "selectedIconPath": "imgs/day0.jpg"
      },
      {
        "pagePath": "pages/class/class",
        "text": "课程",
        "iconPath": "imgs/timg3.jpg",
        "selectedIconPath": "imgs/timg5.jpg"
      },
      {
        "pagePath": "pages/my/my",
        "text": "消息",
        "iconPath": "imgs/my1.jpg",
        "selectedIconPath": "imgs/my0.jpg"
      }
    ]
  }
顶部导航栏设置day.js
 data:{  navbar: ['全部', '今日'],
   currentTab: 0,
  //  showModalStatus: false
  },
  navbarTap: function (e) {
    this.setData({
      currentTab: e.currentTarget.dataset.idx
    })
  } ,
  onLoad: function (options) {
    this.setData({
      days_key: postsData.postList
    });
  }
day.wxml
<viewclass="navbar">

  <textwx:for="{{navbar}}"data-idx="{{index}}"class="item{{currentTab==index ? 'active' : ''}}"wx:key="unique"bindtap="navbarTap">{{item}}</text>
</view>
<!--全部-->
<viewhidden="{{currentTab!==0}}">
  <blockwx:for="{{days_key}}"wx:for-item="item">
    <view>
     <templateis="dayTemplate"data="{{...item}}"></template>
    </view>
  </block>
</view>
<!--今日-->
<viewhidden="{{currentTab!==1}}">
  今日安排
</view>
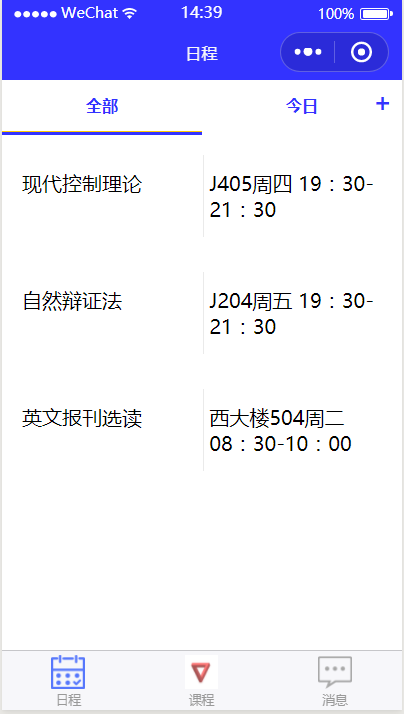
代码分析:根据设置的navbar的数组个数,确定一共有几个导航。Item默认为导航栏的文字内容,本代码指代全部和今日。Index默认为导航栏的索引,本代码指代0,1.
Hidden,在这里起到隐藏作用。当currnetTab=0,时,全部这一项显示,但是今日0!==1,所以hidden为true,所以今日项目不显示。
运行效果:
2 自定义弹窗以及获取弹窗中的内容
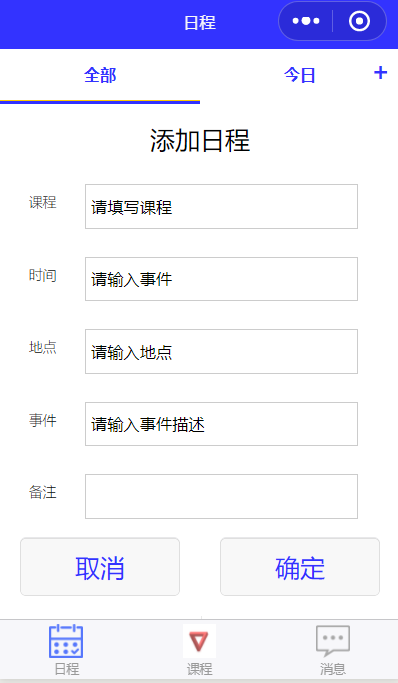
在上述页面,要实现点击+号添加日程,接下来自定义一个弹窗
day.wxml
<viewclass="btn add"bindtap="powerDrawer"data-status="open">+</view>
<view  wx:if="{{showModalStatus}}">
  <!--弹窗内容-->

  <viewclass="drawer_title">添加日程</view>
  <form class="drawer_content"catchsubmit="formSubmit">
    <viewclass="top">
      <labelclass="title">课程</label>
      <inputclass="input_base"name="rName"value="请填写课程"></input>
    </view>
    <viewclass="top">
      <labelclass="title">时间</label>
     <inputclass="input_base"name="atime"value="请输入事件"></input>
    </view>
    <viewclass="top"
      <labelclass="title">地点</label>
      <inputclass="input_base"name="aplace"value="请输入地点"></input>
    </view>
    <viewclass="top">
      <labelclass="title">事件</label>
      <inputclass="input_base"name="aevent"value="请输入事件描述"></input>
    </view>
    <viewclass="top">
      <labelclass="titlecol-0">备注</label>
      <inputclass="input_base  col-1"name="bz"></input>
    </view>
    <viewclass="btn-box">
    <button  class="btn_false"  data-status="close"bindtap='cancel'>取消</button>
    <buttonform-type='submit'class="btn_ok"  data-status="close">确定</button>
    </view>
  </form>
</view>
day.js
 powerDrawer: function (e) {
    var currentStatus = e.currentTarget.dataset.status;
    this.util(currentStatus)
  },
  util: function (currentStatus) {

      //关闭
      if (currentStatus == "close") {
        this.setData(
          {
            showModalStatus: false
          }
        );
      }
     // 显示
    if (currentStatus == "open") {
      this.setData(
        {
          showModalStatus: true
        }
      );
    }
  },
  formSubmit:function(e){
    console.log("恭喜您,提交成功,携带数据为:",e.detail.value);
  },
  cancel:function(e){
    console.log("您取消了本次发布");
},- Form表单用来提交内容,button 的form-type属性必须设置为”submit”,且form标签中,catchsubmit="formSubmit"即为数据提交时候的行为。
- data-status用来打开和关闭模态窗。当status为false, wx:if="{{showModalStatus}}",里包含的所有<view>都不会显示
- 提交时候,获取数据
运行效果:
formSubmit:function(e){
    console.log("恭喜您,提交成功,携带数据为:",e.detail.value);
  },
  cancel:function(e){
    console.log("您取消了本次发布");
  },
注意,e.detail.value前面一定要有逗号,不然获取到的数据是(object object)
运行结果:

3 关于首页(登录页面)跳转不到带有tabBar的页面
修改如下跳转代码:
 bindToView:function(){
    wx.navigateTo({
      url: '../sign/sign'
    })
改为:
 bindToView:function(){
      wx.switchTab({
      url: '../sign/sign',
    })