作者:CSDN @ _养乐多_
本文记录了在Google Earth Engine(GEE)平台上标记样本的技巧和代码脚本,样本点可以用来做土地利用分类、植被提取、水藻提取、冰川提取、农作物提取等应用中。可以应用到的方法包括随机森林(RF)分类,支持矢量机(SVM)分类,决策树分类等机器学习分类方法中。
文章目录
一、样本点选择结果展示

二、代码脚本
代码加入了加彩色合成影像用于参考,当然可以选择Landsat、哨兵、MODIS或者多种参考数据进行辅助标记。
代码链接:https://code.earthengine.google.com/275689210a495ca40bcfbca5dac9fc99?noload=true
var roi = table
Map.centerObject(roi, 6);
//设置显示样式:color代表边界颜色;fillcolor代表填充颜色
var styling={

    color:'red',fillColor:'00000000'}
//roi就是矢量边界
Map.addLayer(roi.style(styling),{

    },"roi")

var startDate = ee.Date('2019-01-01');
var endDate = ee.Date('2019-12-31');

// Visualize the Landsat image
var landsatCollection = ee.ImageCollection("LANDSAT/LC08/C01/T1")
                          .filterDate(startDate, endDate)
                          .filterBounds(roi)
                          .filterMetadata('CLOUD_COVER_LAND', 'less_than', 30);
print('landsatCollection',landsatCollection)

// Make a cloud-free composite.
var composite = ee.Algorithms.Landsat.simpleComposite({


  collection: landsatCollection,
  asFloat: true
});
print('composite', composite)
// Visualize the Composite
Map.addLayer(composite, {

    bands: ['B6', 'B5', 'B4'], max: 0.5, gamma: 2}, 'L8 Image', true);

// Visualize the Sentinel-2 image
var s2img = ee.ImageCollection('COPERNICUS/S2_SR')
              .filterDate(startDate, endDate)
              .filterBounds(roi)
              .map(maskS2clouds)
              .mean();

// Remove cloud
function maskS2clouds(image) {


  var qa = image.select('QA60');
  // Bits 10 and 11 are clouds and cirrus, respectively.
  var cloudBitMask = 1 << 10;
  var cirrusBitMask = 1 << 11;
  // Both flags should be set to zero, indicating clear conditions.
  var mask = qa.bitwiseAnd(cloudBitMask).eq(0)
               .and(qa.bitwiseAnd(cirrusBitMask).eq(0));
  return image.updateMask(mask).divide(10000);
}

var visualization = {


    min: 0.0,
    max: 0.4,
    bands: ['B11', 'B8', 'B4'],//分别对应SWIR1,NIR,RED波段
};
Map.addLayer(s2img, visualization, '假彩色');

// Merge points together
var sampleCollection  = constructionland.merge(forest).merge(cultivatedland).merge(water).merge(unusedland).merge(grassland);
print(sampleCollection , 'Sample Collection')
三、样本创建教程
1、创建 FeatureCollection
第一步,点击地图视图区域的红框new layer按钮新增FeatureCollection。

第二步,点击红框齿轮部分,进入属性修改界面。

2、新增属性 Property
在属性修改界面,可以修改样本要素的名字,格式选择FeaturCollection,显示颜色可以在颜色条中选择,Property(属性),波段名写为landcocer,值设置为1(不同类型样本的landcover值不应该一样)。

3,选择样本点
选中红框forest,然后使用红色箭头所指的工具在地图上选择点。

4、合并样本
// Merge points together
var sampleCollection =constructionland.merge(forest).merge(cultivatedland).merge(water).merge(unusedland).merge(grassland);
print(sampleCollection , 'Sample Collection ')
5、下载样本
5.1 下载到本地
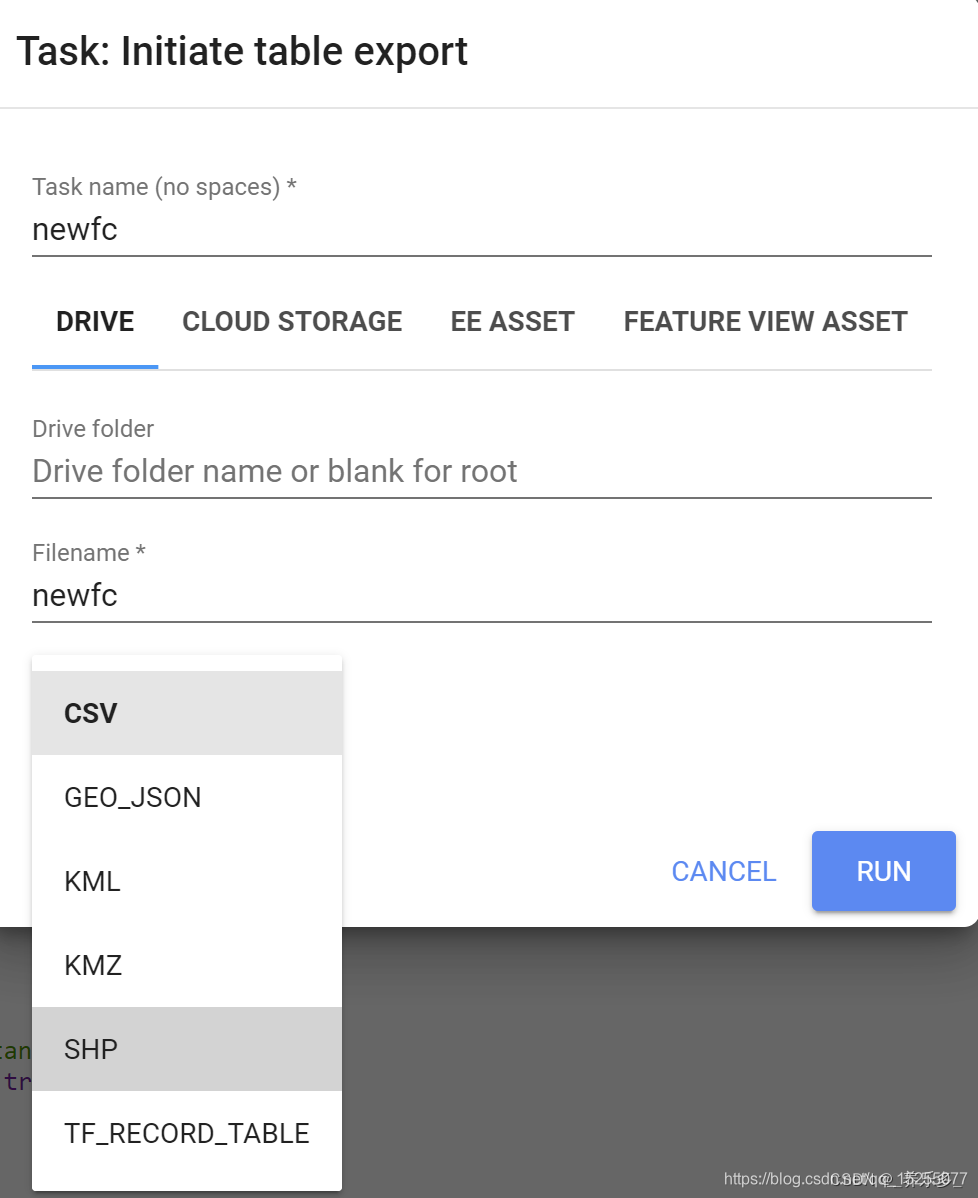
样本数据可以用来做示意图,和在本地分析使用。将样本下载到谷歌云盘的具体步骤如下图所示。
Export.table.toDrive({


  collection: sampleCollection,
  description: 'Sample Feature Collection',
  folder: 'Sample Folder'
});
点击Task中的RUN下载,在弹出界面中选择下载格式,可选格式有:shp、csv、JSON、KML、KMZ、TF_RECORD_TABLE。

5.2 导入Assets中
Export.table.toAsset({


collection:sampleCollection,
//description,
assetId:'sampleCollectionID',
//maxVertices
});