- python安装与测试
系统:windows7-64位
进入网址:
www.python.org
下载3.5.3版本,运行安装选择添加环境变量的PATH,点击install now.
安装后测试:在CMD窗口输入:python –V回车
Python 回车键入print(‘hello’)回车如下;
- 安装numpy 与pandas库
使用pip3工具,直接在CMD命令窗口输入:
pip3 install numpy
将自动下载安装,安装后如下:
Pandas安装同样依照上述:pip3 install pandas
测试:在IDLE中新建py文件编写:
Import numpy
Import pandas
Print(“hello”)
运行没有错误,安装成功。
3,CUDA与CUDNN安装
参考链接:
NOTE: 可能会出现图像驱动安装失败的情况,可以去英伟达官网下载最新驱动安装重启后,再次安装。
安装成功界面如下(没有安装的,它也给出了原因):
4,安装tensorflow-gpu
在cmd中使用:pip3 install tensorflow-gpu
测试:在IDLE中import tensorflow 运行脚本看是否报错。
结果报错:
Python 3.5.3 (v3.5.3:1880cb95a742, Jan 16 2017, 16:02:32) [MSC v.1900 64 bit (AMD64)] on win32
Type "copyright", "credits" or "license()" for more information.
>>>
RESTART: C:\Users\Administrator\AppData\Local\Programs\Python\Python35\test.py
Traceback (most recent call last):
File "C:\Users\Administrator\AppData\Local\Programs\Python\Python35\lib\site-packages\tensorflow\python\pywrap_tensorflow_internal.py", line 18, in swig_import_helper
return importlib.import_module(mname)
File "C:\Users\Administrator\AppData\Local\Programs\Python\Python35\lib\importlib\__init__.py", line 126, in import_module
return _bootstrap._gcd_import(name[level:], package, level)
File "<frozen importlib._bootstrap>", line 986, in _gcd_import
File "<frozen importlib._bootstrap>", line 969, in _find_and_load
File "<frozen importlib._bootstrap>", line 958, in _find_and_load_unlocked
File "<frozen importlib._bootstrap>", line 666, in _load_unlocked
File "<frozen importlib._bootstrap>", line 577, in module_from_spec
File "<frozen importlib._bootstrap_external>", line 914, in create_module
File "<frozen importlib._bootstrap>", line 222, in _call_with_frames_removed
ImportError: DLL load failed: 找不到指定的模块。
During handling of the above exception, another exception occurred:
Traceback (most recent call last):
File "C:\Users\Administrator\AppData\Local\Programs\Python\Python35\lib\site-packages\tensorflow\python\pywrap_tensorflow.py", line 41, in <module>
from tensorflow.python.pywrap_tensorflow_internal import *
File "C:\Users\Administrator\AppData\Local\Programs\Python\Python35\lib\site-packages\tensorflow\python\pywrap_tensorflow_internal.py", line 21, in <module>
_pywrap_tensorflow_internal = swig_import_helper()
File "C:\Users\Administrator\AppData\Local\Programs\Python\Python35\lib\site-packages\tensorflow\python\pywrap_tensorflow_internal.py", line 20, in swig_import_helper
return importlib.import_module('_pywrap_tensorflow_internal')
File "C:\Users\Administrator\AppData\Local\Programs\Python\Python35\lib\importlib\__init__.py", line 126, in import_module
return _bootstrap._gcd_import(name[level:], package, level)
ImportError: No module named '_pywrap_tensorflow_internal'
During handling of the above exception, another exception occurred:
Traceback (most recent call last):
File "C:\Users\Administrator\AppData\Local\Programs\Python\Python35\test.py", line 3, in <module>
import tensorflow as tf
File "C:\Users\Administrator\AppData\Local\Programs\Python\Python35\lib\site-packages\tensorflow\__init__.py", line 24, in <module>
from tensorflow.python import *
File "C:\Users\Administrator\AppData\Local\Programs\Python\Python35\lib\site-packages\tensorflow\python\__init__.py", line 51, in <module>
from tensorflow.python import pywrap_tensorflow
File "C:\Users\Administrator\AppData\Local\Programs\Python\Python35\lib\site-packages\tensorflow\python\pywrap_tensorflow.py", line 52, in <module>
raise ImportError(msg)
ImportError: Traceback (most recent call last):
File "C:\Users\Administrator\AppData\Local\Programs\Python\Python35\lib\site-packages\tensorflow\python\pywrap_tensorflow_internal.py", line 18, in swig_import_helper
return importlib.import_module(mname)
File "C:\Users\Administrator\AppData\Local\Programs\Python\Python35\lib\importlib\__init__.py", line 126, in import_module
return _bootstrap._gcd_import(name[level:], package, level)
File "<frozen importlib._bootstrap>", line 986, in _gcd_import
File "<frozen importlib._bootstrap>", line 969, in _find_and_load
File "<frozen importlib._bootstrap>", line 958, in _find_and_load_unlocked
File "<frozen importlib._bootstrap>", line 666, in _load_unlocked
File "<frozen importlib._bootstrap>", line 577, in module_from_spec
File "<frozen importlib._bootstrap_external>", line 914, in create_module
File "<frozen importlib._bootstrap>", line 222, in _call_with_frames_removed
ImportError: DLL load failed: 找不到指定的模块。
During handling of the above exception, another exception occurred:
Traceback (most recent call last):
File "C:\Users\Administrator\AppData\Local\Programs\Python\Python35\lib\site-packages\tensorflow\python\pywrap_tensorflow.py", line 41, in <module>
from tensorflow.python.pywrap_tensorflow_internal import *
File "C:\Users\Administrator\AppData\Local\Programs\Python\Python35\lib\site-packages\tensorflow\python\pywrap_tensorflow_internal.py", line 21, in <module>
_pywrap_tensorflow_internal = swig_import_helper()
File "C:\Users\Administrator\AppData\Local\Programs\Python\Python35\lib\site-packages\tensorflow\python\pywrap_tensorflow_internal.py", line 20, in swig_import_helper
return importlib.import_module('_pywrap_tensorflow_internal')
File "C:\Users\Administrator\AppData\Local\Programs\Python\Python35\lib\importlib\__init__.py", line 126, in import_module
return _bootstrap._gcd_import(name[level:], package, level)
ImportError: No module named '_pywrap_tensorflow_internal'
Failed to load the native TensorFlow runtime.
See https://www.tensorflow.org/install/install_sources#common_installation _problems
for some common reasons and solutions. Include the entire stack trace
above this error message when asking for help.
>>>
百度有人建议安装下面的软件vc++ 2015 redistributable(x86,x64),重启电脑,问题解决。
尴尬的是后面发现本机的英伟达显卡计算能力只有2.1并不符合tensorflow的要求(如下图)。。。。。
果断卸载装cpu版
测试如下:
5, 在python3.5使用 opencv库
这里官方只支持python2.7,所以我们用非官方的库。
(也可下载完整版:opencv_python-3.2.0+contrib-cp35-cp35m-win_amd64.whl) contrib功能更强大。
拷贝下载的Opencv 3.2模块到Python的安装目录C:\Users\Administrator(若不成功根据报错更改目录)下,运行 pip install opencv_python-3.2.0-cp35-cp35m-win_amd64.whl
然后程序自动安装Opencv模块。
测试:
import
cv2
img = cv2.imread(
'1.bmp'
,
0
)
cv2.imshow(
'image'
,img)
cv2.waitKey(
0
)
cv2.destroyAllWindows()
6,利用opencv实现人脸检测
根据官方教程(我进行了一些修改)可以测试如下:
7,Anconda安装出现问题
下载地址:
Anaconda
>>:python -m pip install --upgrade pip
“Cannot remove entries from nonexistent file c:\program files\anaconda3\lib\site-packages\easy-install.pth” 的问题。查看原因是因为setuptools版本太低,tensorflow要求29.0.1,当前版本为27.2.0,在更新setuptools版本的时候又找不到easy-install.pth,导致更新失败
运行
>>:pip install --upgrade --ignore-installed setuptools,问题解决!
【更改conda安装源镜像】
为了更好安装包需要制定conda安装包所使用的镜像为中国的镜像,目前为止只有一家提供了镜像
执行conda命令:
- conda config
更换安装源镜像,清华大学有提供镜像具体更换方法有如下:
- conda config --add channels 'https://mirrors.tuna.tsinghua.edu.cn/anaconda/pkgs/free/'
- conda config --set show_channel_urls yes
然后你的.condarc 文件应该是这样的内容
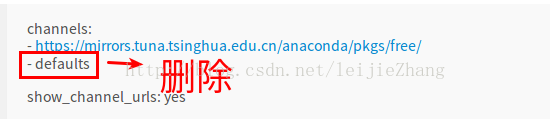
把defaults那一行删除就可以了,问题解决!
或 更改pip的默认源
Python开发安装包时,使用pip进行包安装非常方便。但pip默认的源服务器在国外,下载非常慢,而且经常出现下载后安装出错问题。因此,有必要更换为国内的pypi源。
对于windows来说,直接在当前用户目录下新建一个pip.ini文件,例如:c:\Users\Luoge\pip.ini
pip.ini的文件内容如下:
[global] index-url = http://mirrors.aliyun.com/pypi/simple/[install] trusted-host=mirrors.aliyun.com
上面是将源更换为了
阿里云的源(阿里爸爸牛逼!~),输入完成后,记得保存。
*******Tip*****************************
安装特定版本:
pip install tensorflow==1.2.0
升级到最新版本:
pip install --upgrade tensorflow
获取tensorflow版本号:
在idle命令行中输入import tensorflow——》回车——》tensorflow.__version__ (注意是双下划线)
8,安装keras
Keras 框架搭建
安装
在CMD命令行或者Powershell中输入:
# GPU 版本
>>> pip install --upgrade tensorflow-gpu
# CPU 版本
>>> pip install --upgrade tensorflow
# Keras 安装
>>> pip install keras -U --pre
之后可以验证keras是否安装成功,在命令行中输入Python命令进入Python变成命令行环境:
>>>
import
kerasUsing Tensorflow backend.I c:\tf_jenkins\home\workspace\release-win\device\gpu\os\windows\tensorflow\stream_executor\dso_loader.cc:
135
] successfully opened CUDA library cublas64_80.dll locallyI c:\tf_jenkins\home\workspace\release-win\device\gpu\os\windows\tensorflow\stream_executor\dso_loader.cc:
135
] successfully opened CUDA library cudnn64_5.dll locallyI c:\tf_jenkins\home\workspace\release-win\device\gpu\os\windows\tensorflow\stream_executor\dso_loader.cc:
135
] successfully opened CUDA library cufft64_80.dll locallyI c:\tf_jenkins\home\workspace\release-win\device\gpu\os\windows\tensorflow\stream_executor\dso_loader.cc:
135
] successfully opened CUDA library nvcuda.dll locallyI c:\tf_jenkins\home\workspace\release-win\device\gpu\os\windows\tensorflow\stream_executor\dso_loader.cc:
135
] successfully opened CUDA library curand64_80.dll locally>>>
没有报错,那么Keras就已经
成功安装
了
- Keras中mnist数据集测试 下载Keras开发包
>>> conda install git>>> git clone http
s:
//github.
com
/fchollet/keras.git>>>
cd
keras/examples/>>>
python
mnist_mlp.
py
程序无错进行,至此,keras安装完成。