spring boot 本来应该在spring 结束之后就写的,最开始是被其它事情耽误了,后面就一直拖到了现在,这个框架可以说是目前市面最火的框架,不管是使用它之后的快速开发,还是支持大多数的中间件自动配置,又或者是强大的兼容性等等,都是企业项目优先选择它的理由。
本次就简单聊聊spring boot 的那一些八股文,再详细走一遍自动配置的源码流程。
SpringBoot简介
springBoot 本身是对spring 的一种封装,它的出现就是为了更加方便、快速的开发Spring 的项目。它的设计是为了让你尽可能快的跑起来Spring 应用程序,并且尽可能减少你的配置文件。
springBoot 基于Spring4.0设计,不仅继承了Spring框架原有的优秀特性,而且还通过简化配置来进一步简化了Spring 应用的整个搭建和开发过程。另外SpringBoot 通过集成大量的框架使得依赖包的版本冲突,以及引用的不稳定性等问题得到了很好的解决。
SpringBoot主要特性
- SpringBoot Starter:他将常用的依赖分组进行了整合,将其合并到一个依赖中,这样就可以一次性添加到项目的Maven 或Gradle 构建中;
- 使编码变得简单,SpringBoot 采用 JavaConfig 的方式对Spring 进行配置,并且提供了大量的注解,极大的提高了工作效率。
- 自动配置:SpringBoot 的自动配置特性利用了Spring 对条件化配置的支持,合理地推测应用所需的bean 并自动化配置他们;
- 使部署变得简单,SpringBoot 内置了三种Servlet容器,Tomcat,Jetty,undertow 我们只需要一个Java 的运行环境就可以跑SpringBoot 的项目了,SpringBoot 的项目可以打成一个jar包。
源码流程解析
上述也说了,spring boot 是spring 的封装,所以代码流程方面IOC 和AOP 之类的还是spring 部分的内容,spring boot 主要做的就是一些自动配置之类的东西,同时它也提供出了指定方案让其余的中间件自己去兼容spring boot 的自动配置。我们这里主要看的话也就是自动配置的内容。
源码就不用再引入了,随便找一个spring boot 的项目都能直接去看。
spring boot 的开始是从它的启动类开始的,也就是被@SpringBootApplication 注解所修饰的对象,具体点就是从这里的main 方法开始的,这里也就是调用了SpringApplication.run。
spring boot 自动配置的两个重点也就是@SpringBootApplication 注解和这个run 方法,这里我们先讲注解。
@SpringBootApplication 注解解析
排除三个spring 的标准注解,还有一个@Inherited 注解,我们从@SpringBootConfiguration 注解开始看。
@SpringBootConfiguration:表示这个是spring boot 的启动配置类,这个里面上层注解是@Configuration;
@EnableAutoConfiguration:自动配置实现的主要注解;
@ComponentScan:标注扫描路径的注解。
@Target(ElementType.TYPE)
@Retention(RetentionPolicy.RUNTIME)
@Documented
@Inherited
@SpringBootConfiguration
@EnableAutoConfiguration
@ComponentScan(excludeFilters = {

     @Filter(type = FilterType.CUSTOM, classes = TypeExcludeFilter.class),
      @Filter(type = FilterType.CUSTOM, classes = AutoConfigurationExcludeFilter.class) })
public @interface SpringBootApplication {
显而易见我们下面继续跟的就是@EnableAutoConfiguration 注解。
还是一样的,排除四个不必要注解,主要看最下面两个注解即可。
@AutoConfigurationPackage:这里主要使用@import 注解,调用AutoConfigurationPackages.Registrar 对象的registerBeanDefinitions 方法,将启动对象所在的所在包信息,构建成一个BeanDefinition 对象存入到BeanFcatory 的BeanDefinitionMap 中,后续再根据beanDefinition 对象向IOC 容器中注入一个BasePackages 对象,这个对象的主要作用的提供给外部中间件,告诉他们需要扫描的路径。
@Import:自动配置最根本的注解,大部分@Enable 开头的注解下层基本都是这个注解。
@Target(ElementType.TYPE)
@Retention(RetentionPolicy.RUNTIME)
@Documented
@Inherited
@AutoConfigurationPackage
@Import(AutoConfigurationImportSelector.class)
public @interface EnableAutoConfiguration {
@import 注解的四种用法
下面我们详谈一下@import 注解的四种用法
一:实现ImportSelector 接口
如果@Import 注解中标注的对象,也就是下面的AutoConfigurationImportSelector 对象,后面我们以A 对象简写,这个对象如果实现了ImportSelector 接口,spring 容器就会实例化A 对象,并调用其中重写的selectImports 方法。
二:实现DeferredImportSelector 接口
如果A 对象实现的是DeferredImportSelector 接口,这个接口是ImportSelector 子接口,实现它们两个的效果是一样的。
它们两个接口的区别在于两点:
- 执行时机,实现
ImportSelector接口的执行时机在@Configguration注解中的其他逻辑被处理之前,也就是@Bean 之类的注解执行之前,而实现了DeferredImportSelector接口自然是逻辑处理完成之后才能执行; - DeferredImportSelector 的实现类可以用Order 注解,或者实现Ordered 接口来对selectImports 的执行顺序排序。
三:实现ImportBeanDefinitionRegistrar 接口
如果A 对象实现的是ImportBeanDefinitionRegistrar 接口,spring 容器同样会实例化A 对象,但是是调用它的重写接口的registerBeanDefinitions 方法。
四:没有上面三种接口
如果A 对象没有实现上面的三种接口,那么spring 容器就只会实例化A 对象。
@Import(AutoConfigurationImportSelector.class) 的作用
了解完@import 注解的用法之后,再说回来,我们继续看AutoConfigurationImportSelector 对象。
可以看到这里实现的是DeferredImportSelector 接口,同时实现了Ordered 接口用于排序,不过这里getOrder 的时候是最大值 - 1,优先级是最小的。
public class AutoConfigurationImportSelector implements DeferredImportSelector, BeanClassLoaderAware,
      ResourceLoaderAware, BeanFactoryAware, EnvironmentAware, Ordered {
同时这个对象里面还有一个内部类,AutoConfigurationGroup 对象,后续run 方法走进来的时候,就是走这个类,具体的方法先后流程是process -> selectImports。
这里我们先看process 方法。这里重点看的就是getAutoConfigurationEntry 方法的调用,其余都是一些填充属性之类的,不重要。
public void process(AnnotationMetadata annotationMetadata, DeferredImportSelector deferredImportSelector) {


    Assert.state(deferredImportSelector instanceof AutoConfigurationImportSelector,
                 () -> String.format("Only %s implementations are supported, got %s",
                                     AutoConfigurationImportSelector.class.getSimpleName(),
                                     deferredImportSelector.getClass().getName()));
    AutoConfigurationEntry autoConfigurationEntry = ((AutoConfigurationImportSelector) deferredImportSelector)
        .getAutoConfigurationEntry(annotationMetadata);
    this.autoConfigurationEntries.add(autoConfigurationEntry);
    for (String importClassName : autoConfigurationEntry.getConfigurations()) {


        this.entries.putIfAbsent(importClassName, annotationMetadata);
    }
}
获得所有自动配置类-getAutoConfigurationEntry方法
继续跟进getAutoConfigurationEntry 方法。下面代码中我已经写好注释了,我们重点要看的是三个地方:得到spring.factories 文件配置的所有自动配置类、剔除启动类上注解标明的不需要加载的配置类、剔除不满足配置类中条件注解修饰的配置类。
protected AutoConfigurationEntry getAutoConfigurationEntry(AnnotationMetadata annotationMetadata) {


   if (!isEnabled(annotationMetadata)) {


      return EMPTY_ENTRY;
   }
   AnnotationAttributes attributes = getAttributes(annotationMetadata);
   // 得到spring.factories 文件配置的所有自动配置类
   List<String> configurations = getCandidateConfigurations(annotationMetadata, attributes);

   // 利用LinkedHashSet 移除重复的配置类
   configurations = removeDuplicates(configurations);

   // 得到要排除的自动配置类,比如注解属性exclude 的配置类
   // 比如:@springBootApplicaiton(exclude = FreeMarkerAutoConfiguration.class)
   // 将会获得exclude = FreeMarkerAutoConfiguration.class 注解数据
   Set<String> exclusions = getExclusions(annotationMetadata, attributes);

   // 检查并剔除上面获得的,不需要自动配置的对象
   checkExcludedClasses(configurations, exclusions);
   configurations.removeAll(exclusions);

   // 剔除所有不符合条件的配置类,这里的条件是放在配置类对象上规定的,比如:@ConditionalOnProperty、@ConditionalOnClass
   // 因为太多的不必要对象会导致内存溢出
   configurations = getConfigurationClassFilter().filter(configurations);

   // 获取了符合条件的自动配置类后,此时触发AutoConfigurationImportEvent 事件
   fireAutoConfigurationImportEvents(configurations, exclusions);

   // 将符合条件和要排除的自动配置类封装进AutoConfigurationEntry 对象
   return new AutoConfigurationEntry(configurations, exclusions);
}
得到所有自动配置类-getCandidateConfigurations方法调用
我们直接跟进上面提到的getCandidateConfigurations 方法。
这里关注两点,getSpringFactoriesLoaderFactoryClass() 这个方法获取的是定值EnableAutoConfiguration.class,还有就是后面的getBeanClassLoader() 方法,这个方法是从META-INF/spring.factories 文件中去获取对应的值。
getBeanClassLoader() 方法具体源码可以不用看,具体作用就是根据EnableAutoConfiguration.class 去获取在spring.factories 文件中对应的值,而spring.factories 文件中的值存在是以键值对的形式存在的。
protected List<String> getCandidateConfigurations(AnnotationMetadata metadata, AnnotationAttributes attributes) {


   List<String> configurations = SpringFactoriesLoader.loadFactoryNames(getSpringFactoriesLoaderFactoryClass(),
         getBeanClassLoader());
   Assert.notEmpty(configurations, "No auto configuration classes found in META-INF/spring.factories. If you "
         + "are using a custom packaging, make sure that file is correct.");
   return configurations;
}
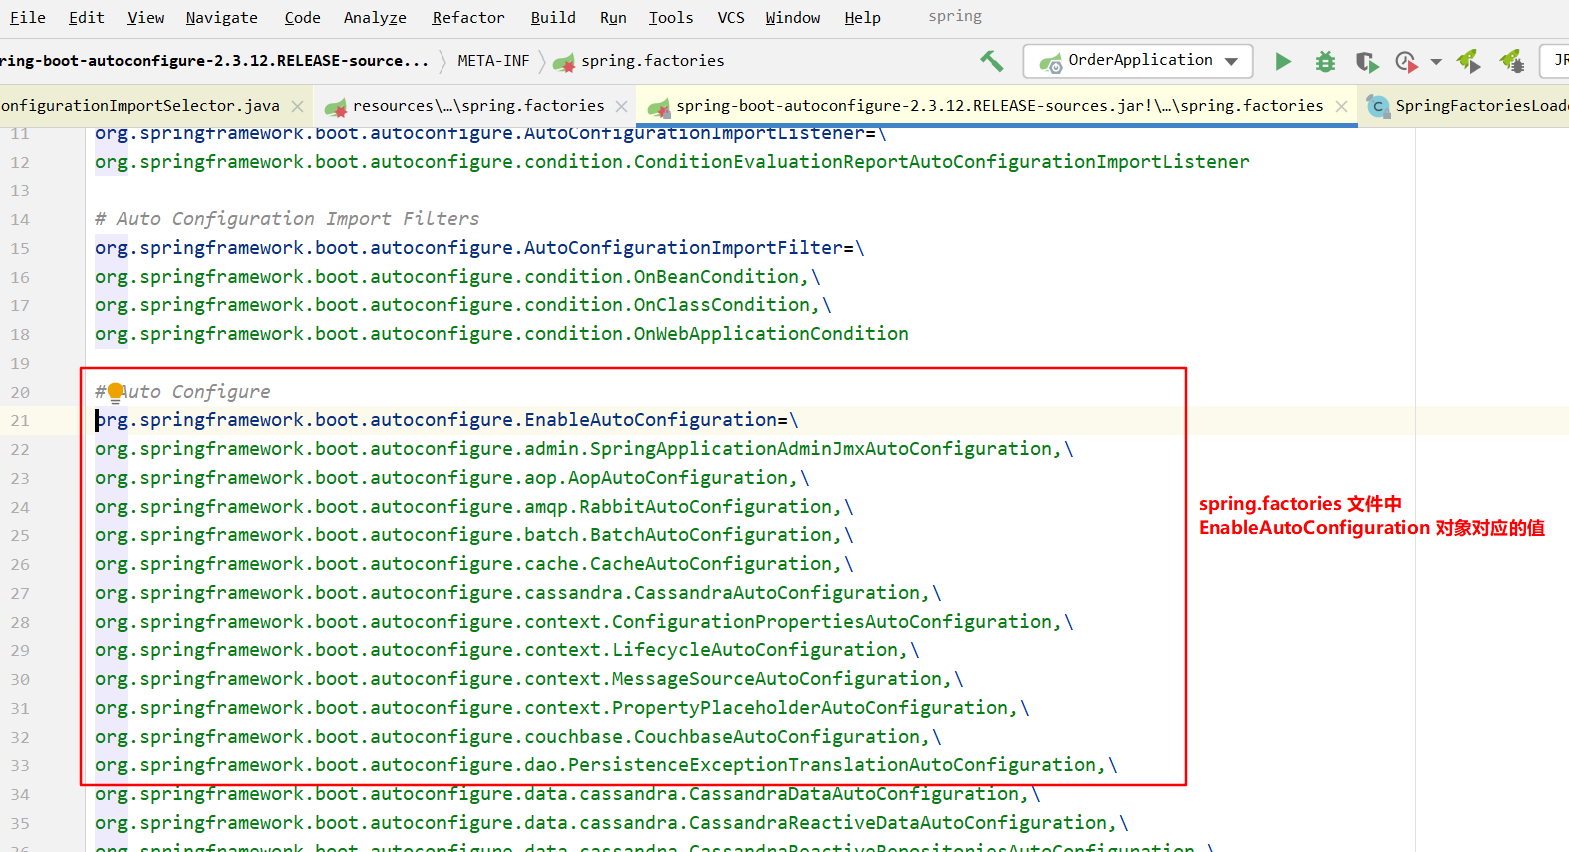
所以走完上述的getCandidateConfigurations 方法就能获取到所有META-INF/spring.factories 文件中EnableAutoConfiguration 对应的所有值,注意:这个文件只一个,这里项目中所有的这个文件。
排除不需要应用的自动配置类-getExclusions方法
接下来我们需要关注的就是getExclusions 方法,先说结论:这个方法调用获得是@springbootApplication 注解中exclude、excludeName 属性标注的类,用于排除上面getCandidateConfigurations 获取的所有自动配置类的部分不应用配置类。
试例如下:
@SpringBootApplication(exclude = OrderInfoController.class)
这个具体方法也很简单,获取对应的属性值就行,这里后将这些获取的所有类全部排除,后续也不会将它们加载为BeanDefinition。
protected Set<String> getExclusions(AnnotationMetadata metadata, AnnotationAttributes attributes) {


   Set<String> excluded = new LinkedHashSet<>();
   excluded.addAll(asList(attributes, "exclude"));
   excluded.addAll(Arrays.asList(attributes.getStringArray("excludeName")));
   excluded.addAll(getExcludeAutoConfigurationsProperty());
   return excluded;
}
过滤出需要应用的核心自动配置类-getConfigurationClassFilter().filter方法
这个是最后一次过滤,会将上面得到的所有配置进行判断,判断的逻辑来源于各个配置类的@Conditional 之类的条件注解,具体点就是比如:@ConditionalOnClass、@ConditionalOnBean 等等。
具体看下这个试例,被@ConditionalOnClass 注解修饰,如果IOC 容器中不存在DispatcherServlet.class,那么将会把被注解修饰的DispatcherServletAutoConfiguration 排除掉,不会在后续代码中生成对应的BeanDefinition,更不会生成对应的bean 存入IOC。
@ConditionalOnClass(DispatcherServlet.class)
public class DispatcherServletAutoConfiguration {

    }
spring 官网 对于条件注解的文档是全英文的,如果英文不错的可以自己去了解看看,但是也就可以参考一下我下面找到的一些翻译过后的文档,当然不会有官网详细。

关于条件注解的讲解
@Conditional 是Spring4 新提供的注解,它的作用是按照一定的条件进行判断,满足条件给容器注册bean。
- @ConditionalOnBean:仅仅在当前上下文中存在某个对象时,才会实例化一个Bean。
- @ConditionalOnClass:某个class位于类路径上,才会实例化一个Bean。
- @ConditionalOnExpression:当表达式为true的时候,才会实例化一个Bean。基于SpEL表达式的条件判断。
- @ConditionalOnMissingBean:仅仅在当前上下文中不存在某个对象时,才会实例化一个Bean。
- @ConditionalOnMissingClass:某个class类路径上不存在的时候,才会实例化一个Bean。
- @ConditionalOnNotWebApplication:不是web应用,才会实例化一个Bean。
- @ConditionalOnWebApplication:当项目是一个Web项目时进行实例化。
- @ConditionalOnNotWebApplication:当项目不是一个Web项目时进行实例化。
- @ConditionalOnProperty:当指定的属性有指定的值时进行实例化。
- @ConditionalOnJava:当JVM版本为指定的版本范围时触发实例化。
- @ConditionalOnResource:当类路径下有指定的资源时触发实例化。
- @ConditionalOnJndi:在JNDI存在的条件下触发实例化。
- @ConditionalOnSingleCandidate:当指定的Bean在容器中只有一个,或者有多个但是指定了首选的Bean时触发实例化。
小结
上述基本已经讲完了getAutoConfigurationEntry 方法的最主要的三部分功能,其实也就是一个目的:获取所有的自动配置类的地址信息并进行封装保存。
AutoConfigurationImportSelector 对象中的其余内容其实可以不用看了,最主要的也就是process 方法,后续run 方法中我们再去看方法的调用时机。
run方法的调用流程
上述总的来说是对@SpringBootApplication 注解的解析,并没有说明这个是什么时候解析的,这就需要看在main 方法中调用的run 方法了。
一直跟进我们会到第一个重点SpringApplication 的创建,这里创建的时候会去构建一些springboot 的一些本身初始器,用于后续的流程,具体的介绍了。
public static ConfigurableApplicationContext run(Class<?>[] primarySources, String[] args) {


   return new SpringApplication(primarySources).run(args);
}
继续跟进run 方法,这个代码过多,我们先要记住我们的目的:自动配置流程,带着目的我们再看回代码,这样我们需要的关注点就不多了。
首先说下最开始的一些准备工作,getRunListeners(args); 用于创建监听器,然后new DefaultApplicationArguments(args) 创建上下文对象。
然后这个prepareEnvironment 方法的调用需要注意下,如果项目中配置了bootstrap 级别的配置文件,这里会发布一个事件给到BootstrapApplicationListener 对象,执行对应的事件,但是这里会回调到run 方法里面来,提前将配置信息存入容器中,当然如果项目中同时配置了application 级别的配置文件,并且与bootstrap 文件中有同一属性,后续配置会以application 文件为准。
public ConfigurableApplicationContext run(String... args) {


    //记录程序运行时间
    StopWatch stopWatch = new StopWatch();
    stopWatch.start();
    // ConfigurableApplicationContext Spring 的上下文
    ConfigurableApplicationContext context = null;
    Collection<SpringBootExceptionReporter> exceptionReporters = new ArrayList<>();
    //java.awt.headless是J2SE的一种模式用于在缺少显示屏、键盘或者鼠标时的系统配置,很多监控工具如jconsole 需要将该值设置为true,系统变量默认为true
    configureHeadlessProperty();
    //【1、获取并启动监听器】
    SpringApplicationRunListeners listeners = getRunListeners(args);
    listeners.starting();
    try {


        ApplicationArguments applicationArguments = new DefaultApplicationArguments(args);
        //【2、准备环境】
        ConfigurableEnvironment environment = prepareEnvironment(listeners, applicationArguments);
        //处理需要忽略的Bean
        configureIgnoreBeanInfo(environment);
        //打印banner
        Banner printedBanner = printBanner(environment);
        ///【3、初始化应用上下文】
        context = createApplicationContext();
        //实例化SpringBootExceptionReporter.class,用来支持报告关于启动的错误
        exceptionReporters = getSpringFactoriesInstances(SpringBootExceptionReporter.class,
                                                         new Class[] {

     ConfigurableApplicationContext.class },
                                                         context);
        //【4、刷新应用上下文前的准备阶段】
        prepareContext(context, environment, listeners, applicationArguments, printedBanner);
        //【5、刷新应用上下文】
        refreshContext(context);
        //【6、刷新应用上下文后的扩展接口】
        afterRefresh(context, applicationArguments);
        //时间记录停止
        stopWatch.stop();
        if (this.logStartupInfo) {


            new StartupInfoLogger(this.mainApplicationClass).logStarted(getApplicationLog(), stopWatch);
        }
        //发布容器启动完成事件
        listeners.started(context);
        callRunners(context, applicationArguments);
    }
    catch (Throwable ex) {


        handleRunFailure(context, ex, exceptionReporters, listeners);
        throw new IllegalStateException(ex);
    }

    try {


        listeners.running(context);
    }
    catch (Throwable ex) {


        handleRunFailure(context, ex, exceptionReporters, null);
        throw new IllegalStateException(ex);
    }
    return context;
}
创建上下文对象ServletWebServerApplicationContext对象-createApplicationContext方法
当上面run 方法回调结束之后,再继续往下走就到了createApplicationContext 方法,这里算是第一个重点。注意啊,回调没有结束之前是不会正在的创建出context 对象的。
这里创建context 对象是AnnotationConfigServletWebServerApplicationContext 对象,并且在构建对象的时候会构建出两个其余的对象。
public AnnotationConfigServletWebServerApplicationContext(DefaultListableBeanFactory beanFactory) {


   super(beanFactory);
   this.reader = new AnnotatedBeanDefinitionReader(this);
   this.scanner = new ClassPathBeanDefinitionScanner(this);
}
在构建AnnotatedBeanDefinitionReader 对象的时候,又会有AnnotationConfigUtils.registerAnnotationConfigProcessors 的调用,在这里会注册多个beanDefinition,其中有一个就是ConfigurationClassPostProcessor 对象,这是一个BeanFactoryPostProcessor 对象,是个重点,后续解析注解的时候会用到。
这里的重点也就是这个ConfigurationClassPostProcessor 对象的beanDefinition 对象构建并存入容器。
容器刷新及bean的构建-refreshContext方法
继续往下走,我们关注的第二个重点来了,如果看过spring 的源码,这个方法一定不陌生,bean 的构建和beanFactory 的构建还有spring 需要的一系列的东西都是这个方法来初始化的,这里就不属于springboot 的逻辑了,而是spring 的逻辑。
这个方法这里就不详细展示了,如果有兴趣可以去看我的spring 源码解析流程。
刚刚我们在context 对象创建的时候,发现了那里会附带的创建一个ConfigurationClassPostProcessor 对象,我们这里直接可以看到beanFactoryPostProcessor 的构建和执行,也就是invokeBeanFactoryPostProcessors 方法的调用。
这个方法里面会去获取到所有的beanFactoryPostProcessor 的beanDefinition,然后进行getBean,然后进行排序,最后根据顺序去执行beanFactoryPostProcessor 里面的postProcessBeanFactory。
ConfigurationClassPostProcessor 对象属于BeanDefinitionRegistryPostProcessor 接口的实现,所以这里我们需要执行的是它的postProcessBeanDefinitionRegistry 方法。
跟进这个方法,这里主要就是调用processConfigBeanDefinitions 方法,后续我们也是在这个方法里面摸爬滚打。
解析注解修饰的对象,生成对应的BeanDefinition-processConfigBeanDefinitions方法
这个方法的内容还是过多,我们不一步一步看了,主要看重点。
第一个重点parser.parse 的调用。这里我们主要看两点parse 方法的调用和deferredImportSelectorHandler.process() 的调用。
获取扫描路径,解析对应注解,得到BeanDefinition存入容器-parse方法
先看parse 方法的调用,这里需要继续跟进doProcessConfigurationClass 方法,可以看到,spring 里面真正做事还是do 开始的方法,比如getBean -> doGetBean -> createdBean -> doCreatedBean 的调用逻辑,做事的就是doGetBean 和doCreatedBean 两个方法。
下面代码中是我们需要看到的第一个地方,这里会获取到配置的@ComponentScan 注解标明的扫描路径,然后调用this.componentScanParser.parse 去将扫描路径下的所有被@Component 注解所修饰的对象,并生成对应的BeanDefinition 对象存入容器。
具体的代码流程:componentScanParser.parse -> scanner.doScan -> findCandidateComponents,可以自己跟debug 走一遍。
// Process any @ComponentScan annotations
Set<AnnotationAttributes> componentScans = AnnotationConfigUtils.attributesForRepeatable(
    sourceClass.getMetadata(), ComponentScans.class, ComponentScan.class);
if (!componentScans.isEmpty() &&
    !this.conditionEvaluator.shouldSkip(sourceClass.getMetadata(), ConfigurationPhase.REGISTER_BEAN)) {


    for (AnnotationAttributes componentScan : componentScans) {


        // The config class is annotated with @ComponentScan -> perform the scan immediately
        Set<BeanDefinitionHolder> scannedBeanDefinitions =
            this.componentScanParser.parse(componentScan, sourceClass.getMetadata().getClassName());
        // Check the set of scanned definitions for any further config classes and parse recursively if needed
        for (BeanDefinitionHolder holder : scannedBeanDefinitions) {


            BeanDefinition bdCand = holder.getBeanDefinition().getOriginatingBeanDefinition();
            if (bdCand == null) {


                bdCand = holder.getBeanDefinition();
            }
            if (ConfigurationClassUtils.checkConfigurationClassCandidate(bdCand, this.metadataReaderFactory)) {


                parse(bdCand.getBeanClassName(), holder.getBeanName());
            }
        }
    }
}
回到doProcessConfigurationClass 方法,继续往下走processImports 方法,这个方法主要就是处理@Impost 注解修饰的对象,这里会先处理调用实现ImportSelector 接口的对象的selectImports 方法,但是不会调用DeferredImportSelector 和ImportBeanDefinitionRegistrar 接口的实现类的对应方法,只会将这两者的实现类存入到deferredImportSelectorHandler 对象中。
后续doProcessConfigurationClass 方法中还有@Bean 等注解的解析,同样也会生成对应的BeanDefinition 后存入容器。
调用DeferredImportSelector接口实现类的process和ImportSelector方法-deferredImportSelectorHandler.process()
结束了doProcessConfigurationClass 方法,我们回到开始的地方parser.parse 调用地方,现在要看的是process 方法的调用,之前我们看@import 注解四种用法的时候,可以知道当ImportSelector 接口实现类的selectImports 方法调用完之后,就是轮到了它的子接口,也就是DeferredImportSelector 接口的process 和ImportSelector 方法调用了。
我们直接跟进代码,具体就写出来了,我直接说明代码流程process() -> processGroupImports() -> getImports(),到最后一步方法就可以直观的看到接口实现类的方法调用了。
这里就是会先调用process 方法,再调用selectImports 方法,也就说这里会调用到我们之前在看@SpringBootApplication 注解解析的时候涉及到逻辑了,换句说到这一步,我们能获得所有符合条件的自动配置类的全路径。
注意啊:这里是还没有将这些自动配置类生成对应的BeanDefinition 的。
public Iterable<Group.Entry> getImports() {


   for (DeferredImportSelectorHolder deferredImport : this.deferredImports) {


      this.group.process(deferredImport.getConfigurationClass().getMetadata(),
            deferredImport.getImportSelector());
   }
   return this.group.selectImports();
}
parser.parse 方法的调用到这里算是已经结束了,我们现在回到processConfigBeanDefinitions 方法中。
自动配置类生成对应的BeanDefinition存入容器-loadBeanDefinitions方法
我们现在看第二个重点,也是最后自动配置的最后一个重点,this.reader.loadBeanDefinitions(configClasses); 的调用执行。
还是老规矩跟进代码,代码流程:loadBeanDefinitions -> loadBeanDefinitionsForConfigurationClass。
这里主要看我注释了的代码,一共是四个方法调用,有兴趣的可以点进去看下,也可以直接看我的注释,这里主要做的就是四件事情:
- 将上面得到的自动配置的全路径,解析封装为BeanDefinition 对象,并存入容器;
- 将自动配置类中被@Bean 注解修饰的对象,封装为BeanDefinition 对象,并存入容器;
- 将自动配置类中涉及的@Impost 注解修饰的对象,再走一遍刚刚的流程;
- 执行ImportBeanDefinitionRegistrar 接口实现类的registerBeanDefinitions 方法。
if (configClass.isImported()) {


      // 将所有的自动配置类生成对应的BeanDefinition 并存入容器
      registerBeanDefinitionForImportedConfigurationClass(configClass);
   }
   for (BeanMethod beanMethod : configClass.getBeanMethods()) {


      // 解析自动配置类中,被@Bean 注解修饰的方法,生成对应的BeanDefinition 并存入容器
      loadBeanDefinitionsForBeanMethod(beanMethod);
   }

   // 解析自动配置类中,被@Import 注解修饰的对象,生成对应的BeanDefinition 并存入容器
   loadBeanDefinitionsFromImportedResources(configClass.getImportedResources());
   // 调用ImportBeanDefinitionRegistrar 接口实现类的registerBeanDefinitions 方法
   loadBeanDefinitionsFromRegistrars(configClass.getImportBeanDefinitionRegistrars());
}
小结
到这里processConfigBeanDefinitions 方法的调用就不用看了,只要知道这里是将自动配置类生成了对应BeanDefinition 并存入了容器中就行。
后续的refresh 方法中会经过finishBeanFactoryInitialization 方法,最后将这些BeanDefinition 进行实例化和初始化后,生成对应的bean 对象,存入IOC 的单例池中即可,到此自动配置的全流程就结束了。
总结
spring boot 本身就是对spring 的封装,所以很逻辑都是通用的spring 的,spring boot 本身自己的逻辑也可看做是对spring 的一个加强补充,所以spring boot 本身也是非常容易上手的。
再说spring boot 的自动配置的源码流程,说白了,就通过spring 中原本的BeanFactoryPostProsessor 机制来实现自动配置全路径转换为BeanDefinition 的过程,后续的还是生成Bean 的流程还是Spring 的那套getBean -> doGetBean- > createdBean -> doCreatedBean 那套。
至于集成Tomcat 和启动时配置集成的spring MVC 相关的东西,后续写Tomcat 和MVC 的时候再说。