
SpringBoot的启动流程可以分为几大部分:
1.创建SpringApplication,加载监听器
2.启动监听器
3.创建创建环境
4.创建容器
5.将环境放入容器中
6.refresh容器
7.启动所有监听器
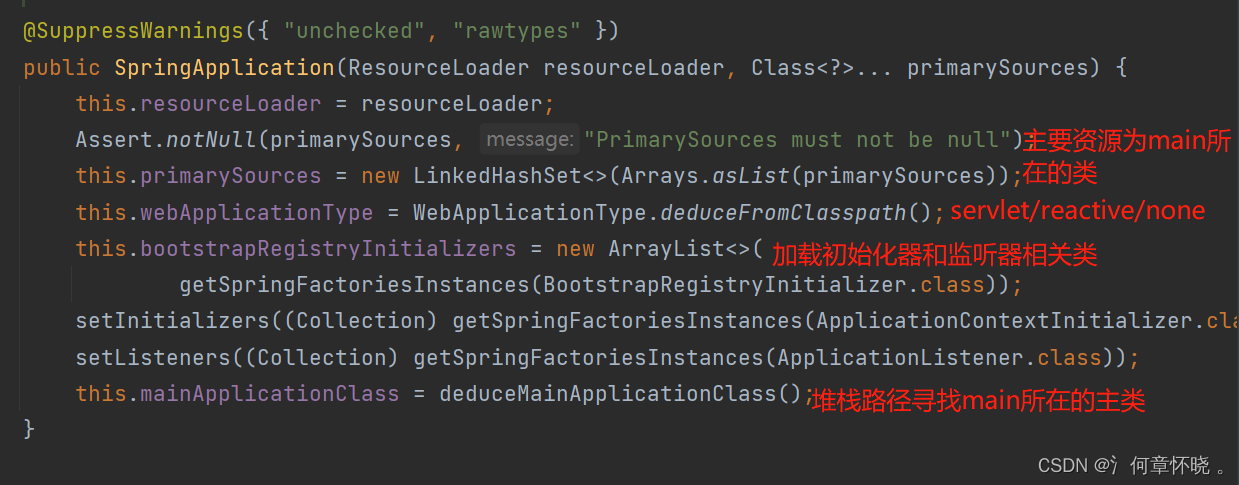
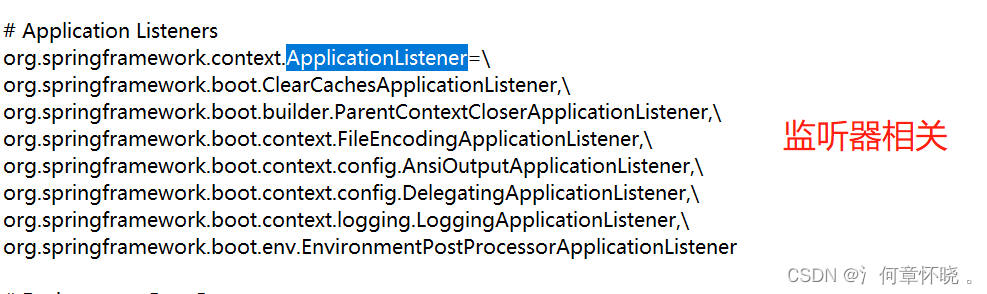
创建SpringApplication
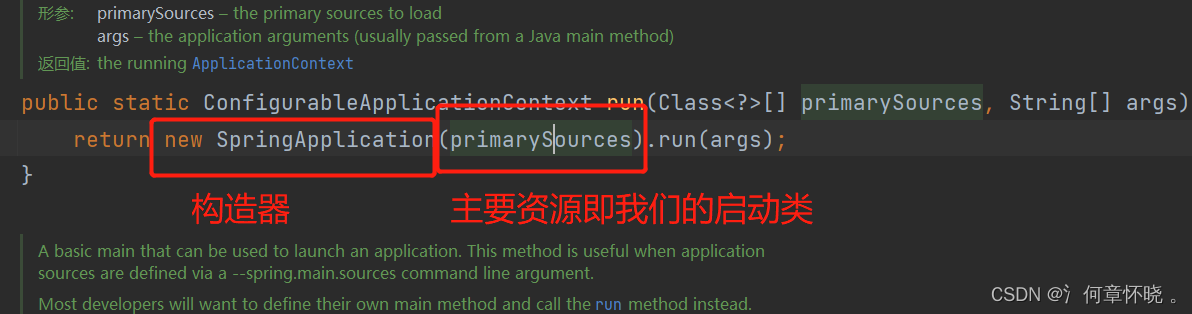


 构建好SpringApplication执行run()

这里是启动的伪代码
   public ConfigurableApplicationContext run(String... args) {


        //记录开始时间
        long startTime = System.nanoTime();
        //创建默认引导上下文
        DefaultBootstrapContext bootstrapContext = createBootstrapContext();
        //声明容器【重要】,spring本身就是容器,针对容器操作
        ConfigurableApplicationContext context = null;
        //设置一些系统属性 awt
        configureHeadlessProperty();
        //实例化启动期间的唯一的监听器  SpringAppliationRunListener--> EventPublishingRunListener
        Class<?>[] types = new Class<?>[]{

    SpringApplication.class, String[].class};
        //【此代码是我整合的伪代码,方便观看】加载SpringApplicationRunListener并反射创建
        SpringApplicationRunListeners listeners = new SpringApplicationRunListeners(logger,
                getSpringFactoriesInstances(SpringApplicationRunListener.class, types, this, args),
                this.applicationStartup);

        //【此代码是我整合的伪代码,方便观看】启动
        listeners.starting(doWithListeners("spring.boot.application.starting", (listener) -> listener.starting(bootstrapContext),
                (step) -> {


                    if (mainApplicationClass != null) {


                        step.tag("mainApplicationClass", mainApplicationClass.getName());
                    }
                }));

        try {


            //如启动项目使用命令行,封装为命令行对象
            ApplicationArguments applicationArguments = new DefaultApplicationArguments(args);
            //根据应用类型创建对应环境 servlet/reactive/none
            // 【此代码是我整合的伪代码,方便观看】-----------------------------------------------------------------
            ConfigurableEnvironment environment = null;
            if (this.environment != null) {


                environment = this.environment;
            }
            switch (this.webApplicationType) {


                case SERVLET:
                    environment = new ApplicationServletEnvironment();
                case REACTIVE:
                    environment = new ApplicationReactiveWebEnvironment();
                default:
                    environment = new ApplicationEnvironment();
            }
            //【此代码是我整合的,方便观看】 配置环境
            //设置转化器和格式化器
            if (this.addConversionService) {


                environment.setConversionService(new ApplicationConversionService());
            }
            configurePropertySources(environment, args);
            //配置文件,如我们配置的spring.profiles.active  dev/daily/online/pre等
            configureProfiles(environment, args);
            //监听器监听该环境
            listeners.environmentPrepared(bootstrapContext, environment);
            //将环境绑定到SpringApplication
            bindToSpringApplication(environment);
            //----------------------------------------------------------------------------------------------
            //设置忽略的bean信息
            configureIgnoreBeanInfo(environment);
            //打印banner
            Banner printedBanner = printBanner(environment);
            //创建容器
            //创建AnnotationConfigServletWebServerApplicationContext容器
            //【此代码是我整合的,方便观看】
            context = new AnnotationConfigServletWebServerApplicationContext();
            //读取
            this.reader = new AnnotatedBeanDefinitionReader(this);
            //扫描
            this.scanner = new ClassPathBeanDefinitionScanner(this);
            //设置applicationStartup
            context.setApplicationStartup(this.applicationStartup);
            //预处理容器,会将环境放入容器
            prepareContext(bootstrapContext, context, environment, listeners, applicationArguments, printedBanner);
            //刷新这里调用Spring核心源码-->AbstractApplicationContext#refresh
            refreshContext(context);
            //后处理  空实现  扩展点
            afterRefresh(context, applicationArguments);
            //计算启动时间
            Duration timeTakenToStartup = Duration.ofNanos(System.nanoTime() - startTime);
            if (this.logStartupInfo) {


                new StartupInfoLogger(this.mainApplicationClass).logStarted(getApplicationLog(), timeTakenToStartup);
            }
            //启动其他监听器
            listeners.started(context, timeTakenToStartup);
            callRunners(context, applicationArguments);
        } catch (Throwable ex) {


            handleRunFailure(context, ex, listeners);
            throw new IllegalStateException(ex);
        }
        try {


            Duration timeTakenToReady = Duration.ofNanos(System.nanoTime() - startTime);
            listeners.ready(context, timeTakenToReady);
        } catch (Throwable ex) {


            handleRunFailure(context, ex, null);
            throw new IllegalStateException(ex);
        }
        return context;
    }