上一篇SpringBoot源码解析-启动流程(一)我们分析了SpringBoot启动的第一步:创建SpringApplication对象,这一篇我们继续分析其中的第二步:run方法,在开始之前,我们先有个宏观的认识。
我们进入run方法:
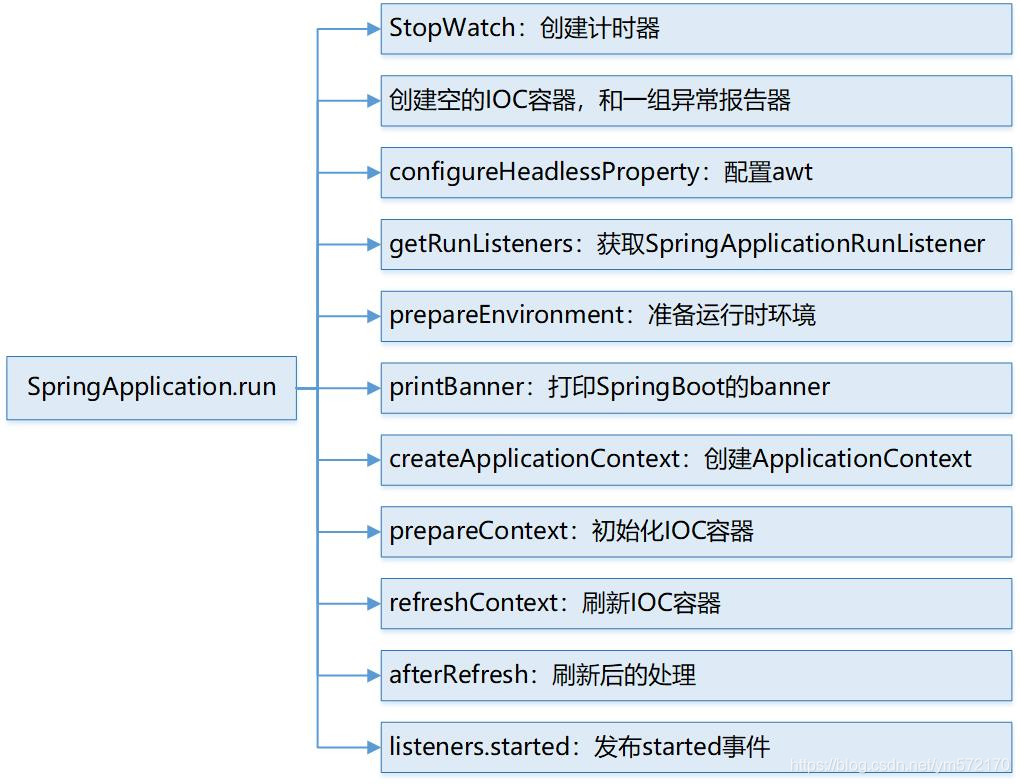
    public ConfigurableApplicationContext run(String... args) {
        //创建计时器
        StopWatch stopWatch = new StopWatch();
        stopWatch.start();
        //创建空的IOC容器,和一组异常报告器
        ConfigurableApplicationContext context = null;
        Collection<SpringBootExceptionReporter> exceptionReporters = new ArrayList<>();
        //配置与awt相关的信息
        configureHeadlessProperty();
        //获取SpringApplicationRunListeners
        SpringApplicationRunListeners listeners = getRunListeners(args);
        //调用监听器starting方法
        listeners.starting();
        try {
            ApplicationArguments applicationArguments = new DefaultApplicationArguments(args);
            //准备运行时环境
            ConfigurableEnvironment environment = prepareEnvironment(listeners, applicationArguments);
            configureIgnoreBeanInfo(environment);
            //打印SpringBoot的banner
            Banner printedBanner = printBanner(environment);
            //创建ApplicationContext
            context = createApplicationContext();
            exceptionReporters = getSpringFactoriesInstances(SpringBootExceptionReporter.class, new Class[] { ConfigurableApplicationContext.class }, context);
            //初始化IOC容器
            prepareContext(context, environment, listeners, applicationArguments, printedBanner);
            //刷新IOC容器
            refreshContext(context);
            //刷新后的处理
            afterRefresh(context, applicationArguments);
            stopWatch.stop();
            if (this.logStartupInfo) {
                new StartupInfoLogger(this.mainApplicationClass).logStarted(getApplicationLog(), stopWatch);
            }
            //发布started事件
            listeners.started(context);
            //运行期回调
            callRunners(context, applicationArguments);
        }
        catch (Throwable ex) {
            handleRunFailure(context, ex, exceptionReporters, listeners);
            throw new IllegalStateException(ex);
        }
        try {
            //发布running事件
            listeners.running(context);
        }catch (Throwable ex) {
            handleRunFailure(context, ex, exceptionReporters, null);
            throw new IllegalStateException(ex);
        }
        return context;
    }
下面我们进行具体的分析
创建StopWatch对象
StopWatch是位于org.springframework.util包下的一个工具类,通过它可方便的对程序部分代码进行计时(ms级别),我们平时如果要统计代码执行时间也可以使用它,例如:
public static void main(String[] args) {
        StopWatch stopWatch = new StopWatch();
        stopWatch.start("业务1");
        //业务1的代码
        try {
            Thread.sleep(3000);
        } catch (InterruptedException e) {
            e.printStackTrace();
        }
        stopWatch.stop();
        stopWatch.start("业务2");
        //业务2的代码
        try {
            Thread.sleep(5000);
        } catch (InterruptedException e) {
            e.printStackTrace();
        }
        stopWatch.stop();
        System.out.println(stopWatch.prettyPrint());
    }
	执行结果如下:
	---------------------------------------------
	ns         %     Task name
	---------------------------------------------
	2999784000  038%  业务1
	4999352800  062%  业务2
创建空的IOC容器,和一组异常报告器
ConfigurableApplicationContext context = null;
Collection<SpringBootExceptionReporter> exceptionReporters = new ArrayList<>();
获取SpringApplicationRunListeners
我们进入方法,这边调用了getSpringFactoriesInstances方法,主要初始化一组SpringApplicationRunListeners。SpringApplicationRunListeners是SpringBoot在启动过程中发布各种事件用的。
	private SpringApplicationRunListeners getRunListeners(String[] args) {
		Class<?>[] types = new Class<?>[] { SpringApplication.class, String[].class };
		return new SpringApplicationRunListeners(logger, getSpringFactoriesInstances(SpringApplicationRunListener.class, types, this, args));
	}
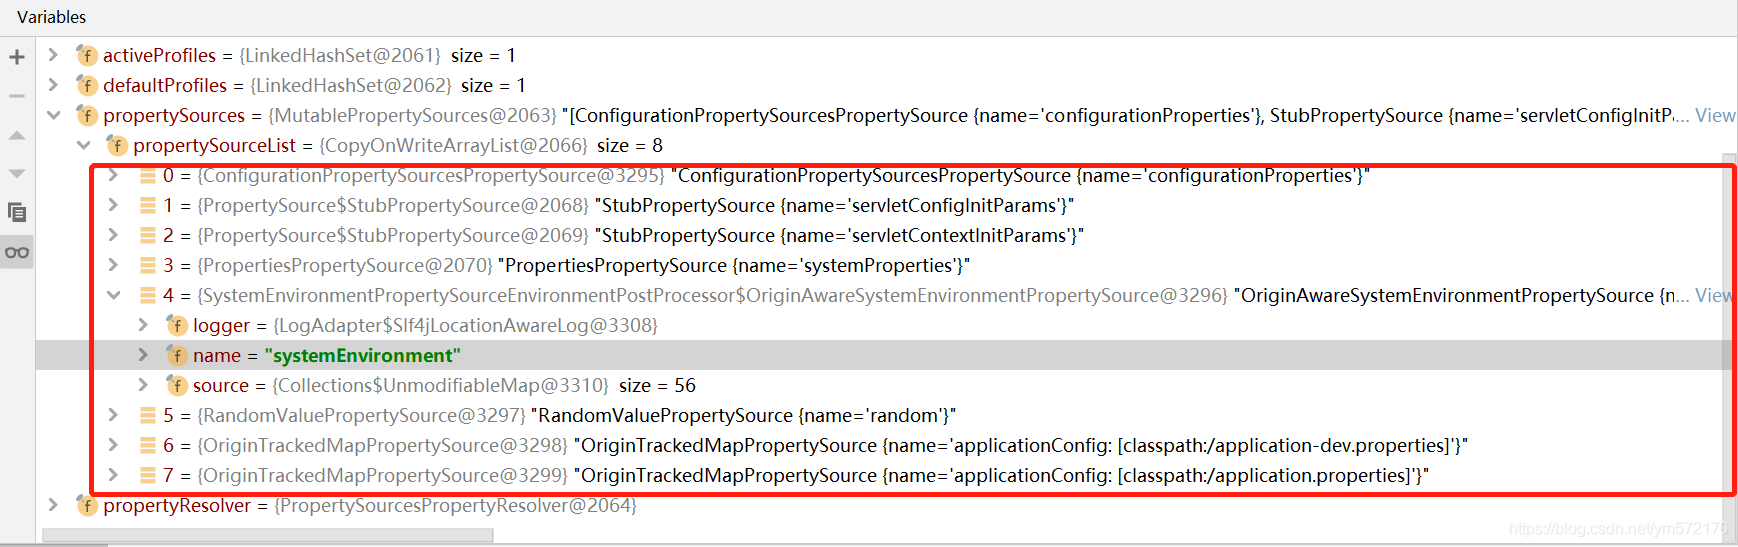
准备运行时环境(prepareEnvironment)
我们先了解一下 Environment ,它是IOC容器的运行环境,它包括Profile和Properties两大部分。它封装了诸多属性来源(命令行属性、JVM properties、system环境变量、properties文件等)。
	private ConfigurableEnvironment prepareEnvironment(SpringApplicationRunListeners listeners,ApplicationArguments applicationArguments) {
		// 创建运行时环境
		ConfigurableEnvironment environment = getOrCreateEnvironment();
		// 配置运行时环境
		configureEnvironment(environment, applicationArguments.getSourceArgs());
		ConfigurationPropertySources.attach(environment);
		// 发布environmentPrepared事件
		listeners.environmentPrepared(environment);
		// 环境与应用绑定
		bindToSpringApplication(environment);
		if (!this.isCustomEnvironment) {
			environment = new EnvironmentConverter(getClassLoader()).convertEnvironmentIfNecessary(environment,deduceEnvironmentClass());
		}
		ConfigurationPropertySources.attach(environment);
		return environment;
	}
环境准备好后,我们通过debug可以看到初始化了如下属性来源:
打印SpringBoot的banner
还记得我们启动完SpringBoot应用后,在控制台打印了如下字符:
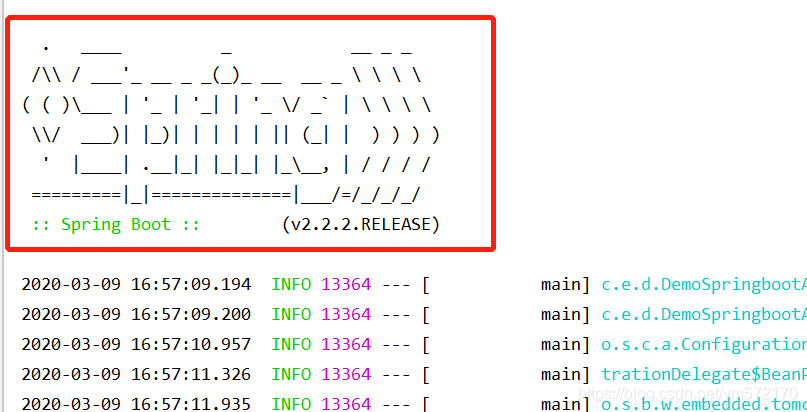
就是通过printBanner这个方法实现的,这边我们不多深究。
创建ApplicationContext(createApplicationContext)
我们进入createApplicationContext方法:
	public static final String DEFAULT_CONTEXT_CLASS = "org.springframework.context.annotation.AnnotationConfigApplicationContext";
	public static final String DEFAULT_SERVLET_WEB_CONTEXT_CLASS = "org.springframework.boot.web.servlet.context.AnnotationConfigServletWebServerApplicationContext";
	public static final String DEFAULT_REACTIVE_WEB_CONTEXT_CLASS = "org.springframework.boot.web.reactive.context.AnnotationConfigReactiveWebServerApplicationContext";
	protected ConfigurableApplicationContext createApplicationContext() {
		Class<?> contextClass = this.applicationContextClass;
		if (contextClass == null) {
			try {
				// 根据Web应用类型决定实例化哪个IOC容器
				switch (this.webApplicationType) {
				case SERVLET:
					contextClass = Class.forName(DEFAULT_SERVLET_WEB_CONTEXT_CLASS);
					break;
				case REACTIVE:
					contextClass = Class.forName(DEFAULT_REACTIVE_WEB_CONTEXT_CLASS);
					break;
				default:
					contextClass = Class.forName(DEFAULT_CONTEXT_CLASS);
				}
			}
			catch (ClassNotFoundException ex) {
				throw new IllegalStateException(
						"Unable create a default ApplicationContext, please specify an ApplicationContextClass", ex);
			}
		}
		return (ConfigurableApplicationContext) BeanUtils.instantiateClass(contextClass);
	}
我们这边是Servlet环境,故上面导入的类为:AnnotationConfigServletWebServerApplicationContext 。
初始化IOC容器(prepareContext)
private void prepareContext(ConfigurableApplicationContext context, ConfigurableEnvironment environment,
        SpringApplicationRunListeners listeners, ApplicationArguments applicationArguments, Banner printedBanner) {
    // 将创建好的应用环境设置到IOC容器中
    context.setEnvironment(environment);
    // IOC容器的后置处理
    postProcessApplicationContext(context);
    // 执行初始化器Initializer
    applyInitializers(context);
    // 发布contextPrepared方法事件
    listeners.contextPrepared(context);
    if (this.logStartupInfo) {
        logStartupInfo(context.getParent() == null);
        logStartupProfileInfo(context);
    }
    // 创建spring bean容器
    ConfigurableListableBeanFactory beanFactory = context.getBeanFactory();
    // 注册两个组件springApplicationArguments和springBootBanner
 	beanFactory.registerSingleton("springApplicationArguments", applicationArguments);
    if (printedBanner != null) {
        beanFactory.registerSingleton("springBootBanner", printedBanner);
    }
    if (beanFactory instanceof DefaultListableBeanFactory) {
        ((DefaultListableBeanFactory) beanFactory)
                .setAllowBeanDefinitionOverriding(this.allowBeanDefinitionOverriding);
    }
    // 加载主启动类
    Set<Object> sources = getAllSources();
    Assert.notEmpty(sources, "Sources must not be empty");
    // 主启动类注册至IOC容器
    load(context, sources.toArray(new Object[0]));
    // 发布contextLoaded事件
    listeners.contextLoaded(context);
}
我们主要看下最后几行
	// 加载主启动类
    Set<Object> sources = getAllSources();
这边加载了我们的启动类,也就是main方法所在的类,通过debug可以验证:
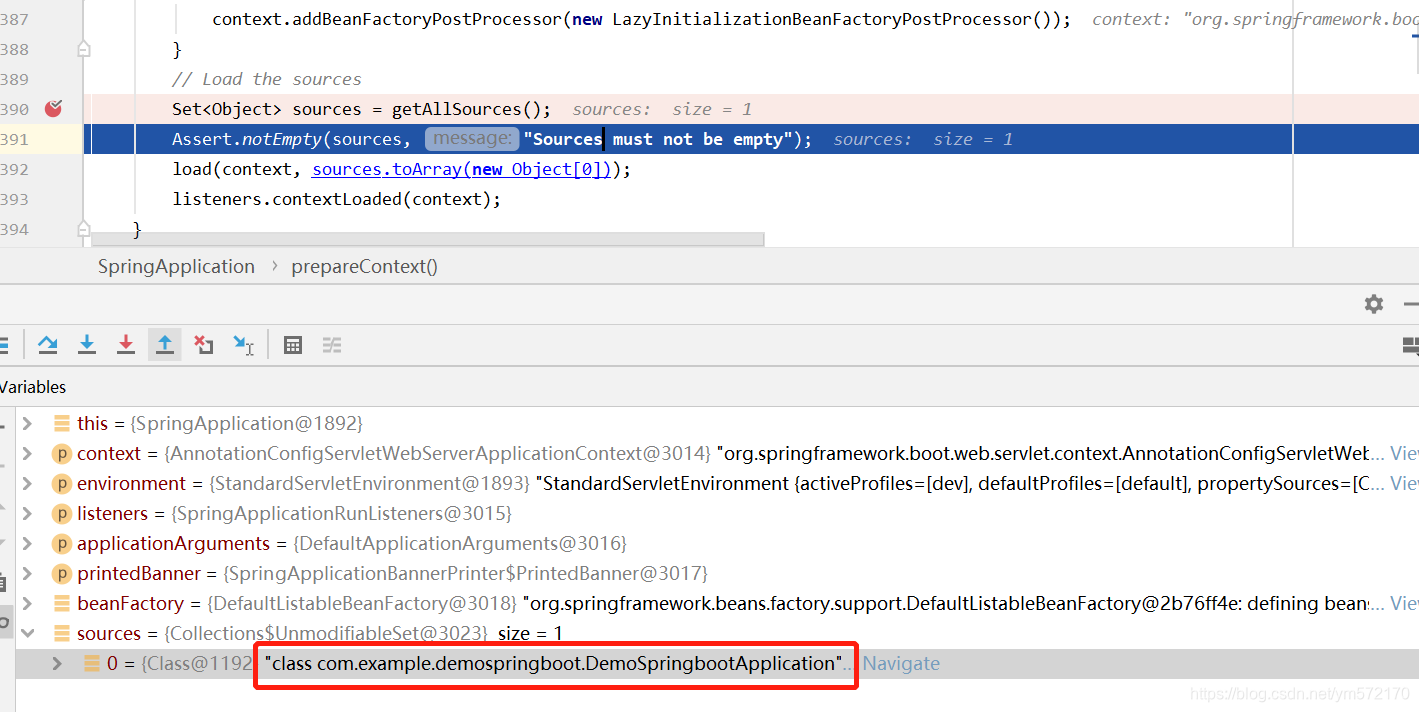
// 主启动类注册至IOC容器
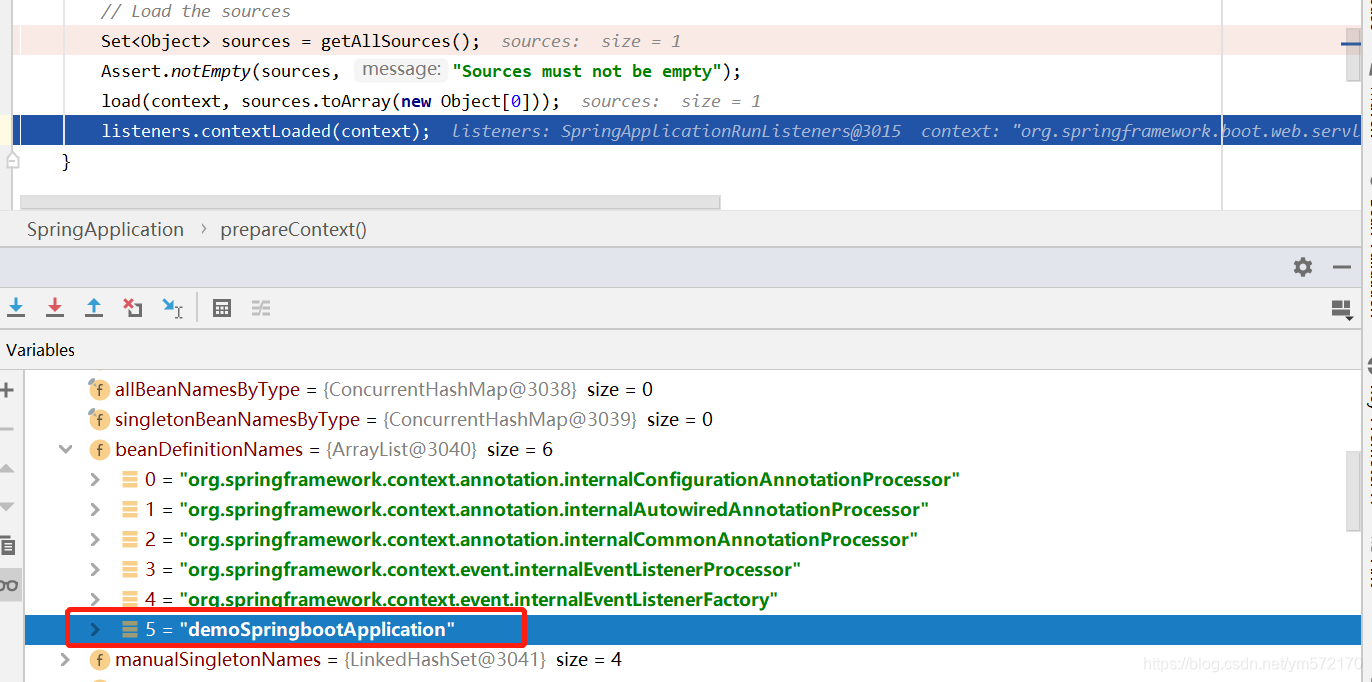
load(context, sources.toArray(new Object[0]));
这个方法主要就是把我们的main主启动类以BeanDefinition注入到IOC容器中,执行完通过debug可以验证:
刷新IOC容器(refreshContext)
这个方法其实是调用了AbstractApplicationContext的refresh方法,这个方法也是Spring Ioc容器最核心方法,这边我们只展示一下方法,以后再单独做详细分析。
   // 最终调用AbstractApplicationContext的refresh方法
   public void refresh() throws BeansException, IllegalStateException {
        synchronized(this.startupShutdownMonitor) {
        	// 初始化前的预处理
            this.prepareRefresh();
            // 获取BeanFactory,加载所有bean的定义信息
            ConfigurableListableBeanFactory beanFactory = this.obtainFreshBeanFactory();
            // BeanFactory的预处理
            this.prepareBeanFactory(beanFactory);

            try {
            	// 初始化BeanFactory的后置处理器
                this.postProcessBeanFactory(beanFactory);
                // 执行BeanFactory的后置处理器
                this.invokeBeanFactoryPostProcessors(beanFactory);
                // 注册Bean的后置处理器
                this.registerBeanPostProcessors(beanFactory);
                //  初始化MessageSource
                this.initMessageSource();
                // 初始化事件派发器
                this.initApplicationEventMulticaster();
                // 供子类的扩展
                this.onRefresh();
                // 注册监听器
                this.registerListeners();
                // 实例化所有单例Bean
                this.finishBeanFactoryInitialization(beanFactory);
                // 完成容器的创建工作
                this.finishRefresh();
            } catch (BeansException var9) {
                if (this.logger.isWarnEnabled()) {
                    this.logger.warn("Exception encountered during context initialization - cancelling refresh attempt: " + var9);
                }

                this.destroyBeans();
                this.cancelRefresh(var9);
                throw var9;
            } finally {
                this.resetCommonCaches();
            }

        }
    }
刷新后的处理(afterRefresh)
这是个空方法,故不再深究。
发布started事件
这边代码比较简单,主要是发布started事件。
	void started(ConfigurableApplicationContext context) {
		for (SpringApplicationRunListener listener : this.listeners) {
			listener.started(context);
		}
	}
至此,SpringBoot启动流程的第二部分run方法讲完了,这边只是大概梳理了一下整体流程,一些内部实现细节没有较深入分析,感兴趣的朋友可以自己深入研究。
