提示:文章写完后,目录可以自动生成,如何生成可参考右边的帮助文档
前言
SSD是一种非常优秀的one-stage目标检测方法,one-stage算法就是目标检测和分类是同时完成的,其主要思路是利用CNN提取特征后,均匀地在图片的不同位置进行密集抽样,抽样时可以采用不同尺度和长宽比,物体分类与预测框的回归同时进行,整个过程只需要一步,所以其优势是速度快。
但是均匀的密集采样的一个重要缺点是训练比较困难,这主要是因为正样本与负样本(背景)极其不均衡(参见Focal Loss),导致模型准确度稍低。
SSD的英文全名是Single Shot MultiBox Detector,Single shot说明SSD算法属于one-stage方法,MultiBox说明SSD算法基于多框预测。
这里默认大家会使用anaconda环境,如果不会的可以看看其他的博主,我自己出过Ubuntu系统的教程,本质上没有什么区别,大家可以看看
一、github下载源码
GitHub - bubbliiiing/ssd-pytorch: 这是一个ssd-pytorch的源码,可以用于训练自己的模型。
二、步骤
首先创建一个anaconda的环境
打开你的cmd命令窗口
conda create -n SSD python=3.8 # SSD为所创建虚拟环境名称;python版本可以更换创建好之后激活该环境
conda activate SSD先下载一个numpy,不下载有可能会报错
pip install numpy -i https://pypi.tuna.tsinghua.edu.cn/simple numpy源码里提供了requirements.txt文件,但是我在使用的时候出现了很多问题,感觉年代太久远了,所以这里大家累点,手动pip比较好。
Previous PyTorch Versions | PyTorch
这个网址是各个版本的torch和对应的torchvision 建议收藏,以后必用的上
pip install torch==1.7.1+cu110 torchvision==0.8.2+cu110 torchaudio==0.7.2 -f https://download.pytorch.org/whl/torch_stable.html -i https://pypi.tuna.tsinghua.edu.cn/simple h5py在你的conda中,输入以上代码安装torch,这个版本亲测有效,github源码里提到的那个我是下载不了,你们可以试试,这个已经换好源了,直接无脑冲。
有兴趣的可以试试requirements,我反正是失败了
pip install -r requirements.txt -i https://pypi.mirrors.ustc.edu.cn/simple/
scipy==1.2.1
numpy==1.17.0
matplotlib==3.1.2
opencv_python==4.1.2.30
torch==1.2.0
torchvision==0.4.0
tqdm==4.60.0
Pillow==8.2.0
h5py==2.10.0
按顺序pip install 文件名 -i https://pypi.tuna.tsinghua.edu.cn/simple h5py 后面是换源的链接
安装完成进入pycharm 添加解释器
依次打开各个包,看到报红,就pip 对应的包,我试了没有复杂的包,无脑pip就好。
打开 predic.py文件 点击运行
这里需要注意!!我当时懵了半天它不显示结果。
在底下的运行界面输入
img/street.jpg
训练所需的ssd_weights.pth和主干的权值可以在百度云下载。
链接: 百度网盘 请输入提取码百度网盘为您提供文件的网络备份、同步和分享服务。空间大、速度快、安全稳固,支持教育网加速,支持手机端。注册使用百度网盘即可享受免费存储空间
提取码: jgn8
在底下的运行界面输入 img/street.jpg
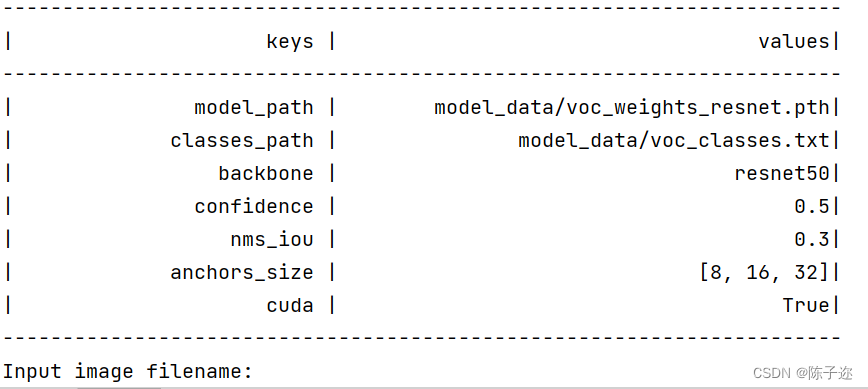
Input image filename:img/street.jpg
img/street.jpg
---------------------------------------------
分割线
下面讲一下如何训练自己的数据集
VOC数据集下载地址如下,里面已经包括了训练集、测试集、验证集(与测试集一样),无需再次划分:
链接: 百度网盘 请输入提取码百度网盘为您提供文件的网络备份、同步和分享服务。空间大、速度快、安全稳固,支持教育网加速,支持手机端。注册使用百度网盘即可享受免费存储空间
提取码: ph32
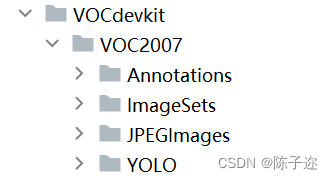
Annotations:这个文件名是存放xml文件的地方
JPEGImages:这个文件是存放图片的地方
ImageSets:这个先不管,他是程序运行后产后测试、训练、验证文件的地方
下面是个YOLO格式转voc的脚本,不需要的直接跳过
from xml.dom.minidom import Document
import os
import cv2


# def makexml(txtPath, xmlPath, picPath):  # txt所在文件夹路径,xml文件保存路径,图片所在文件夹路径
def makexml(picPath, txtPath, xmlPath):  # txt所在文件夹路径,xml文件保存路径,图片所在文件夹路径
    """此函数用于将yolo格式txt标注文件转换为voc格式xml标注文件
    在自己的标注图片文件夹下建三个子文件夹,分别命名为picture、txt、xml
    """
    dic = {'0': "bicyclist",  # 创建字典用来对类型进行转换
           '1': "car",  # 此处的字典要与自己的classes.txt文件中的类对应,且顺序要一致
           '2': "light",
           '3': "pedestrian",
           '4': "truck",
           }
    files = os.listdir(txtPath)
    for i, name in enumerate(files):
        xmlBuilder = Document()
        annotation = xmlBuilder.createElement("annotation")  # 创建annotation标签
        xmlBuilder.appendChild(annotation)
        txtFile = open(txtPath + name)
        txtList = txtFile.readlines()
        img = cv2.imread(picPath + name[0:-4] + ".jpg")
        Pheight, Pwidth, Pdepth = img.shape

        folder = xmlBuilder.createElement("folder")  # folder标签
        foldercontent = xmlBuilder.createTextNode("driving_annotation_dataset")
        folder.appendChild(foldercontent)
        annotation.appendChild(folder)  # folder标签结束

        filename = xmlBuilder.createElement("filename")  # filename标签
        filenamecontent = xmlBuilder.createTextNode(name[0:-4] + ".jpg")
        filename.appendChild(filenamecontent)
        annotation.appendChild(filename)  # filename标签结束

        size = xmlBuilder.createElement("size")  # size标签
        width = xmlBuilder.createElement("width")  # size子标签width
        widthcontent = xmlBuilder.createTextNode(str(Pwidth))
        width.appendChild(widthcontent)
        size.appendChild(width)  # size子标签width结束

        height = xmlBuilder.createElement("height")  # size子标签height
        heightcontent = xmlBuilder.createTextNode(str(Pheight))
        height.appendChild(heightcontent)
        size.appendChild(height)  # size子标签height结束

        depth = xmlBuilder.createElement("depth")  # size子标签depth
        depthcontent = xmlBuilder.createTextNode(str(Pdepth))
        depth.appendChild(depthcontent)
        size.appendChild(depth)  # size子标签depth结束

        annotation.appendChild(size)  # size标签结束

        for j in txtList:
            oneline = j.strip().split(" ")
            object = xmlBuilder.createElement("object")  # object 标签
            picname = xmlBuilder.createElement("name")  # name标签
            namecontent = xmlBuilder.createTextNode(dic[oneline[0]])
            picname.appendChild(namecontent)
            object.appendChild(picname)  # name标签结束

            pose = xmlBuilder.createElement("pose")  # pose标签
            posecontent = xmlBuilder.createTextNode("Unspecified")
            pose.appendChild(posecontent)
            object.appendChild(pose)  # pose标签结束

            truncated = xmlBuilder.createElement("truncated")  # truncated标签
            truncatedContent = xmlBuilder.createTextNode("0")
            truncated.appendChild(truncatedContent)
            object.appendChild(truncated)  # truncated标签结束

            difficult = xmlBuilder.createElement("difficult")  # difficult标签
            difficultcontent = xmlBuilder.createTextNode("0")
            difficult.appendChild(difficultcontent)
            object.appendChild(difficult)  # difficult标签结束

            bndbox = xmlBuilder.createElement("bndbox")  # bndbox标签
            xmin = xmlBuilder.createElement("xmin")  # xmin标签
            mathData = int(((float(oneline[1])) * Pwidth + 1) - (float(oneline[3])) * 0.5 * Pwidth)
            xminContent = xmlBuilder.createTextNode(str(mathData))
            xmin.appendChild(xminContent)
            bndbox.appendChild(xmin)  # xmin标签结束

            ymin = xmlBuilder.createElement("ymin")  # ymin标签
            mathData = int(((float(oneline[2])) * Pheight + 1) - (float(oneline[4])) * 0.5 * Pheight)
            yminContent = xmlBuilder.createTextNode(str(mathData))
            ymin.appendChild(yminContent)
            bndbox.appendChild(ymin)  # ymin标签结束

            xmax = xmlBuilder.createElement("xmax")  # xmax标签
            mathData = int(((float(oneline[1])) * Pwidth + 1) + (float(oneline[3])) * 0.5 * Pwidth)
            xmaxContent = xmlBuilder.createTextNode(str(mathData))
            xmax.appendChild(xmaxContent)
            bndbox.appendChild(xmax)  # xmax标签结束

            ymax = xmlBuilder.createElement("ymax")  # ymax标签
            mathData = int(((float(oneline[2])) * Pheight + 1) + (float(oneline[4])) * 0.5 * Pheight)
            ymaxContent = xmlBuilder.createTextNode(str(mathData))
            ymax.appendChild(ymaxContent)
            bndbox.appendChild(ymax)  # ymax标签结束

            object.appendChild(bndbox)  # bndbox标签结束

            annotation.appendChild(object)  # object标签结束

        f = open(xmlPath + name[0:-4] + ".xml", 'w')
        xmlBuilder.writexml(f, indent='\t', newl='\n', addindent='\t', encoding='utf-8')
        f.close()


if __name__ == "__main__":
    picPath = "VOCdevkit/VOC2007/JPEGImages/"  # 图片所在文件夹路径,后面的/一定要带上
    txtPath = "VOCdevkit/VOC2007/YOLO/"  # txt所在文件夹路径,后面的/一定要带上
    xmlPath = "VOCdevkit/VOC2007/Annotations/"  # xml文件保存路径,后面的/一定要带上
    makexml(picPath, txtPath, xmlPath)
这个是YOLO格式数据集转voc格式的脚本
使用它的时候需要在你的voc2007下建一个YOLO的文件夹,将全部的TXT标签放入其中,然后图片全部放入ImageSets中,然后运行上面的程序。
 dic = {'0': "bicyclist",  # 创建字典用来对类型进行转换
           '1': "car",  # 此处的字典要与自己的classes.txt文件中的类对应,且顺序要一致
           '2': "light",
           '3': "pedestrian",
           '4': "truck",
           }
在第十六行,注意修改标签,一定要按顺序。
然后再model下面有一个
model_data/voc_classes.txt
将其中的标签类别修改成自己的
接下来 运行 voc_annotation.py
第二十三行
classes_path = 'model_data/Driving.txt'
路径改成自己修改好的类别文件路径
接下来就可以直接run了
遇到过一个报错
1.错误提示
OMP: Error #15: Initializing libiomp5md.dll, but found libiomp5md.dll already initialized.
OMP: Hint This means that multiple copies of the OpenMP runtime have been linked into the program. That is dangerous, since it can degrade performance or cause incorrect results. The best thing to do is to ensure that only a single OpenMP runtime is linked into the process, e.g. by avoiding static linking of the OpenMP runtime in any library. As an unsafe, unsupported, undocumented workaround you can set the environment variable KMP_DUPLICATE_LIB_OK=TRUE to allow the program to continue to execute, but that may cause crashes or silently produce incorrect results. For more information, please see http://www.intel.com/software/products/support/.
2.解决办法:在import os后面加上os.environ["KMP_DUPLICATE_LIB_OK"] = "TRUE"
import os
os.environ["KMP_DUPLICATE_LIB_OK"]  =  "TRUE"
如果你们有遇到其他报错可以评论区私聊,跑这个代码是为了发论文做对比实验用的,没有深入研究。
最后fastrcnn和这个差不多,搭好的环境可以直接用。