在实时检测Aruco标签坐标用于定位的时候发现,追踪效果不是很好,于是在检测过程中添加了卡尔曼滤波,在aruco检测算法检测不到aruco标签的时候,调用卡尔曼滤波算法(KalmanFilter),补偿丢失的定位的坐标信息。
步骤1:标定相机,获得“标定文件.yaml”,前面的文章有详细介绍;相机+棋盘格opencv-python标定生成yaml文件_大胡子大叔的博客-CSDN博客
步骤2:调用摄像头/使用本地的视频
调用摄像头写法
video_cap = cv2.VideoCapture(0,cv2.CAP_DSHOW)
调用本地视频写法
video_cap = cv2.VideoCapture('./aruco.mp4'
步骤3:进行实时检测
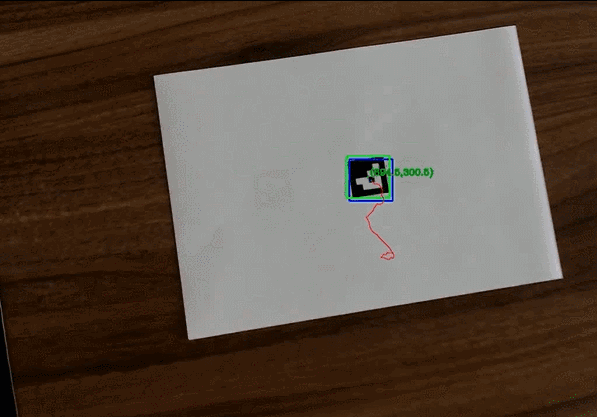
检测效果见下图
直接上代码
import cv2
import numpy as np
import time
import cv2.aruco as aruco
import yaml
file_path = ("./标定文件.yaml")
###加载文件路径###

with open(file_path, "r") as file:
    parameter = yaml.load(file.read(), Loader=yaml.Loader)
    mtx = parameter['camera_matrix']
    dist = parameter['dist_coeff']
    camera_u = parameter['camera_u']
    camera_v = parameter['camera_v']
    mtx = np.array(mtx)
    dist = np.array(dist)
font = cv2.FONT_HERSHEY_SIMPLEX #font for displaying text (below)
#卡尔曼滤波的算法,参考链接https://blog.csdn.net/Miaosh999/article/details/106934655/
#本文修改了min_hsv_bound,max_hsv_bound里面的数值,还将cv2.rectangle里面的数值强制转化为int
#这个检测可以和未加卡尔曼滤波的做比对,即tracker5里面
# hsv阈值,便于进行轮廓判断及轨迹绘制,需要根据运动目标的颜色自己进行调整
min_hsv_bound = (25, 52, 72)
max_hsv_bound = (100, 255, 255)
#状态向量
stateSize = 6
#观测向量
measSize = 4
coutrSize = 0
kf = cv2.KalmanFilter(stateSize,measSize,coutrSize)
state = np.zeros(stateSize, np.float32)#[x,y,v_x,v_y,w,h],簇心位置,速度,高宽
meas = np.zeros(measSize, np.float32)#[z_x,z_y,z_w,z_h]
procNoise = np.zeros(stateSize, np.float32)

#状态转移矩阵
cv2.setIdentity(kf.transitionMatrix)#生成单位矩阵
kf.measurementMatrix = np.zeros((measSize,stateSize),np.float32)
kf.measurementMatrix[0,0]=1.0
kf.measurementMatrix[1,1]=1.0
kf.measurementMatrix[2,4]=1.0
kf.measurementMatrix[3,5]=1.0


cv2.setIdentity(kf.processNoiseCov)
kf.processNoiseCov[0,0] = 1e-2
kf.processNoiseCov[1,1] = 1e-2
kf.processNoiseCov[2,2] = 5.0
kf.processNoiseCov[3,3] = 5.0
kf.processNoiseCov[4,4] = 1e-2
kf.processNoiseCov[5,5] = 1e-2

#测量噪声
cv2.setIdentity(kf.measurementNoiseCov)
#video_cap = cv2.VideoCapture(0,cv2.CAP_DSHOW)
#video_cap = cv2.VideoCapture('./zhenAruco.mp4')
video_cap = cv2.VideoCapture('./aruco.mp4')
# 视频输出
fps = video_cap.get(cv2.CAP_PROP_FPS) #获得视频帧率,即每秒多少帧
size = (int(video_cap.get(cv2.CAP_PROP_FRAME_WIDTH)),int(video_cap.get(cv2.CAP_PROP_FRAME_HEIGHT)))
#保存检测结果,将预测框和中心点的路径保存到视频中
videoWriter = cv2.VideoWriter('./new_aruco.mp4' ,cv2.VideoWriter_fourcc('m', 'p', '4', 'v'), fps, size)
ticks = 0
i=0
found = False
notFoundCount = 0
prePointCen = [] #存储中心点位置
meaPointCen = []
while(True):
    ret, frame = video_cap.read()
    gray = cv2.cvtColor(frame, cv2.COLOR_BGR2GRAY)
    aruco_dict = aruco.getPredefinedDictionary(aruco.DICT_4X4_1000)
    parameters = aruco.DetectorParameters_create()
    corners, ids, rejectedImgPoints = aruco.detectMarkers(gray,
                                                          aruco_dict,
                                                          parameters=parameters)
    if ret is False:
        break
    cv2.imshow('frame',frame)
    cv2.waitKey(1)
    precTick = ticks
    ticks = float(cv2.getTickCount())
    res = frame.copy()
    # dT = float(1/fps)
    dT = float((ticks - precTick)/cv2.getTickFrequency())
    if(found):
        #预测得到的位置
        kf.transitionMatrix[0,2] = dT
        kf.transitionMatrix[1,3] = dT

        state = kf.predict()
        width = state[4]
        height = state[5]
        x_left = state[0] - width/2 #左上角横坐标
        y_left = state[1] - height/2  #左上角纵坐标
        x_right = state[0] + width/2
        y_right = state[1] + height/2

        center_x = state[0]
        center_y = state[1]
        prePointCen.append((int(center_x),int(center_y)))
        cv2.circle(res, (int(center_x),int(center_y)),2,(255,0,0),-1)
        cv2.rectangle(res,(int(x_left),int(y_left)),(int(x_right),int(y_right)),(255,0,0),2)

    #根据颜色二值化得到的位置
    if ids is not None:
        rvec, tvec, _ = aruco.estimatePoseSingleMarkers(corners, 0.05, mtx, dist)
        (rvec - tvec).any()
        for i in range(rvec.shape[0]):
            cv2.drawFrameAxes(frame, mtx, dist, rvec[i, :, :], tvec[i, :, :], 0.03)
            aruco.drawDetectedMarkers(frame, corners)
        # 显示ID,rvec,tvec, 旋转向量和平移向量
        cv2.putText(frame, "Id: " + str(ids), (0, 40), font, 0.5, (0, 0, 255), 1, cv2.LINE_AA)
        cv2.putText(frame, "rvec: " + str(rvec[i, :, :]), (0, 60), font, 0.5, (0, 255, 0), 2, cv2.LINE_AA)
        cv2.putText(frame, "tvec: " + str(tvec[i, :, :]), (0, 80), font, 0.5, (0, 0, 255), 1, cv2.LINE_AA)
    #检测轮廓,只检测最外围轮廓,保存物体边界上所有连续的轮廓点到contours向量内
    balls = []
    ballsBox = []
    for i in range(len(corners)):
        x, y, w, h = cv2.boundingRect(np.array(corners[i]))

        ratio = float(w/h)
        if(ratio > 1.0):
            ratio = 1.0 / ratio
        if(ratio > 0.75 and w*h>=400):
            balls.append(corners[i])
            ballsBox.append([x, y, w, h])

    print( "found:", len(ballsBox))
    print("\n")

    for i in range(len(balls)):
        # 绘制轮廓
        #cv2.drawContours(res, balls, i, (20,150,20),1)
        cv2.rectangle(res,(ballsBox[i][0],ballsBox[i][1]),(ballsBox[i][0]+ballsBox[i][2],ballsBox[i][1]+ballsBox[i][3]),(0,255,0),2) #二值化得到边界

        center_x = ballsBox[i][0] + ballsBox[i][2] / 2
        center_y = ballsBox[i][1] + ballsBox[i][3] / 2

        meaPointCen.append((int(center_x),int(center_y)))
        cv2.circle(res,(int(center_x),int(center_y)), 2, (20,150,20) ,-1)

        name = "(" + str(center_x) + "," + str(center_y) + ")"
        cv2.putText(res, name, (int(center_x) + 3, int(center_y) - 3), cv2.FONT_HERSHEY_COMPLEX, 0.5, (20,150,20), 2)
    n = len(prePointCen)
    for i in range(1, n):
        print(i)
        if prePointCen[i-1] is None or prePointCen[i] is None:
            continue
         #  注释掉的这块是为了绘制能够随时间先后慢慢消失的追踪轨迹,但是有一些小错误
        # 计算所画小线段的粗细
        # thickness = int(np.sqrt(64 / float(n - i + 1))*2.5)
        # print(thickness)
        # 画出小线段
        # cv2.line(res, prePointCen[i-1], prePointCen[i], (0, 0, 255), thickness)
        cv2.line(res, prePointCen[i-1], prePointCen[i], (0,0,255), 1, 4)
    if(len(balls) == 0):
        notFoundCount += 1
        print("notFoundCount",notFoundCount)
        print("\n")

        if notFoundCount >= 100:
            found = False

    else:
        #测量得到的物体位置
        notFoundCount = 0
        meas[0] = ballsBox[0][0] + ballsBox[0][2] / 2
        meas[1] = ballsBox[0][1] + ballsBox[0][3] / 2
        meas[2] = float(ballsBox[0][2])
        meas[3] = float(ballsBox[0][3])

        #第一次检测
        if not found:
            for i in range(len(kf.errorCovPre)):
                kf.errorCovPre[i,i] = 1
            state[0] = meas[0]
            state[1] = meas[1]
            state[2] = 0
            state[3] = 0
            state[4] = meas[2]
            state[5] = meas[3]

            kf.statePost = state
            found = True

        else:
            kf.correct(meas) #Kalman修正

            print('rr',res.shape)
            print("Measure matrix:", meas)
            cv2.imshow("Tracking", res)

            cv2.waitKey(1)
    videoWriter.write(res)
全部的代码以及用到的视频文件,和标定文件已经上传至资源,需要的朋友自行下载
https://download.csdn.net/download/sunnyrainflower/87936967
/*------------------------------------------------------------
// 作 者: 大胡子大叔
// 版权声明: 未经同意请勿转载
-------------------------------------------------------------*/
如果有帮助到你,请给个赞,谢谢!