Ray Tracing in One Weekend学习笔记
1.Overview
从零开始实现一个简单的光线追踪渲染器,能够实现漫反射材质、金属材质、透明材质的渲染,此外还实现了摄像机的自由移动和焦散效果
效果展示

项目主页:Ray Tracing in One Weekend
项目地址:https://github.com/RayTracing/raytracing.github.io/
本笔记主要记录主要流程以及遇到的问题和解决方案,还有一些补充材料
2.Output an Image
首先输出一张图片
#include <iostream>

int main() {


    // Image

    const int image_width = 256;
    const int image_height = 256;

    // Render

    std::cout << "P3\n" << image_width << ' ' << image_height << "\n255\n";

    for (int j = image_height - 1; j >= 0; --j) {


        std::cerr << "\rScanlines remaining: " << j << ' ' << std::flush;
        for (int i = 0; i < image_width; ++i) {


            auto r = double(i) / (image_width - 1);
            auto g = double(j) / (image_height - 1);
            auto b = 0.25;

            int ir = static_cast<int>(255.999 * r);
            int ig = static_cast<int>(255.999 * g);
            int ib = static_cast<int>(255.999 * b);

            std::cout << ir << ' ' << ig << ' ' << ib << '\n';
        }
    }

    std::cerr << "\nDone.\n";
}
![[外链图片转存失败,源站可能有防盗链机制,建议将图片保存下来直接上传(img-131sKj1w-1647772939965)(C:/Users/Megatron/AppData/Roaming/Typora/typora-user-images/image-20220318223618685.png)]](https://img-blog.csdnimg.cn/bd3b46d41e1c4499b5962d8d08c91c66.png)
用错误输出流std::cerr显示进度
输出的.ppm文件是Linux下的一种图片格式,在Windows环境下可以用Xnview、 ImageMagick、OpenSeeIt等软件打开
![[外链图片转存失败,源站可能有防盗链机制,建议将图片保存下来直接上传(img-tCpHTcrh-1647772939967)(file:///C:/Users/Megatron/Desktop/ray%20tracing/raytracing.github.io-master/images/fig-1.01-ppm.jpg)]](https://img-blog.csdnimg.cn/feea34194c5c4ff2a4f8cc9e6f706e6c.png?x-oss-process=image/watermark,type_d3F5LXplbmhlaQ,shadow_50,text_Q1NETiBAWmlyZWFlbDIwMTk=,size_20,color_FFFFFF,t_70,g_se,x_16)
在这里我遇到了一个问题就是打不开,用记事本检查输出发现并无问题,最后发现是编码的问题

用vscode检查输出文件,在我的Windows10环境下,默认输出是UTF-16LE编码,与PPM要求的ASCII编码并不兼容,用vscode保存为兼容的UTF-8编码即可解决问题
![[外链图片转存失败,源站可能有防盗链机制,建议将图片保存下来直接上传(img-1W4oKa2I-1647772939967)(C:/Users/Megatron/AppData/Roaming/Typora/typora-user-images/image-20220318223325596.png)]](https://img-blog.csdnimg.cn/217c939c032a4290a5fb13af86a0afc7.png)
3.The vec3 Class
实现一个简单的三维向量的类
实现后原来的main函数可改为:
for (int j = image_height - 1; j >= 0; --j) {


        std::cerr << "\rScanlines remaining: " << j << ' ' << std::flush;
        for (int i = 0; i < image_width; ++i) {


            color pixel_color(double(i) / (image_width - 1), double(j) / (image_height - 1), 0.25);
            write_color(std::cout, pixel_color);
        }
    }
需要注意的是,上面的color只是vec3类的一个别名,并不是一个新的类,而在coler.h中定义的write_color函数是一个全局的函数,并不是color类中函数
4.Rays, a Simple Camera, and Background
实现一个简单的光线类,以$ P=a+tb$的形式定义光线
#ifndef RAY_H
#define RAY_H

#include "vec3.h"

class ray {


    public:
        ray() {

    }
        ray(const point3& origin, const vec3& direction)
            : orig(origin), dir(direction)
        {

    }

        point3 origin() const  {

     return orig; }
        vec3 direction() const {

     return dir; }

        point3 at(double t) const {


            return orig + t*dir;
        }

    public:
        point3 orig;
        vec3 dir;
};

#endif
光线追踪器的核心是使得光线穿过每个像素,并计算沿着对应方向所能看到的颜色。这包含三个步骤:1.计算从眼睛到像素的光线。2.求出与光线相交的物体。3.计算出交点处的颜色。
摄像机和虚拟视口的定义图所示

修改main函数,实现背景的绘制
#include "color.h"
#include "ray.h"
#include "vec3.h"

#include <iostream>

color ray_color(const ray& r) {


    vec3 unit_direction = unit_vector(r.direction());
    auto t = 0.5*(unit_direction.y() + 1.0);
    return (1.0-t)*color(1.0, 1.0, 1.0) + t*color(0.5, 0.7, 1.0);
}

int main() {


    // Image
    const auto aspect_ratio = 16.0 / 9.0;
    const int image_width = 400;
    const int image_height = static_cast<int>(image_width / aspect_ratio);

    // Camera

    auto viewport_height = 2.0;
    auto viewport_width = aspect_ratio * viewport_height;
    auto focal_length = 1.0;

    auto origin = point3(0, 0, 0);
    auto horizontal = vec3(viewport_width, 0, 0);
    auto vertical = vec3(0, viewport_height, 0);
    auto lower_left_corner = origin - horizontal/2 - vertical/2 - vec3(0, 0, focal_length);

    // Render

    std::cout << "P3\n" << image_width << " " << image_height << "\n255\n";

    for (int j = image_height-1; j >= 0; --j) {


        std::cerr << "\rScanlines remaining: " << j << ' ' << std::flush;
        for (int i = 0; i < image_width; ++i) {


            auto u = double(i) / (image_width-1);
            auto v = double(j) / (image_height-1);
            ray r(origin, lower_left_corner + u*horizontal + v*vertical - origin);
            color pixel_color = ray_color(r);
            write_color(std::cout, pixel_color);
        }
    }

    std::cerr << "\nDone.\n";
}
其中ray_color函数实现两种颜色在y方向的插值,t是y坐标从原空间到 (0,1) 上的映射
b l e n d e d V a l u e = ( 1 − t ) ⋅ s t a r t V a l u e + t ⋅ e n d V a l u e blendedValue=(1−t)⋅startValue+t⋅endValue blendedValue=(1−t)⋅startValue+t⋅endValue
color ray_color(const ray& r) {


    vec3 unit_direction = unit_vector(r.direction());
    auto t = 0.5*(unit_direction.y() + 1.0);
    return (1.0-t)*color(1.0, 1.0, 1.0) + t*color(0.5, 0.7, 1.0);
}
5.Adding a Sphere
在场景中添加一个球,当光线碰到球时,设置像素颜色为红色
通过下面这个公式判断光线是否与球相交
( P ( t ) − C ) ⋅ ( P ( t ) − C ) = r 2 (P(t)−C)⋅(P(t)−C)=r^2 (P(t)−C)⋅(P(t)−C)=r2
这是个二次方程,根据德尔塔的正负可以判断与球有几个交点
bool hit_sphere(const point3& center, double radius, const ray& r) {


    vec3 oc = r.origin() - center;
    auto a = dot(r.direction(), r.direction());
    auto b = 2.0 * dot(oc, r.direction());
    auto c = dot(oc, oc) - radius*radius;
    auto discriminant = b*b - 4*a*c;
    return (discriminant > 0);
}

color ray_color(const ray& r) {


    if (hit_sphere(point3(0,0,-1), 0.5, r))
        return color(1, 0, 0);
    vec3 unit_direction = unit_vector(r.direction());
    auto t = 0.5*(unit_direction.y() + 1.0);
    return (1.0-t)*color(1.0, 1.0, 1.0) + t*color(0.5, 0.7, 1.0);
}
此时并没有判断t的正负,因此当设置球在摄像机(位于原点)后方时,依然能绘制出同样的结果
6.Surface Normals and Multiple Objects
6.1绘制交点的法向量
将交点的法向量映射到rgb绘制出来
此时需更改hit_sphere当有交点时,返回较小的那个t值,然后根据t计算出法向量,然后映射到rgb并绘制
double hit_sphere(const point3& center, double radius, const ray& r) {


    vec3 oc = r.origin() - center;
    auto a = dot(r.direction(), r.direction());
    auto b = 2.0 * dot(oc, r.direction());
    auto c = dot(oc, oc) - radius * radius;
    auto discriminant = b * b - 4 * a * c;
    if (discriminant < 0) {


        return -1.0;
    }
    else {


        return (-b - sqrt(discriminant)) / (2.0 * a);
    }
}

color ray_color(const ray& r) {


    auto t = hit_sphere(point3(0, 0, -1), 0.5, r);
    if (t > 0.0) {


        vec3 N = unit_vector(r.at(t) - vec3(0, 0, -1));
        return 0.5 * color(N.x() + 1, N.y() + 1, N.z() + 1);
    }
    vec3 unit_direction = unit_vector(r.direction());
    t = 0.5 * (unit_direction.y() + 1.0);
    return (1.0 - t) * color(1.0, 1.0, 1.0) + t * color(0.5, 0.7, 1.0);
}
6.2简化求交函数
将 b = 2 h b=2h b=2h带入可以化简求交函数
double hit_sphere(const point3& center, double radius, const ray& r) {


    vec3 oc = r.origin() - center;
    auto a = r.direction().length_squared();
    auto half_b = dot(oc, r.direction());
    auto c = oc.length_squared() - radius*radius;
    auto discriminant = half_b*half_b - a*c;

    if (discriminant < 0) {


        return -1.0;
    } else {


        return (-half_b - sqrt(discriminant) ) / a;
    }
}
6.3定义物体类
首先定义一个父类hittable,表示场景中所有可以被击中的物体,其内容只包括一个函数用于判断光线是否与物体有交点
结构体hit_record记录了交点信息,包括交点坐标,交点的法向量和交点处光线的t值
hit函数中t_max变量在后面多个物体求交点时能够简化逻辑
#ifndef HITTABLE_H
#define HITTABLE_H

#include "ray.h"

struct hit_record {


    point3 p;
    vec3 normal;
    double t;
};

class hittable {


public:
    //检测在t_min,t_max范围内光线是否与物体有交点
    virtual bool hit(const ray& r, double t_min, double t_max, hit_record& rec) const = 0;
};

#endif
定义球类,继承自hittable,其内容包括球心坐标,半径和hit函数的实现
#ifndef SPHERE_H
#define SPHERE_H

#include "hittable.h"
#include "vec3.h"

class sphere : public hittable {


public:
    sphere() {

    }
    sphere(point3 cen, double r) : center(cen), radius(r) {

    };

    virtual bool hit(
        const ray& r, double t_min, double t_max, hit_record& rec) const override;

public:
    point3 center;
    double radius;
};

bool sphere::hit(const ray& r, double t_min, double t_max, hit_record& rec) const {


    vec3 oc = r.origin() - center;
    auto a = r.direction().length_squared();
    auto half_b = dot(oc, r.direction());
    auto c = oc.length_squared() - radius * radius;

    auto discriminant = half_b * half_b - a * c;
    if (discriminant < 0) return false;
    auto sqrtd = sqrt(discriminant);

    // Find the nearest root that lies in the acceptable range.
    auto root = (-half_b - sqrtd) / a;
    if (root < t_min || t_max < root) {


        root = (-half_b + sqrtd) / a;
        if (root < t_min || t_max < root)
            return false;
    }

    rec.t = root;
    rec.p = r.at(rec.t);
    rec.normal = (rec.p - center) / radius;

    return true;
}

#endif
6.4法线的朝向问题
我们既可以规定法线始终朝外,又可以让法线方向始终指向光线方向但是记录下交点在表面内还是外,区别是在几何求交阶段还是在着色阶段处理交点内外的不同
此处我们采用后者,因为我们实现的材质数量多于物体数量,因此将这个工作放在几何求交阶段能减少我们的工作量
更改hit_record结构体,增加一个变量记录交点在内还是在外,并用一个函数来设置它
struct hit_record {


    point3 p;
    vec3 normal;
    double t;
    bool front_face;

    inline void set_face_normal(const ray& r, const vec3& outward_normal) {


        front_face = dot(r.direction(), outward_normal) < 0;
        normal = front_face ? outward_normal :-outward_normal;
    }
};
6.5 hittable_list
定义hittable_list类,同样继承自hittable
这个类中保存着一系列指向hittable对象的指针,hit函数返回的是与所有相交的物体中最小的t值(tmax在此处有着很巧妙的应用)
#ifndef HITTABLE_LIST_H
#define HITTABLE_LIST_H

#include "hittable.h"

#include <memory>
#include <vector>

using std::shared_ptr;
using std::make_shared;

class hittable_list : public hittable {


    public:
        hittable_list() {

    }
        hittable_list(shared_ptr<hittable> object) {

     add(object); }

        void clear() {

     objects.clear(); }
        void add(shared_ptr<hittable> object) {

     objects.push_back(object); }

        virtual bool hit(
            const ray& r, double t_min, double t_max, hit_record& rec) const override;

    public:
        std::vector<shared_ptr<hittable>> objects;
};

bool hittable_list::hit(const ray& r, double t_min, double t_max, hit_record& rec) const {


    hit_record temp_rec;
    bool hit_anything = false;
    auto closest_so_far = t_max;

    for (const auto& object : objects) {


        if (object->hit(r, t_min, closest_so_far, temp_rec)) {


            hit_anything = true;
            closest_so_far = temp_rec.t;
            rec = temp_rec;
        }
    }

    return hit_anything;
}

#endif
6.6 shared_ptr
shared_ptr用于自动的内存管理,此外它允许多个几何体共享一个公共实例(例如,一堆球体都使用相同的纹理贴图材质)
6.7 rtweekend.h
rtweekend.h用于存放常用的全局函数和一些全局变量(如pi)
#ifndef RTWEEKEND_H
#define RTWEEKEND_H

#include <cmath>
#include <limits>
#include <memory>


// Usings

using std::shared_ptr;
using std::make_shared;
using std::sqrt;

// Constants

const double infinity = std::numeric_limits<double>::infinity();
const double pi = 3.1415926535897932385;

// Utility Functions

inline double degrees_to_radians(double degrees) {


    return degrees * pi / 180.0;
}

// Common Headers

#include "ray.h"
#include "vec3.h"

#endif
此时我们就可以在场景中定义多个球体了,修改main函数如下
#include "rtweekend.h"

#include "color.h"
#include "hittable_list.h"
#include "sphere.h"

#include <iostream>
color ray_color(const ray& r, const hittable& world) {


    hit_record rec;
    if (world.hit(r, 0, infinity, rec)) {


        return 0.5 * (rec.normal + color(1,1,1));
    }
    vec3 unit_direction = unit_vector(r.direction());
    auto t = 0.5*(unit_direction.y() + 1.0);
    return (1.0-t)*color(1.0, 1.0, 1.0) + t*color(0.5, 0.7, 1.0);
}

int main() {


    // Image

    const auto aspect_ratio = 16.0 / 9.0;
    const int image_width = 400;
    const int image_height = static_cast<int>(image_width / aspect_ratio);

    // World
    hittable_list world;
    world.add(make_shared<sphere>(point3(0,0,-1), 0.5));
    world.add(make_shared<sphere>(point3(0,-100.5,-1), 100));

    // Camera

    auto viewport_height = 2.0;
    auto viewport_width = aspect_ratio * viewport_height;
    auto focal_length = 1.0;

    auto origin = point3(0, 0, 0);
    auto horizontal = vec3(viewport_width, 0, 0);
    auto vertical = vec3(0, viewport_height, 0);
    auto lower_left_corner = origin - horizontal/2 - vertical/2 - vec3(0, 0, focal_length);

    // Render

    std::cout << "P3\n" << image_width << ' ' << image_height << "\n255\n";

    for (int j = image_height-1; j >= 0; --j) {


        std::cerr << "\rScanlines remaining: " << j << ' ' << std::flush;
        for (int i = 0; i < image_width; ++i) {


            auto u = double(i) / (image_width-1);
            auto v = double(j) / (image_height-1);
            ray r(origin, lower_left_corner + u*horizontal + v*vertical);
            color pixel_color = ray_color(r, world);
            write_color(std::cout, pixel_color);
        }
    }

    std::cerr << "\nDone.\n";
}

7.Antialiasing
首先,定义随机数生成函数
inline double random_double() {


    static std::uniform_real_distribution<double> distribution(0.0, 1.0);
    static std::mt19937 generator;
    return distribution(generator);
}
inline double random_double(double min, double max) {


    // Returns a random real in [min,max).
    return min + (max - min) * random_double();
}
定义摄像机类,get_ray函数返回从摄像机到目标位置(虚拟视口空间)的一条光线
#ifndef CAMERA_H
#define CAMERA_H

#include "rtweekend.h"

class camera {


    public:
        camera() {


            auto aspect_ratio = 16.0 / 9.0;
            auto viewport_height = 2.0;
            auto viewport_width = aspect_ratio * viewport_height;
            auto focal_length = 1.0;

            origin = point3(0, 0, 0);
            horizontal = vec3(viewport_width, 0.0, 0.0);
            vertical = vec3(0.0, viewport_height, 0.0);
            lower_left_corner = origin - horizontal/2 - vertical/2 - vec3(0, 0, focal_length);
        }

        ray get_ray(double u, double v) const {


            return ray(origin, lower_left_corner + u*horizontal + v*vertical - origin);
        }

    private:
        point3 origin;
        point3 lower_left_corner;
        vec3 horizontal;
        vec3 vertical;
};
#endif
通过像素内多次采样的的方式抗锯齿,采样点坐标用前面的随机数获得,在main函数中只是简单的将采样结果相加,在最后write_color时再根据采样点个数进行平均,这样能够减少工作量
修改后的main函数和write_color函数如下
for (int j = image_height - 1; j >= 0; --j) {


		std::cerr << "\rScanlines remaining: " << j << ' ' << std::flush;
		for (int i = 0; i < image_width; ++i) {


			color pixel_color(0, 0, 0);
			for (int s = 0; s < samples_per_pixel; ++s) {


				auto u = (i + random_double()) / (image_width - 1.);
				auto v = (j + random_double()) / (image_height - 1.);
				ray r = cam.get_ray(u, v);
				pixel_color += ray_color(r, world);
			}
			write_color(std::cout, pixel_color, samples_per_pixel);
		}
	}
void write_color(std::ostream& out, color pixel_color, int samples_per_pixel) {


    auto r = pixel_color.x();
    auto g = pixel_color.y();
    auto b = pixel_color.z();

    // Divide the color by the number of samples.
    auto scale = 1.0 / samples_per_pixel;
    r *= scale;
    g *= scale;
    b *= scale;

    // Write the translated [0,255] value of each color component.
    out << static_cast<int>(256 * clamp(r, 0.0, 0.999)) << ' '
        << static_cast<int>(256 * clamp(g, 0.0, 0.999)) << ' '
        << static_cast<int>(256 * clamp(b, 0.0, 0.999)) << '\n';
}
其中clamp用于将值限制在一定范围内

可以看到抗锯齿后的边缘光滑了很多
8. Diffuse Materials
8.1 简单的漫反射材质
漫反射材质的特点:接收到光后吸收一部分光,然后向一个随机的方向反射
我们使用random_in_unit_sphere()函数来模拟随机的反射,如图在以交点法向量所指的坐标为原点,以单位长度为半径的球中随机取一个点 S S S, S − P S-P S−P就是我们找到的随机的反射方向
S = r e c . p + r e c . n o r m a l + r a n d o m _ i n _ u n i t _ s p h e r e ( ) S=rec.p + rec.normal + random\_in\_unit\_sphere() S=rec.p+rec.normal+random_in_unit_sphere()

random_in_unit_sphere函数和相关函数定义如下,采用了简单的拒绝的方式找随机点,首先在一个长宽高两个单位立方体取一点,如果不在内切球内就再取一点,直到在内切球内
inline static vec3 random() {


        return vec3(random_double(), random_double(), random_double());
    }

    inline static vec3 random(double min, double max) {


        return vec3(random_double(min,max), random_double(min,max), random_double(min,max));
    }

vec3 random_in_unit_sphere() {


    while (true) {


        auto p = vec3::random(-1,1);
        if (p.length_squared() >= 1) continue;
        return p;
    }
}
修改ray_color函数实现我们的漫反射材质,注意0.5是漫反射系数,代表了材质的吸收量,此外这还是一个递归的函数
color ray_color(const ray& r, const hittable& world) {


    hit_record rec;

    if (world.hit(r, 0, infinity, rec)) {


        point3 target = rec.p + rec.normal + random_in_unit_sphere();
        return 0.5 * ray_color(ray(rec.p, target - rec.p), world);
    }

    vec3 unit_direction = unit_vector(r.direction());
    auto t = 0.5*(unit_direction.y() + 1.0);
    return (1.0-t)*color(1.0, 1.0, 1.0) + t*color(0.5, 0.7, 1.0);
}
8.2 设置递归限制
前面定义的ray_color函数的递归停止条件是不命中任何物体,但这有可能导致光线弹射太多次导致堆栈抱闸,因此我们限制光线的弹射次数,修改的main函数如下,用max_depth限制最大弹射次数
color ray_color(const ray& r, const hittable& world, int depth) {


    hit_record rec;

    // If we've exceeded the ray bounce limit, no more light is gathered.
    if (depth <= 0)
        return color(0,0,0);

    if (world.hit(r, 0, infinity, rec)) {


        point3 target = rec.p + rec.normal + random_in_unit_sphere();
        return 0.5 * ray_color(ray(rec.p, target - rec.p), world, depth-1);
    }

    vec3 unit_direction = unit_vector(r.direction());
    auto t = 0.5*(unit_direction.y() + 1.0);
    return (1.0-t)*color(1.0, 1.0, 1.0) + t*color(0.5, 0.7, 1.0);
}

...

int main() {


    // Image

    const auto aspect_ratio = 16.0 / 9.0;
    const int image_width = 400;
    const int image_height = static_cast<int>(image_width / aspect_ratio);
    const int samples_per_pixel = 100;
    const int max_depth = 50;
    ...

    // Render

    std::cout << "P3\n" << image_width << " " << image_height << "\n255\n";

    for (int j = image_height-1; j >= 0; --j) {


        std::cerr << "\rScanlines remaining: " << j << ' ' << std::flush;
        for (int i = 0; i < image_width; ++i) {


            color pixel_color(0, 0, 0);
            for (int s = 0; s < samples_per_pixel; ++s) {


                auto u = (i + random_double()) / (image_width-1);
                auto v = (j + random_double()) / (image_height-1);
                ray r = cam.get_ray(u, v);
                pixel_color += ray_color(r, world, max_depth);
            }
            write_color(std::cout, pixel_color, samples_per_pixel);
        }
    }

    std::cerr << "\nDone.\n";
}
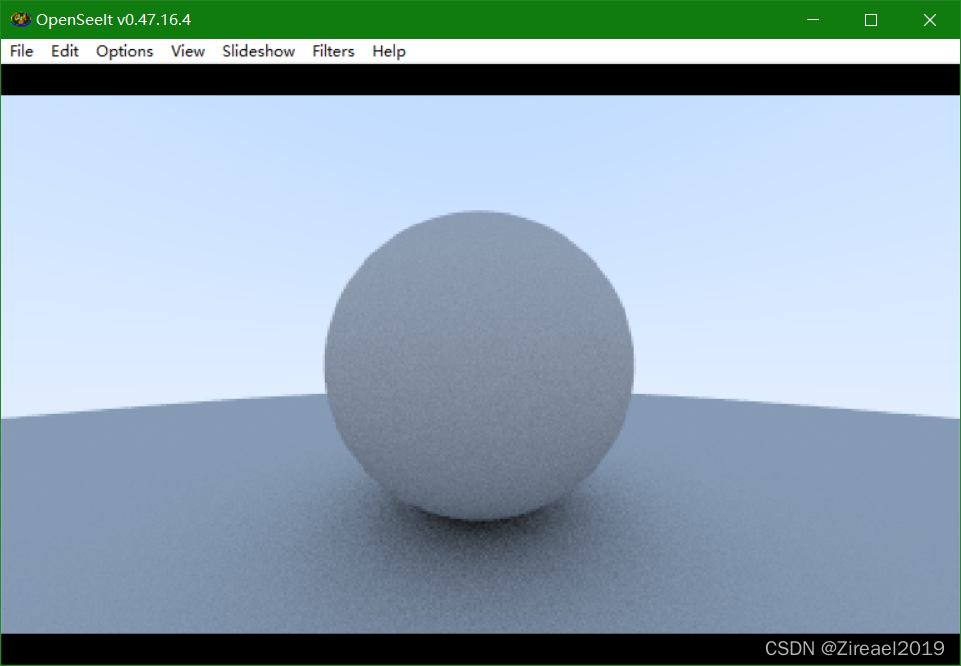
渲染效果:

可以看到场景非常暗
8.3 伽马矫正
前面的图像非常暗,主要是因为没有进行伽马矫正的缘故
关于伽马矫正的介绍:【图形学】我理解的伽马校正(Gamma Correction)_妈妈说女孩子要自立自强的博客-CSDN博客_伽马校正
在write_color添加伽马矫正,简单起见,直接取伽马值为2
void write_color(std::ostream &out, color pixel_color, int samples_per_pixel) {


    auto r = pixel_color.x();
    auto g = pixel_color.y();
    auto b = pixel_color.z();

    // Divide the color by the number of samples and gamma-correct for gamma=2.0.
    auto scale = 1.0 / samples_per_pixel;
    r = sqrt(scale * r);
    g = sqrt(scale * g);
    b = sqrt(scale * b);

    // Write the translated [0,255] value of each color component.
    out << static_cast<int>(256 * clamp(r, 0.0, 0.999)) << ' '
        << static_cast<int>(256 * clamp(g, 0.0, 0.999)) << ' '
        << static_cast<int>(256 * clamp(b, 0.0, 0.999)) << '\n';
}
8.4 暗疮问题
在计算hit时,若当前光线是反射出的光线,当计算这条光线与它发出点的物体hit值时,t有可能不是0而是一个非常小的数,因此我们要忽略这种情况,如此可避免暗疮问题
if (world.hit(r, 0.001, infinity, rec)) {
通过修改t的取值范围忽略上述情况,效果如下

8.5 真正的朗伯反射
上面在单位球中取的随机方向实际上是不均匀的,越靠近法线的概率越大(直观的想象一下,取以交点( P P P)为原点的某条射线上的任意一点( S S S)最后返回的方向是相同的,而越靠近法线,这条射线在球内的长度就越长,点就越“多”,因此取到的概率也就越大)通过在球面上取点可以解决这种不均匀的问题
vec3 random_unit_vector() {
    return unit_vector(random_in_unit_sphere());
}
point3 target = rec.p + rec.normal + random_unit_vector();
此时target( S S S)就是球面上一点了
8.6 另一种实现方法
还有另一种方法让出射方向均匀取值,那就是不让法向量参与计算,而是直接用随机的方向来作为出射方向
我们可以在以 P P P点为球心的上半球上直接取 S S S来达到这种效果,最后的出射方向依然是( S − P S-P S−P)
vec3 random_in_hemisphere(const vec3& normal) {


    vec3 in_unit_sphere = random_in_unit_sphere();
    if (dot(in_unit_sphere, normal) > 0.0) // In the same hemisphere as the normal
        return in_unit_sphere;
    else
        return -in_unit_sphere;
}
point3 target = rec.p + random_in_hemisphere(rec.normal);
9. Metal
9.1 材质类
抽象材质类,仅含有一个待重载的scatter函数用于处理反射
#ifndef MATERIAL_H
#define MATERIAL_H

#include "rtweekend.h"

struct hit_record;

class material {


    public:
        virtual bool scatter(
            const ray& r_in, const hit_record& rec, color& attenuation, ray& scattered
        ) const = 0;
};

#endif
9.2 添加材质信息
首先在hit_record中添加材质信息
struct hit_record {


    point3 p;
    vec3 normal;
    shared_ptr<material> mat_ptr;
    double t;
    bool front_face;

    inline void set_face_normal(const ray& r, const vec3& outward_normal) {


        front_face = dot(r.direction(), outward_normal) < 0;
        normal = front_face ? outward_normal :-outward_normal;
    }
};
然后在sphere类中添加材质信息,一个实例绑定一种材质
class sphere : public hittable {


    public:
        sphere() {

    }
        sphere(point3 cen, double r, shared_ptr<material> m)
            : center(cen), radius(r), mat_ptr(m) {

    };

        virtual bool hit(
            const ray& r, double t_min, double t_max, hit_record& rec) const override;

    public:
        point3 center;
        double radius;
        shared_ptr<material> mat_ptr;
};

bool sphere::hit(const ray& r, double t_min, double t_max, hit_record& rec) const {


    ...

    rec.t = root;
    rec.p = r.at(rec.t);
    vec3 outward_normal = (rec.p - center) / radius;
    rec.set_face_normal(r, outward_normal);
    rec.mat_ptr = mat_ptr;

    return true;
}
9.3 漫反射材质特性
漫反射材质特点:吸收一部分,向随机方向反射一部分
class lambertian : public material {


public:
    lambertian(const color& a) : albedo(a) {

    }

    virtual bool scatter(
        const ray& r_in, const hit_record& rec, color& attenuation, ray& scattered
    ) const override {


        auto scatter_direction = rec.normal + random_unit_vector();

        // Catch degenerate scatter direction
        if (scatter_direction.near_zero())
            scatter_direction = rec.normal;

        scattered = ray(rec.p, scatter_direction);
        attenuation = albedo;
        return true;
    }

public:
    color albedo;
};
9.4 镜面反射材质
镜面反射:

如图所示反射光线(红色)应为 v + 2 b v+2b v+2b,由于v不一定是单位向量,因此$ ||b||=|v⋅n|=-v⋅n$ 可得 b = ∣ ∣ b ∣ ∣ ∗ n b=||b||*n b=∣∣b∣∣∗n
由此得到反射光线:
vec3 reflect(const vec3& v, const vec3& n) {


    return v - 2*dot(v,n)*n;
}
只有镜面反射的金属材质定义如下:
class metal : public material {


    public:
        metal(const color& a) : albedo(a) {

    }

        virtual bool scatter(
            const ray& r_in, const hit_record& rec, color& attenuation, ray& scattered
        ) const override {


            vec3 reflected = reflect(unit_vector(r_in.direction()), rec.normal);
            scattered = ray(rec.p, reflected);
            attenuation = albedo;
            return (dot(scattered.direction(), rec.normal) > 0);
        }

    public:
        color albedo;
};
其中return的部分目前来看一定是true,后面会有不同的情况
修改main函数中的ray_color,应用上我们新定义的材质类(attenuation是衰减系数,代表材质的吸收量)
    if (world.hit(r, 0.001, infinity, rec)) {


        ray scattered;
        color attenuation;
        if (rec.mat_ptr->scatter(r, rec, attenuation, scattered))
            return attenuation * ray_color(scattered, world, depth-1);
        return color(0,0,0);
    }
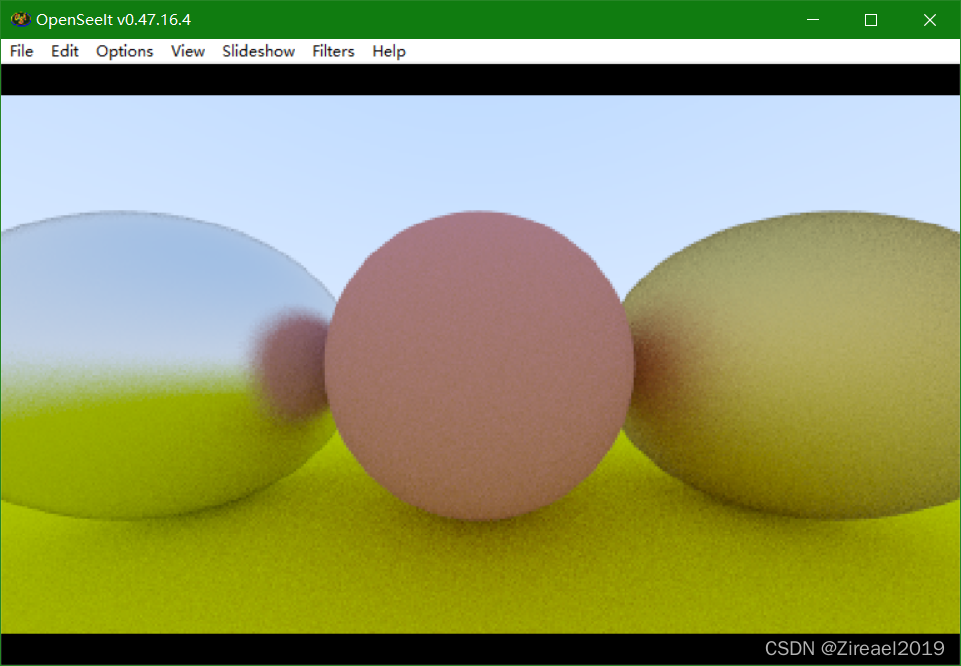
9.5 添加包含材质的物体
修改main函数,添加上包含材质的物体:
	// World
	hittable_list world;

	auto material_ground = make_shared<lambertian>(color(0.8, 0.8, 0.0));
	auto material_center = make_shared<lambertian>(color(0.7, 0.3, 0.3));
	auto material_left = make_shared<metal>(color(0.8, 0.8, 0.8));
	auto material_right = make_shared<metal>(color(0.8, 0.6, 0.2));

	world.add(make_shared<sphere>(point3(0.0, -100.5, -1.0), 100.0, material_ground));
	world.add(make_shared<sphere>(point3(0.0, 0.0, -1.0), 0.5, material_center));
	world.add(make_shared<sphere>(point3(-1.0, 0.0, -1.0), 0.5, material_left));
	world.add(make_shared<sphere>(point3(1.0, 0.0, -1.0), 0.5, material_right));

可以看到我们很好的实现了两种材质
9.6 添加金属效果
显示中的金属并不是完全镜面反射的,而是带有一点模糊,我们增加一个fuzz参数来描述这种模糊
实现非常简单,只需在原来的镜面反射光线上加上一个随机的方向即可,随机方向的半径由fuzz决定,fuzz越大,随机程度越高

class metal : public material {


    public:
        metal(const color& a, double f) : albedo(a), fuzz(f < 1 ? f : 1) {

    }

        virtual bool scatter(
            const ray& r_in, const hit_record& rec, color& attenuation, ray& scattered
        ) const override {


            vec3 reflected = reflect(unit_vector(r_in.direction()), rec.normal);
            scattered = ray(rec.p, reflected + fuzz*random_in_unit_sphere());
            attenuation = albedo;
            return (dot(scattered.direction(), rec.normal) > 0);
        }

    public:
        color albedo;
        double fuzz;
};
在添加模糊度后,前面提到的return部分就不一定是true了,因为这个随机方向有可能使反射方向进入到表面下方
在main函数中修改材质定义,可以看到金属的模糊效果

10. Dielectrics
10.1 折射
玻璃等透明材料会发生折射,同时也会反射,同时处理会很复杂,因此我们对一条光线仅计算折射或者反射,并由一个随机数决定
10.2 折射定律
折射定律: η ⋅ s i n θ = η ′ ⋅ s i n θ ′ η⋅sinθ=η′⋅sinθ′ η⋅sinθ=η′⋅sinθ′ η η η 为折射率

折射方向的推导如下

计算折射方向:
vec3 refract(const vec3& uv, const vec3& n, double etai_over_etat) {


    auto cos_theta = fmin(dot(-uv, n), 1.0);
    vec3 r_out_perp =  etai_over_etat * (uv + cos_theta*n);
    vec3 r_out_parallel = -sqrt(fabs(1.0 - r_out_perp.length_squared())) * n;
    return r_out_perp + r_out_parallel;
}
为什么会有fmin(dot(-uv, n), 1.0);呢,这与全反射有关,后面会提到
定义折射材质:
class dielectric : public material {


    public:
        dielectric(double index_of_refraction) : ir(index_of_refraction) {

    }

        virtual bool scatter(
            const ray& r_in, const hit_record& rec, color& attenuation, ray& scattered
        ) const override {


            attenuation = color(1.0, 1.0, 1.0);
            double refraction_ratio = rec.front_face ? (1.0/ir) : ir;

            vec3 unit_direction = unit_vector(r_in.direction());
            vec3 refracted = refract(unit_direction, rec.normal, refraction_ratio);

            scattered = ray(rec.p, refracted);
            return true;
        }

    public:
        double ir; // Index of Refraction
};
注意,这里仅考虑了空气(折射率为1)和材质直接的折射,并未考虑材质之间的折射
此时,我们还未考虑全反射的情况
10.3 全反射
当入射角很大时,折射方程无解,会发生全反射,前面auto cos_theta = fmin(dot(-uv, n), 1.0);中,dot(-uv, n)>1就是这样一种情况
修改材质,处理这种情况,当全反射发生时,计算反射光线
class dielectric : public material {


    public:
        dielectric(double index_of_refraction) : ir(index_of_refraction) {

    }

        virtual bool scatter(
            const ray& r_in, const hit_record& rec, color& attenuation, ray& scattered
        ) const override {


            attenuation = color(1.0, 1.0, 1.0);
            double refraction_ratio = rec.front_face ? (1.0/ir) : ir;

            vec3 unit_direction = unit_vector(r_in.direction());
            double cos_theta = fmin(dot(-unit_direction, rec.normal), 1.0);
            double sin_theta = sqrt(1.0 - cos_theta*cos_theta);

            bool cannot_refract = refraction_ratio * sin_theta > 1.0;
            vec3 direction;

            if (cannot_refract)
                direction = reflect(unit_direction, rec.normal);
            else
                direction = refract(unit_direction, rec.normal, refraction_ratio);

            scattered = ray(rec.p, direction);
            return true;
        }

    public:
        double ir; // Index of Refraction
};
修改main函数,添加折射材质:
auto material_ground = make_shared<lambertian>(color(0.8, 0.8, 0.0));
auto material_center = make_shared<lambertian>(color(0.1, 0.2, 0.5));
auto material_left   = make_shared<dielectric>(1.5);
auto material_right  = make_shared<metal>(color(0.8, 0.6, 0.2), 0.0);

10.4 Schlick近似
真正的折射材料在不同角度下,折射和反射的比例是不同的,我们可以用Schlick近似来近似的求出折射光线和反射光线的比例,并 用随机数来决定是计算反射还是折射
class dielectric : public material {


    public:
        dielectric(double index_of_refraction) : ir(index_of_refraction) {

    }

        virtual bool scatter(
            const ray& r_in, const hit_record& rec, color& attenuation, ray& scattered
        ) const override {


            attenuation = color(1.0, 1.0, 1.0);
            double refraction_ratio = rec.front_face ? (1.0/ir) : ir;

            vec3 unit_direction = unit_vector(r_in.direction());
            double cos_theta = fmin(dot(-unit_direction, rec.normal), 1.0);
            double sin_theta = sqrt(1.0 - cos_theta*cos_theta);

            bool cannot_refract = refraction_ratio * sin_theta > 1.0;
            vec3 direction;
            if (cannot_refract || reflectance(cos_theta, refraction_ratio) > random_double())
                direction = reflect(unit_direction, rec.normal);
            else
                direction = refract(unit_direction, rec.normal, refraction_ratio);

            scattered = ray(rec.p, direction);
            return true;
        }

    public:
        double ir; // Index of Refraction

    private:
        static double reflectance(double cosine, double ref_idx) {


            // Use Schlick's approximation for reflectance.
            auto r0 = (1-ref_idx) / (1+ref_idx);
            r0 = r0*r0;
            return r0 + (1-r0)*pow((1 - cosine),5);
        }
};
可以看到修改前后还是有一些不同

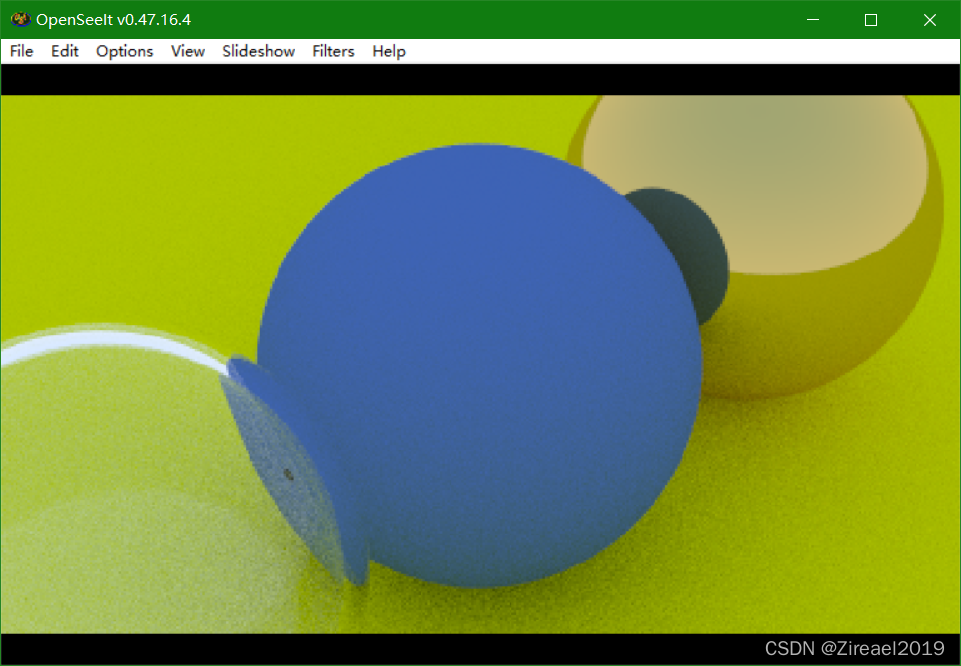
10.5 玻璃球壳
在折射材质中,负半径并不会影响计算,区别在于其表面法向量会指向球的内部,我们可以利用这个特性来模拟空心的玻璃球壳
world.add(make_shared<sphere>(point3( 0.0, -100.5, -1.0), 100.0, material_ground));
world.add(make_shared<sphere>(point3( 0.0,    0.0, -1.0),   0.5, material_center));
world.add(make_shared<sphere>(point3(-1.0,    0.0, -1.0),   0.5, material_left));
world.add(make_shared<sphere>(point3(-1.0,    0.0, -1.0),  -0.4, material_left));
world.add(make_shared<sphere>(point3( 1.0,    0.0, -1.0),   0.5, material_right));
11. Positionable Camera
11.1 摄像机类
修改摄像机类,添加两个可变参数:视角和长宽比,默认摄像机到虚拟视口的距离为1
class camera {


    public:
        camera(
            double vfov, // vertical field-of-view in degrees
            double aspect_ratio
        ) {


            auto theta = degrees_to_radians(vfov);
            auto h = tan(theta/2);
            auto viewport_height = 2.0 * h;
            auto viewport_width = aspect_ratio * viewport_height;

            auto focal_length = 1.0;

            origin = point3(0, 0, 0);
            horizontal = vec3(viewport_width, 0.0, 0.0);
            vertical = vec3(0.0, viewport_height, 0.0);
            lower_left_corner = origin - horizontal/2 - vertical/2 - vec3(0, 0, focal_length);
        }

        ray get_ray(double u, double v) const {


            return ray(origin, lower_left_corner + u*horizontal + v*vertical - origin);
        }

    private:
        point3 origin;
        point3 lower_left_corner;
        vec3 horizontal;
        vec3 vertical;
};
11.2 任意一点的摄像机
增加三个参数来固定摄像机:摄像机位置、看向的位置、头顶方向,关系如图所示,u,v是虚拟视口的水平和竖直方向,通过叉乘计算

class camera {


    public:
        camera(
            point3 lookfrom,
            point3 lookat,
            vec3   vup,
            double vfov, // vertical field-of-view in degrees
            double aspect_ratio
        ) {


            auto theta = degrees_to_radians(vfov);
            auto h = tan(theta/2);
            auto viewport_height = 2.0 * h;
            auto viewport_width = aspect_ratio * viewport_height;

            auto w = unit_vector(lookfrom - lookat);
            auto u = unit_vector(cross(vup, w));
            auto v = cross(w, u);

            origin = lookfrom;
            horizontal = viewport_width * u;
            vertical = viewport_height * v;
            lower_left_corner = origin - horizontal/2 - vertical/2 - w;
        }

        ray get_ray(double s, double t) const {


            return ray(origin, lower_left_corner + s*horizontal + t*vertical - origin);
        }

    private:
        point3 origin;
        point3 lower_left_corner;
        vec3 horizontal;
        vec3 vertical;
};
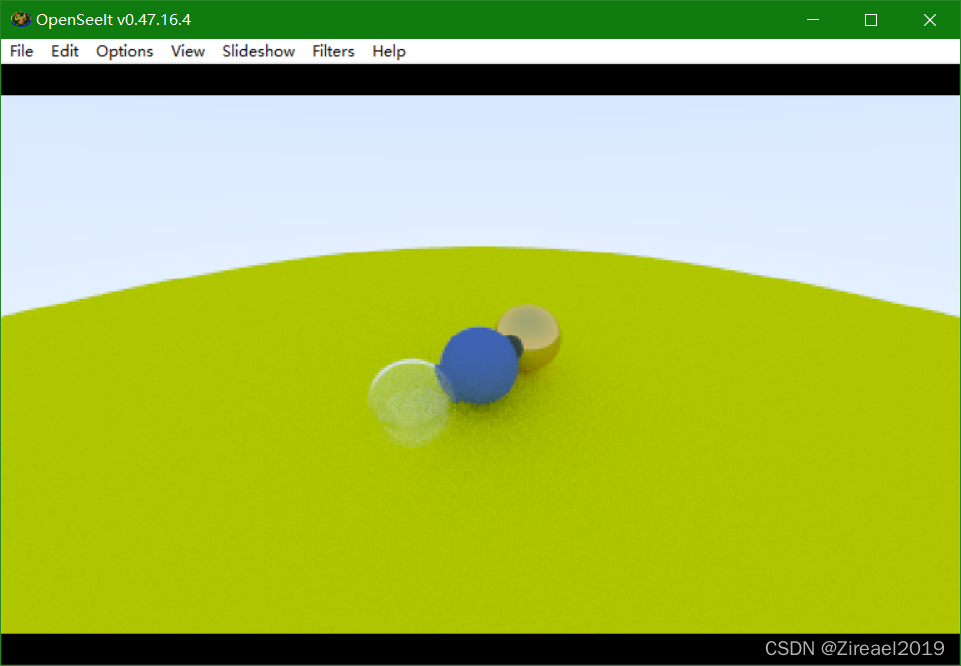
两种不同视角(90/20)的摄像机:

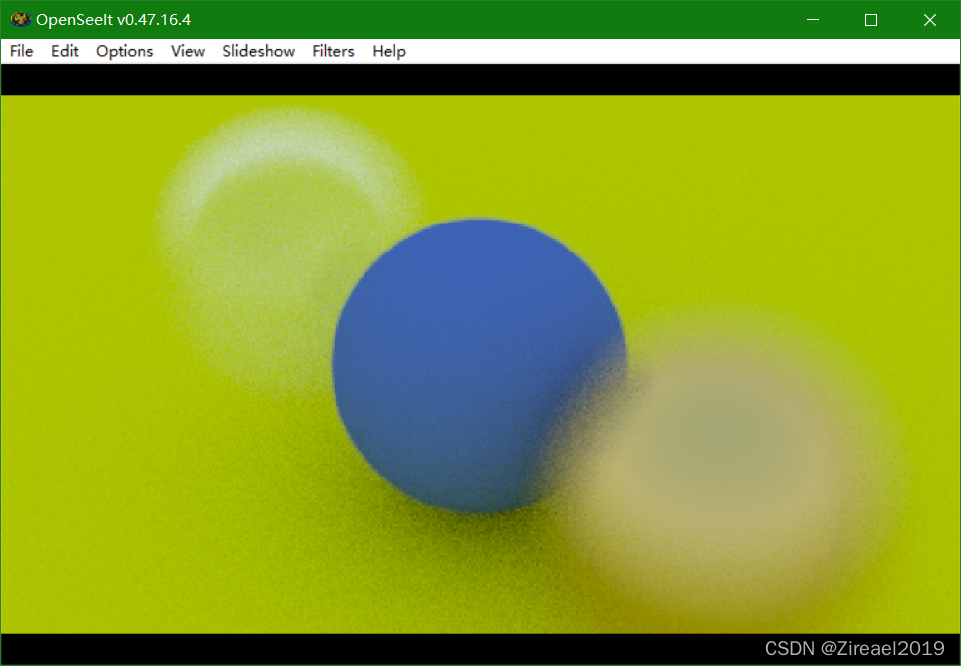
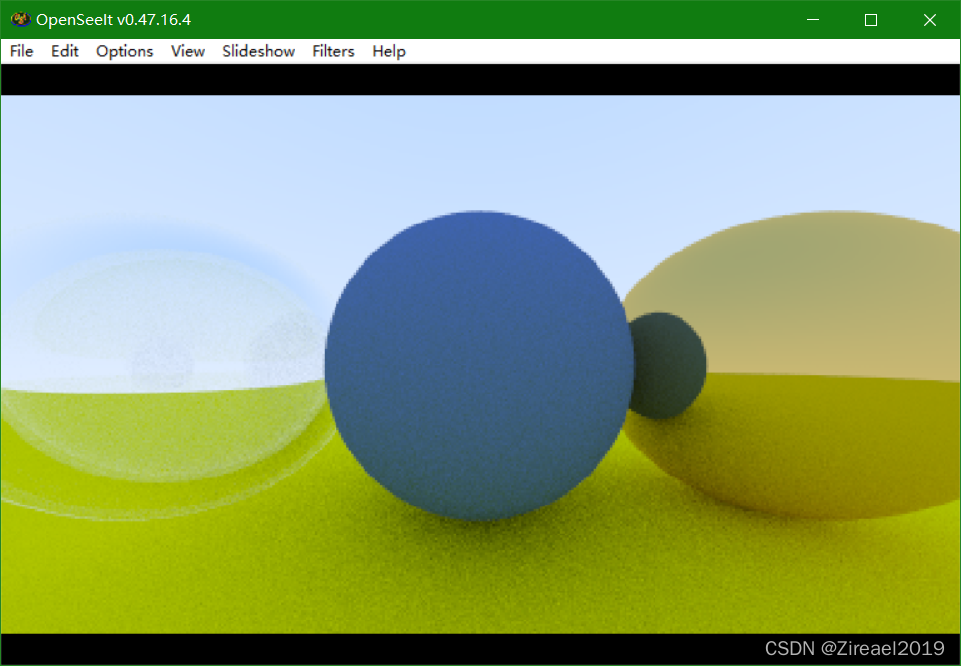
12. Defocus Blur
摄像机是用透镜将透过光圈的光聚焦到传感器上成像的,因此会有一个焦距,离焦距越远,焦散现象越严重,光圈用于调节进入镜头的光的多少。真实的摄像机往往有一组复杂的透镜组,这里我们用一个薄透镜进行模拟

在实现上,我们可以直接从透镜上发射光线来模拟,两个参数来描述这个透镜:光圈大小(透镜直径)和焦距(透镜到成像平面的距离)

原本我们的光线是从一个点发出,因此没有焦散现象,现在光线是从一个圆盘上随机发出,圆盘半径越大,焦散现象越明显
vec3 random_in_unit_disk() {


    while (true) {


        auto p = vec3(random_double(-1,1), random_double(-1,1), 0);
        if (p.length_squared() >= 1) continue;
        return p;
    }
}
修改摄像机类,添加光圈和聚焦平面参数:
class camera {


    public:
        camera(
            point3 lookfrom,
            point3 lookat,
            vec3   vup,
            double vfov, // vertical field-of-view in degrees
            double aspect_ratio,
            double aperture,
            double focus_dist
        ) {


            auto theta = degrees_to_radians(vfov);
            auto h = tan(theta/2);
            auto viewport_height = 2.0 * h;
            auto viewport_width = aspect_ratio * viewport_height;

            w = unit_vector(lookfrom - lookat);
            u = unit_vector(cross(vup, w));
            v = cross(w, u);

            origin = lookfrom;
            horizontal = focus_dist * viewport_width * u;
            vertical = focus_dist * viewport_height * v;
            lower_left_corner = origin - horizontal/2 - vertical/2 - focus_dist*w;

            lens_radius = aperture / 2;
        }


        ray get_ray(double s, double t) const {


            vec3 rd = lens_radius * random_in_unit_disk();
            vec3 offset = u * rd.x() + v * rd.y();

            return ray(
                origin + offset,
                lower_left_corner + s*horizontal + t*vertical - origin - offset
            );
        }

    private:
        point3 origin;
        point3 lower_left_corner;
        vec3 horizontal;
        vec3 vertical;
        vec3 u, v, w;
        double lens_radius;
};
定义新的摄像机:
point3 lookfrom(3,3,2);
point3 lookat(0,0,-1);
vec3 vup(0,1,0);
auto dist_to_focus = (lookfrom-lookat).length();
auto aperture = 2.0;

camera cam(lookfrom, lookat, vup, 20, aspect_ratio, aperture, dist_to_focus);
效果如图:

13. Where Next?
向场景中添加若干随机的球,看看最终的效果
hittable_list random_scene() {


    hittable_list world;

    auto ground_material = make_shared<lambertian>(color(0.5, 0.5, 0.5));
    world.add(make_shared<sphere>(point3(0,-1000,0), 1000, ground_material));

    for (int a = -11; a < 11; a++) {


        for (int b = -11; b < 11; b++) {


            auto choose_mat = random_double();
            point3 center(a + 0.9*random_double(), 0.2, b + 0.9*random_double());

            if ((center - point3(4, 0.2, 0)).length() > 0.9) {


                shared_ptr<material> sphere_material;

                if (choose_mat < 0.8) {


                    // diffuse
                    auto albedo = color::random() * color::random();
                    sphere_material = make_shared<lambertian>(albedo);
                    world.add(make_shared<sphere>(center, 0.2, sphere_material));
                } else if (choose_mat < 0.95) {


                    // metal
                    auto albedo = color::random(0.5, 1);
                    auto fuzz = random_double(0, 0.5);
                    sphere_material = make_shared<metal>(albedo, fuzz);
                    world.add(make_shared<sphere>(center, 0.2, sphere_material));
                } else {


                    // glass
                    sphere_material = make_shared<dielectric>(1.5);
                    world.add(make_shared<sphere>(center, 0.2, sphere_material));
                }
            }
        }
    }

    auto material1 = make_shared<dielectric>(1.5);
    world.add(make_shared<sphere>(point3(0, 1, 0), 1.0, material1));

    auto material2 = make_shared<lambertian>(color(0.4, 0.2, 0.1));
    world.add(make_shared<sphere>(point3(-4, 1, 0), 1.0, material2));

    auto material3 = make_shared<metal>(color(0.7, 0.6, 0.5), 0.0);
    world.add(make_shared<sphere>(point3(4, 1, 0), 1.0, material3));

    return world;
}

int main() {


    // Image

    const auto aspect_ratio = 3.0 / 2.0;
    const int image_width = 1200;
    const int image_height = static_cast<int>(image_width / aspect_ratio);
    const int samples_per_pixel = 500;
    const int max_depth = 50;

    // World

    auto world = random_scene();

    // Camera

    point3 lookfrom(13,2,3);
    point3 lookat(0,0,0);
    vec3 vup(0,1,0);
    auto dist_to_focus = 10.0;
    auto aperture = 0.1;

    camera cam(lookfrom, lookat, vup, 20, aspect_ratio, aperture, dist_to_focus);

    // Render

    std::cout << "P3\n" << image_width << ' ' << image_height << "\n255\n";

    for (int j = image_height-1; j >= 0; --j) {


        ...
}