springboot内置Tomcat依赖图

如上图所示Tomcat在spring-boot-starter-web中自动引入
如何修改内置Tomcat属性
如果是正常的Tomcat容器可以通过在conf/web.xml、conf/server.xml文件来修改配置,但内置Tomcat并没有这两个文件,那么如何修改呢?
通过看官方文档知道可以通过server.port属性更改Tomcat端口,由我上篇文章提到的SpringBoot加载规则可以知道必然存在一个ServerProperties来设置默认的Tomcat相关属性,咱们来看下这个类
@ConfigurationProperties(prefix = "server", ignoreUnknownFields = true)
public class ServerProperties {


	/**
	 * Server HTTP port.
	 */
	private Integer port;

	/**
	 * Network address to which the server should bind.
	 */
	private InetAddress address;

	/**
	中间省略
	*/

}
看下哪里调用了getPort()
public class ServletWebServerFactoryCustomizer implements
		WebServerFactoryCustomizer<ConfigurableServletWebServerFactory>, Ordered {


	private final ServerProperties serverProperties;

	public ServletWebServerFactoryCustomizer(ServerProperties serverProperties) {


		this.serverProperties = serverProperties;
	}

	@Override
	public int getOrder() {


		return 0;
	}

	@Override
	public void customize(ConfigurableServletWebServerFactory factory) {


		PropertyMapper map = PropertyMapper.get().alwaysApplyingWhenNonNull();
		map.from(this.serverProperties::getPort).to(factory::setPort);
		map.from(this.serverProperties::getAddress).to(factory::setAddress);
		map.from(this.serverProperties.getServlet()::getContextPath)
				.to(factory::setContextPath);
		map.from(this.serverProperties.getServlet()::getApplicationDisplayName)
				.to(factory::setDisplayName);
		map.from(this.serverProperties.getServlet()::getSession).to(factory::setSession);
		map.from(this.serverProperties::getSsl).to(factory::setSsl);
		map.from(this.serverProperties.getServlet()::getJsp).to(factory::setJsp);
		map.from(this.serverProperties::getCompression).to(factory::setCompression);
		map.from(this.serverProperties::getHttp2).to(factory::setHttp2);
		map.from(this.serverProperties::getServerHeader).to(factory::setServerHeader);
		map.from(this.serverProperties.getServlet()::getContextParameters)
				.to(factory::setInitParameters);
	}

}
可以看到在这里把ServerProperties中的属性都设置到到ConfigurableServletWebServerFactory,所以从这里可以知道在SpringBoot中实际对web容器做定制实际上是修改ConfigurableServletWebServerFactory类的相关属性.再来看下这个customize方法的WebServerFactoryCustomizerBeanPostProcessor类
private void postProcessBeforeInitialization(WebServerFactory webServerFactory) {


		LambdaSafe
				.callbacks(WebServerFactoryCustomizer.class, getCustomizers(),
						webServerFactory)
				.withLogger(WebServerFactoryCustomizerBeanPostProcessor.class)
				.invoke((customizer) -> customizer.customize(webServerFactory));
	}
通过上面的代码可以看到这里整个过程实际上是获取容器中所有的customizer,往customizer中传入WebServerFactory参数,然后调用customize()方法把ServerProperteis中的属性设置到WebServerFactory中,那我们是不是可以实现这种方式来达到配置服务器属性的目的呢?实际上是可以的,代码如下
@Bean
    public WebServerFactoryCustomizer configWebServer(){


        WebServerFactoryCustomizer webServerFactoryCustomizer = new WebServerFactoryCustomizer<ConfigurableServletWebServerFactory>() {


            @Override
            public void customize(ConfigurableServletWebServerFactory factory) {


                factory.setPort(9000);
            }
        };
        return webServerFactoryCustomizer;
    }
再看SpringBoot官方也是通过这种方式来更改web服务器配置的;https://docs.spring.io/spring-boot/docs/2.0.0.RELEASE/reference/htmlsingle/#boot-features-embedded-container-application-context
总结一下就是修改web服务器配置有两种方式
1、在application.properties中通过server.XXX配置
server.port=8082
server.servlet.context-path=/test
2、通过实现WebServerFactoryCustomizer接口并用其提供的接口来通过ConfigurableServletWebServerFactory的方法来修改
@Bean
    public WebServerFactoryCustomizer configWebServer(){


        WebServerFactoryCustomizer webServerFactoryCustomizer = new WebServerFactoryCustomizer<ConfigurableServletWebServerFactory>() {


            @Override
            public void customize(ConfigurableServletWebServerFactory factory) {


                factory.setPort(9000);
                factory.setContextPath("/test");
            }
        };
        return webServerFactoryCustomizer;
    }
Servlet容器自动配置原理
我们首先看下ServletWebServerFactoryAutoConfiguration这个类
@Configuration
@AutoConfigureOrder(Ordered.HIGHEST_PRECEDENCE)
@ConditionalOnClass(ServletRequest.class)
@ConditionalOnWebApplication(type = Type.SERVLET)
@EnableConfigurationProperties(ServerProperties.class)
@Import({

     ServletWebServerFactoryAutoConfiguration.BeanPostProcessorsRegistrar.class,
		ServletWebServerFactoryConfiguration.EmbeddedTomcat.class,
		ServletWebServerFactoryConfiguration.EmbeddedJetty.class,
		ServletWebServerFactoryConfiguration.EmbeddedUndertow.class })
public class ServletWebServerFactoryAutoConfiguration {


//中间省略
}
这里引入的几个类比较关键,首先咱们看下BeanPostProcessorsRegistrar
public static class BeanPostProcessorsRegistrar
			implements ImportBeanDefinitionRegistrar, BeanFactoryAware {


			    		@Override
		public void registerBeanDefinitions(AnnotationMetadata importingClassMetadata,
				BeanDefinitionRegistry registry) {


			if (this.beanFactory == null) {


				return;
			}
			registerSyntheticBeanIfMissing(registry,
					"webServerFactoryCustomizerBeanPostProcessor",
					WebServerFactoryCustomizerBeanPostProcessor.class);
			registerSyntheticBeanIfMissing(registry,
					"errorPageRegistrarBeanPostProcessor",
					ErrorPageRegistrarBeanPostProcessor.class);
		}
			}
这个类实现了spring中的ImportBeanDefinitionRegistrar、BeanFactoryAware接口,并在上面的方法中注册了WebServerFactoryCustomizerBeanPostProcessor;而这个类就很眼熟了,我们上面刚刚分析过,这里我把代码再贴一下
public class WebServerFactoryCustomizerBeanPostProcessor
		implements BeanPostProcessor, BeanFactoryAware {


	//在初始化之前执行
	@Override
	public Object postProcessBeforeInitialization(Object bean, String beanName)
			throws BeansException {


		//如果当前类是一个WebSerFactory
		if (bean instanceof WebServerFactory) {


			postProcessBeforeInitialization((WebServerFactory) bean);
		}
		return bean;
	}

	//调用WebServerFactoryCustomizer的customize对当前的WebServerFactory进行设置
	private void postProcessBeforeInitialization(WebServerFactory webServerFactory) {


	LambdaSafe
			.callbacks(WebServerFactoryCustomizer.class, getCustomizers(),
						webServerFactory)
			.withLogger(WebServerFactoryCustomizerBeanPostProcessor.class)
			.invoke((customizer) -> customizer.customize(webServerFactory));
	}
}
这个过程就很清晰了,++当spring启动时ServletWebServerFactoryAutoConfiguration会添加WebServerFactoryCustomizerBeanPostProcessor类,WebServerFactoryCustomizerBeanPostProcessor会在bean初始化之前判是否存在WebServerFactory,如果存在的话使用WebServerFactoryCustomizer来对WebServerFactory进行定制,定制的属性是从ServerProperties中读取的++
那么现在还剩下一个问题,WebServerFactory是在哪里定义的?
再看ServletWebServerFactoryAutoConfiguration引入的另外一个类ServletWebServerFactoryConfiguration
class ServletWebServerFactoryConfiguration {


	@Configuration
	//当系统中有tomcat的关键类,即有tomcat容器时,则注入TomcatServletWebServerFactory
	@ConditionalOnClass({

     Servlet.class, Tomcat.class, UpgradeProtocol.class })
	@ConditionalOnMissingBean(value = ServletWebServerFactory.class, search = SearchStrategy.CURRENT)
	public static class EmbeddedTomcat {


		@Bean
		public TomcatServletWebServerFactory tomcatServletWebServerFactory() {


			return new TomcatServletWebServerFactory();
		}

	}


	@Configuration
	@ConditionalOnClass({

     Servlet.class, Server.class, Loader.class,
			WebAppContext.class })
	@ConditionalOnMissingBean(value = ServletWebServerFactory.class, search = SearchStrategy.CURRENT)
	public static class EmbeddedJetty {


		@Bean
		public JettyServletWebServerFactory JettyServletWebServerFactory() {


			return new JettyServletWebServerFactory();
		}

	}

	/**
	 * Nested configuration if Undertow is being used.
	 */
	@Configuration
	@ConditionalOnClass({

     Servlet.class, Undertow.class, SslClientAuthMode.class })
	@ConditionalOnMissingBean(value = ServletWebServerFactory.class, search = SearchStrategy.CURRENT)
	public static class EmbeddedUndertow {


		@Bean
		public UndertowServletWebServerFactory undertowServletWebServerFactory() {


			return new UndertowServletWebServerFactory();
		}

	}

}
这里可以看到当系统中有Tomcat、Jetty、Undertow容器时,会分别往系统中添加对应的WebServerFactory
那这里我们又可以发现一个事情,也就是说我们想启用jetty或者undertow的话直接引入相关的组件就行了(如果在一个项目中同时引用多个servlet容器默认使用tomcat启动的,感兴趣的可以去了解下为什么)
        <dependency>
			<groupId>org.springframework.boot</groupId>
			<artifactId>spring-boot-starter-web</artifactId>
			<exclusions>
		        <artifactId>spring-boot-starter-tomcat</artifactId>
			    <groupId>org.springframework.boot</groupId>
			</exclusions>
		</dependency>
		<dependency>
			<artifactId>spring-boot-starter-jetty</artifactId>
			<groupId>org.springframework.boot</groupId>
		</dependency>
		//或者
		<dependency>
			<artifactId>spring-boot-starter-undertow</artifactId>
			<groupId>org.springframework.boot</groupId>
		</dependency>
我们再来总结一下SpringBoot管理servlet容器的整个过程
- SpringBoot根据导入的依赖情况给容器添加响应的WebServerFactory
- 当有组件要创建对象时会惊动WebServerFactoryCustomizerBeanPostProcessor,如果是WebServerFactory则会进行后续处理
- 后续处理,从容器中获取所有的WebServerFactoryCustomizer对WebServerFactory进行定制
- 定制属性从ServerProperties中获取
Servlet容器启动原理
现在我们来分析一下内嵌的servlet容器时在什么时候启动的
这里大家可以再对应的WebServerFactory的getWebServer()方法上打个断点,这样通过栈帧能清楚的看到webServer启动的逻辑,我这里以TomcatServletWebServerFactory为例说一下几个比较关键的点
public class ServletWebServerApplicationContext extends GenericWebApplicationContext
		implements ConfigurableWebServerApplicationContext {


	@Override
	protected void onRefresh() {


		super.onRefresh();
		try {


			createWebServer();
		}
		catch (Throwable ex) {


			throw new ApplicationContextException("Unable to start web server", ex);
		}
	}

	private void createWebServer() {


		WebServer webServer = this.webServer;
		ServletContext servletContext = getServletContext();
		if (webServer == null && servletContext == null) {


			ServletWebServerFactory factory = getWebServerFactory();
			this.webServer = factory.getWebServer(getSelfInitializer());
		}
		else if (servletContext != null) {


			try {


				getSelfInitializer().onStartup(servletContext);
			}
			catch (ServletException ex) {


				throw new ApplicationContextException("Cannot initialize servlet context",
						ex);
			}
		}
		initPropertySources();
	}
}
可以看到这个类重写了spring的ConfigurableApplicationContext类的onRefresh()方法,在onRefresh()方法中调用的createWebServer()方法在createWebServer()中通过调用ServletWebServerFactory的getWebServer()方法来获取webServer.咱们来看下TomcatServletWebServerFactory的getWebServer()做了那些事
	@Override
	public WebServer getWebServer(ServletContextInitializer... initializers) {


	   //new一个tomcat组件
		Tomcat tomcat = new Tomcat();
		File baseDir = (this.baseDirectory != null ? this.baseDirectory
				: createTempDir("tomcat"));
		tomcat.setBaseDir(baseDir.getAbsolutePath());
		//设置必要的连接器组件
		Connector connector = new Connector(this.protocol);
		tomcat.getService().addConnector(connector);
		customizeConnector(connector);
		tomcat.setConnector(connector);
		tomcat.getHost().setAutoDeploy(false);
		//设置引擎
		configureEngine(tomcat.getEngine());
		for (Connector additionalConnector : this.additionalTomcatConnectors) {


			tomcat.getService().addConnector(additionalConnector);
		}
		prepareContext(tomcat.getHost(), initializers);
		return getTomcatWebServer(tomcat);
	}
在getTomcatWebServer()方法中有个很重要的地方
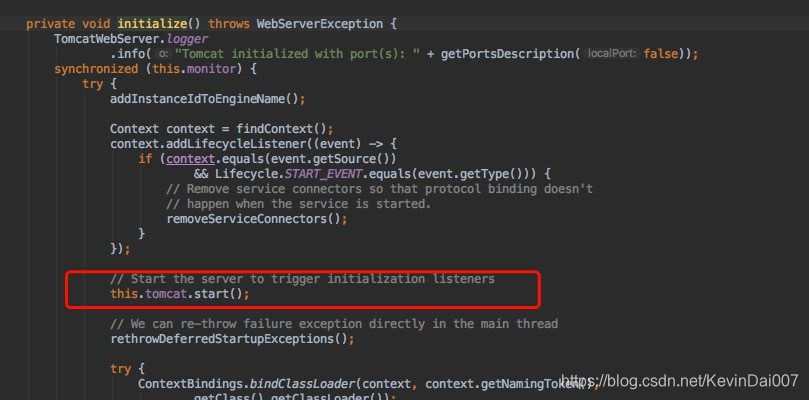
这样tomcat启动的流程咱们也清楚了
- ServletWebServerApplicationContext重写容器的onRefresh(),并在onRefresh()中调用createWebServer()
- createWebServer()获取容器中的ServletWebServerFactory,并调用getWebServer()
- getWebServer()对servlet容器进行初始化并启动
SpringBoot外部servelt容器启动原理
上面我们讲了SpringBoot通过内嵌servlet启动的相关的东西,下面我们分析下SpringBoot在外部servlet容器中是如何启动的
大家都知道要把SpringBoot放到外置servlet容器中运行需要以下几个步骤
- 设置SpringBoot打包的方式为war包
- 添加依赖
    	<dependency>
			<groupId>org.springframework.boot</groupId>
			<artifactId>spring-boot-starter-tomcat</artifactId>
			<scope>provided</scope>
		</dependency>
- 在应用中继承SpringBootServletInitializer类
public class ServletInitializer extends SpringBootServletInitializer {


    @Override
    protected SpringApplicationBuilder configure(SpringApplicationBuilder application) {


        return application.sources(SpringbootApplicationStarter.class);
    }
}
这里咱们对比以下内嵌、外部两种方式的启动区别:
内嵌servlet容器:jar包,执行SpringBoot主程序的main(),启动ioc容器,启动servlet容器
外部servlet容器:war包,启动servlet容器,启动SpringBoot,启动ioc容器
想明白这种区别的原理要从servlet3.0的规范说起(见servlet规范 8.2.4 共享库 / 运行时可插拔性)
- 对于每一个应用,应用启动时,由容器创建一个ServletContainerInitializer实例
- ServletContainerInitializer实现必须绑定在jar包的META-INF/services目录中的一个叫做javax.servlet.ServletContainerInitializer 的文件
- 在ServletContainerInitializer实现上的HandlesTypes注解用于表示感兴趣的一些类
根据这三点规范我们看下SpringBoot的启动流程
-
启动Tomcat
-
spring-web模块中META-INF/services/javax.servlet.ServletContainerInitializer,这个文件中定义了org.springframework.web.SpringServletContainerInitializer
-
这个类实现了ServletContainerInitializer
这里我贴一下关键代码

-
可以看到WebApplicationInitializer是一个接口,那看一下它的实现(如下图),可以看到SpringBootServletInitializer(也就是应用中要继承的类)被创建了实例,并调用了onStartUp()方法
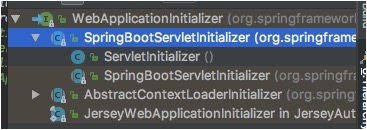
-
咱们把SpringBootServletInitializer关键代码贴出来
public abstract class SpringBootServletInitializer implements WebApplicationInitializer {


    protected WebApplicationContext createRootApplicationContext(ServletContext servletContext) {


        //创建SpringBuilder
        SpringApplicationBuilder builder = this.createSpringApplicationBuilder();
        builder.main(this.getClass());
        ApplicationContext parent = this.getExistingRootWebApplicationContext(servletContext);
        if (parent != null) {


            this.logger.info("Root context already created (using as parent).");
            servletContext.setAttribute(WebApplicationContext.ROOT_WEB_APPLICATION_CONTEXT_ATTRIBUTE, (Object)null);
            builder.initializers(new ApplicationContextInitializer[]{

    new ParentContextApplicationContextInitializer(parent)});
        }

        builder.initializers(new ApplicationContextInitializer[]{

    new ServletContextApplicationContextInitializer(servletContext)});
        builder.listeners(new ApplicationListener[]{

    new ServletContextApplicationListener(servletContext)});
        builder.contextClass(AnnotationConfigEmbeddedWebApplicationContext.class);
        //调用configure方法,此方法被子类重写,将SpringBoot主程序传入进来
        builder = this.configure(builder);
        //使用SpringBuilder创建spring应用
        SpringApplication application = builder.build();
        if (application.getSources().isEmpty() && AnnotationUtils.findAnnotation(this.getClass(), Configuration.class) != null) {


            application.getSources().add(this.getClass());
        }

        Assert.state(!application.getSources().isEmpty(), "No SpringApplication sources have been defined. Either override the configure method or add an @Configuration annotation");
        if (this.registerErrorPageFilter) {


            application.getSources().add(ErrorPageFilter.class);
        }
        //启动spring应用,在此方法中通过this.refreshContext(context);来启动ioc容器
        return this.run(application);
    }
}
Servlet三大组件的注册(Servlet、Filter、Listener)
如果是一个普通的web应用三大组件的注册都是在webapp/web-inf/web.xml中添加配置,而嵌入式的web服务器并没有这个web.xml文件,通过查阅官方文档可以知道,可以通过如下三个组件进行注册ServletRegistrationBean,FilterRegistrationBean,ServletListenerRegistrationBean
这里就贴一下servlet怎么注册,其他就不讲了
public class TestServlet extends HttpServlet {


    @Override
    protected void doGet(HttpServletRequest req, HttpServletResponse resp) throws ServletException, IOException {


        this.doPost(req, resp);
    }

    @Override
    protected void doPost(HttpServletRequest req, HttpServletResponse resp) throws ServletException, IOException {


        resp.getWriter().println("this is servlet");
    }
}
然后在SpringBoot中注册此servlet
    @Bean
    public ServletRegistrationBean servletRegistrationBean() {


        return new ServletRegistrationBean(new TestServlet(), "/test");// ServletName默认值为首字母小写,即myServlet
    }
那这里又引申出一个问题,这个servlet是怎么注册到DispatcherServlet的呢?
这里可以看下DispatcherServletAutoConfiguration
@Bean(name = DEFAULT_DISPATCHER_SERVLET_REGISTRATION_BEAN_NAME)
@ConditionalOnBean(value = DispatcherServlet.class, name = DEFAULT_DISPATCHER_SERVLET_BEAN_NAME)
public ServletRegistrationBean<DispatcherServlet> dispatcherServletRegistration(DispatcherServlet dispatcherServlet) {


    ServletRegistrationBean<DispatcherServlet>
    //这里this.serverProperties.getServlet().getServletMapping()的值是"/",既默认dispatcherServlet默认处理当前项目下所有请求
    registration = new ServletRegistrationBean<>(
					dispatcherServlet,this.serverProperties.getServlet().getServletMapping());
	registration.setName(DEFAULT_DISPATCHER_SERVLET_BEAN_NAME);
	registration.setLoadOnStartup(	this.webMvcProperties.getServlet().getLoadOnStartup());
	if (this.multipartConfig != null) {


		registration.setMultipartConfig(this.multipartConfig);
	}
	return registration;
}
看了上面的代码我们可以知道,如果想在SpringBoot中注册多个DispatcherServlet只需要注册ServletRegistrationBean即可,大致代码如下
    @Bean
    public ServletRegistrationBean foo() {


        DispatcherServlet dispatcherServlet = new DispatcherServlet();
        AnnotationConfigWebApplicationContext applicationContext = new AnnotationConfigWebApplicationContext();
        applicationContext.register(FooConfig.class);
        dispatcherServlet.setApplicationContext(applicationContext);
        ServletRegistrationBean servletRegistrationBean = new ServletRegistrationBean(dispatcherServlet, "/foo/*");
        servletRegistrationBean.setName("foo");
        return servletRegistrationBean;
    }
    @Bean
    public ServletRegistrationBean bar() {


        DispatcherServlet dispatcherServlet = new DispatcherServlet();
        AnnotationConfigWebApplicationContext applicationContext = new AnnotationConfigWebApplicationContext();
        applicationContext.register(BarConfig.class);
        dispatcherServlet.setApplicationContext(applicationContext);
        ServletRegistrationBean servletRegistrationBean = new ServletRegistrationBean(dispatcherServlet, "/bar/*");
        servletRegistrationBean.setName("bar");
        return servletRegistrationBean;
    }