SpringBoot切换Servlet容器
SpringBoot默认使用tomca作为嵌入式的servlet容器。
使用IDEA,在pom文件中右键,选择Diagrams下的Show Dependencies选项即可看到项目的依赖关系图。

springboot依赖图。

启动项目,springboot默认运行到 tomca 的8080端口。

一、切换成Undertow
怎么换成其他的Servlet容器呢,如Jetty、Undertow呢? 其实相当简单只需要移除默认的,再引入新的即可。
如换成Undertow只需移除spring-boot-starter-web中的tomcat再添加spring-boot-starter-undertow即可。修改pom文件:
<dependency>
    <groupId>org.springframework.boot</groupId>
    <artifactId>spring-boot-starter-web</artifactId>
    <exclusions>
        <exclusion>
            <groupId>org.springframework.boot</groupId>
            <artifactId>spring-boot-starter-tomcat</artifactId>
        </exclusion>
    </exclusions>
</dependency>
<!--undertow-->
<dependency>
    <groupId>org.springframework.boot</groupId>
    <artifactId>spring-boot-starter-undertow</artifactId>
</dependency>
启动项目,运行到Undertow。它是一个高性能非阻塞的servlet容器,并发性能非常好。

二、切换成Jetty
同理切换成Jetty,修改pom文件:
<dependency>
    <groupId>org.springframework.boot</groupId>
    <artifactId>spring-boot-starter-web</artifactId>
    <exclusions>
        <exclusion>
            <groupId>org.springframework.boot</groupId>
            <artifactId>spring-boot-starter-tomcat</artifactId>
        </exclusion>
    </exclusions>
</dependency>
<!--jetty-->
<dependency>
    <groupId>org.springframework.boot</groupId>
    <artifactId>spring-boot-starter-jetty</artifactId>
</dependency>
启动项目,运行到Jetty。它适合如web聊天之类的长连接应用开发。

其实到这里SpringBoot切换Servlet容器就完成了。
三、Servlet容器的自动配置
找到自动配置类,SpringBoot2.2.4版本的servlet容器自动配置类如下图:
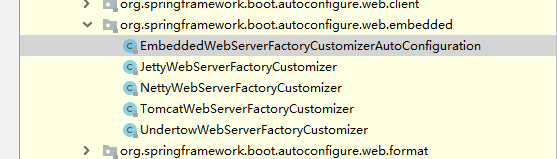
点进去看看源码。每一个bean上都加有@ConditionalOnClass注解,这就解释了为什么SpringBoot可以通过修改依赖这么简单的方式切换servlet容器。
//
// Source code recreated from a .class file by IntelliJ IDEA
// (powered by Fernflower decompiler)
//

package org.springframework.boot.autoconfigure.web.embedded;

import io.undertow.Undertow;
import org.apache.catalina.startup.Tomcat;
import org.apache.coyote.UpgradeProtocol;
import org.eclipse.jetty.server.Server;
import org.eclipse.jetty.util.Loader;
import org.eclipse.jetty.webapp.WebAppContext;
import org.springframework.boot.autoconfigure.condition.ConditionalOnClass;
import org.springframework.boot.autoconfigure.condition.ConditionalOnWebApplication;
import org.springframework.boot.autoconfigure.web.ServerProperties;
import org.springframework.boot.context.properties.EnableConfigurationProperties;
import org.springframework.context.annotation.Bean;
import org.springframework.context.annotation.Configuration;
import org.springframework.core.env.Environment;
import org.xnio.SslClientAuthMode;
import reactor.netty.http.server.HttpServer;

@Configuration(
    proxyBeanMethods = false
)
@ConditionalOnWebApplication
@EnableConfigurationProperties({ServerProperties.class})
public class EmbeddedWebServerFactoryCustomizerAutoConfiguration {
    public EmbeddedWebServerFactoryCustomizerAutoConfiguration() {
    }

    @Configuration(
        proxyBeanMethods = false
    )
    @ConditionalOnClass({HttpServer.class})
    public static class NettyWebServerFactoryCustomizerConfiguration {
        public NettyWebServerFactoryCustomizerConfiguration() {
        }

        @Bean
        public NettyWebServerFactoryCustomizer nettyWebServerFactoryCustomizer(Environment environment, ServerProperties serverProperties) {
            return new NettyWebServerFactoryCustomizer(environment, serverProperties);
        }
    }

    @Configuration(
        proxyBeanMethods = false
    )
    @ConditionalOnClass({Undertow.class, SslClientAuthMode.class})
    public static class UndertowWebServerFactoryCustomizerConfiguration {
        public UndertowWebServerFactoryCustomizerConfiguration() {
        }

        @Bean
        public UndertowWebServerFactoryCustomizer undertowWebServerFactoryCustomizer(Environment environment, ServerProperties serverProperties) {
            return new UndertowWebServerFactoryCustomizer(environment, serverProperties);
        }
    }

    @Configuration(
        proxyBeanMethods = false
    )
    @ConditionalOnClass({Server.class, Loader.class, WebAppContext.class})
    public static class JettyWebServerFactoryCustomizerConfiguration {
        public JettyWebServerFactoryCustomizerConfiguration() {
        }

        @Bean
        public JettyWebServerFactoryCustomizer jettyWebServerFactoryCustomizer(Environment environment, ServerProperties serverProperties) {
            return new JettyWebServerFactoryCustomizer(environment, serverProperties);
        }
    }

    @Configuration(
        proxyBeanMethods = false
    )
    @ConditionalOnClass({Tomcat.class, UpgradeProtocol.class})
    public static class TomcatWebServerFactoryCustomizerConfiguration {
        public TomcatWebServerFactoryCustomizerConfiguration() {
        }

        @Bean
        public TomcatWebServerFactoryCustomizer tomcatWebServerFactoryCustomizer(Environment environment, ServerProperties serverProperties) {
            return new TomcatWebServerFactoryCustomizer(environment, serverProperties);
        }
    }
}
嵌入式容器最大的优点就是简单方便,缺点就是不方便优化和定制servlet容器。
四、配置外部Tomcat
1、修改原有SpringBoot项目
新建ServletInitializer 继承SpringBootServletInitializer ,然后重写configure方法并返回启动类DemoApplication.class。
package com.tom.demo;

import org.springframework.boot.builder.SpringApplicationBuilder;
import org.springframework.boot.web.servlet.support.SpringBootServletInitializer;

public class ServletInitializer extends SpringBootServletInitializer {

    @Override
    protected SpringApplicationBuilder configure(SpringApplicationBuilder application) {
        return application.sources(DemoApplication.class);
    }

}
然后修改内置的tomcat作用域。在pom文件中添加:
<dependency>
    <groupId>org.springframework.boot</groupId>
    <artifactId>spring-boot-starter-tomcat</artifactId>
    <scope>provided</scope>
</dependency>
在pom文件project标签下修改打包方式为war。
<packaging>war</packaging>
最后在项目中新建src\main\webapp\WEB-INF路径,并在其下新建web.xml文件。文件内容如下:
<?xml version="1.0" encoding="UTF-8"?>
<web-app xmlns="http://xmlns.jcp.org/xml/ns/javaee"
         xmlns:xsi="http://www.w3.org/2001/XMLSchema-instance"
         xsi:schemaLocation="http://xmlns.jcp.org/xml/ns/javaee http://xmlns.jcp.org/xml/ns/javaee/web-app_4_0.xsd"
         version="4.0">
</web-app>
当前项目结构:

接下来点击IDEA右上角的形似文件夹的按钮,如下图所示:

来到下面这个页面,选中Web,然后点击右侧的 + 号,并选则弹出来的 web.xml。

直接点OK按钮,最后保存并应用即可。

完成后的项目结构(自己添加了两个html页面方便测试):

2、IDEA向导创建(和第1点作用一致)
当然上面的第1点在新建项目的时候也可以用强大的IDEA快速执行,具体步骤如下:
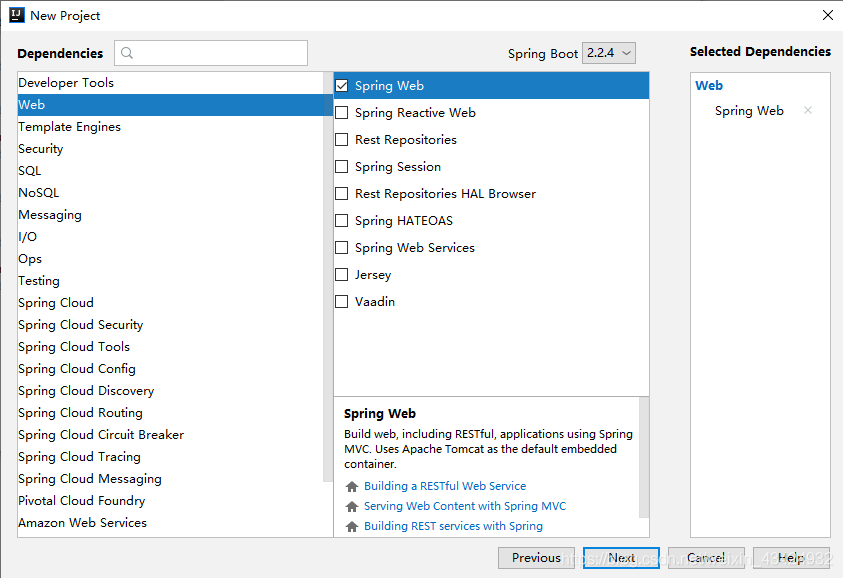
使用新建向导创建springboot项目。

关键是这里打包方式要选择为War。

最后选择上Web模块。点击next完成新建。
新建完成后的初始项目结构。

接下来点击IDEA右上角的形似文件夹的按钮,如下图所示:
来到这个页面后,双击下面这个报红色的路径,然后点OK创建webapp路径。

然后点击右侧的 + 号,在src\main\webapp\WEB-INF路径下创建web.xml文件。之后一路保存带应用即可。

最后就可以看到web.xml文件被自动创建出来了。

创建完成后的初始pom文件如下。
<?xml version="1.0" encoding="UTF-8"?>
<project xmlns="http://maven.apache.org/POM/4.0.0" xmlns:xsi="http://www.w3.org/2001/XMLSchema-instance"
         xsi:schemaLocation="http://maven.apache.org/POM/4.0.0 https://maven.apache.org/xsd/maven-4.0.0.xsd">
    <modelVersion>4.0.0</modelVersion>
    <parent>
        <groupId>org.springframework.boot</groupId>
        <artifactId>spring-boot-starter-parent</artifactId>
        <version>2.2.4.RELEASE</version>
        <relativePath/> <!-- lookup parent from repository -->
    </parent>
    <groupId>com.ge</groupId>
    <artifactId>demo</artifactId>
    <version>0.0.1-SNAPSHOT</version>
    <packaging>war</packaging>
    <name>demo</name>
    <description>Demo project for Spring Boot</description>

    <properties>
        <java.version>1.8</java.version>
    </properties>

    <dependencies>
        <dependency>
            <groupId>org.springframework.boot</groupId>
            <artifactId>spring-boot-starter-web</artifactId>
        </dependency>

        <dependency>
            <groupId>org.springframework.boot</groupId>
            <artifactId>spring-boot-starter-tomcat</artifactId>
            <scope>provided</scope>
        </dependency>
        <dependency>
            <groupId>org.springframework.boot</groupId>
            <artifactId>spring-boot-starter-test</artifactId>
            <scope>test</scope>
            <exclusions>
                <exclusion>
                    <groupId>org.junit.vintage</groupId>
                    <artifactId>junit-vintage-engine</artifactId>
                </exclusion>
            </exclusions>
        </dependency>
    </dependencies>

    <build>
        <plugins>
            <plugin>
                <groupId>org.springframework.boot</groupId>
                <artifactId>spring-boot-maven-plugin</artifactId>
            </plugin>
        </plugins>
    </build>

</project>
3、设置tomacat
接下来配置tomacat,准备运行项目。点击右上角的启动类,选择Edit Configurations…

点击左上角+号,在列表中选择Tomcat Server,然后点击Local(本地)。

来到下面这个页面。最关键的是点击Application server栏后面的Configure…按钮,配置自己本地的 tomcat 路径。

选则自己本地的tomcat。

之后可以填写tomcat的名字,还可以修改URL和端口号等属性。
上面全部完成之后点击右下角的Fix按钮。来到如下界面,点击右侧的+号,选择以exploded结尾的war部署。

最后点击OK和Apply,完成配置。注意Application context栏填 / 号。

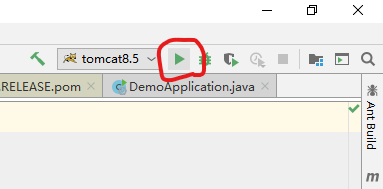
4、启动tomcat
点击右上角的绿色三角形按钮启动tomcat。
tomcat开始启动。

tomcat启动成功并开始带起SpringBoot项目。

tomcat成功带起SpringBoot项目。

项目启动之后会自动访问 webapp 路径下的 index.html 页面。

webapp路径下没有index页面:

之后也可以访问 SpringBoot 项目中的接口了(后面项目中写了一个返回 HelloWorld 字符串的接口)。

至此就完成了 springboot 项目的 tomcat 外部配置。
