一.嵌入式Servlet容器
在传统的开发中,我们在完成开发后需要将项目打成war包,在外部配置好TomCat容器,而这个TomCat就是Servlet容器.在使用SpringBoot开发时,我们无需再外部配置Servlet容器,使用的是嵌入式的Servlet容器(TomCat).如果我们使用嵌入式的Servlet容器,存在以下问题:
1.如果我们是在外部安装了TomCat,如果我们想要进行自定义的配置优化,可以在其conf文件夹下修改配置文件来实现.在使用内置Servlet容器时,我们可以使用如下方法来修改Servlet容器的相关配置:
(1)例如我们可以使用server.port=80来修改我们的启用端口号为80;及我们可以通过修改和Server有关的配置来实现(ServerProperties)
(2)修改通用的设置server.XXX;
(3)修改和Tomcat相关的设置:server.tomcat.xxx
2.我们可以编写一个EmbeddedServletContainerCustomizer(嵌入式Servlet容器的定制器):
 1     @Bean
 2     public EmbeddedServletContainerCustomizer embeddedServletContainerCustomizer(){
 3         return new EmbeddedServletContainerCustomizer() {
 4             //定制嵌入式的Servlet容器相关的规则
 5             @Override
 6             public void customize(ConfigurableEmbeddedServletContainer container) {
 7                     container.setPort(8083);        //设置端口为8083
 8             }
 9         };
10     }
二.注册Servlet Filter Listener
我们可以分别使用ServletRegisterationBean FilterRegisterationBean ServletListenerRegisterationBean完成这三大组件的注册
--Servlet
 1 package com.zhiyun.springboot.web_restfulcrud.servlet;
 2
 3 import javax.servlet.ServletException;
 4 import javax.servlet.http.HttpServlet;
 5 import javax.servlet.http.HttpServletRequest;
 6 import javax.servlet.http.HttpServletResponse;
 7 import java.io.IOException;
 8
 9 /**
10  * @author : S K Y
11  * @version :0.0.1
12  */
13 public class MyServlet extends HttpServlet {
14     //处理get()请求
15     @Override
16     protected void doGet(HttpServletRequest req, HttpServletResponse resp) throws ServletException, IOException {
17         doPost(req, resp);
18     }
19
20     @Override
21     protected void doPost(HttpServletRequest req, HttpServletResponse resp) throws ServletException, IOException {
22         resp.getWriter().write("Hello MyServlet");
23     }
24 }
 1 package com.zhiyun.springboot.web_restfulcrud.config;
 2
 3 import com.zhiyun.springboot.web_restfulcrud.servlet.MyServlet;
 4 import org.springframework.boot.web.servlet.ServletRegistrationBean;
 5 import org.springframework.context.annotation.Bean;
 6 import org.springframework.context.annotation.Configuration;
 7
 8 /**
 9  * @author : S K Y
10  * @version :0.0.1
11  */
12 @Configuration
13 public class MyServerConfig {
14     //注册三大组件
15     @Bean
16     public ServletRegistrationBean servletRegistrationBean() {
17         return new ServletRegistrationBean(new MyServlet(), "/myServlet");
18     }
19 }
--Filter
 1 package com.zhiyun.springboot.web_restfulcrud.filter;
 2
 3 import org.slf4j.Logger;
 4 import org.slf4j.LoggerFactory;
 5
 6 import javax.servlet.*;
 7 import java.io.IOException;
 8
 9 /**
10  * @author : S K Y
11  * @version :0.0.1
12  */
13 public class MyFilter implements Filter {
14     private Logger logger = LoggerFactory.getLogger(this.getClass());
15
16     @Override
17     public void init(FilterConfig filterConfig) throws ServletException {
18
19     }
20
21     @Override
22     public void doFilter(ServletRequest request, ServletResponse response, FilterChain chain) throws IOException, ServletException {
23         logger.debug("自定义的Filter启用了!");
24         chain.doFilter(request, response);
25     }
26
27     @Override
28     public void destroy() {
29
30     }
31 }
1     @Bean
2     public FilterRegistrationBean filterRegistrationBean() {
3         FilterRegistrationBean filterRegistrationBean = new FilterRegistrationBean();
4         filterRegistrationBean.setFilter(new MyFilter());
5         filterRegistrationBean.setUrlPatterns(Arrays.asList("/hello", "/myServlet"));
6         return filterRegistrationBean;
7     }
--Listener
 1 package com.zhiyun.springboot.web_restfulcrud.listener;
 2
 3 import org.slf4j.Logger;
 4 import org.slf4j.LoggerFactory;
 5
 6 import javax.servlet.ServletContextEvent;
 7 import javax.servlet.ServletContextListener;
 8
 9 /**
10  * @author : S K Y
11  * @version :0.0.1
12  */
13 public class MyListener implements ServletContextListener {
14     private Logger logger = LoggerFactory.getLogger(this.getClass());
15
16     @Override
17     public void contextInitialized(ServletContextEvent sce) {
18         logger.debug("contextInitialized...当前web应用启动了");
19     }
20
21     @Override
22     public void contextDestroyed(ServletContextEvent sce) {
23         logger.debug("contextDestroyed...当前web项目销毁");
24     }
25 }
1     @Bean
2     public ServletListenerRegistrationBean servletListenerRegistrationBean() {
3         return new ServletListenerRegistrationBean<>(new MyListener());
4     }
--由于SpringBoot默认是以jar包的方式启动嵌入式的Servlet容器来启动SpringBoot的web应用,没有web.xml文件.注册三大组件可以采取这样的方法.
--SpringBoot帮我们自动配置SpringMVC的是惠普,自动的注册SpringMVC的前端控制器:DispatcherServlet.默认拦截"/"所有资源包括静态资源,但是不拦截JSP请求,"/*"会拦截JSP.我们可以通过server.servletPath来修改SpringMVC前端控制器默认拦截的请求路径.
三.使用其他的嵌入式容器
SpringBoot还支持Jetty(适合开发长连接的应用,例如聊天室),Undertow(不支持JSP):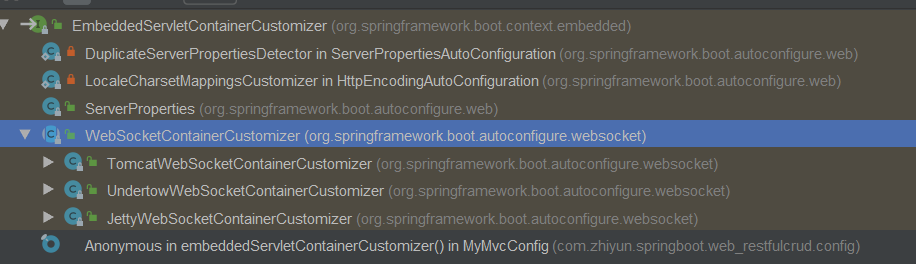
1.默认使用了TomCat
2.切换使用其他Servlet容器,首先需要排除其中的spring-boot-starter-web -->spring-boot-starter-tomcat依赖,而后则可以引入其他的Servlet容器
 1         <!--引入Web模块-->
 2         <dependency>
 3             <groupId>org.springframework.boot</groupId>
 4             <artifactId>spring-boot-starter-web</artifactId>
 5             <exclusions>
 6                 <exclusion>
 7                     <artifactId>spring-boot-starter-tomcat</artifactId>
 8                     <groupId>org.springframework.boot</groupId>
 9                 </exclusion>
10             </exclusions>
11         </dependency>
12
13         <!--引入其他的Servlet容器-->
14         <dependency>
15             <artifactId>spring-boot-starter-jetty</artifactId>
16             <groupId>org.springframework.boot</groupId>
17         </dependency>
四.嵌入式Servlet容器的自动配置原理
在SpringBoot中拥有如下自动配置类EmbeddedServletContainerAutoConfiguration:
1 @AutoConfigureOrder(Ordered.HIGHEST_PRECEDENCE)
2 @Configuration
3 @ConditionalOnWebApplication
4 @Import(BeanPostProcessorsRegistrar.class)
5 public class EmbeddedServletContainerAutoConfiguration {
--该类就是嵌入式的Servlet容器自动配置类
 1 /**
 2      * Nested configuration if Tomcat is being used.
 3      */
 4     @Configuration
 5     @ConditionalOnClass({ Servlet.class, Tomcat.class })
 6     @ConditionalOnMissingBean(value = EmbeddedServletContainerFactory.class, search = SearchStrategy.CURRENT)
 7     public static class EmbeddedTomcat {
 8
 9         @Bean
10         public TomcatEmbeddedServletContainerFactory tomcatEmbeddedServletContainerFactory() {
11             return new TomcatEmbeddedServletContainerFactory();
12         }
13
14     }
--如果我们导入了Servlet的相关袭来,那么我们就会存在Servlet.class类以及Tomcat.class类,并且容器中不存在EmbeddedServletContainerFactory嵌入式容器工厂(用户自定义的Servlet容器工厂,那么该配置就会生效),在嵌入式容器工厂中定义了如下类:
 1 public interface EmbeddedServletContainerFactory {
 2
 3     /**
 4      * Gets a new fully configured but paused {@link EmbeddedServletContainer} instance.
 5      * Clients should not be able to connect to the returned server until
 6      * {@link EmbeddedServletContainer#start()} is called (which happens when the
 7      * {@link ApplicationContext} has been fully refreshed).
 8      * @param initializers {@link ServletContextInitializer}s that should be applied as
 9      * the container starts
10      * @return a fully configured and started {@link EmbeddedServletContainer}
11      * @see EmbeddedServletContainer#stop()
12      */
13     EmbeddedServletContainer getEmbeddedServletContainer(
14             ServletContextInitializer... initializers);
15
16 }
--获取嵌入式的Servlet容器,在SpringBoot的默认实现中存在如下的实现: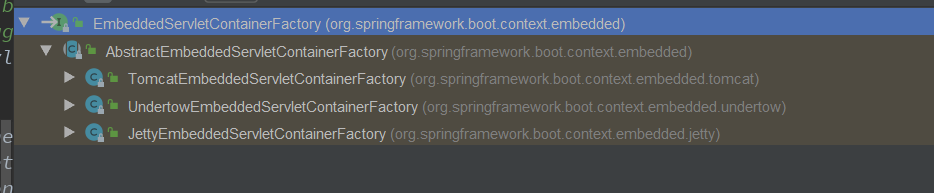
--以嵌入式Tomcat容器工程为例:
 1     @Override
 2     public EmbeddedServletContainer getEmbeddedServletContainer(
 3             ServletContextInitializer... initializers) {
 4         Tomcat tomcat = new Tomcat();
 5         File baseDir = (this.baseDirectory != null ? this.baseDirectory
 6                 : createTempDir("tomcat"));
 7         tomcat.setBaseDir(baseDir.getAbsolutePath());
 8         Connector connector = new Connector(this.protocol);
 9         tomcat.getService().addConnector(connector);
10         customizeConnector(connector);
11         tomcat.setConnector(connector);
12         tomcat.getHost().setAutoDeploy(false);
13         configureEngine(tomcat.getEngine());
14         for (Connector additionalConnector : this.additionalTomcatConnectors) {
15             tomcat.getService().addConnector(additionalConnector);
16         }
17         prepareContext(tomcat.getHost(), initializers);
18         return getTomcatEmbeddedServletContainer(tomcat);
19     }
--可以发现其内部使用Java代码的方式创建了一个Tomcat,并配置了Tomcat工作的基本环境,最终返回一个嵌入式的Tomcat容器
 1 /**
 2      * Create a new {@link TomcatEmbeddedServletContainer} instance.
 3      * @param tomcat the underlying Tomcat server
 4      * @param autoStart if the server should be started
 5      */
 6     public TomcatEmbeddedServletContainer(Tomcat tomcat, boolean autoStart) {
 7         Assert.notNull(tomcat, "Tomcat Server must not be null");
 8         this.tomcat = tomcat;
 9         this.autoStart = autoStart;
10         initialize();
11     }
12
13     private void initialize() throws EmbeddedServletContainerException {
14         TomcatEmbeddedServletContainer.logger
15                 .info("Tomcat initialized with port(s): " + getPortsDescription(false));
16         synchronized (this.monitor) {
17             try {
18                 addInstanceIdToEngineName();
19                 try {
20                     // Remove service connectors to that protocol binding doesn't happen
21                     // yet
22                     removeServiceConnectors();
23
24                     // Start the server to trigger initialization listeners
25                     this.tomcat.start();
26
27                     // We can re-throw failure exception directly in the main thread
28                     rethrowDeferredStartupExceptions();
29
30                     Context context = findContext();
31                     try {
32                         ContextBindings.bindClassLoader(context, getNamingToken(context),
33                                 getClass().getClassLoader());
34                     }
35                     catch (NamingException ex) {
36                         // Naming is not enabled. Continue
37                     }
38
39                     // Unlike Jetty, all Tomcat threads are daemon threads. We create a
40                     // blocking non-daemon to stop immediate shutdown
41                     startDaemonAwaitThread();
42                 }
43                 catch (Exception ex) {
44                     containerCounter.decrementAndGet();
45                     throw ex;
46                 }
47             }
48             catch (Exception ex) {
49                 throw new EmbeddedServletContainerException(
50                         "Unable to start embedded Tomcat", ex);
51             }
52         }
53     }
--我们对嵌入式容器的配置修改是如何生效的:
1.修改ServerProperties中的属性
2.嵌入式Servlet容器定制器:EmbeddedServletContainerCustomizer,帮助我们修改了Sevlet容器的一些默认配置,例如端口号;在EmbeddedServletContainerAutoConfiguration中导入了一个名为BeanPostProcessorsRegistrar,给容器中导入一些组件即嵌入式Servlet容器的后置处理器.后置处理器表示的是在bean初始化前后(创建完对象,还没有赋予初值)执行初始化工作.
3.EmbeddedServletContainerAutoConfiguration为嵌入式Servlet容器的后置处理器的自动配置类,其存在如下类:
1     @Override
2     public Object postProcessBeforeInitialization(Object bean, String beanName)
3             throws BeansException {
4         if (bean instanceof ConfigurableEmbeddedServletContainer) {
5             postProcessBeforeInitialization((ConfigurableEmbeddedServletContainer) bean);
6         }
7         return bean;
8     }
1     private void postProcessBeforeInitialization(
2             ConfigurableEmbeddedServletContainer bean) {
3         for (EmbeddedServletContainerCustomizer customizer : getCustomizers()) {
4             customizer.customize(bean);
5         }
6     }
 1     private Collection<EmbeddedServletContainerCustomizer> getCustomizers() {
 2         if (this.customizers == null) {
 3             // Look up does not include the parent context
 4             this.customizers = new ArrayList<EmbeddedServletContainerCustomizer>(
 5                     this.beanFactory
 6                             .getBeansOfType(EmbeddedServletContainerCustomizer.class,
 7                                     false, false)
 8                             .values());
 9             Collections.sort(this.customizers, AnnotationAwareOrderComparator.INSTANCE);
10             this.customizers = Collections.unmodifiableList(this.customizers);
11         }
12         return this.customizers;
13     }
4.获取到了所有的定制器,调用了每一个定制器的customer方法来给Servlet容器进行属性赋值.
5.ServerProperties也是配置器,因此其配置流程如下:
(1)SpringBoot根据导入的依赖情况,添加响应的配置容器工厂EmbeddedServletCustomerFactory
(2)容器中某个组件要创建对象就会惊动后置处理器;
(3)只要是嵌入式的Servlet容器工厂 后置处理器就工作,从容器中获取所有的EmbeddedServletContainerCustomizer调用定制器的定制方法
五.嵌入式Servlet容器启动原理
获取嵌入式的Servlet容器工厂:
1.SpringBoot引用启动运行run方法;
2.refreshContext(context);SpringBoot刷新容器并初始化容器,创建容器中的每一个组件:如果是Web应用,创建web的IOC容器AnnotationConfigEmbeddedWebApplicationContext,如果不是则创建AnnotationConfigApplicationContext;
3.refreshContext(context)刷新刚才创建好的容器
4.onRefresh():web的IOC容器重写了onRefresh方法;
5.webIOC容器会创建嵌入式的servlet容器:createEmbeddedServletContainer();
6.获取嵌入式的servlet容器工厂:EmbeddedServletContainerFactory containerFactory = getEmbeddedServletContainerFactory();
7.使用容器工厂获取嵌入式的Servlet容器;
8.嵌入式的Servlet容器创建对象,并启动servlet容器.
六.使用外置的Servlet容器
嵌入式Servlet容器:
优点: 简单,快捷
缺点:默认不支持JSP,优化定制复杂(使用定制器,自定义配置servlet容器的创建工厂);
--外部的Servlet容器,:外面安装Tomcat-应用war包的方式打包.
--我们使用war包的形式创建SpringBoot工程可以发现其目录结构如下: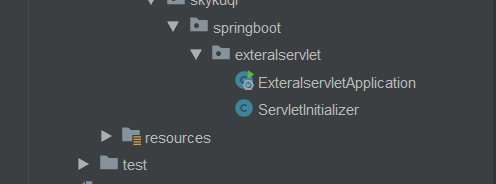
--创建项目webapp路径及web-XML文件:
--部署Tomcat服务器:

--创建步骤:
1.必须创建一个war项目;
2.将嵌入式的Tomcat指定为provided
1         <dependency>
2             <groupId>org.springframework.boot</groupId>
3             <artifactId>spring-boot-starter-web</artifactId>
4         </dependency>
5         <dependency>
6             <groupId>org.springframework.boot</groupId>
7             <artifactId>spring-boot-starter-tomcat</artifactId>
8             <scope>provided</scope>
9         </dependency>
3.必须编写一个SpringBootServletInitializer的子类,目的就是调用config方法
 1 package com.skykuqi.springboot.exteralservlet;
 2
 3 import org.springframework.boot.builder.SpringApplicationBuilder;
 4 import org.springframework.boot.web.support.SpringBootServletInitializer;
 5
 6 public class ServletInitializer extends SpringBootServletInitializer {
 7
 8     @Override
 9     protected SpringApplicationBuilder configure(SpringApplicationBuilder application) {
10         //传入SpringBoot应用的主程序
11         return application.sources(ExteralservletApplication.class);
12     }
13
14 }
七.外置Servlet容器的启动原理
1.jar包:当我们的应用是使用SpringBoot的jar包形式的话,我们可以直接通过执行SpringBoot主类的main方法,启动IOC容器,创建嵌入式的Servlet容器;
2.war包:启动服务器,服务器启动SpringBoot应用,启用IOC容器:
3.在Servlet3.0中有一项规范: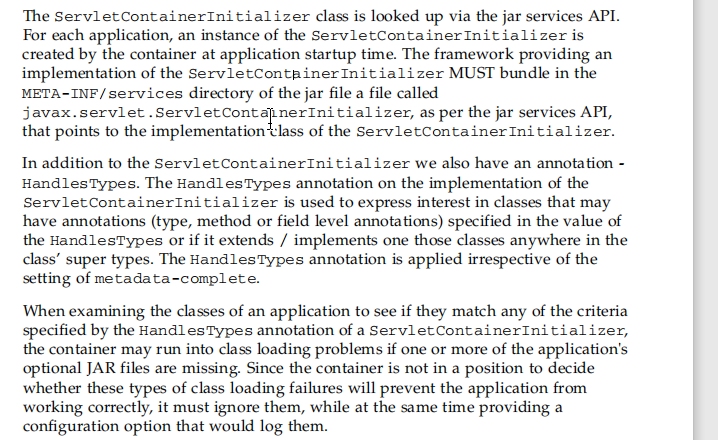
(1)服务器启动(web应用启动)会创建当前web应用里面每一个jar包里面ServletContainerInitializer的实例;
(2)ServletContainerInitializer的实现必须放在META-INF/services文件夹下,该文件夹下还必须有一个文件名为javax.servlet.ServletContainerInitializer的文件,文件的内容就是ServletContainerInitializer实现的全类名.
(3)可以使用@HandlesTypes注解来实现,容器在应用启动的时候,加载我们所感兴趣的类.
4.启动流程:
(1)启动Tomcat服务器,Spring的Web模块中存在该文件: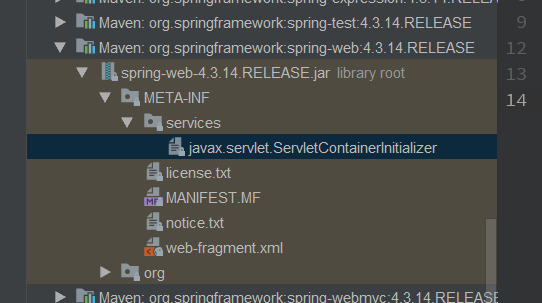

(2)SpringServletContainerInitializer将@HandlesTypes(WebApplicationInitializer.class)所标注的所有这个类型的类都传入到onStartup方法的集合中为这些不是接口不是抽象类类型的类创建实例;
(3)每一个WebApplicationInitializer的实现类都调用自己的onStartup方法.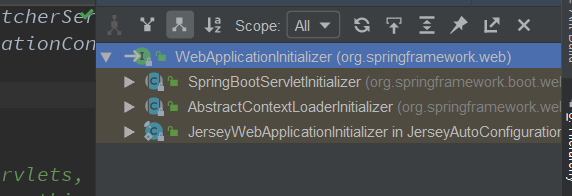
(4)相当于我们的SpringServletContainerInitializer的类会被创建对象,并执行onStartup方法;
(6)SpringServletContainerInitializer执行onStartup的时候会创建容器
 1     protected WebApplicationContext createRootApplicationContext(
 2             ServletContext servletContext) {
 3         SpringApplicationBuilder builder = createSpringApplicationBuilder();
 4         StandardServletEnvironment environment = new StandardServletEnvironment();
 5         environment.initPropertySources(servletContext, null);
 6         builder.environment(environment);
 7         builder.main(getClass());
 8         ApplicationContext parent = getExistingRootWebApplicationContext(servletContext);
 9         if (parent != null) {
10             this.logger.info("Root context already created (using as parent).");
11             servletContext.setAttribute(
12                     WebApplicationContext.ROOT_WEB_APPLICATION_CONTEXT_ATTRIBUTE, null);
13             builder.initializers(new ParentContextApplicationContextInitializer(parent));
14         }
15         builder.initializers(
16                 new ServletContextApplicationContextInitializer(servletContext));
17         builder.contextClass(AnnotationConfigEmbeddedWebApplicationContext.class);
18         builder = configure(builder);
19         SpringApplication application = builder.build();
20         if (application.getSources().isEmpty() && AnnotationUtils
21                 .findAnnotation(getClass(), Configuration.class) != null) {
22             application.getSources().add(getClass());
23         }
24         Assert.state(!application.getSources().isEmpty(),
25                 "No SpringApplication sources have been defined. Either override the "
26                         + "configure method or add an @Configuration annotation");
27         // Ensure error pages are registered
28         if (this.registerErrorPageFilter) {
29             application.getSources().add(ErrorPageFilterConfiguration.class);
30         }
31         return run(application);
32     }
--将创建RootApplicationContext容器,在创建容器时会进行如下操作:
a.创建SpringApplicationBuilder
b.在18行调用了configer(),将SpringBoot的主程序类传入了进来
c.使用builder创建一个Spring应用