由于博主最近实验需要将tensorrt部署到端到端的抓取网络当中,但之前没有使用过tensorrt,查阅了很多资料,踩了很多坑,最后才部署成功。于是想着记录一下,本篇内容主要以Unet和grcnn(antipodal robotic grasping)为例来讲解端到端pytorch模型转换为tensorrt。
文章索引
第一章:前期准备
博主的软件环境:ubuntu18+cuda11.3+cudnn8.6.0+python3.8+torch1.12.0+tensorrt8.5.2.2,GPU为RTX3070。由于cuda+cudnn+pytorch1.12安装网络上有很多教程,这里就不再赘述。
Step1:安装tensorRT8.5.2.2
可以通过官网下载。
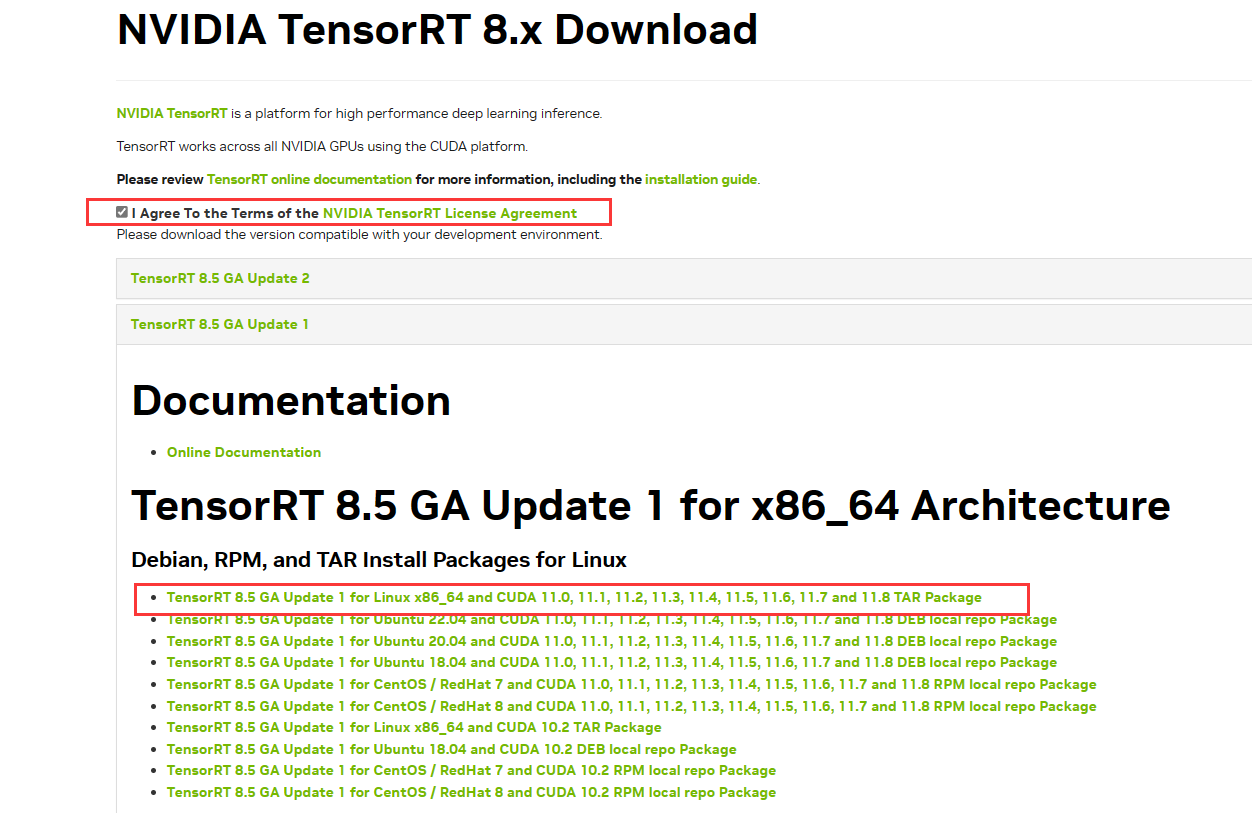
因为去nvidia官网还需要登录,为了方便这里提供百度云网盘下载:提取码ltjy。
解压文件:
tar -xzvf TensorRT-8.5.2.2.Linux.x86_64-gnu.cuda-11.8.cudnn8.6.tar.gz
添加环境变量:
export PATH="$PATH:*****/TensorRT-8.5.2.2/bin"#自己下载的TensorRT/bin所在地址
export LD_LIBRARY_PATH="$LD_LIBRARY_PATH:*******/TensorRT/lib"#自己下载的TensorRT/lib所在地址
创建并且激活虚拟环境:
conda create -n pt12 python=3.8
conda activate pt12
安装wheel文件:
cd TensorRT-8.5.2.2/python
pip install tensorrt-8.5.2.2-cp38-none-linux_x86_64.whl
Step2:安装onnx-tensorrt工具包
由onnx文件转到trt文件有很多种方法,如果不需要使用INT8进行量化推理,推荐使用该工具包来进行转换。

git clone https://github.com/onnx/onnx-tensorrt.git
cd onnx-tensorrt
git checkout 8.0-GA
git submodule update --init
mkdir build && cd build
cmake .. -DTENSORRT_ROOT=/******/TensorRT-8.5.2.2 #刚才装的位置
与该博客类似,报错1:cmake版本太低
解决:升级cmake版本
pip install cmake --upgrade
或去cmake官网下载
报错2:Could NOT find Protobuf(missing:Protobuf_LIBRARIESProtobuf_INCLUDE_DIR)
解决:安装libprotobuf-dev protobuf-compiler
sudo apt-get install libprotobuf-dev protobuf-compiler
proto --version
开始编译
make -j8
报错:/usr/include/NvInferRuntimeCommon.h:56:10:fatal error:cuda_runtime_api.h:没有那个文件或目录
解决:配置cuda相关环境变量
sudo gedit ~/.bashrc
export PATH=/usr/local/cuda-11.3/bin:$PATH
export LD_LIBRARY_PATH=/usr/local/cuda-11.3/lib64:$LD_LIBRARY_PATH
export CPATH=/usr/local/cuda-11.3/targets/x86_64-linux/include:$CPATH
export LD_LIBARARY_PATH=/usr/local/cuda-11.3/targets/x86_64-linux/lib:$LD_LIBARARY_PATH
source ~/.basrc

开始安装:
sudo make install
运行测试:
onnx2trt -V
查看版本号,至此所有前期准备完成。
第二章:Pytorch-Unet to TensorRT-Unet
要将pytorch模型转换为tensorrt的engine模型需要经过一下两个步骤。
1、将pt或者模型文件转换为onnx文件;
2、使用转换工具将onnx文件转换为trt文件。
Pytorch-Unet通过输入一张rgb图片通过网络得到其分割后的灰度图,其github项目地址在此,其相关讲解可以参考该博客。这里直接上干货。
Step1:从github拉取代码
git clone https://github.com/milesial/Pytorch-UNet.git
cd Pytorch-UNet
git checkout v1.0
下载数据集:
通过github中代码的项目readme文件,下载其数据集,将train_hq.zip里面的图片放入data/img里,将train_mask.zip里面的图片放入data/mask里。
Step2:训练网络
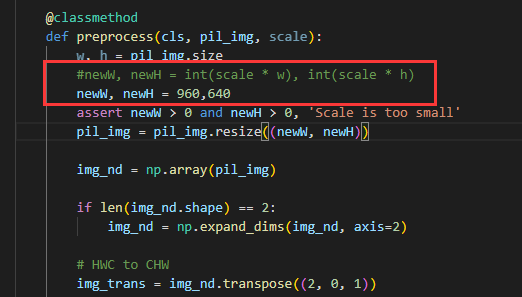
为方便后续部署,修改utils中的dataset.py中preprocess函数内容,将NewW,NewH修改为960,640。
直接运行train.py文件即可。
Step3:将pt模型文件转换为onnx
test.py:
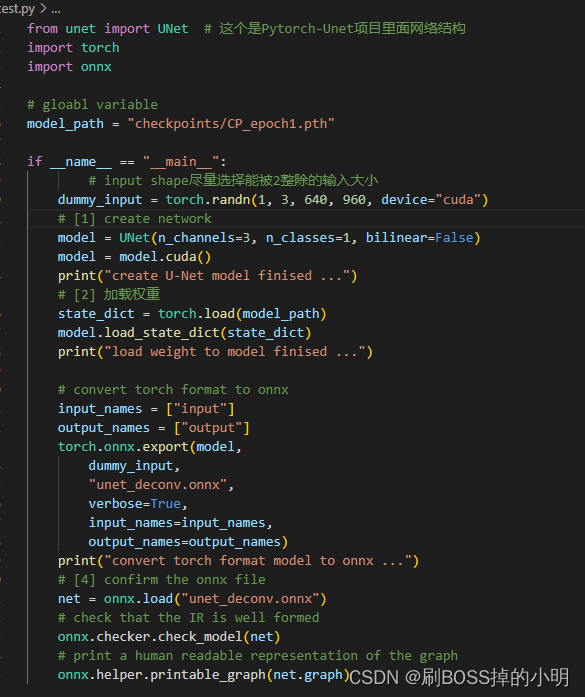
这里的dummy_input改为我们修改的(1,3,640,960)初始化模型参数保证与train.py中一致。
train.py
Step4:将onnx转换为trt模型
onnx2trt unet_deconv.onnx -o unet_deconv.trt
报错1:onnx模型太复杂,无法转换。
解决:安装onnxsim工具
pip install onnx-simplifier
python -m onnxsim input_onnx_model output_onnx_model
报错2:不能打开目标文件libnvinfer.so.8

解决:链接动态库
sudo gedit  /etc/ld.so.conf
添加一行:
/home/lab/xcy/TensorRT-8.5.2.2/lib #自己TensorRT中lib所在路径
sudo ldconfig
报错3:找不到libnvinfer.so.8.4.3
解决:
sudo cp /home/lab/xcy/TensorRT-8.5.2.2/lib/libvinfer_build_resource.so.8.4.3 /usr/lib
Step5:编写推理代码
inference.py
import os
import sys
import time
# from PIL import Image
import tensorrt as trt
import pycuda.driver as cuda
import pycuda.autoinit
import numpy as np
import cv2
# TensorRT logger singleton
TRT_LOGGER = trt.Logger(trt.Logger.WARNING)

def allocate_buffers(engine):
    inputs = []
    outputs = []
    bindings = []
    stream = cuda.Stream()
    class HostDeviceMem(object):
        def __init__(self, host_mem, device_mem):
            self.host = host_mem
            self.device = device_mem

        def __str__(self):
            return "Host:\n" + str(self.host) + "\nDevice:\n" + str(self.device)

        def __repr__(self):
            return self.__str__()

    for binding in engine:
        size = trt.volume(engine.get_binding_shape(binding)) * engine.max_batch_size
        dtype = trt.nptype(engine.get_binding_dtype(binding))
        # Allocate host and device buffers
        host_mem = cuda.pagelocked_empty(size, dtype)
        device_mem = cuda.mem_alloc(host_mem.nbytes)
        # Append the device buffer to device bindings.
        bindings.append(int(device_mem))
        # Append to the appropriate list.
        if engine.binding_is_input(binding):
            inputs.append(HostDeviceMem(host_mem, device_mem))
        else:
            outputs.append(HostDeviceMem(host_mem, device_mem))

    return inputs, outputs, bindings, stream

def load_engine(trt_path):
    # 反序列化引擎
    with open(trt_path, "rb") as f, trt.Runtime(TRT_LOGGER) as runtime:
        return runtime.deserialize_cuda_engine(f.read())


class TRTInference(object):
    """Manages TensorRT objects for model inference."""

    def __init__(self, trt_engine_path, onnx_model_path, trt_engine_datatype=trt.DataType.FLOAT, batch_size=1):
        """Initializes TensorRT objects needed for model inference.
        Args:
            trt_engine_path (str): path where TensorRT engine should be stored
            uff_model_path (str): path of .uff model
            trt_engine_datatype (trt.DataType):
                requested precision of TensorRT engine used for inference
            batch_size (int): batch size for which engine
                should be optimized for
        """

        # Initialize runtime needed for loading TensorRT engine from file
        # TRT engine placeholder
        self.trt_engine = None

        # Display requested engine settings to stdout
        print("TensorRT inference engine settings:")
        print("  * Inference precision - {}".format(trt_engine_datatype))
        print("  * Max batch size - {}\n".format(batch_size))
        # If we get here, the file with engine exists, so we can load it
        if not self.trt_engine:
            print("Loading cached TensorRT engine from {}".format(
                trt_engine_path))
            self.trt_engine = load_engine(
                trt_engine_path)

        # This allocates memory for network inputs/outputs on both CPU and GPU
        self.inputs, self.outputs, self.bindings, self.stream = allocate_buffers(self.trt_engine)

        # Execution context is needed for inference
        self.context = self.trt_engine.create_execution_context()

    def infer(self, full_img, output_shapes, new_width, new_height):
        """Infers model on given image.
        Args:
            image_path (str): image to run object detection model on
        """

        assert new_width > 0 and new_height > 0, "Scale is too small"
        # resize and transform to array
        scale_img = cv2.resize(full_img, (new_width, new_height))
        print("scale image shape:{}".format(scale_img.shape))
        # scale_img = np.array(scale_img)
        # HWC to CHW
        scale_img = scale_img.transpose((2, 0, 1))
        # 归一化
        if scale_img.max() > 1:
            scale_img = scale_img / 255
        # 扩增通道数
        # scale_img = np.expand_dims(scale_img, axis=0)
        # 将数据成块
        scale_img = np.array(scale_img, dtype=np.float32, order='C')
        # Copy it into appropriate place into memory
        # (self.inputs was returned earlier by allocate_buffers())
        np.copyto(self.inputs[0].host, scale_img.ravel())
        # Output shapes expected by the post-processor
        # output_shapes = [(1, 11616, 4), (11616, 21)]
        # When infering on single image, we measure inference
        # time to output it to the user
        inference_start_time = time.time()

        # Fetch output from the model
        trt_outputs = do_inference(
            self.context, bindings=self.bindings, inputs=self.inputs,
            outputs=self.outputs, stream=self.stream)
        print("network output shape:{}".format(trt_outputs[0].shape))
        # Output inference time
        print("TensorRT inference time: {} ms".format(
            int(round((time.time() - inference_start_time) * 1000))))
        # Before doing post-processing, we need to reshape the outputs as the common.do_inference will
        # give us flat arrays.
        outputs = [output.reshape(shape) for output, shape in zip(trt_outputs, output_shapes)]
        # And return results
        return outputs


# This function is generalized for multiple inputs/outputs.
# inputs and outputs are expected to be lists of HostDeviceMem objects.
def do_inference(context, bindings, inputs, outputs, stream, batch_size=1):
    # Transfer input data to the GPU.
    [cuda.memcpy_htod_async(inp.device, inp.host, stream) for inp in inputs]
    # Run inference.
    context.execute_async(batch_size=batch_size, bindings=bindings, stream_handle=stream.handle)
    # Transfer predictions back from the GPU.
    [cuda.memcpy_dtoh_async(out.host, out.device, stream) for out in outputs]
    # Synchronize the stream
    stream.synchronize()
    # Return only the host outputs.
    return [out.host for out in outputs]
ps:这里是完整的推理代码,网上很多资料都不全,所以贴上去了。
predict.py
根据实际情况需要设置的参数:
engine_file_path:engine的文件路径
onnx_file_path:onnx文件路径
new_width, new_height: 输入的宽和高
trt_engine_datatype:engine的精度支持fp32和fp16
image_path:测试图片路径
import tensorrt as trt
import numpy as np
import cv2
import inference as inference_utils  # TRT/TF inference wrappers

if __name__ == "__main__":
    # 1. 网络构建
    # Precision command line argument -> TRT Engine datatype
    TRT_PRECISION_TO_DATATYPE = {


        16: trt.DataType.HALF,
        32: trt.DataType.FLOAT
    }
    # datatype: float 32
    trt_engine_datatype = TRT_PRECISION_TO_DATATYPE[16]
    # batch size = 1
    max_batch_size = 1
    engine_file_path = "unet_deconv_sim.trt"
    onnx_file_path = "unet_deconv_sim.onnx"
    new_width, new_height = 960, 640
    output_shapes = [(1, new_height, new_width)]
    trt_inference_wrapper = inference_utils.TRTInference(
        engine_file_path, onnx_file_path,
        trt_engine_datatype, max_batch_size,
    )

    # 2. 图像预处理
    image_path = "example.jpg"
    img = cv2.imread(image_path)
    # inference
    trt_outputs = trt_inference_wrapper.infer(img, output_shapes, new_width, new_height)[0]
    # 输出后处理
    out_threshold = 0.5
    print("the size of tensorrt output : {}".format(trt_outputs.shape))
    output = trt_outputs.transpose((1, 2, 0))
    # 0/1像素值
    output[output > out_threshold] = 255
    output[output <= out_threshold] = 0

    output = output.astype(np.uint8)
    result = cv2.resize(output, (img.shape[1], img.shape[0]))
    cv2.imwrite("best_output_deconv.jpg", result)
最后结果:

因为这个网络只是用来测试能否部署tensorrt。为了节省时间,训练模型只使用了一个epoch,故精度不高。
第三章:Pytorch-grcnn to Tensorrt-grcnn
antipodal robotic grasping网络输入一张224x224x(1,3,4)的图片,这张图片可以是rgbd类型,rgb类型和d类型,输出抓取pos,抓取sin,抓取cos和抓取夹爪开度。其github项目在此,这里讲解输入rgb图片网络转换的方法。
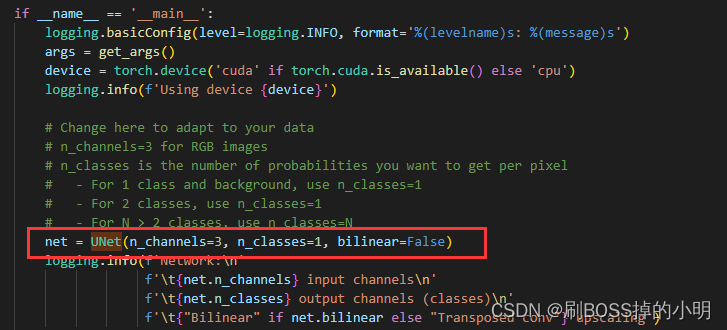
Step1:训练rgb输入pytorch网络
这个步骤就不讲解了,其github官网上readme有教程,去看一看。
Step2:将模型文件转换为onnx文件
其onnxtotrt.py代码内容如下:

由于输入图片为rgb是三个通道的,输入类型即为(3,224,224)于是需要修改dummy_input的内容,再初始化其模型参数(输入通道,通道个数)等等。这里需要注意的是由于其训练模型不是按.pt文件保存的,所以这里在加载权重时只需要调用torch.load即可。其余与第二章的转换一致。
Step3:将onnx转换为.trt文件
由于篇幅原因,这里直接贴上代码:
onnx2trt grcnn.onnx -o grcnn.trt
Step4:编写推理代码
得到trt文件后,开始写inference和predict代码。
inferencetest.py中的重点:
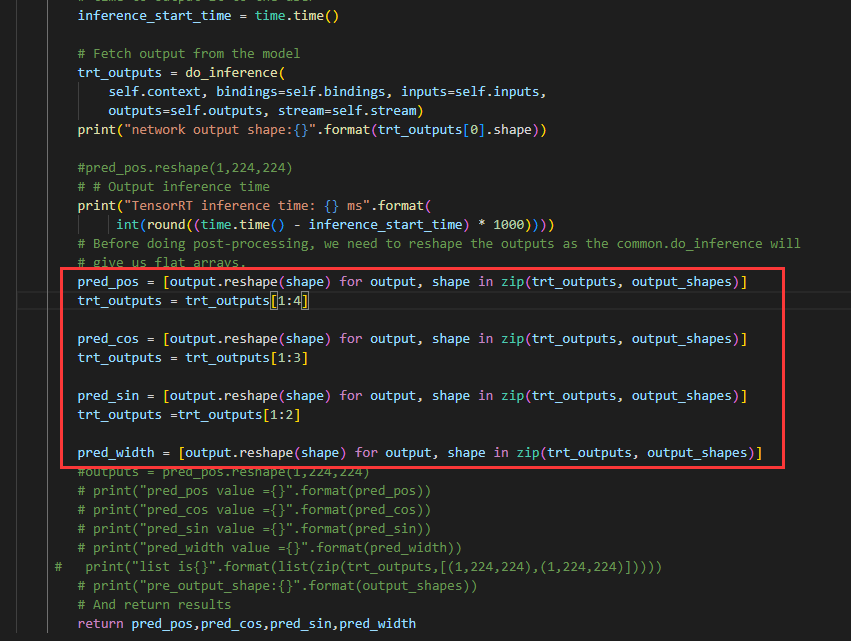
由于网络模型输出有4个,所以在do_inference得到output后,需要通过切片操作,分别取4个结果。
predict.py中的重点:
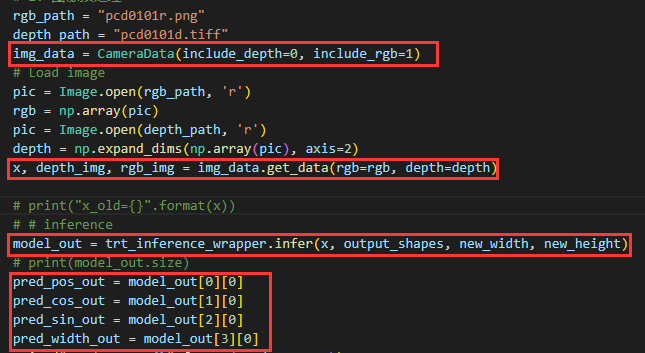
这里的输入图片预处理与原网络中run_offline.py输入图片一致,只是将深度设置成了false
run_offline.py
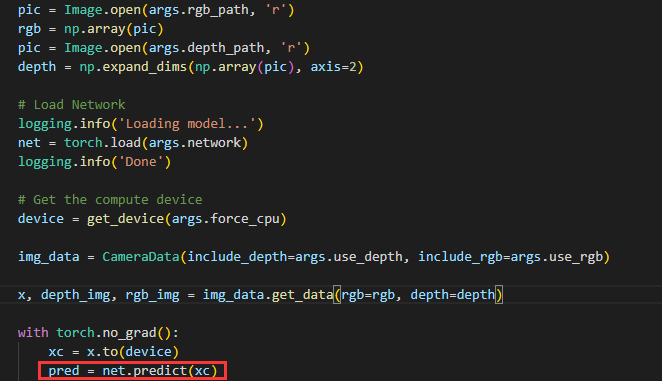
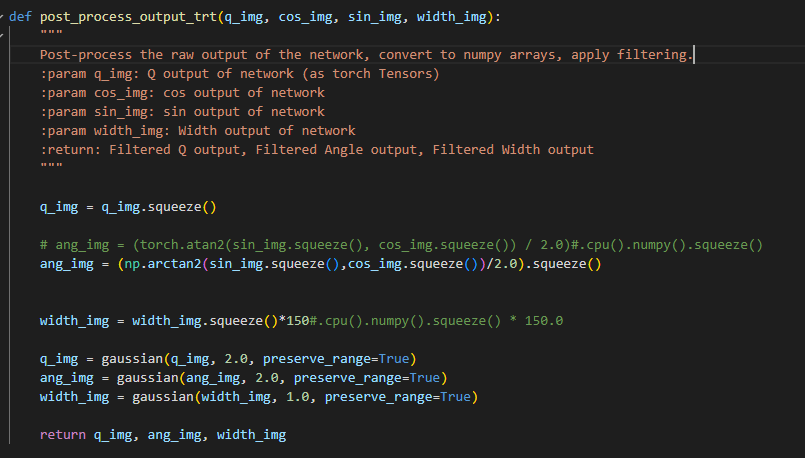
与pytorch不同的是,要部署tensorrt,需要将里面的predict函数换成tensorrt的推理函数,其余不变。对于其后处理函数也与原网络相同,只是需要将pytorch所支持的tensor变量操作改为numpy操作。
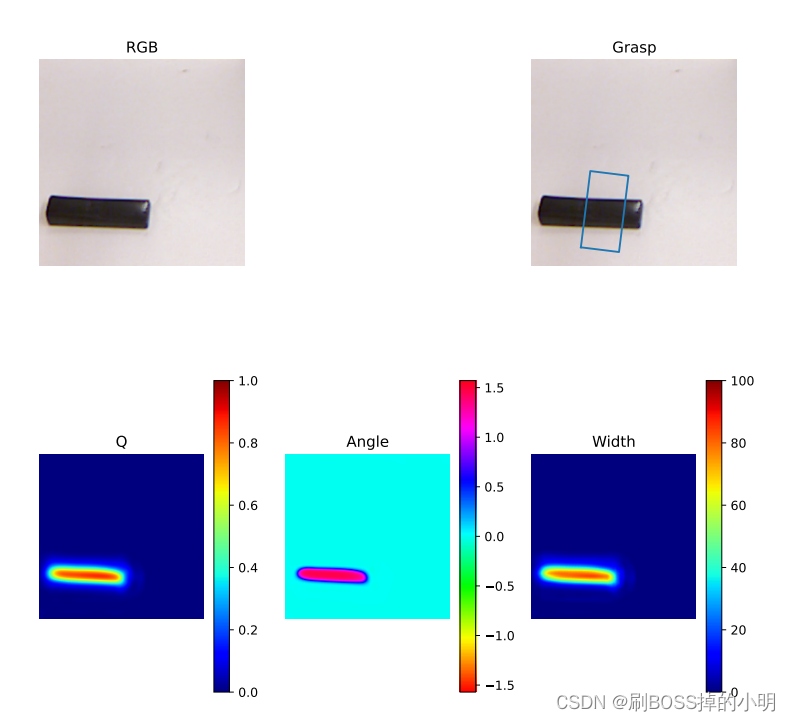
最后得出结果如下图
通过评估代码,将数据集中所有图像用于验证,得到原推理速度为33ms每一张图片:

经过tensorrt加速后的推理速度为:

可以看出还是有加速效果的(博主电脑拉)估计在台式机上会更好。此外,原网络占用显存会比经过tensorrt加速后网络占用显存大很多,博主忘了截图了就口头说明一下。其经过tensorrt开源代码在此。不要白嫖~点个star再克隆吧!