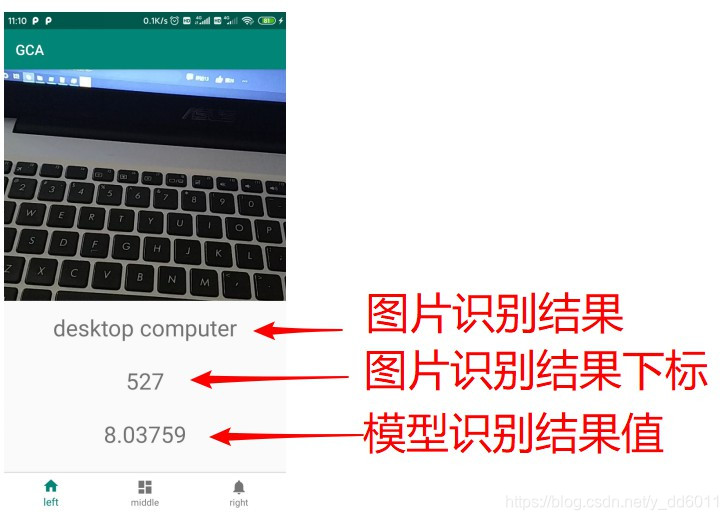
最后效果:
准备:
- pytorch1.4(pytorch环境至少要在1.3以上,当前最新版本1.4)
- 已经训练好的pytorch模型
- Jetpack组件:CameraX(这个用来调用相机的)
如有需要,可以先看看我这两篇博文:
如果pytorch环境不满足,进行pytorch环境升级:win10+pytorch1.4+cuda10.1安装:从显卡驱动开始
Jetpack组件:CameraX,使用前一定要先了解:Jetpack CameraX实践,预览(preview)及分析(analysis)
模型转化
# pytorch环境中
model_pth = os.path.join(MODEL_PATH, 'resnet18.pth') # resnet18模型的参数文件
mobile_pt = os.path.join(MODEL_PATH, 'resnet18.pt')  # 将resnet18模型保存为Android可以调用的文件

model = make_model('resnet18') # 搭建网络
model.load_state_dict(torch.load(model_pth)) # 加载参数
model.eval() # 模型设为评估模式

# 1张3通道224*224的图片
input_tensor = torch.rand(1, 3, 224, 224) # 设定输入数据格式

mobile = torch.jit.trace(model, input_tensor) # 模型转化
mobile.save(mobile_pt) # 保存文件
注:这样就完成了模型的转化,得到resnet18.pt文件
Android 设置CameraX:实现预览
添加依赖:
// CameraX core library using the camera2 implementation
def camerax_version = "1.0.0-beta01"
implementation "androidx.camera:camera-camera2:${camerax_version}"
implementation "androidx.camera:camera-view:1.0.0-alpha08"
implementation "androidx.camera:camera-extensions:1.0.0-alpha08"
implementation "androidx.camera:camera-lifecycle:${camerax_version}"

//pytorch
implementation 'org.pytorch:pytorch_android:1.4.0'
implementation 'org.pytorch:pytorch_android_torchvision:1.4.0'
申请相机权限及跳转:
在AndroidManifest.xml中添加权限:<uses-permission android:name="android.permission.CAMERA" />,然后跳转CameraX页面之前进行动态权限申请(也可以将动态权限申请放在CameraXFragment中,调用相机时再申请):
package com.example.gca.leftFragment

import android.Manifest
......
import kotlinx.android.synthetic.main.left_fragment.*

private const val REQUEST_CODE_PERMISSIONS = 10 // 权限标识符
private val REQUIRED_PERMISSIONS = arrayOf(Manifest.permission.CAMERA) // 相机权限

class LeftFragment : Fragment() {

    override fun onCreateView(
        inflater: LayoutInflater, container: ViewGroup?,
        savedInstanceState: Bundle?
    ): View? {
        return inflater.inflate(R.layout.left_fragment, container, false)
    }

    override fun onActivityCreated(savedInstanceState: Bundle?) {
        super.onActivityCreated(savedInstanceState)

        // 去到CameraXFragment页面
        buttonCameraX.setOnClickListener {
            // 检查相机权限
            if (allPermissionsGranted()) {
            	// 这里是用导航组件(Navigation)进行跳转的
                Navigation.findNavController(it).navigate(R.id.action_leftFragment_to_cameraXFragment)
            } else {
                requestPermissions(REQUIRED_PERMISSIONS, REQUEST_CODE_PERMISSIONS)
            }
        }
    }

    // 请求权限结果回调
    override fun onRequestPermissionsResult(
        requestCode: Int, permissions: Array<String>, grantResults: IntArray
    ) {
        if (requestCode == REQUEST_CODE_PERMISSIONS) {
            if (allPermissionsGranted()) {
                // 权限通过,进行跳转
                Navigation.findNavController(requireView()).navigate(R.id.action_leftFragment_to_cameraXFragment)
            } else {
                Toast.makeText(
                    requireContext(),
                    "Permissions not granted by the user.",
                    Toast.LENGTH_SHORT
                ).show()
            }
        }
    }

    // 检查权限
    private fun allPermissionsGranted() = REQUIRED_PERMISSIONS.all {
        ContextCompat.checkSelfPermission(
            requireContext(), it
        ) == PackageManager.PERMISSION_GRANTED
    }
}
新建一个fragment和布局文件(用来放置相机的),布局如下(fragment_camera_x.xml):
<?xml version="1.0" encoding="utf-8"?>
<androidx.constraintlayout.widget.ConstraintLayout xmlns:android="http://schemas.android.com/apk/res/android"
    xmlns:app="http://schemas.android.com/apk/res-auto"
    xmlns:tools="http://schemas.android.com/tools"
    android:layout_width="match_parent"
    android:layout_height="match_parent"
    tools:context=".leftFragment.cameraXFragment.CameraXFragment">

    <androidx.camera.view.PreviewView
        android:id="@+id/previewView"
        android:layout_width="wrap_content"
        android:layout_height="0dp"
        android:layout_marginBottom="16dp"
        app:layout_constraintBottom_toTopOf="@+id/textView2"
        app:layout_constraintEnd_toEndOf="parent"
        app:layout_constraintHorizontal_bias="0.0"
        app:layout_constraintStart_toStartOf="parent"
        app:layout_constraintTop_toTopOf="parent" />

    <TextView
        android:id="@+id/textView2"
        android:layout_width="wrap_content"
        android:layout_height="wrap_content"
        android:layout_marginBottom="32dp"
        android:text="TextView"
        android:textSize="30sp"
        app:layout_constraintBottom_toTopOf="@+id/textView3"
        app:layout_constraintEnd_toEndOf="parent"
        app:layout_constraintStart_toStartOf="parent" />

    <TextView
        android:id="@+id/textView3"
        android:layout_width="wrap_content"
        android:layout_height="wrap_content"
        android:layout_marginBottom="32dp"
        android:text="TextView"
        android:textSize="30sp"
        app:layout_constraintBottom_toTopOf="@+id/textView4"
        app:layout_constraintEnd_toEndOf="parent"
        app:layout_constraintStart_toStartOf="parent" />

    <TextView
        android:id="@+id/textView4"
        android:layout_width="wrap_content"
        android:layout_height="wrap_content"
        android:layout_marginBottom="32dp"
        android:text="TextView"
        android:textSize="30sp"
        app:layout_constraintBottom_toBottomOf="parent"
        app:layout_constraintEnd_toEndOf="parent"
        app:layout_constraintStart_toStartOf="parent" />

</androidx.constraintlayout.widget.ConstraintLayout>
fragment设置(CameraXFragment.kt):
package com.example.gca.leftFragment.cameraXFragment

import android.os.Bundle
......
import java.util.concurrent.Executors

class CameraXFragment : Fragment(), CameraXConfig.Provider {
    override fun getCameraXConfig(): CameraXConfig {
        return Camera2Config.defaultConfig()
    }

    private lateinit var cameraProviderFuture: ListenableFuture<ProcessCameraProvider> // 相机的控制者
    private lateinit var imagePreview: Preview // 图像预览
    private lateinit var cameraPreviewView: PreviewView // 显示相机的控件

    override fun onCreateView(
        inflater: LayoutInflater, container: ViewGroup?,
        savedInstanceState: Bundle?
    ): View? {
        // Inflate the layout for this fragment
        return inflater.inflate(R.layout.fragment_camera_x, container, false)
    }

    override fun onActivityCreated(savedInstanceState: Bundle?) {
        super.onActivityCreated(savedInstanceState)

        cameraProviderFuture = ProcessCameraProvider.getInstance(requireContext()) // 相机控制权
        cameraPreviewView = previewView // 显示相机控件

        // 加载相机
        cameraPreviewView.post { startCamera() }
    }

    private fun startCamera() {
        // 预览
        imagePreview = Preview.Builder().apply {
            setTargetAspectRatio(AspectRatio.RATIO_16_9)
            setTargetRotation(previewView.display.rotation)
        }.build()
        imagePreview.setSurfaceProvider(previewView.previewSurfaceProvider)

        // 绑定
        val cameraSelector = CameraSelector.Builder().requireLensFacing(CameraSelector.LENS_FACING_BACK).build()
        cameraProviderFuture.addListener(Runnable {
            val cameraProvider = cameraProviderFuture.get()
            cameraProvider.bindToLifecycle(this, cameraSelector, imagePreview)
        }, ContextCompat.getMainExecutor(requireContext()))
    }
}
注:到这一步,可以运行项目,已经可以调用相机进行预览了,如果不行,参考Jetpack CameraX实践,预览(preview)及分析(analysis),应该是哪里漏掉了什么
pytorch模型部署
添加资源,将我们转化的模型resnet18.pt复制到assets文件夹下(如果你没有assets文件夹,参考:https://blog.csdn.net/y_dd6011)
添加两个常量:
const val MODEL_NAME = "resnet18.pt" // 神经网络
val IMAGE_CLASSIFICATION = arrayOf(  // 这个就是你的神经网络能够识别的图片种类数目
    "tench, Tinca tinca",
    ......
    "goldfish, Carassius auratus",
)
新建一个kotlin类(Unit.kt):(用来获取神经网络的绝对地址)
package com.example.gca.unit

import android.content.Context
import android.util.Log
import java.io.File
import java.io.FileOutputStream
import java.io.IOException

object Unit {
    fun assetFilePath(context: Context, assetName: String): String? {
        val file = File(context.filesDir, assetName)
        try {
            context.assets.open(assetName).use { `is` ->
                FileOutputStream(file).use { os ->
                    val buffer = ByteArray(4 * 1024)
                    while (true) {
                        val length = `is`.read(buffer)
                        if (length <= 0)
                            break
                        os.write(buffer, 0, length)
                    }
                    os.flush()
                    os.close()
                }
                return file.absolutePath
            }
        } catch (e: IOException) {
            Log.e("pytorch", "Error process asset $assetName to file path")
        }
        return null
    }
}
再新建一个kotlin类(ImageClassificationResult.kt):(图像分析之后的回调结果,这里封装成类)
package com.example.gca.unit

import com.example.gca.IMAGE_CLASSIFICATION

class ImageClassificationResult(private val index: Int, private val value: Float) {

    fun getImageClassification() = IMAGE_CLASSIFICATION[index]
    fun getGarbageIndex() = index
    fun getGarbageValue() = value
}
最后一步,给相机添加图像分析器(CameraXFragment.kt完整代码如下):
package com.example.gca.leftFragment.cameraXFragment

import android.os.Bundle
import android.util.Log
import android.util.Size
import android.view.LayoutInflater
import android.view.View
import android.view.ViewGroup
import androidx.camera.camera2.Camera2Config
import androidx.camera.core.*
import androidx.camera.lifecycle.ProcessCameraProvider
import androidx.camera.view.PreviewView
import androidx.core.content.ContextCompat
import androidx.fragment.app.Fragment
import com.example.gca.MODEL_NAME
import com.example.gca.R
import com.example.gca.unit.ImageClassificationResult
import com.example.gca.unit.Unit.assetFilePath
import com.google.common.util.concurrent.ListenableFuture
import kotlinx.android.synthetic.main.fragment_camera_x.*
import kotlinx.coroutines.MainScope
import kotlinx.coroutines.launch
import org.pytorch.IValue
import org.pytorch.Module
import org.pytorch.Tensor
import org.pytorch.torchvision.TensorImageUtils
import java.nio.ByteBuffer
import java.util.concurrent.Executors

typealias ResultListener = (result: ImageClassificationResult) -> Unit // 图像分析器的返回结果类型,typealias 是取别名

class CameraXFragment : Fragment(), CameraXConfig.Provider {
    override fun getCameraXConfig(): CameraXConfig {
        return Camera2Config.defaultConfig()
    }

    private lateinit var cameraProviderFuture: ListenableFuture<ProcessCameraProvider> // 相机的控制者
    private lateinit var imagePreview: Preview // 图像预览
    private lateinit var imageAnalysis: ImageAnalysis // 图像分析
    private val executor = Executors.newSingleThreadExecutor() // 后台线程
    private lateinit var cameraPreviewView: PreviewView // 显示相机的控件
    private lateinit var module: Module // 模型

    override fun onCreateView(
        inflater: LayoutInflater, container: ViewGroup?,
        savedInstanceState: Bundle?
    ): View? {
        // Inflate the layout for this fragment
        return inflater.inflate(R.layout.fragment_camera_x, container, false)
    }

    override fun onActivityCreated(savedInstanceState: Bundle?) {
        super.onActivityCreated(savedInstanceState)

        cameraProviderFuture = ProcessCameraProvider.getInstance(requireContext()) // 相机控制权
        cameraPreviewView = previewView // 显示相机控件

        // 加载图片识别模型
        try {
            val modulePath = assetFilePath(requireContext(), MODEL_NAME)
            module = Module.load(modulePath)
        } catch (e: Exception) {
            Log.e(CameraXFragment::class.java.simpleName, e.toString())
        }

        // 加载相机
        cameraPreviewView.post { startCamera() }
    }

    private fun startCamera() {
        // 预览
        imagePreview = Preview.Builder().apply {
            setTargetAspectRatio(AspectRatio.RATIO_16_9)
            setTargetRotation(previewView.display.rotation)
        }.build()
        imagePreview.setSurfaceProvider(previewView.previewSurfaceProvider)

        // 分析
        imageAnalysis = ImageAnalysis.Builder().apply {
            setImageQueueDepth(ImageAnalysis.STRATEGY_KEEP_ONLY_LATEST)
            setTargetResolution(Size(224, 224))
        }.build()
        imageAnalysis.setAnalyzer(executor, ImageClassificationAnalyzer(module) {
            MainScope().launch {
                textView2.text = it.getImageClassification()
                textView3.text = it.getGarbageIndex().toString()
                textView4.text = it.getGarbageValue().toString()
            }
            Log.v(CameraXFragment::class.java.simpleName, it.toString())
        })

        // 绑定
        val cameraSelector = CameraSelector.Builder().requireLensFacing(CameraSelector.LENS_FACING_BACK).build()
        cameraProviderFuture.addListener(Runnable {
            val cameraProvider = cameraProviderFuture.get()
            cameraProvider.bindToLifecycle(this, cameraSelector, imagePreview, imageAnalysis)
        }, ContextCompat.getMainExecutor(requireContext()))
    }

    // 图像分类器
    private class ImageClassificationAnalyzer(module: Module, listener: ResultListener?=null) : ImageAnalysis.Analyzer {

        private val mModule = module
        private val listeners = ArrayList<ResultListener>().apply { listener?.let { add(it) } }

        private fun ByteBuffer.toByteArray(): ByteArray {
            rewind()    // Rewind the buffer to zero
            val data = ByteArray(remaining())
            get(data)   // Copy the buffer into a byte array
            return data // Return the byte array
        }

        override fun analyze(imageProxy: ImageProxy) {
            if (listeners.isEmpty()) {
                imageProxy.close()
                return
            }

            val buffer = imageProxy.planes[0].buffer
            val data = buffer.toByteArray()

            // 图像识别
            val inputTensorBuffer = Tensor.allocateFloatBuffer(3*224*224) // 输入数据格式设置
            val inputTensor = Tensor.fromBlob(inputTensorBuffer, longArrayOf(1, 3, 224, 224)) // 转化成tensor

            TensorImageUtils.imageYUV420CenterCropToFloatBuffer( // 加载图片
                imageProxy.image,0, 224, 224,
                TensorImageUtils.TORCHVISION_NORM_MEAN_RGB,
                TensorImageUtils.TORCHVISION_NORM_STD_RGB,
                inputTensorBuffer, 0)

            val outputTensor = mModule.forward(IValue.from(inputTensor)).toTensor() // 使用模型进行图像识别
            val scores = outputTensor.dataAsFloatArray
            var topScore = 0.0f
            var topIndex = 0
            for (index in scores.indices) { // 获取识别结果可能性最大的
                if (topScore < scores[index]) {
                    topScore = scores[index]
                    topIndex = index
                }
            }

            // Call all listeners with new value
            listeners.forEach { it(ImageClassificationResult(topIndex, topScore)) }

            imageProxy.close()
        }
    }
}
注:到此整个pytorch模型部署就完成了,整个流程和核心代码都在这了,其余的可以自己扩展
