文章目录
前言
近期,想尝试将YOLOV5的backbone改为ShuffleNetv2这类的轻量级网络,想和yolov5s进行对比,话不多少,正文开始
一、准备工作
1、代码准备
拉取YOLOV5的最新代码,代码链接如下:YOLOV5
2、数据集准备
2.1数据集下载
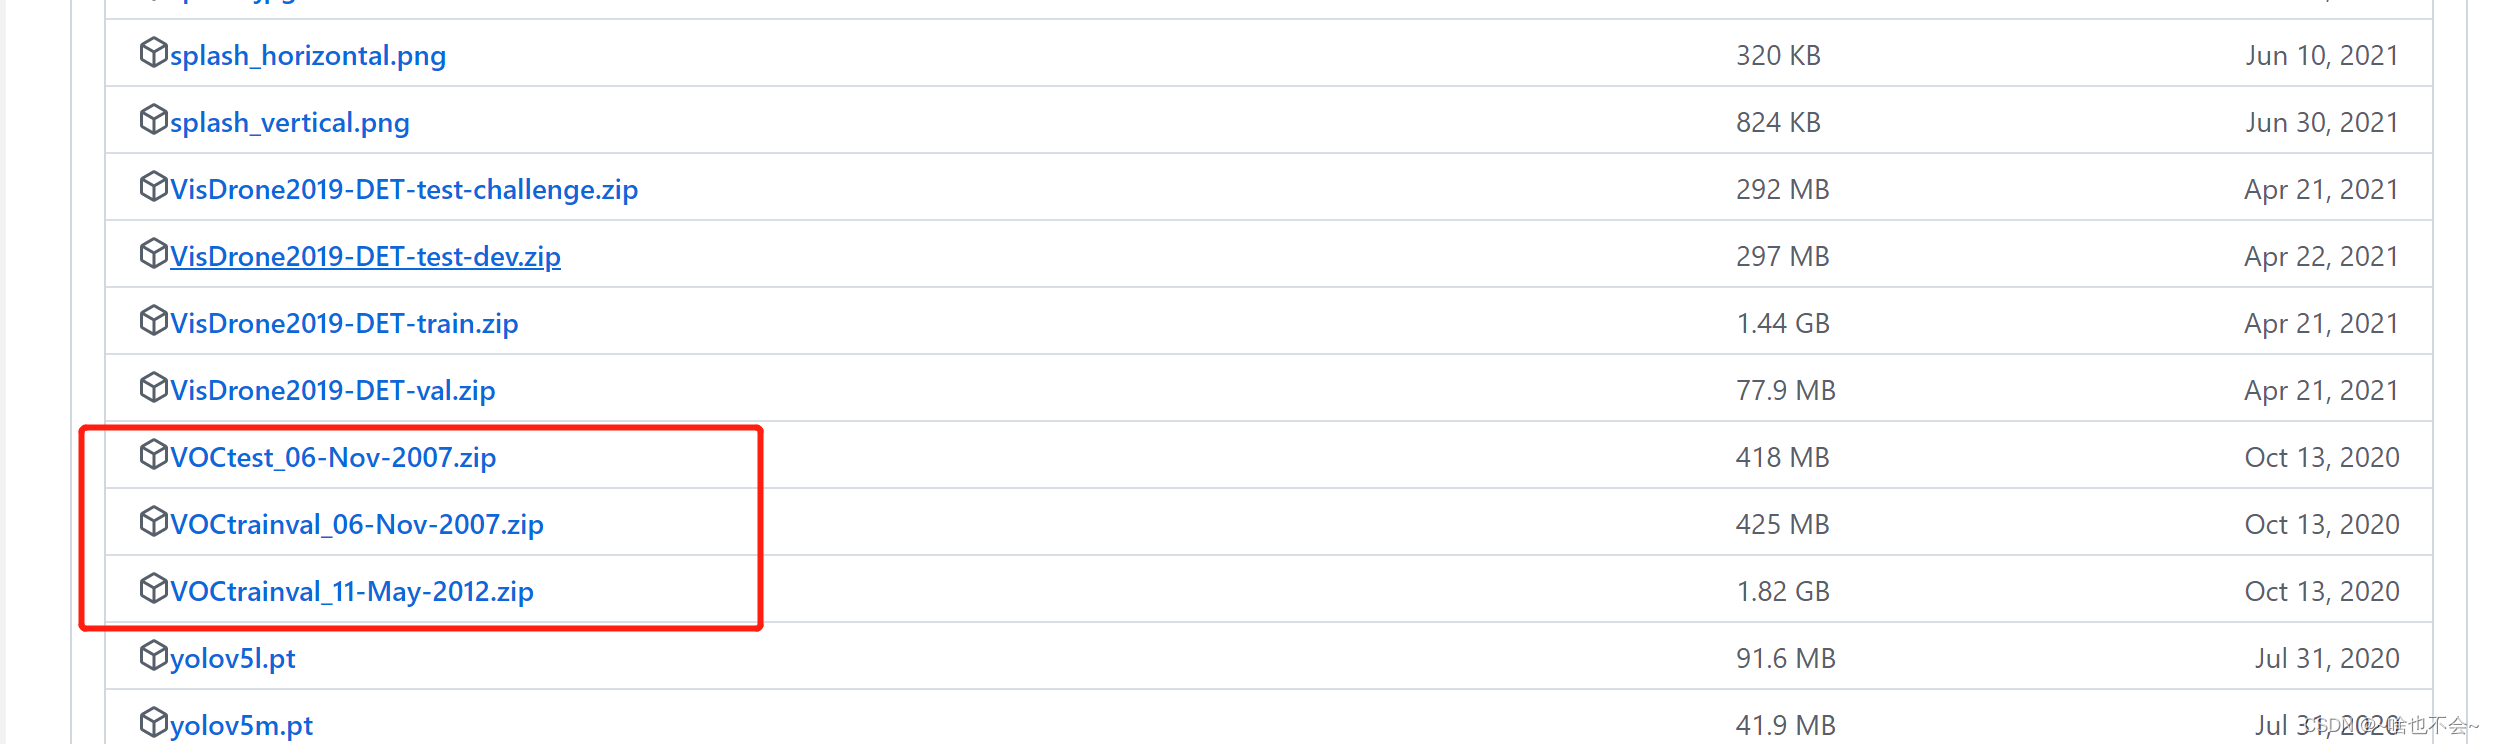
这里我们准备VOC数据集,如果不想提现下载也没关系,训练时会自动下载,但是这里还是建议提前准备好,下载链接如下:VOC,只需要下载下图中框中的部分:
2.2数据集解压及摆放
(1)如果数据集是自己手动下载的,那么需要上传至yolov5/datasets/VOC/images目录下,没有则创建,目录可以不一致,但是为了训练时少改点东西,还是和官方的摆放目录一致吧。(个人建议训练自己数据集时,别放yolov5目录下)
(2)在YOLOv5目录下,新建文件夹my_tools,然后新建Python文件,文件名随意,这里我命名为test.py,这个脚本是为了解压文件夹,并生成YOLO格式,代码如下:
import xml.etree.ElementTree as ET
from tqdm import tqdm
from pathlib import Path
import os,sys,platform
FILE = Path(__file__).resolve()
ROOT = FILE.parents[1]  # YOLOv5 root directory
print(ROOT)
if str(ROOT) not in sys.path:
    sys.path.append(str(ROOT))  # add ROOT to PATH
if platform.system() != 'Windows':
    ROOT = Path(os.path.relpath(ROOT, Path.cwd()))  # relative
print(ROOT)
from utils.general import download

def convert_label(path, lb_path, year, image_id):
    def convert_box(size, box):
      dw, dh = 1. / size[0], 1. / size[1]
      x, y, w, h = (box[0] + box[1]) / 2.0 - 1, (box[2] + box[3]) / 2.0 - 1, box[1] - box[0], box[3] - box[2]
      return x * dw, y * dh, w * dw, h * dh

    in_file = open(path / f'VOC{

      year}/Annotations/{

      image_id}.xml')
    out_file = open(lb_path, 'w')
    tree = ET.parse(in_file)
    root = tree.getroot()
    size = root.find('size')
    w = int(size.find('width').text)
    h = int(size.find('height').text)

    names=["aeroplane","bicycle","bird","boat","bottle","bus","car",
     "cat","chair","cow","diningtable","dog","horse","motorbike","person",
    "pottedplant","sheep","sofa","train","tvmonitor"]
    for obj in root.iter('object'):
      cls = obj.find('name').text
      if cls in names and int(obj.find('difficult').text) != 1:
          xmlbox = obj.find('bndbox')
          bb = convert_box((w, h), [float(xmlbox.find(x).text) for x in ('xmin', 'xmax', 'ymin', 'ymax')])
          cls_id = names.index(cls)  # class id
          out_file.write(" ".join([str(a) for a in (cls_id, *bb)]) + '\n')


# Download
dir = Path("../datasets/VOC")
url = 'https://github.com/ultralytics/yolov5/releases/download/v1.0/'
urls = [f'{

      url}VOCtrainval_06-Nov-2007.zip',  # 446MB, 5012 images
      f'{

      url}VOCtest_06-Nov-2007.zip',  # 438MB, 4953 images
      f'{

      url}VOCtrainval_11-May-2012.zip']  # 1.95GB, 17126 images
download(urls, dir=dir / 'images', delete=False, curl=True, threads=3)

# Convert
path = dir / 'images/VOCdevkit'
for year, image_set in ('2012', 'train'), ('2012', 'val'), ('2007', 'train'), ('2007', 'val'), ('2007', 'test'):
    imgs_path = dir / 'images' / f'{

      image_set}{

      year}'
    lbs_path = dir / 'labels' / f'{

      image_set}{

      year}'
    imgs_path.mkdir(exist_ok=True, parents=True)
    lbs_path.mkdir(exist_ok=True, parents=True)

    with open(path / f'VOC{

      year}/ImageSets/Main/{

      image_set}.txt') as f:
        image_ids = f.read().strip().split()
    for id in tqdm(image_ids, desc=f'{

      image_set}{

      year}'):
        f = path / f'VOC{

      year}/JPEGImages/{

      id}.jpg'  # old img path
        lb_path = (lbs_path / f.name).with_suffix('.txt')  # new label path
        f.rename(imgs_path / f.name)  # move image
        convert_label(path, lb_path, year, id)  # convert labels to YOLO format
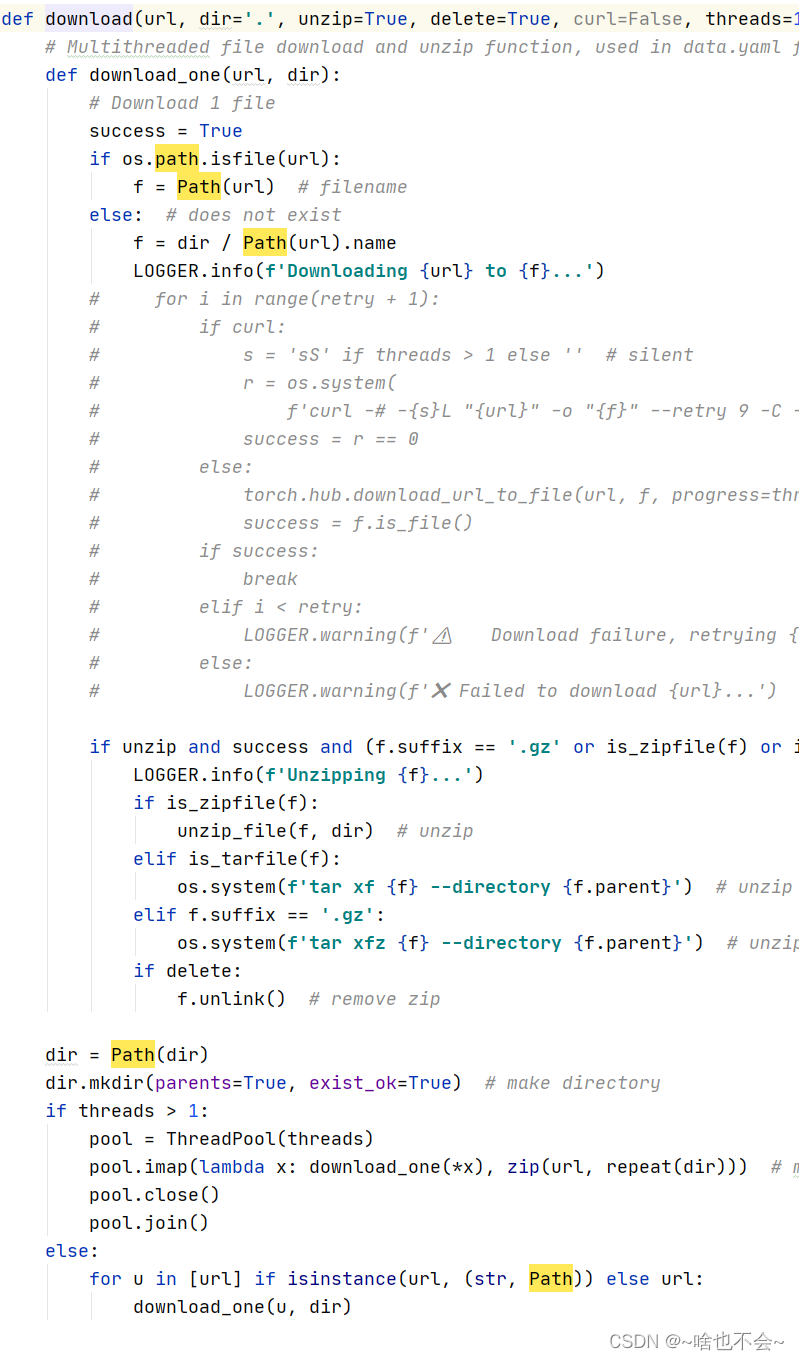
(3)进入到yolov5/utils/general.py中,对download函数进行更改,主要是为了把下载过程注释掉,直接进行解压过程,注释后的download函数如图:
(4)、进入到yolov5/my_tools下,运行我们的test.py即可,执行完后,我们的数据集摆放如下:

二、修改结构为shufflenet
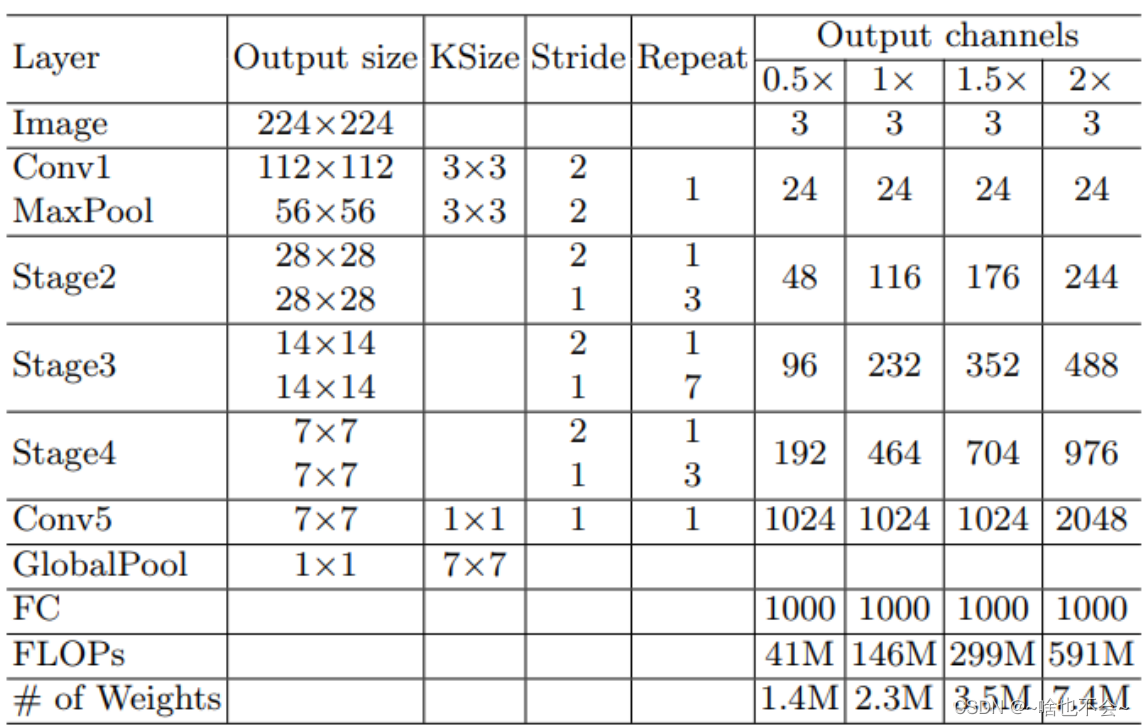
1.shufflenetV2
网络结构如下:
pytorch官方实现如下:
import torch
import torch.nn as nn
__all__ = [
    'ShuffleNetV2', 'shufflenet_v2_x0_5', 'shufflenet_v2_x1_0',
    'shufflenet_v2_x1_5', 'shufflenet_v2_x2_0'
]

model_urls = {


    'shufflenetv2_x0.5': 'https://download.pytorch.org/models/shufflenetv2_x0.5-f707e7126e.pth',
    'shufflenetv2_x1.0': 'https://download.pytorch.org/models/shufflenetv2_x1-5666bf0f80.pth',
    'shufflenetv2_x1.5': None,
    'shufflenetv2_x2.0': None,
}


def channel_shuffle(x, groups):
    batchsize, num_channels, height, width = x.data.size()
    channels_per_group = num_channels // groups

    # reshape
    x = x.view(batchsize, groups,
               channels_per_group, height, width)

    x = torch.transpose(x, 1, 2).contiguous()

    # flatten
    x = x.view(batchsize, -1, height, width)

    return x


class InvertedResidual(nn.Module):
    def __init__(self, inp, oup, stride):
        super(InvertedResidual, self).__init__()

        if not (1 <= stride <= 3):
            raise ValueError('illegal stride value')
        self.stride = stride

        branch_features = oup // 2
        assert (self.stride != 1) or (inp == branch_features << 1)

        if self.stride > 1:
            self.branch1 = nn.Sequential(
                self.depthwise_conv(inp, inp, kernel_size=3, stride=self.stride, padding=1),
                nn.BatchNorm2d(inp),
                nn.Conv2d(inp, branch_features, kernel_size=1, stride=1, padding=0, bias=False),
                nn.BatchNorm2d(branch_features),
                nn.ReLU(inplace=True),
            )

        self.branch2 = nn.Sequential(
            nn.Conv2d(inp if (self.stride > 1) else branch_features,
                      branch_features, kernel_size=1, stride=1, padding=0, bias=False),
            nn.BatchNorm2d(branch_features),
            nn.ReLU(inplace=True),
            self.depthwise_conv(branch_features, branch_features, kernel_size=3, stride=self.stride, padding=1),
            nn.BatchNorm2d(branch_features),
            nn.Conv2d(branch_features, branch_features, kernel_size=1, stride=1, padding=0, bias=False),
            nn.BatchNorm2d(branch_features),
            nn.ReLU(inplace=True),
        )

    @staticmethod
    def depthwise_conv(i, o, kernel_size, stride=1, padding=0, bias=False):
        return nn.Conv2d(i, o, kernel_size, stride, padding, bias=bias, groups=i)

    def forward(self, x):
        if self.stride == 1:
            x1, x2 = x.chunk(2, dim=1)
            out = torch.cat((x1, self.branch2(x2)), dim=1)
        else:
            out = torch.cat((self.branch1(x), self.branch2(x)), dim=1)

        out = channel_shuffle(out, 2)

        return out


class ShuffleNetV2(nn.Module):
    def __init__(self, stages_repeats, stages_out_channels, num_classes=1000):
        super(ShuffleNetV2, self).__init__()

        if len(stages_repeats) != 3:
            raise ValueError('expected stages_repeats as list of 3 positive ints')
        if len(stages_out_channels) != 5:
            raise ValueError('expected stages_out_channels as list of 5 positive ints')
        self._stage_out_channels = stages_out_channels

        input_channels = 3
        output_channels = self._stage_out_channels[0]
        self.conv1 = nn.Sequential(
            nn.Conv2d(input_channels, output_channels, 3, 2, 1, bias=False),
            nn.BatchNorm2d(output_channels),
            nn.ReLU(inplace=True),
        )
        input_channels = output_channels

        self.maxpool = nn.MaxPool2d(kernel_size=3, stride=2, padding=1)

        stage_names = ['stage{}'.format(i) for i in [2, 3, 4]]
        for name, repeats, output_channels in zip(
                stage_names, stages_repeats, self._stage_out_channels[1:]):
            seq = [InvertedResidual(input_channels, output_channels, 2)]
            for i in range(repeats - 1):
                seq.append(InvertedResidual(output_channels, output_channels, 1))
            setattr(self, name, nn.Sequential(*seq))
            input_channels = output_channels

        output_channels = self._stage_out_channels[-1]
        self.conv5 = nn.Sequential(
            nn.Conv2d(input_channels, output_channels, 1, 1, 0, bias=False),
            nn.BatchNorm2d(output_channels),
            nn.ReLU(inplace=True),
        )

        self.fc = nn.Linear(output_channels, num_classes)

    def forward(self, x):
        x = self.conv1(x)
        x = self.maxpool(x)
        x = self.stage2(x)
        x = self.stage3(x)
        x = self.stage4(x)
        x = self.conv5(x)
        x = x.mean([2, 3])  # globalpool
        x = self.fc(x)
        return x


def _shufflenetv2(arch, pretrained, progress, *args, **kwargs):
    model = ShuffleNetV2(*args, **kwargs)

    if pretrained:
        model_url = model_urls[arch]
        if model_url is None:
            raise NotImplementedError('pretrained {} is not supported as of now'.format(arch))
        else:
            state_dict = load_state_dict_from_url(model_url, progress=progress)
            model.load_state_dict(state_dict)

    return model


def shufflenet_v2_x0_5(pretrained=False, progress=True, **kwargs):
    """
    Constructs a ShuffleNetV2 with 0.5x output channels, as described in
    `"ShuffleNet V2: Practical Guidelines for Efficient CNN Architecture Design"
    <https://arxiv.org/abs/1807.11164>`_.

    Args:
        pretrained (bool): If True, returns a model pre-trained on ImageNet
        progress (bool): If True, displays a progress bar of the download to stderr
    """
    return _shufflenetv2('shufflenetv2_x0.5', pretrained, progress,
                         [4, 8, 4], [24, 48, 96, 192, 1024], **kwargs)


def shufflenet_v2_x1_0(pretrained=False, progress=True, **kwargs):
    """
    Constructs a ShuffleNetV2 with 1.0x output channels, as described in
    `"ShuffleNet V2: Practical Guidelines for Efficient CNN Architecture Design"
    <https://arxiv.org/abs/1807.11164>`_.

    Args:
        pretrained (bool): If True, returns a model pre-trained on ImageNet
        progress (bool): If True, displays a progress bar of the download to stderr
    """
    return _shufflenetv2('shufflenetv2_x1.0', pretrained, progress,
                         [4, 8, 4], [24, 116, 232, 464, 1024], **kwargs)


def shufflenet_v2_x1_5(pretrained=False, progress=True, **kwargs):
    """
    Constructs a ShuffleNetV2 with 1.5x output channels, as described in
    `"ShuffleNet V2: Practical Guidelines for Efficient CNN Architecture Design"
    <https://arxiv.org/abs/1807.11164>`_.

    Args:
        pretrained (bool): If True, returns a model pre-trained on ImageNet
        progress (bool): If True, displays a progress bar of the download to stderr
    """
    return _shufflenetv2('shufflenetv2_x1.5', pretrained, progress,
                         [4, 8, 4], [24, 176, 352, 704, 1024], **kwargs)


def shufflenet_v2_x2_0(pretrained=False, progress=True, **kwargs):
    """
    Constructs a ShuffleNetV2 with 2.0x output channels, as described in
    `"ShuffleNet V2: Practical Guidelines for Efficient CNN Architecture Design"
    <https://arxiv.org/abs/1807.11164>`_.

    Args:
        pretrained (bool): If True, returns a model pre-trained on ImageNet
        progress (bool): If True, displays a progress bar of the download to stderr
    """
    return _shufflenetv2('shufflenetv2_x2.0', pretrained, progress,
                         [4, 8, 4], [24, 244, 488, 976, 2048], **kwargs)
2.修改yaml文件的backbone为纯shufflenet
复制一份yolov5s.yaml文件,命名为yolov5_shufflenet.yaml,这里我将以VOC数据集为基准进行训练,故nc需要改为20,具体如下:
# Parameters
nc: 20  # number of classes
depth_multiple: 0.33  # model depth multiple
width_multiple: 0.50  # layer channel multiple
anchors:
  - [10,13, 16,30, 33,23]  # P3/8
  - [30,61, 62,45, 59,119]  # P4/16
  - [116,90, 156,198, 373,326]  # P5/32

# YOLOv5 v6.0 backbone
backbone:
  # [from, number, module, args]
  [
     [-1, 1, CRM, [32]],  # 0-P2/4
     [-1, 1, InvertedResidual, [128,2]],
     [-1, 3, InvertedResidual, [128,1]],  # 2-P3/8
     [-1, 1, InvertedResidual, [256,2]],
     [-1, 7, InvertedResidual, [256,1]],  # 4-P4/16
     [-1, 1, InvertedResidual, [512,2]],
     [-1, 3, InvertedResidual, [512,1]],  # 6-P5/32
    ]

# YOLOv5 v6.0 head
head:

  [[-1, 1, Conv, [256, 1, 1]],
   [-1, 1, nn.Upsample, [None, 2, 'nearest']],
   [[-1, 4], 1, Concat, [1]],  # cat backbone P4
   [-1, 3, C3, [256, False]],  # 10

   [-1, 1, Conv, [256, 1, 1]],
   [-1, 1, nn.Upsample, [None, 2, 'nearest']],
   [[-1, 2], 1, Concat, [1]],  # cat backbone P3
   [-1, 3, C3, [128, False]],  # 14 (P3/8-small)

   [-1, 1, Conv, [128, 3, 2]],
   [[-1, 11], 1, Concat, [1]],  # cat head P4
   [-1, 3, C3, [256, False]],  # 17 (P4/16-medium)

   [-1, 1, Conv, [256, 3, 2]],
   [[-1, 7], 1, Concat, [1]],  # cat head P5
   [-1, 3, C3, [512, False]],  # 20 (P5/32-large)

   [[14, 17, 20], 1, Detect, [nc, anchors]],  # Detect(P3, P4, P5)
  ]
3、官方代码更改
这里我们需要将缺少的函数添加至指定文件中,如下:
(1)yolov5/models/common.py中添加函数如下:
#Conv+Relu+MaxPool
class CRM(nn.Module):
    def __init__(self,c1,c2,k=3,s=2):
        super(CRM, self).__init__()
        self.conv1=nn.Sequential(
            nn.Conv2d(c1,c2,k,s,padding=1,bias=False),
            nn.BatchNorm2d(c2),
            nn.ReLU(inplace=True),
        )
        self.mp=nn.MaxPool2d(kernel_size=3,stride=2,padding=1)
    def forward(self,x):
        res=self.mp(self.conv1(x))
        return res
#打乱通道
def channel_shuffle(x,groups):


#shuffleBlock
class InvertedResidual(nn.Module):
其中,channel_shuffle函数和InvertedResidual类我们直接将二.1中copy过来即可,不需要进行更改。
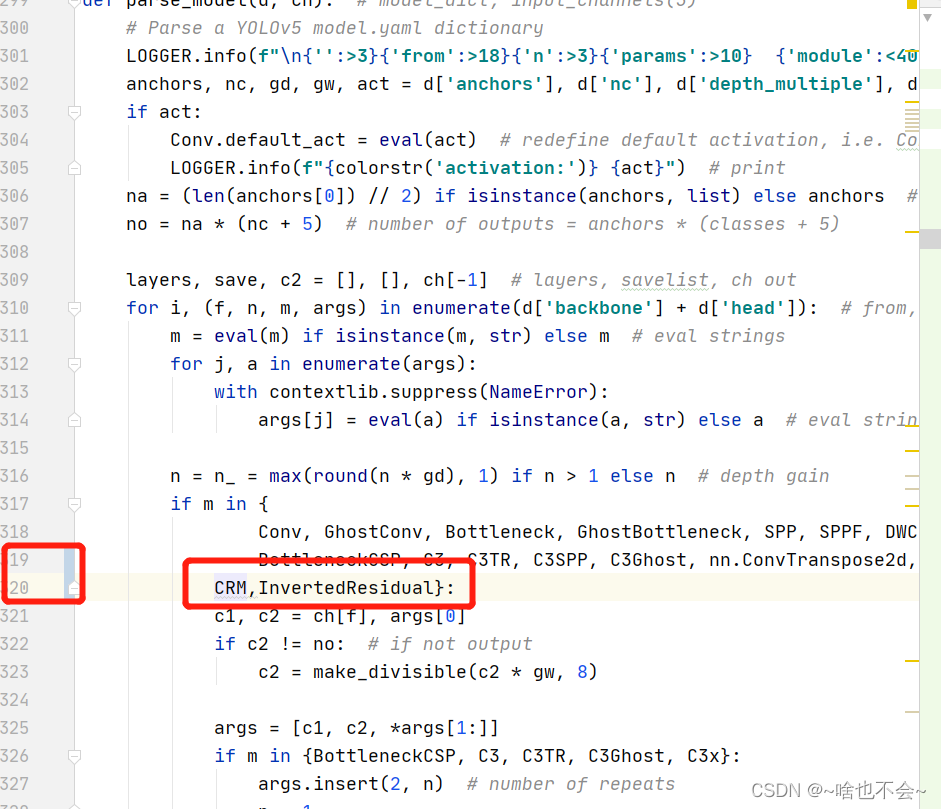
(2) 修改yolov5/yolo.py中parse_model函数,最新的代码大约在319行处需要加入我们二、3.(1)中所加入的函数,如下图:
(3)train.py需要修改内容如下
weights:指定为空
cfg:指定路径为新增的yolov5_shufflenet.yaml路径
data:指定路径为yolov5/data下的VOC.yaml即可,前提是数据拜访要和上方一、2.2、(3)截图的部分相同
然后训练即可
三、对照实验(backbone修改为stemblock+shufflenet)
1、stemblock结构
结构图如下:

该结构是我在之前读yolov5-face的论文发现的一个用来替代yolov5中的Focus的。focus的提出并不是为了提升模型精度,而是为了达到下采样、减少计算量并且提升速度的目的,但是它的问题在于下采样时间过长并且对某些设备不是很友好。而yolov5-face提出的stemblock结构,最后的输出尺寸变为了输入的1/4,并且只需要进行一次下采样即可。详情参考链接如下:
Focus参考链接
StemBlock
代码实现如下:
#StemBlock结构
class StemBlock(nn.Module):
    def __init__(self, c1, c2, k=3, s=2, p=None, g=1, d=1, act=True):
        super(StemBlock, self).__init__()
        self.stem_1=Conv(c1,c2,k,s,p,g,act)
        self.stem_2a=Conv(c2,c2//2,1,1)
        self.stem_2b=Conv(c2//2,c2,3,2)
        self.stem_2c=nn.MaxPool2d(2,2,ceil_mode=True)
        self.stem_3=Conv(c2*2,c2,1,1)
    def forward(self,x):
        res1=self.stem_1(x)
        res2_a=self.stem_2a(res1)
        res2_b=self.stem_2b(res2_a)
        res2_c=self.stem_2c(res1)
        cat_res=torch.cat((res2_b,res2_c),dim=1)
        out=self.stem_3(cat_res)
        return out
2、yaml文件修改
copy一份yolov5s.yaml文件至同目录下,重命名为yolov5_stem_shufflenet.yaml,这里也以VOC数据集为训练集,详情如下:
# Parameters
nc: 20  # number of classes
depth_multiple: 0.33  # model depth multiple
width_multiple: 0.50  # layer channel multiple
anchors:
  - [10,13, 16,30, 33,23]  # P3/8
  - [30,61, 62,45, 59,119]  # P4/16
  - [116,90, 156,198, 373,326]  # P5/32

# YOLOv5 v6.0 backbone
backbone:
  # [from, number, module, args]
  [[-1, 1, StemBlock, [64]],  # 0-P1/2
   [-1, 1, CRM, [128]],  # 1-P2/4
   [-1, 1, InvertedResidual, [256,2]],
   [-1, 3, InvertedResidual, [256,1]],  # 3-P3/8
   [-1, 1, InvertedResidual, [512,2]],
   [-1, 7, InvertedResidual, [512,1]],  # 5-P4/16
   [-1, 1, InvertedResidual, [1024,2]],
   [-1, 3, InvertedResidual, [1024,1]],  # 7-P5/32
  ]

# YOLOv5 v6.0 head
head:
  [[-1, 1, Conv, [512, 1, 1]],
   [-1, 1, nn.Upsample, [None, 2, 'nearest']],
   [[-1, 5], 1, Concat, [1]],  # cat backbone P4
   [-1, 3, C3, [512, False]],  # 11

   [-1, 1, Conv, [256, 1, 1]],
   [-1, 1, nn.Upsample, [None, 2, 'nearest']],
   [[-1, 3], 1, Concat, [1]],  # cat backbone P3
   [-1, 3, C3, [256, False]],  # 15 (P3/8-small)

   [-1, 1, Conv, [256, 3, 2]],
   [[-1, 12], 1, Concat, [1]],  # cat head P4
   [-1, 3, C3, [512, False]],  # 18 (P4/16-medium)

   [-1, 1, Conv, [512, 3, 2]],
   [[-1, 8], 1, Concat, [1]],  # cat head P5
   [-1, 3, C3, [1024, False]],  # 21 (P5/32-large)

   [[15, 18, 21], 1, Detect, [nc, anchors]],  # Detect(P3, P4, P5)
  ]
3、相关代码修改
(1)将三.1中stemBlock的实现代码复制到yolov5/models/common.py文件中,注意这里还需要复制二.3.(1)中的CRM、channel_shuffle函数和InvertedResidual类,如果已经有了就可以跳过
(2)和二、3.(2)相同,我们需要将这些函数定义在yolo.py大约319行哪里
(3)train.py修改和二.3.(3)相同
四、训练结果
这里都是训练了300epoch之后的结果,优化器、学习率等设置均相同
1、指标对比
| 网络结构 | P | R | mAP_0.5 | mAP_0.5:0.95 | 模型大小 |
|---|---|---|---|---|---|
| yolov5-shufflenet | 0.56 | 0.54 | 0.54 | 0.28 | 2.0M |
| yolov5-stem_shufflenet | 0.72 | 0.56 | 0.62 | 0.37 | 6.7M |
从训练指标上看,是后者略胜一筹;从模型大小上看,前者胜。接下来我们看看测试的结果图
2、图片测试
下列图片左边均为shufflenet,右边为stem+shufflenet:


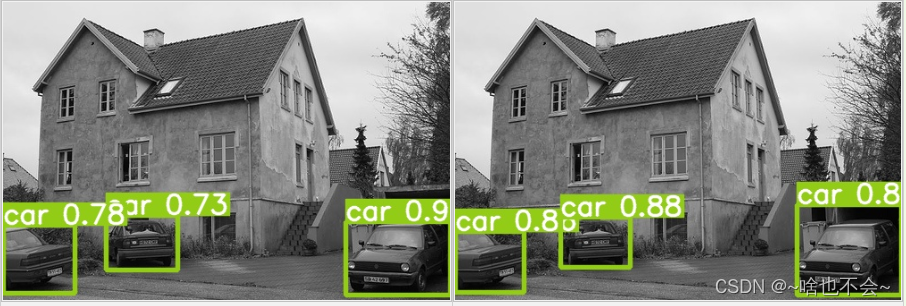
这里仅展示这些图,从图中可以看到
-后者置信度基本是要高于前者的
-双方都分别存在误检的现象,但是都可以通过调整测试时的阈值进行过滤
可以说,各有千秋吧
参考链接为:魔改YOLOv5
总结
以上就是本篇的全部内容,有问题有指出,也可加入QQ群:995760755 一起交流。