1 安装pycocotools
使用指令:conda/pip install pycocotools进行安装,如果安装不上,就看这个:
参考:https://blog.csdn.net/qq_51116518/article/details/121207941
2 将YOLO的txt标签格式转换为json格式
这一步参考:YOLO的txt转json以及yolov5使用pycocotools评估
步骤
- 先将YOLO的txt文件生成需要使用的txt文件。
新的生成的txt文件格式:
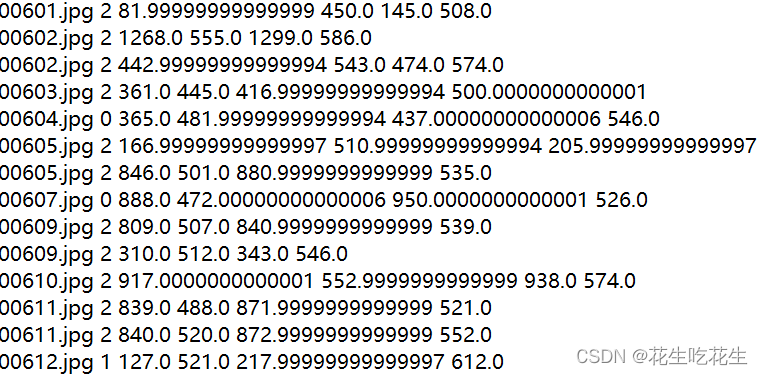
这个步骤的代码为:
import os
import cv2
'''
function:可将yolo格式的数据集转换为coco格式的(1), 生成annos.txt

需要准备:
labels:yolo格式的标签,是txt格式,名字为图片名
images:原始标签对应的图片,需要有序号
'''

# 原始标签路径E:\pyCharmProject\AI\papercode\datasets\GTSDB
originLabelsDir = '../labels/test'
# 转换后的文件保存路径
saveDir = '../labels/annos1.txt'
# 原始标签对应的图片路径
originImagesDir = '../images/test'

txtFileList = os.listdir(originLabelsDir)
with open(saveDir, 'w') as fw:
    for txtFile in txtFileList:
        with open(os.path.join(originLabelsDir, txtFile), 'r') as fr:
            labelList = fr.readlines()
            for label in labelList:
                label = label.strip().split()
                x = float(label[1])
                y = float(label[2])
                w = float(label[3])
                h = float(label[4])

                # convert x,y,w,h to x1,y1,x2,y2
                imagePath = os.path.join(originImagesDir,
                                         txtFile.replace('txt', 'jpg'))
                print(imagePath)
                image = cv2.imread(imagePath)
                print(image.shape)
                H, W, _ = image.shape
                x1 = (x - w / 2) * W
                y1 = (y - h / 2) * H
                x2 = (x + w / 2) * W
                y2 = (y + h / 2) * H
                # 为了与coco标签方式对,标签序号从1开始计算
                fw.write(txtFile.replace('txt', 'jpg') + ' {} {} {} {} {}\n'.format(int(label[0]), x1, y1, x2, y2))

        print('{} done'.format(txtFile))
- 将txt转换为json格式。
# -*- coding: utf-8 -*-
# @Time    : 2022/9/5
# @Author  : rickHan
# @Software: PyCharm
# @File    : yolo2coco2.py
import json
import os
import cv2

#-------------------可用-----------------------------------
'''
function:可将yolo格式的数据集转换为coco格式的(2)
需要准备:
classes.txt:一行就是一个类,不需要数字,只要类名称
annos.txt:由上一个.py文件生成
images:与annos.txt对应的图片,需要有序号

生成.json文件,在annotations文件下
'''

# ------------用os提取images文件夹中的图片名称,并且将BBox都读进去------------
# 根路径,里面包含images(图片文件夹),annos.txt(bbox标注),classes.txt(类别标签),
# 以及annotations文件夹(如果没有则会自动创建,用于保存最后的json)
root_path = '../coco'
# 用于创建训练集或验证集
phase = 'val'  # 需要修正,保存后的json文件名

# dataset用于保存所有数据的图片信息和标注信息
dataset = {'categories': [], 'annotations': [], 'images': []}

# 打开类别标签
with open(os.path.join(root_path, 'classes.txt')) as f:
    classes = f.read().strip().split()

# 建立类别标签和数字id的对应关系
for i, cls in enumerate(classes, 1):
    dataset['categories'].append({'id': i, 'name': cls, 'supercategory': 'mark'})

# 读取images文件夹的图片名称
indexes = os.listdir('../images/test')

# 统计处理图片的数量
global count
count = 0

# 读取Bbox信息
with open('../labels/annos1.txt') as tr:
    annos = tr.readlines()

    # ---------------接着将,以上数据转换为COCO所需要的格式---------------
    for k, index in enumerate(indexes):
        count += 1
        # 用opencv读取图片,得到图像的宽和高
        im = cv2.imread('../images/test/' + index)
        height, width, _ = im.shape
        print(index)
        # 添加图像的信息到dataset中
        dataset['images'].append({'file_name': index.replace("\\", "/"),
                                  'id': int(index[:5]),  # 提取文件名 里的数字标号 必须是int类型,不能是str
                                  'width': width,
                                  'height': height})

        for ii, anno in enumerate(annos):
            parts = anno.strip().split()

            # 如果图像的名称和标记的名称对上,则添加标记
            if parts[0] == index:
                # 类别
                cls_id = parts[1]
                # x_min
                x1 = float(parts[2])
                # y_min
                y1 = float(parts[3])
                # x_max
                x2 = float(parts[4])
                # y_max
                y2 = float(parts[5])
                width = max(0, x2 - x1)
                height = max(0, y2 - y1)
                dataset['annotations'].append({
                    'area': width * height,
                    'bbox': [x1, y1, width, height],
                    'category_id': int(cls_id),
                    'id': ii,
                    'image_id': int(index[0:5]),	# 提取文件名里的数字标号  必须是int类型,不能是str
                    'iscrowd': 0,
                    # mask, 矩形是从左上角点按顺时针的四个顶点
                    'segmentation': [[x1, y1, x2, y1, x2, y2, x1, y2]]
                })

        print('{} images handled'.format(count))

# 保存结果的文件夹
folder = os.path.join(root_path, './valid/annotations')
if not os.path.exists(folder):
    os.makedirs(folder)
json_name = os.path.join(root_path, './valid/annotations/{}.json'.format(phase))
with open(json_name, 'w') as f:
    json.dump(dataset, f, ensure_ascii=False, indent=1)
- 测试:
# -*- coding: utf-8 -*-
# @Time    : 2022/9/5
# @Author  : rickHan
# @Software: PyCharm
# @File    : drawtest.py
import os
from pycocotools.coco import COCO
from PIL import Image, ImageDraw
import matplotlib.pyplot as plt
'''
function:绘制标注的数据集和对应图片的位置是否正确
绘制前三张,如果yoyo转换标注的json数据集没有问题,则也能在图上画出框

'''
json_path = '../coco/valid/annotations/val.json'
# json_path = r'predictions.json'
img_path = '../images/test'  #json对应的图片

# load coco data
coco = COCO(annotation_file=json_path)

# get all image index info
ids = list(sorted(coco.imgs.keys()))
print("number of images: {}".format(len(ids)))

# get all coco class labels
coco_classes = dict([(v["id"], v["name"]) for k, v in coco.cats.items()])

# 遍历前三张图像
for img_id in ids[:3]:
    # 获取对应图像id的所有annotations idx信息
    ann_ids = coco.getAnnIds(imgIds=img_id)

    # 根据annotations idx信息获取所有标注信息
    targets = coco.loadAnns(ann_ids)

    # get image file name
    path = coco.loadImgs(img_id)[0]['file_name']

    # read image
    img = Image.open(os.path.join(img_path, path)).convert('RGB')
    draw = ImageDraw.Draw(img)
    # draw box to image
    for target in targets:
        x, y, w, h = target["bbox"]
        x1, y1, x2, y2 = x, y, int(x + w), int(y + h)
        draw.rectangle((x1, y1, x2, y2))
        draw.text((x1, y1), coco_classes[target["category_id"]])

    # show image
    plt.imshow(img)
    plt.show()
没有报错就OK了。
4. 将生成的.json文件改名为instances_val2017.json,然后放到数据集目录文件中的annptations文件夹中,没有需要自己创建。
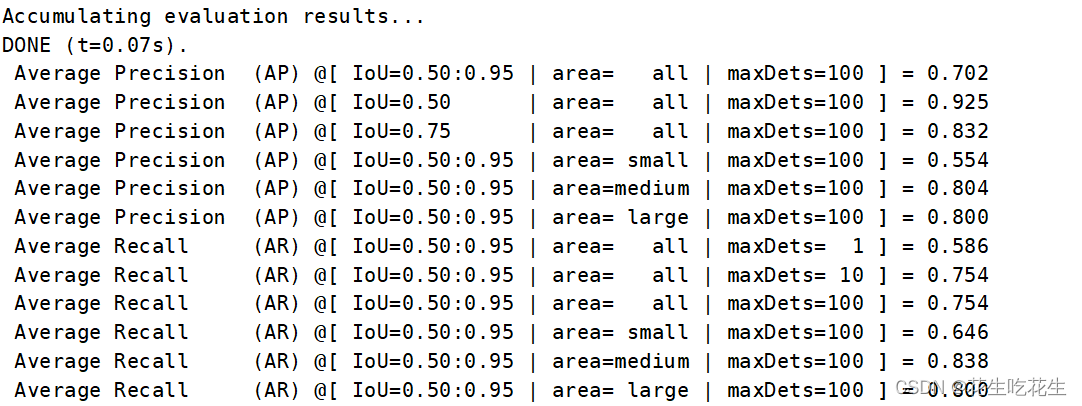
3.运行程序
终端输入:
python val.py --save-json即可。
大功告成!