前言
上一篇中我们简单回顾了yolov5的架构和搭建了开发环境。需要回顾的小伙伴可以点击下面传送门,基于第一篇的理解我们再进行源码解读就会有事半功倍的效果。
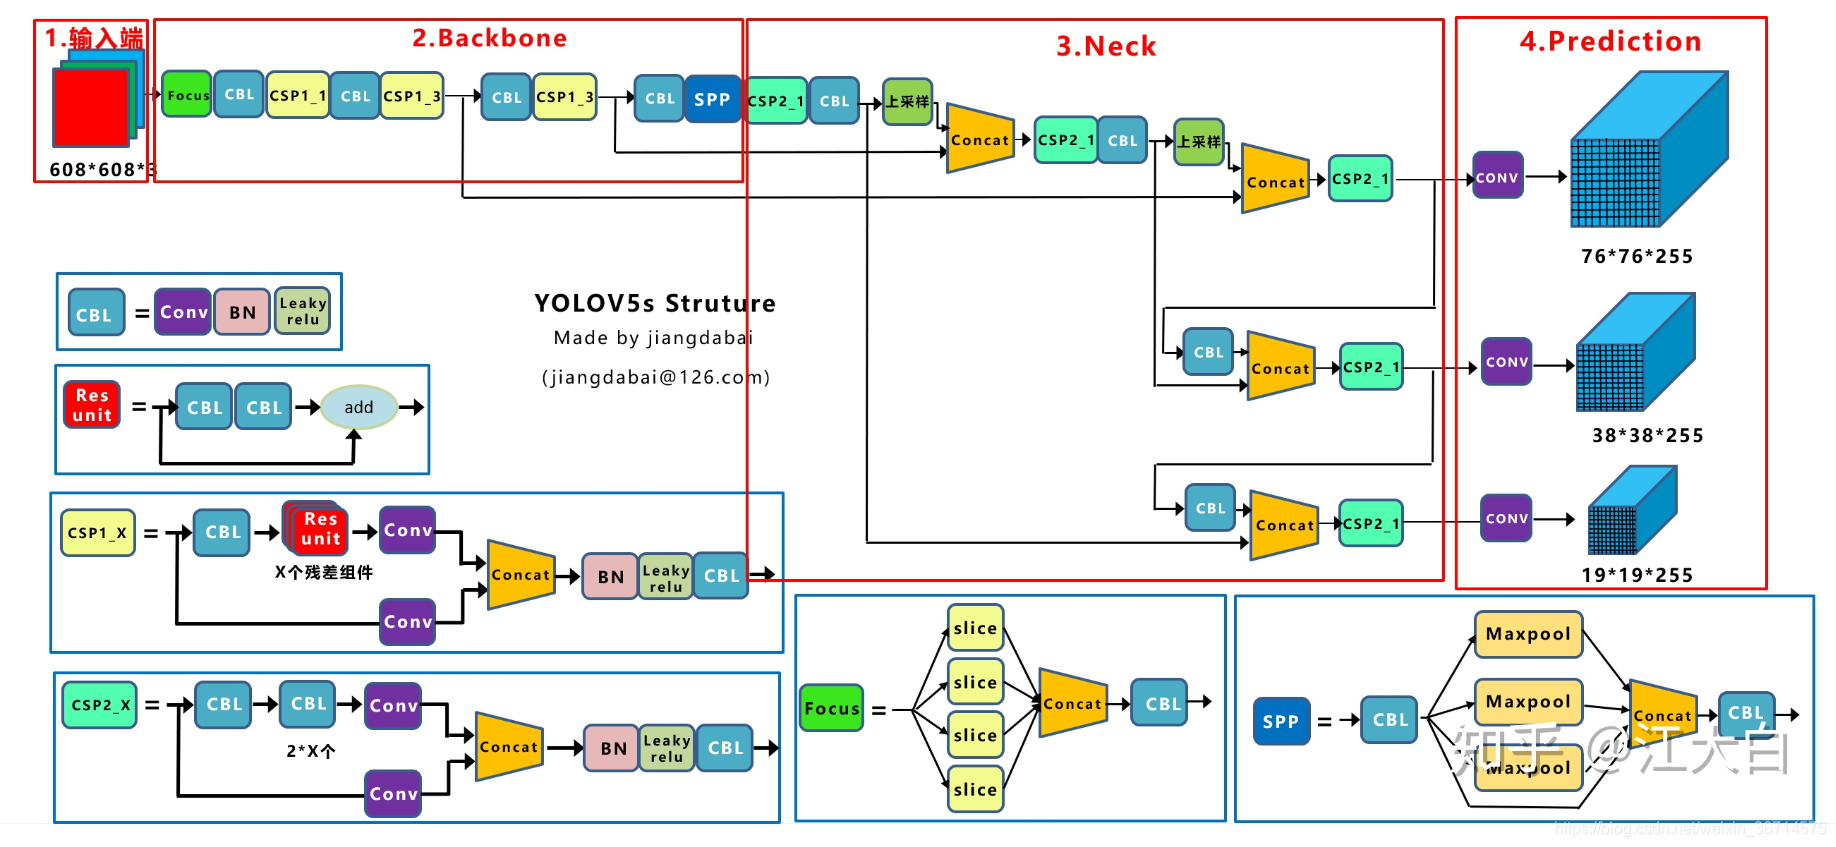
这篇中我们开始解析yolov5的源码,类似yolov3我们同样从模型的构建开始。这部分核心的代码在yolo.py文件中。我采用的yolo代码版本是官方4.0版本(2021年1月发布的最新版本),这个版本的很多细节都和之前的略有区别了。代码传送门见下面链接。
另外大家可以在官网看到yolov5的技术演进路线,看到每个版本的更新的内容:

在解析前仍然需要说的是理解源码最好的办法就是配置好图片和标签,然后进行debug。官方提供了coco128的数据集可以快速下载跑通,方便debug。
我们打印出每行源码涉及的tensor的维度,标注好函数的功能。下面我们开始吧!
yolo.py 源码解析
1.init()函数
我们首先来看模型构建的源码部分:class Model()
首先是该类的init()函数的源码,模型在init()就已经通过配置文件全部构建了:
 def __init__(self, cfg='yolov5s.yaml', ch=3, nc=None):  # model, input channels, number of classes
        super(Model, self).__init__()
        if isinstance(cfg, dict):
            self.yaml = cfg  # model dict
        else:  # is *.yaml
            import yaml  # for torch hub
            self.yaml_file = Path(cfg).name
            with open(cfg) as f:
                self.yaml = yaml.load(f, Loader=yaml.SafeLoader)  # model dict

        # Define model
        ch = self.yaml['ch'] = self.yaml.get('ch', ch)  # input channels
        if nc and nc != self.yaml['nc']:
            logger.info('Overriding model.yaml nc=%g with nc=%g' % (self.yaml['nc'], nc))
            self.yaml['nc'] = nc  # override yaml value
        self.model, self.save = parse_model(deepcopy(self.yaml), ch=[ch])  # model, savelist
        self.names = [str(i) for i in range(self.yaml['nc'])]  # default names
        # print([x.shape for x in self.forward(torch.zeros(1, ch, 64, 64))])

        # Build strides, anchors
        m = self.model[-1]  # Detect()
        if isinstance(m, Detect):
            s = 256  # 2x min stride
            m.stride = torch.tensor([s / x.shape[-2] for x in self.forward(torch.zeros(1, ch, s, s))])  # forward
            m.anchors /= m.stride.view(-1, 1, 1)
            check_anchor_order(m)
            self.stride = m.stride
            self._initialize_biases()  # only run once
            # print('Strides: %s' % m.stride.tolist())

        # Init weights, biases
        initialize_weights(self)
        self.info()
        logger.info('')
前面的不用多说,模型仍然是解析yaml的配置文件:
我们以yolov5s为例进行debug:
            with open(cfg) as f:
                self.yaml = yaml.load(f, Loader=yaml.SafeLoader)  # model dict

可以看到yaml解析后是一个dict形式:
- nc代表类别数量
- depth_multiple是控制模型深度的参数。
- width_multiple是一个控制模型宽度的参数。
- anchors是预置的锚框,FPN每层设置3个,共有3*3=9个。
- backbone是backbone网络的构建参数,根据这个配置可以加载出backbone网络。
- head是yolo head网络的构建参数,根据这个配置可以加载出yolo head的网络。(其实可以认为这部分是neck+head)
        ch = self.yaml['ch'] = self.yaml.get('ch', ch)  # input channels
        if nc and nc != self.yaml['nc']:
            logger.info('Overriding model.yaml nc=%g with nc=%g' % (self.yaml['nc'], nc))
            self.yaml['nc'] = nc  # override yaml value
这里判断一下输入的channel和配置文件里的是否一致,不一致则以输入参数为准。
self.model, self.save = parse_model(deepcopy(self.yaml), ch=[ch])
下面就要进入核心函数parse_model()了。这个函数的源码见下面:
ef parse_model(d, ch):  # model_dict, input_channels(3)
    logger.info('\n%3s%18s%3s%10s  %-40s%-30s' % ('', 'from', 'n', 'params', 'module', 'arguments'))
    anchors, nc, gd, gw = d['anchors'], d['nc'], d['depth_multiple'], d['width_multiple']
    na = (len(anchors[0]) // 2) if isinstance(anchors, list) else anchors  # number of anchors
    no = na * (nc + 5)  # number of outputs = anchors * (classes + 5)

    layers, save, c2 = [], [], ch[-1]  # layers, savelist, ch out
    for i, (f, n, m, args) in enumerate(d['backbone'] + d['head']):  # from, number, module, args
        m = eval(m) if isinstance(m, str) else m  # eval strings
        for j, a in enumerate(args):
            try:
                args[j] = eval(a) if isinstance(a, str) else a  # eval strings
            except:
                pass

        n = max(round(n * gd), 1) if n > 1 else n  # depth gain
        if m in [Conv, GhostConv, Bottleneck, GhostBottleneck, SPP, DWConv, MixConv2d, Focus, CrossConv, BottleneckCSP,
                 C3]:
            c1, c2 = ch[f], args[0]
            if c2 != no:  # if not output
                c2 = make_divisible(c2 * gw, 8)

            args = [c1, c2, *args[1:]]
            if m in [BottleneckCSP, C3]:
                args.insert(2, n)  # number of repeats
                n = 1
        elif m is nn.BatchNorm2d:
            args = [ch[f]]
        elif m is Concat:
            c2 = sum([ch[x] for x in f])
        elif m is Detect:
            args.append([ch[x] for x in f])
            if isinstance(args[1], int):  # number of anchors
                args[1] = [list(range(args[1] * 2))] * len(f)
        elif m is Contract:
            c2 = ch[f] * args[0] ** 2
        elif m is Expand:
            c2 = ch[f] // args[0] ** 2
        else:
            c2 = ch[f]

        m_ = nn.Sequential(*[m(*args) for _ in range(n)]) if n > 1 else m(*args)  # module
        t = str(m)[8:-2].replace('__main__.', '')  # module type
        np = sum([x.numel() for x in m_.parameters()])  # number params
        m_.i, m_.f, m_.type, m_.np = i, f, t, np  # attach index, 'from' index, type, number params
        logger.info('%3s%18s%3s%10.0f  %-40s%-30s' % (i, f, n, np, t, args))  # print
        save.extend(x % i for x in ([f] if isinstance(f, int) else f) if x != -1)  # append to savelist
        layers.append(m_)
        if i == 0:
            ch = []
        ch.append(c2)
    return nn.Sequential(*layers), sorted(save)
下面我们来逐步解析下这个函数:
    logger.info('\n%3s%18s%3s%10s  %-40s%-30s' % ('', 'from', 'n', 'params', 'module', 'arguments'))
    anchors, nc, gd, gw = d['anchors'], d['nc'], d['depth_multiple'], d['width_multiple']
    na = (len(anchors[0]) // 2) if isinstance(anchors, list) else anchors  # number of anchors
    no = na * (nc + 5)  # number of outputs = anchors * (classes + 5)
这部分很简单,读出配置dict里面的参数,na是判断anchor的数量,no是根据anchor数量推断的输出维度,比如对于coco是255。输出维度=anchor数量*(类别数量+置信度+xywh四个回归坐标)。
    for i, (f, n, m, args) in enumerate(d['backbone'] + d['head']):  # from, number, module, args
        m = eval(m) if isinstance(m, str) else m  # eval strings
        for j, a in enumerate(args):
            try:
                args[j] = eval(a) if isinstance(a, str) else a  # eval strings
            except:
                pass

        n = max(round(n * gd), 1) if n > 1 else n  # depth gain
这里开始迭代循环backbone与head的配置。f,n,m,args分别代表着从哪层开始,模块的默认深度,模块的类型和模块的参数。
n = max(round(n * gd), 1) if n > 1 else n
网络用n*gd控制模块的深度缩放,比如对于yolo5s来讲,gd为0.33,也就是把默认的深度缩放为原来的1/3。
        if m in [Conv, GhostConv, Bottleneck, GhostBottleneck, SPP, DWConv, MixConv2d, Focus, CrossConv, BottleneckCSP,
                 C3]:
            c1, c2 = ch[f], args[0]
            if c2 != no:  # if not output
                c2 = make_divisible(c2 * gw, 8)

            args = [c1, c2, *args[1:]]
            if m in [BottleneckCSP, C3]:
                args.insert(2, n)  # number of repeats
                n = 1
对于以上的这几种类型的模块,ch是一个用来保存之前所有的模块输出的channle,ch[-1]代表着上一个模块的输出通道。args[0]是默认的输出通道。
def make_divisible(x, divisor):
    # Returns x evenly divisible by divisor
    return math.ceil(x / divisor) * divisor
这里配合make_divisible()函数,是为了放缩网络模块的宽度(既输出的通道数),比如对于第一个模块“Focus”,默认的输出通道是64,而yolov5s里的放缩系数是0.5,所以通过以上代码变换,最终的输出通道为32。make_divisible()函数保证了输出的通道是8的倍数。
            args = [c1, c2, *args[1:]]
            if m in [BottleneckCSP, C3]:
                args.insert(2, n)  # number of repeats
                n = 1
经过以上处理,args里面保存的前两个参数就是module的输入通道数、输出通道数。如果是BottleneckCSP或者是C3则还需要重新添加重复次数的参数n。
        elif m is nn.BatchNorm2d:
            args = [ch[f]]
        elif m is Concat:
            c2 = sum([ch[x] for x in f])
        elif m is Detect:
            args.append([ch[x] for x in f])
            if isinstance(args[1], int):  # number of anchors
                args[1] = [list(range(args[1] * 2))] * len(f)
        elif m is Contract:
            c2 = ch[f] * args[0] ** 2
        elif m is Expand:
            c2 = ch[f] // args[0] ** 2
        else:
            c2 = ch[f]
以上是其他几种类型的Module。
如果是nn.BatchNorm2d则通道数保持不变。
如果是Concat则f是所有需要拼接层的index,则输出通道c2是所有层的和。
如果是Detect则对应检测头,这部分后面再详细讲。
Contract和Expand目前未在模型中使用。
m_ = nn.Sequential(*[m(*args) for _ in range(n)]) if n > 1 else m(*args) # module
这里把args里的参数用于构建了module m,然后模块的循环次数用参数n控制。值得注意的是C3模块被控制为n=1也就是外部构建只循环一次。
        t = str(m)[8:-2].replace('__main__.', '')  # module type
        np = sum([x.numel() for x in m_.parameters()])  # number params
        m_.i, m_.f, m_.type, m_.np = i, f, t, np  # attach index, 'from' index, type, number params
        logger.info('%3s%18s%3s%10.0f  %-40s%-30s' % (i, f, n, np, t, args))  # print
这里做了一些输出打印,可以看到每一层module构建的编号、参数量等情况,比如:
                 from  n    params  module                                  arguments
  0                -1  1      3520  models.common.Focus                     [3, 32, 3]
        save.extend(x % i for x in ([f] if isinstance(f, int) else f) if x != -1)  # append to savelist
        layers.append(m_)
        if i == 0:
            ch = []
        ch.append(c2)
    return nn.Sequential(*layers), sorted(save)
最后把构建的模块保存到layers里,把该层的输出通道数写入ch列表里。
待全部循环结束后再构建成模型。至此模型就全部构建完毕了。
现在我们再回到yolo.py里刚刚调用parse_model的位置然后继续完成init()函数的学习。
        self.model, self.save = parse_model(deepcopy(self.yaml), ch=[ch])  # model, savelist
        self.names = [str(i) for i in range(self.yaml['nc'])]  # default names
        # print([x.shape for x in self.forward(torch.zeros(1, ch, 64, 64))])

        # Build strides, anchors
        m = self.model[-1]  # Detect()
        if isinstance(m, Detect):
            s = 256  # 2x min stride
            m.stride = torch.tensor([s / x.shape[-2] for x in self.forward(torch.zeros(1, ch, s, s))])  # forward
            m.anchors /= m.stride.view(-1, 1, 1)
            check_anchor_order(m)
            self.stride = m.stride
            self._initialize_biases()  # only run once
            # print('Strides: %s' % m.stride.tolist())

        # Init weights, biases
        initialize_weights(self)
        self.info()
        logger.info('')
这里通过调用一次forward()函数,输入了一个[1, C, 256, 256]的tensor,然后得到FPN输出结果的维度。然后求出了下采样的倍数stride:8,16,32。
最后把anchor除以以上的数值,将anchor放缩到了3个不同的尺度上。anchor的最终shape是[3,3,2]。
至此init()函数已经完整的过了一遍。
2.各种Modules的源码解析
在网络构建的过程中涉及到了多种Modules,这些Modules默认在models文件夹下面的common.py文件里我们下面还过一下这些函数。
(1) 普通卷积Conv
class Conv(nn.Module):
    # Standard convolution
    def __init__(self, c1, c2, k=1, s=1, p=None, g=1, act=True):  # ch_in, ch_out, kernel, stride, padding, groups
        super(Conv, self).__init__()
        self.conv = nn.Conv2d(c1, c2, k, s, autopad(k, p), groups=g, bias=False)
        self.bn = nn.BatchNorm2d(c2)
        self.act = nn.SiLU() if act is True else (act if isinstance(act, nn.Module) else nn.Identity())

    def forward(self, x):
        return self.act(self.bn(self.conv(x)))

    def fuseforward(self, x):
        return self.act(self.conv(x))
普通的卷积,这里调用了autopad()函数计算了same-padding所需要的padding数量。
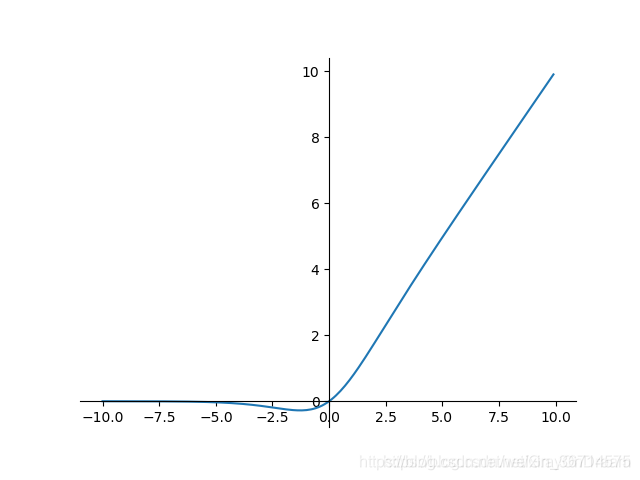
默认的激活函数是SiLU()。
SiLU函数形式:f(x)=x⋅σ(x)
导函数形式: f(x)=f(x)+σ(x)(1−f(x))
(2) BottleNeck结构
class Bottleneck(nn.Module):
    # Standard bottleneck
    def __init__(self, c1, c2, shortcut=True, g=1, e=0.5):  # ch_in, ch_out, shortcut, groups, expansion
        super(Bottleneck, self).__init__()
        c_ = int(c2 * e)  # hidden channels
        self.cv1 = Conv(c1, c_, 1, 1)
        self.cv2 = Conv(c_, c2, 3, 1, g=g)
        self.add = shortcut and c1 == c2

    def forward(self, x):
        return x + self.cv2(self.cv1(x)) if self.add else self.cv2(self.cv1(x))
可以看出BottleNeck结构默认是先1x1卷积缩小channel为原来的1/2,再通过3x3卷积提取特征。如果输入通道c1和3x3卷积输出通道c2相等,则进行残差输出。shortcut参数控制是否进行残差连接。
(3) BottleNeckCSP和C3
class BottleneckCSP(nn.Module):
    # CSP Bottleneck https://github.com/WongKinYiu/CrossStagePartialNetworks
    def __init__(self, c1, c2, n=1, shortcut=True, g=1, e=0.5):  # ch_in, ch_out, number, shortcut, groups, expansion
        super(BottleneckCSP, self).__init__()
        c_ = int(c2 * e)  # hidden channels
        self.cv1 = Conv(c1, c_, 1, 1)
        self.cv2 = nn.Conv2d(c1, c_, 1, 1, bias=False)
        self.cv3 = nn.Conv2d(c_, c_, 1, 1, bias=False)
        self.cv4 = Conv(2 * c_, c2, 1, 1)
        self.bn = nn.BatchNorm2d(2 * c_)  # applied to cat(cv2, cv3)
        self.act = nn.LeakyReLU(0.1, inplace=True)
        self.m = nn.Sequential(*[Bottleneck(c_, c_, shortcut, g, e=1.0) for _ in range(n)])

    def forward(self, x):
        y1 = self.cv3(self.m(self.cv1(x)))
        y2 = self.cv2(x)
        return self.cv4(self.act(self.bn(torch.cat((y1, y2), dim=1))))


class C3(nn.Module):
    # CSP Bottleneck with 3 convolutions
    def __init__(self, c1, c2, n=1, shortcut=True, g=1, e=0.5):  # ch_in, ch_out, number, shortcut, groups, expansion
        super(C3, self).__init__()
        c_ = int(c2 * e)  # hidden channels
        self.cv1 = Conv(c1, c_, 1, 1)
        self.cv2 = Conv(c1, c_, 1, 1)
        self.cv3 = Conv(2 * c_, c2, 1)  # act=FReLU(c2)
        self.m = nn.Sequential(*[Bottleneck(c_, c_, shortcut, g, e=1.0) for _ in range(n)])
        # self.m = nn.Sequential(*[CrossConv(c_, c_, 3, 1, g, 1.0, shortcut) for _ in range(n)])

    def forward(self, x):
        return self.cv3(torch.cat((self.m(self.cv1(x)), self.cv2(x)), dim=1))
在common.py里实现了两种csp结构:
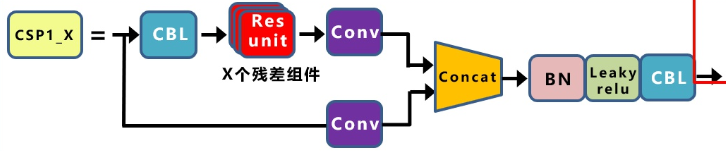
BottleneckCSP就完全对应着上面的结构。但是作者在yoloV5 4.0的版本中将这部分结构改成了C3。C3的结构如下图:
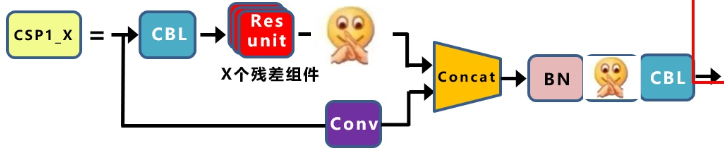
残差之后的Conv被去掉了,激活函数从上面的LeakyRelu变为了SiLU。
(4) SPP
class SPP(nn.Module):
    # Spatial pyramid pooling layer used in YOLOv3-SPP
    def __init__(self, c1, c2, k=(5, 9, 13)):
        super(SPP, self).__init__()
        c_ = c1 // 2  # hidden channels
        self.cv1 = Conv(c1, c_, 1, 1)
        self.cv2 = Conv(c_ * (len(k) + 1), c2, 1, 1)
        self.m = nn.ModuleList([nn.MaxPool2d(kernel_size=x, stride=1, padding=x // 2) for x in k])

    def forward(self, x):
        x = self.cv1(x)
        return self.cv2(torch.cat([x] + [m(x) for m in self.m], 1))
SPP模块将输入通道减半,然后分别做kernel size为5,9,13的maxpooling,最后将结过拼接,包含原始输入的四组结果合并后通道应该是原来的2倍。
(5) Focus
class Focus(nn.Module):
    # Focus wh information into c-space
    def __init__(self, c1, c2, k=1, s=1, p=None, g=1, act=True):  # ch_in, ch_out, kernel, stride, padding, groups
        super(Focus, self).__init__()
        self.conv = Conv(c1 * 4, c2, k, s, p, g, act)
        # self.contract = Contract(gain=2)

    def forward(self, x):  # x(b,c,w,h) -> y(b,4c,w/2,h/2)
        return self.conv(torch.cat([x[..., ::2, ::2], x[..., 1::2, ::2], x[..., ::2, 1::2], x[..., 1::2, 1::2]], 1))
        # return self.conv(self.contract(x))
把feature map 切成四等分,然后叠加起来。最后的结果是通道数变为原来的四倍,resolution为原来的1/4(H,W分别减半)。最后通过一个卷积调整通道数为预先设置。
以上我们完成了模型构建部分的部分内容,剩下的Model中的forward()前向传播和YoloV5的detection head部分我们将在下一篇里面讲述。
如果你觉得内容有用的话,请点赞关注支持下博主,有问题欢迎留言谢谢!