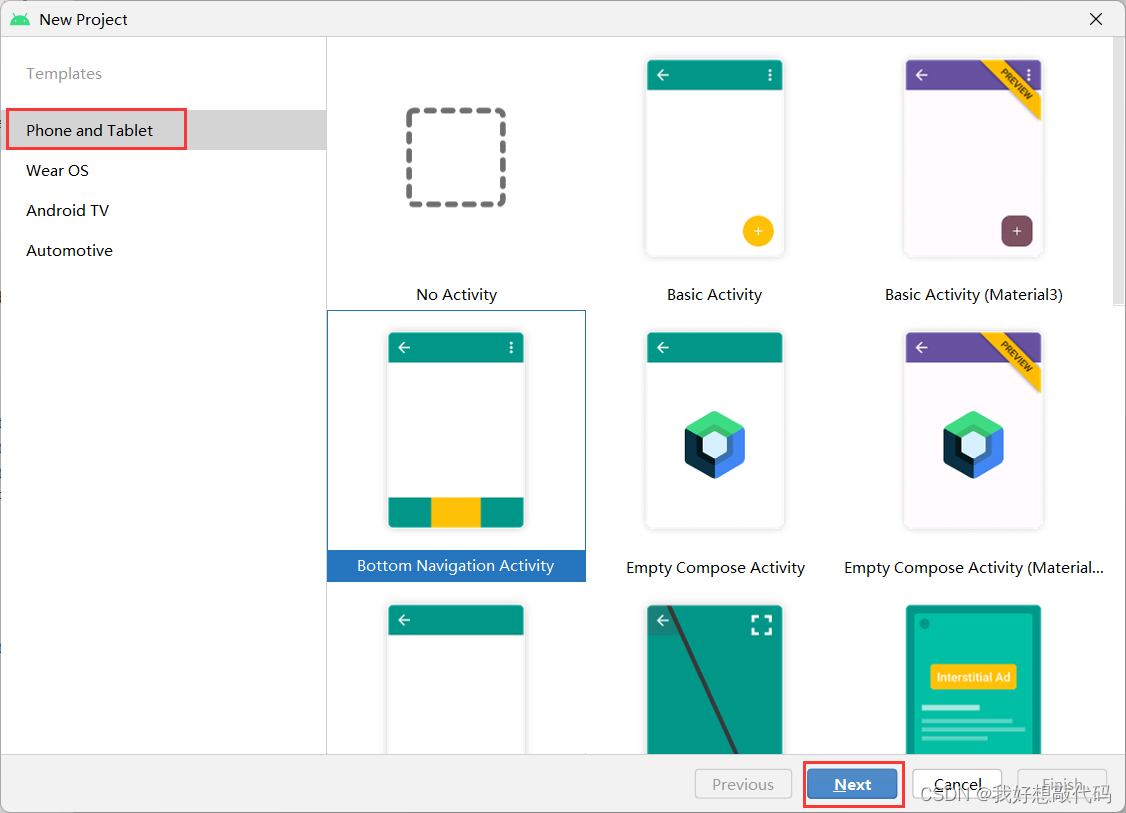
1、新建项目
新建项目,选择"Bottom Navigation Activity"后,点击"Next"。

2、activity_main.xml
该界面布局为:BottomNavigationView+fragment。
在BottomNavigationView里,app:menu:底部导航栏按钮菜单。
在fragment里,app:navGraph:关联导航图。
<?xml version="1.0" encoding="utf-8"?>
<androidx.constraintlayout.widget.ConstraintLayout xmlns:android="http://schemas.android.com/apk/res/android"
    xmlns:app="http://schemas.android.com/apk/res-auto"
    android:id="@+id/container"
    android:layout_width="match_parent"
    android:layout_height="match_parent">

    <com.google.android.material.bottomnavigation.BottomNavigationView
        android:id="@+id/nav_view"
        android:layout_width="0dp"
        android:layout_height="wrap_content"
        android:layout_marginStart="0dp"
        android:layout_marginEnd="0dp"
        android:background="?android:attr/windowBackground"
        app:layout_constraintBottom_toBottomOf="parent"
        app:layout_constraintLeft_toLeftOf="parent"
        app:layout_constraintRight_toRightOf="parent"
        app:menu="@menu/bottom_nav_menu" />//底部的导航按钮

    <fragment
        android:id="@+id/nav_host_fragment_activity_main"
        android:name="androidx.navigation.fragment.NavHostFragment"
        android:layout_width="match_parent"
        android:layout_height="match_parent"
        app:defaultNavHost="true"
        app:layout_constraintBottom_toTopOf="@id/nav_view"
        app:layout_constraintLeft_toLeftOf="parent"
        app:layout_constraintRight_toRightOf="parent"
        app:layout_constraintTop_toTopOf="parent"
        app:navGraph="@navigation/mobile_navigation" />//导航图

</androidx.constraintlayout.widget.ConstraintLayout>
3、bottom_nav_menu.xml菜单文件
在该文件里面定义底部的导航按钮,每一个item代表一个导航按钮。最多可显示五个导航按钮,开始系统默认创建3个导航按钮,可根据自己的需要自行添加。
说明:
- android:icon<导航按钮显示的图标>
- android:title<导航按钮显示的文字>
<?xml version="1.0" encoding="utf-8"?>
<menu xmlns:android="http://schemas.android.com/apk/res/android">

    <item
        android:id="@+id/navigation_home"
        android:icon="@mipmap/bottom_btn1"
        android:title="账单" />

    <item
        android:id="@+id/navigation_dashboard"
        android:icon="@mipmap/bottom_btn2"
        android:title="图表" />

    <item
        android:id="@+id/navigation_notifications"
        android:icon="@mipmap/bottom_btn3"
        android:title="记账" />
    <item
        android:id="@+id/navigation_blank"
        android:icon="@mipmap/bottom_btn5"
        android:title="我的" />

</menu>
4、mobile_navigation.xml
该文件的作用为:定义fragment。
说明:
- 每一个fragment的id与相应的底部导航按钮id需一致
- navigation里:app:startDestination<指明开始默认的fragment>
- fragment里:android:name<和它对应的Java类>
- fragment里:android:label<界面顶部标题栏显示的文字>
- fragment里:tools:layout<指明布局文件>
<?xml version="1.0" encoding="utf-8"?>
<navigation xmlns:android="http://schemas.android.com/apk/res/android"
    xmlns:app="http://schemas.android.com/apk/res-auto"
    xmlns:tools="http://schemas.android.com/tools"
    android:id="@+id/mobile_navigation"
    app:startDestination="@+id/navigation_home"> //开始默认显示的fragment

    <fragment
        android:id="@+id/navigation_home"
        android:name="com.example.ji_zhang_ben.ui.home.HomeFragment"
        android:label="账单"
        tools:layout="@layout/fragment_home" />

    <fragment
        android:id="@+id/navigation_dashboard"
        android:name="com.example.ji_zhang_ben.ui.dashboard.DashboardFragment"
        android:label="图表"
        tools:layout="@layout/fragment_dashboard" />

    <fragment
        android:id="@+id/navigation_notifications"
        android:name="com.example.ji_zhang_ben.ui.notifications.NotificationsFragment"
        android:label="记账"
        tools:layout="@layout/fragment_notifications" />

    <fragment
        android:id="@+id/navigation_blank"
        android:name="com.example.ji_zhang_ben.ui.blank.BlankFragment"
        android:label="我的"
        tools:layout="@layout/fragment_blank" />
</navigation>
5、MainActivity.java
package com.example.ji_zhang_ben;

import android.os.Bundle;

import com.google.android.material.bottomnavigation.BottomNavigationView;

import androidx.appcompat.app.AppCompatActivity;
import androidx.navigation.NavController;
import androidx.navigation.Navigation;
import androidx.navigation.ui.AppBarConfiguration;
import androidx.navigation.ui.NavigationUI;

import com.example.ji_zhang_ben.databinding.ActivityMainBinding;

public class MainActivity extends AppCompatActivity {

    private ActivityMainBinding binding;

    @Override
    protected void onCreate(Bundle savedInstanceState) {
        super.onCreate(savedInstanceState);

        binding = ActivityMainBinding.inflate(getLayoutInflater());
        setContentView(binding.getRoot());

        BottomNavigationView navView = findViewById(R.id.nav_view);

        AppBarConfiguration appBarConfiguration = new AppBarConfiguration.Builder(
                R.id.navigation_home, R.id.navigation_dashboard, R.id.navigation_notifications,R.id.navigation_blank)
                .build();

        NavController navController = Navigation.findNavController(this, R.id.nav_host_fragment_activity_main);
        NavigationUI.setupActionBarWithNavController(this, navController, appBarConfiguration);
        NavigationUI.setupWithNavController(binding.navView, navController);
    }

}
6、HomeFragment.java
4个Fragment相应的Java类代码同理,只举例其中一个。
package com.example.ji_zhang_ben.ui.home;

import android.os.Bundle;
import android.view.LayoutInflater;
import android.view.View;
import android.view.ViewGroup;
import androidx.annotation.NonNull;
import androidx.fragment.app.Fragment;
import com.example.ji_zhang_ben.R;


public class HomeFragment extends Fragment {

    public View onCreateView(@NonNull LayoutInflater inflater,
                             ViewGroup container, Bundle savedInstanceState) {
        View view= inflater.inflate(R.layout.fragment_home, container, false);
        return view;                   //相应的布局文件
    }

}
7、项目结构图

8、实现效果


