前言:
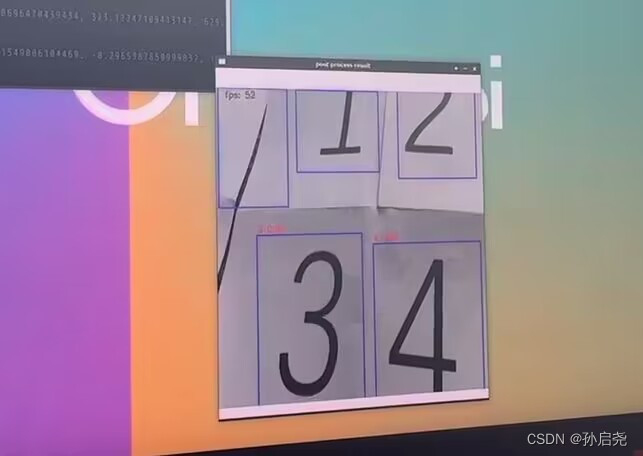
香橙派5采用了RK3588S,内置的NPU达到了6Tops的算力,博主这里记录一下自己的踩坑过程,好不容易做出来的不能以后忘记了(手动狗头)。这里博主还在B站上发布了效果视频,大家感兴趣的话可以看一下数字识别50fps
前期准备:
这里我给大家说一下需要做的准备:
1、首先是香橙派5,烧录了香橙派5的官方debian11系统。
2、用来做深度学习训练的电脑(这里我用的是实验室的3060)。
3、一台有装有Ubuntu20.04的电脑(或者移动硬盘,把Ubuntu20.04装在移动硬盘上面)。
使用RKNN官方指定的yolov5训练模型:
环境配置:
先把官方指定的yolov5版本贴出来官方yolov5
这里建议大家用官方的yolov5去训练,这样最后在香橙派5上展现出来的效果最好。
大家先到GitHub上把yolov5给下载下来,这时候我们得给电脑安装一个anaconda,用来创建虚拟环境,这样我们再把yolov5需要的环境给下载到这个虚拟环境中,这样环境与环境中就不会相互干扰和污染。这里我不再赘述anaconda的安装,如果不知道的话,还是去百度一下。进入虚拟环境后,我们根据需求来安装一下依赖包。
pip install -r requirements.txt这里要注意一点,因为每台电脑装载的显卡版本不同,在安装完之后,大家可以运行一下一下代码来判断一下自己的torch版本是否匹配。如果出现“successful installation!”那就是安装成功了,反之就是每成功。
import torch
print("successful installation!") if torch.cuda.is_available() else print("fail installation") 如果不匹配的话,大家可以到torch官网下载一下,这里我也给大家把地址贴一下,省的大家再去找https://download.pytorch.org/whl/torch_stable.html在这个界面下,torch的版本是非常全的。
数据集的标注:
对于数据集的标注,我建议大家用labelimg,这款软件我这里有一个很方便的版本,是免安装版本的,下载下来就能用 提取码2471
具体的使用在里面的readme.txt里面交代的很清楚了。
适用于windows10
快捷键:
w : 创建一个矩形框
d :下一张图片
a :上一张图片
空格 :保存Ctrl++ 放大
Ctrl-- 缩小
↑→↓← 键盘箭头移动选定的矩形框
Ctrl + u 加载目录中的所有图像,鼠标点击Open dir同功能
Ctrl + r 更改默认注释目标目录(xml文件保存的地址)
Ctrl + s 保存
Ctrl + d 复制当前标签和矩形框
space 将当前图像标记为已验证想要修改标签类别内容(如默认的dog、person、cat等)则在主目录下data文件夹中的predefined_classes.txt文件中修改。
我就不再给大家展示了,我们在标注的时候,将数据格式选择为默认的即可,这样生成的就是xml文件了。当我们收集到足够的数据集之后,我们就可以开始准备yolov5的训练了。
yolov5模型训练:
这部分我是自学的,根据一篇大佬的文章大佬的文章,这里也简单记录一下吧,毕竟还是有些不同的
首先在yolov5文件夹下新建一个文件夹,这里取名为VOCData,并在这个文件夹下面新建两个文件夹,一个是Annotations,另一个是images。其中Annotations下面放的是我们标注好的.xml文件,另一个images下面放的是我们拍摄的图片。
划分数据集
接下来,我们要在VOCData下面新建文件 split_train_val.py用来划分我们的数据集(这里不需要修改,直接运行就可以)
# coding:utf-8
import os
import random
import argparse
parser = argparse.ArgumentParser()
# xml文件的地址,根据自己的数据进行修改 xml一般存放在Annotations下
parser.add_argument('--xml_path', default='Annotations', type=str, help='input xml label path')
# 数据集的划分,地址选择自己数据下的ImageSets/Main
parser.add_argument('--txt_path', default='ImageSets/Main', type=str, help='output txt label path')
opt = parser.parse_args()
trainval_percent = 1.0 # 训练集和验证集所占比例。 这里没有划分测试集
train_percent = 0.9 # 训练集所占比例,可自己进行调整
xmlfilepath = opt.xml_path
txtsavepath = opt.txt_path
total_xml = os.listdir(xmlfilepath)
if not os.path.exists(txtsavepath):
os.makedirs(txtsavepath)
num = len(total_xml)
list_index = range(num)
tv = int(num * trainval_percent)
tr = int(tv * train_percent)
trainval = random.sample(list_index, tv)
train = random.sample(trainval, tr)
file_trainval = open(txtsavepath + '/trainval.txt', 'w')
file_test = open(txtsavepath + '/test.txt', 'w')
file_train = open(txtsavepath + '/train.txt', 'w')
file_val = open(txtsavepath + '/val.txt', 'w')
for i in list_index:
name = total_xml[i][:-4] + '\n'
if i in trainval:
file_trainval.write(name)
if i in train:
file_train.write(name)
else:
file_val.write(name)
else:
file_test.write(name)
file_trainval.close()
file_train.close()
file_val.close()
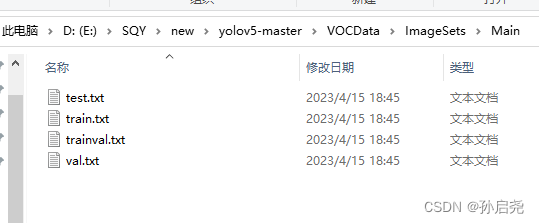
file_test.close()运行完后会在VOCData\ImagesSets\Main下生成 测试集、训练集、训练验证集和验证集,如下图所示:
将.xml文件转为.txt文件
在VOCData目录下创建程序 text_to_yolo.py 并运行,开头classes部分改成自己的类别。
# -*- coding: utf-8 -*-
import xml.etree.ElementTree as ET
import os
from os import getcwd

sets = ['train', 'val', 'test']
classes = ["0","1","2","3","4","5","6","7","8","9"]  # 改成自己的类别
abs_path = os.getcwd()
print(abs_path)


def convert(size, box):
    dw = 1. / (size[0])
    dh = 1. / (size[1])
    x = (box[0] + box[1]) / 2.0 - 1
    y = (box[2] + box[3]) / 2.0 - 1
    w = box[1] - box[0]
    h = box[3] - box[2]
    x = x * dw
    w = w * dw
    y = y * dh
    h = h * dh
    return x, y, w, h


def convert_annotation(image_id):
    in_file = open('E:/SQY/new/yolov5-master/VOCData/Annotations/%s.xml' % (image_id), encoding='UTF-8')
    out_file = open('E:/SQY/new/yolov5-master/VOCData/labels/%s.txt' % (image_id), 'w')
    tree = ET.parse(in_file)
    root = tree.getroot()
    size = root.find('size')
    w = int(size.find('width').text)
    h = int(size.find('height').text)
    for obj in root.iter('object'):
        difficult = obj.find('difficult').text
        # difficult = obj.find('Difficult').text
        cls = obj.find('name').text
        if cls not in classes or int(difficult) == 1:
            continue
        cls_id = classes.index(cls)
        xmlbox = obj.find('bndbox')
        b = (float(xmlbox.find('xmin').text), float(xmlbox.find('xmax').text), float(xmlbox.find('ymin').text),
             float(xmlbox.find('ymax').text))
        b1, b2, b3, b4 = b
        # 标注越界修正
        if b2 > w:
            b2 = w
        if b4 > h:
            b4 = h
        b = (b1, b2, b3, b4)
        bb = convert((w, h), b)
        out_file.write(str(cls_id) + " " + " ".join([str(a) for a in bb]) + '\n')


wd = getcwd()
for image_set in sets:
    if not os.path.exists('E:/SQY/new/yolov5-master/VOCData/labels/'):
        os.makedirs('E:/SQY/new/yolov5-master/VOCData/labels/')
    image_ids = open('E:/SQY/new/yolov5-master/VOCData/ImageSets/Main/%s.txt' % (image_set)).read().strip().split()

    if not os.path.exists('E:/SQY/new/yolov5-master/VOCData/dataSet_path/'):
        os.makedirs('E:/SQY/new/yolov5-master/VOCData/dataSet_path/')

    list_file = open('dataSet_path/%s.txt' % (image_set), 'w')
    for image_id in image_ids:
        list_file.write('E:/SQY/new/yolov5-master/VOCData/images/%s.JPG\n' % (image_id))
        convert_annotation(image_id)
    list_file.close()
运行完后会生成如下 labels 文件夹和 dataSet_path 文件夹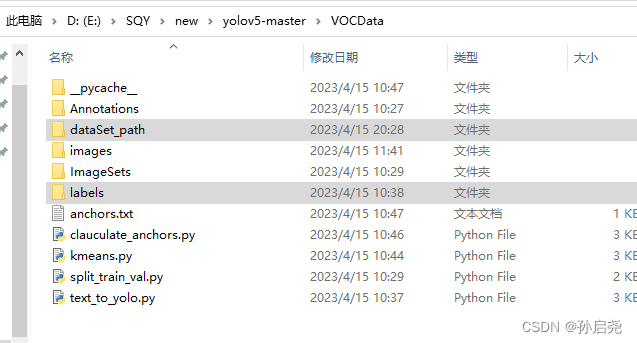
其中 labels 中为不同图像的标注文件。每个图像对应一个txt文件,文件每一行为一个目标的信息,包括class, x_center, y_center, width, height格式,这种即为 yolo_txt格式。dataSet_path文件夹包含三个数据集的txt文件,train.txt等txt文件为划分后图像所在位置的绝对路径,如train.txt就含有所有训练集图像的绝对路径。
配置myvoc.yaml文件
在 yolov5 目录下的 data 文件夹下 新建一个 myvoc.yaml文件
train: E:\SQY\new\yolov5-master\VOCData\dataSet_path\train.txt
val: E:\SQY\new\yolov5-master\VOCData\dataSet_path\val.txt

# number of classes
nc: 10

# class names
names: ["0","1","2","3","4","5","6","7","8","9"]
聚类先验框
生成anchors文件,VOCData目录下创建程序两个程序 kmeans.py 以及 clauculate_anchors.py不需要运行 kmeans.py,运行 clauculate_anchors.py 即可。
kmeans.py 程序如下:这不需要运行,也不需要更改,报错则查看第十三行内容。
import numpy as np


def iou(box, clusters):
    """
    Calculates the Intersection over Union (IoU) between a box and k clusters.
    :param box: tuple or array, shifted to the origin (i. e. width and height)
    :param clusters: numpy array of shape (k, 2) where k is the number of clusters
    :return: numpy array of shape (k, 0) where k is the number of clusters
    """
    x = np.minimum(clusters[:, 0], box[0])
    y = np.minimum(clusters[:, 1], box[1])
    if np.count_nonzero(x == 0) > 0 or np.count_nonzero(y == 0) > 0:
        raise ValueError("Box has no area")  # 如果报这个错,可以把这行改成pass即可

    intersection = x * y
    box_area = box[0] * box[1]
    cluster_area = clusters[:, 0] * clusters[:, 1]

    iou_ = intersection / (box_area + cluster_area - intersection)

    return iou_


def avg_iou(boxes, clusters):
    """
    Calculates the average Intersection over Union (IoU) between a numpy array of boxes and k clusters.
    :param boxes: numpy array of shape (r, 2), where r is the number of rows
    :param clusters: numpy array of shape (k, 2) where k is the number of clusters
    :return: average IoU as a single float
    """
    return np.mean([np.max(iou(boxes[i], clusters)) for i in range(boxes.shape[0])])


def translate_boxes(boxes):
    """
    Translates all the boxes to the origin.
    :param boxes: numpy array of shape (r, 4)
    :return: numpy array of shape (r, 2)
    """
    new_boxes = boxes.copy()
    for row in range(new_boxes.shape[0]):
        new_boxes[row][2] = np.abs(new_boxes[row][2] - new_boxes[row][0])
        new_boxes[row][3] = np.abs(new_boxes[row][3] - new_boxes[row][1])
    return np.delete(new_boxes, [0, 1], axis=1)


def kmeans(boxes, k, dist=np.median):
    """
    Calculates k-means clustering with the Intersection over Union (IoU) metric.
    :param boxes: numpy array of shape (r, 2), where r is the number of rows
    :param k: number of clusters
    :param dist: distance function
    :return: numpy array of shape (k, 2)
    """
    rows = boxes.shape[0]

    distances = np.empty((rows, k))
    last_clusters = np.zeros((rows,))

    np.random.seed()

    # the Forgy method will fail if the whole array contains the same rows
    clusters = boxes[np.random.choice(rows, k, replace=False)]

    while True:
        for row in range(rows):
            distances[row] = 1 - iou(boxes[row], clusters)

        nearest_clusters = np.argmin(distances, axis=1)

        if (last_clusters == nearest_clusters).all():
            break

        for cluster in range(k):
            clusters[cluster] = dist(boxes[nearest_clusters == cluster], axis=0)

        last_clusters = nearest_clusters

    return clusters


if __name__ == '__main__':
    a = np.array([[1, 2, 3, 4], [5, 7, 6, 8]])
    print(translate_boxes(a))
运行:clauculate_anchors.py会调用 kmeans.py 聚类生成新anchors的文件。程序如下:需要更改第 9 、13行文件路径 以及 第 16 行标注类别名称
# -*- coding: utf-8 -*-
# 根据标签文件求先验框
import os
import numpy as np
import xml.etree.cElementTree as et
from kmeans import kmeans, avg_iou
FILE_ROOT = "E:/SQY/new/yolov5-master/VOCData/" # 根路径
ANNOTATION_ROOT = "Annotations" # 数据集标签文件夹路径
ANNOTATION_PATH = FILE_ROOT + ANNOTATION_ROOT
ANCHORS_TXT_PATH = "E:/SQY/new/yolov5-master/VOCData/anchors.txt" # anchors文件保存位置
CLUSTERS = 9
CLASS_NAMES = ['0','1','2','3','4','5','6','7','8','9'] # 类别名称
def load_data(anno_dir, class_names):
xml_names = os.listdir(anno_dir)
boxes = []
for xml_name in xml_names:
xml_pth = os.path.join(anno_dir, xml_name)
tree = et.parse(xml_pth)
width = float(tree.findtext("./size/width"))
height = float(tree.findtext("./size/height"))
for obj in tree.findall("./object"):
cls_name = obj.findtext("name")
if cls_name in class_names:
xmin = float(obj.findtext("bndbox/xmin")) / width
ymin = float(obj.findtext("bndbox/ymin")) / height
xmax = float(obj.findtext("bndbox/xmax")) / width
ymax = float(obj.findtext("bndbox/ymax")) / height
box = [xmax - xmin, ymax - ymin]
boxes.append(box)
else:
continue
return np.array(boxes)
if __name__ == '__main__':
anchors_txt = open(ANCHORS_TXT_PATH, "w")
train_boxes = load_data(ANNOTATION_PATH, CLASS_NAMES)
count = 1
best_accuracy = 0
best_anchors = []
best_ratios = []
for i in range(10): ##### 可以修改,不要太大,否则时间很长
anchors_tmp = []
clusters = kmeans(train_boxes, k=CLUSTERS)
idx = clusters[:, 0].argsort()
clusters = clusters[idx]
# print(clusters)
for j in range(CLUSTERS):
anchor = [round(clusters[j][0] * 640, 2), round(clusters[j][1] * 640, 2)]
anchors_tmp.append(anchor)
print(f"Anchors:{anchor}")
temp_accuracy = avg_iou(train_boxes, clusters) * 100
print("Train_Accuracy:{:.2f}%".format(temp_accuracy))
ratios = np.around(clusters[:, 0] / clusters[:, 1], decimals=2).tolist()
ratios.sort()
print("Ratios:{}".format(ratios))
print(20 * "*" + " {} ".format(count) + 20 * "*")
count += 1
if temp_accuracy > best_accuracy:
best_accuracy = temp_accuracy
best_anchors = anchors_tmp
best_ratios = ratios
anchors_txt.write("Best Accuracy = " + str(round(best_accuracy, 2)) + '%' + "\r\n")
anchors_txt.write("Best Anchors = " + str(best_anchors) + "\r\n")
anchors_txt.write("Best Ratios = " + str(best_ratios))
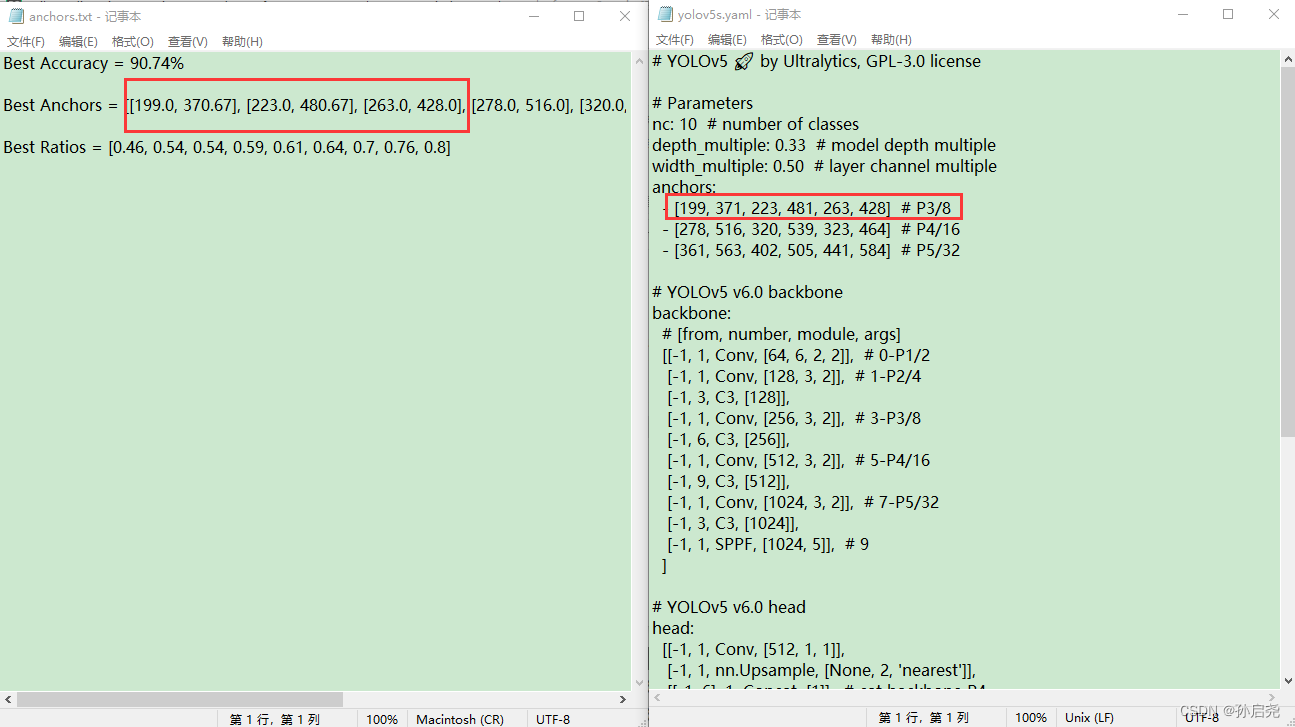
anchors_txt.close()接下来,我们会生成一个名为anchor的文件,在这个文件的第二行,我们需要把Best Anchors 复制到我们的yolov5s.yaml里面。每一行有6个,把我框起来的部分复制即可,这里要注意一点,我们对于小数部分是四舍五入的,最后要保证在yolov5s.yaml里面的都是整数,整个yolov5s.yaml的anchor部分全部要换成我们的Best Anchors,同时还要把我们的nc也就是识别的类别数目给修改一下。
下载权重:
在Github上的官方仓库里,有我们需要的权重文件yolov5s.pt,这里方便大家取用,我也上传到了百度网盘里面提取码2471,我们在yolov5下面新建weights文件夹,并将我们的权重文件放进去。
准备训练:
我们进入anaconda创建的虚拟环境,然后我们就可以运行以下的命令了:
python train.py --weights weights/yolov5s.pt --cfg models/yolov5s.yaml --data data/myvoc.yaml --epoch 200 --batch-size 8 --img 640 --device 0 接下来就进入到了漫长的训练阶段,在此之前,可能大家还会遇到一些小问题,比如什么页面太小,无法完成操作的问题,这个不难,分配一下虚拟内存即可,具体可以参考一下这个文章报错解决
将训练好的.pt文件转化为.onnx文件
首先,我们参照官方的RKNN文档的操作,将对应的部分给修改一下。RKNN官方文档
根据官方的步骤,我们把下面的代码
    def forward(self, x):
        z = []  # inference output
        for i in range(self.nl):
            if os.getenv('RKNN_model_hack', '0') != '0':
                z.append(torch.sigmoid(self.m[i](x[i])))
                continue

            x[i] = self.m[i](x[i])  # conv
            bs, _, ny, nx = x[i].shape  # x(bs,255,20,20) to x(bs,3,20,20,85)
            x[i] = x[i].view(bs, self.na, self.no, ny, nx).permute(0, 1, 3, 4, 2).contiguous()

            if not self.training:  # inference
                if self.onnx_dynamic or self.grid[i].shape[2:4] != x[i].shape[2:4]:
                    self.grid[i], self.anchor_grid[i] = self._make_grid(nx, ny, i)

                y = x[i].sigmoid()
                if self.inplace:
                    y[..., 0:2] = (y[..., 0:2] * 2 + self.grid[i]) * self.stride[i]  # xy
                    y[..., 2:4] = (y[..., 2:4] * 2) ** 2 * self.anchor_grid[i]  # wh
                else:  # for YOLOv5 on AWS Inferentia https://github.com/ultralytics/yolov5/pull/2953
                    xy, wh, conf = y.split((2, 2, self.nc + 1), 4)  # y.tensor_split((2, 4, 5), 4)  # torch 1.8.0
                    xy = (xy * 2 + self.grid[i]) * self.stride[i]  # xy
                    wh = (wh * 2) ** 2 * self.anchor_grid[i]  # wh
                    y = torch.cat((xy, wh, conf), 4)
                z.append(y.view(bs, -1, self.no))

        if os.getenv('RKNN_model_hack', '0') != '0':
            return z

        return x if self.training else (torch.cat(z, 1),) if self.export else (torch.cat(z, 1), x)
修改为
def forward(self, x):
        z = []  # inference output
        for i in range(self.nl):
            x[i] = self.m[i](x[i])  # conv

        return x
这一步一定要等训练完成后,再对export.py进行修改,然后我们要把得出的best.pt复制到export.py同一级文件夹下。
接下来,我们就可以在pycharm终端中将.pt模型转为.onnx模型了。
python export.py --weights best.pt --img 640 --batch 1 --include onnx之后,在export.py的同级目录下,就会生成best.onnx这个文件,我们需要做的就是把这个文件copy到我们的Ubuntu20.04系统里面,进行处理。
同时,他会在文件目录下给我们生成一个对应的RK.anchor
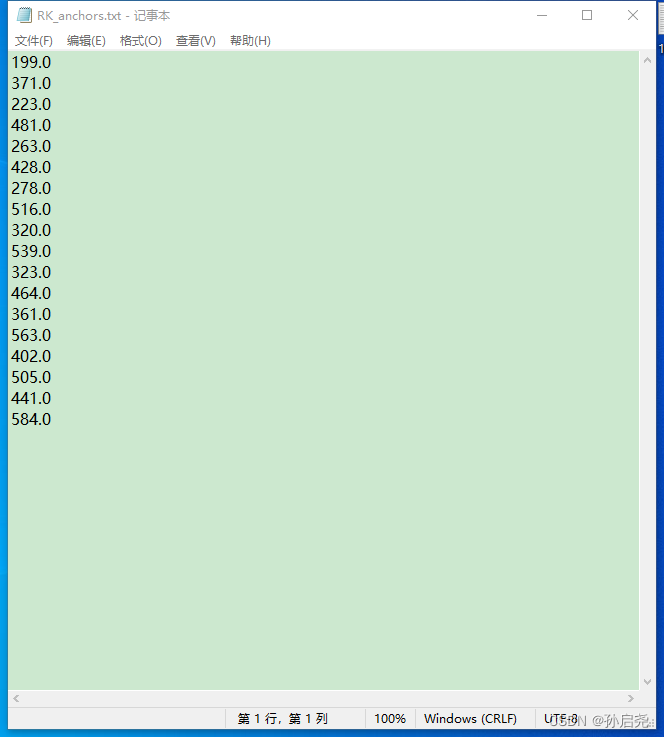
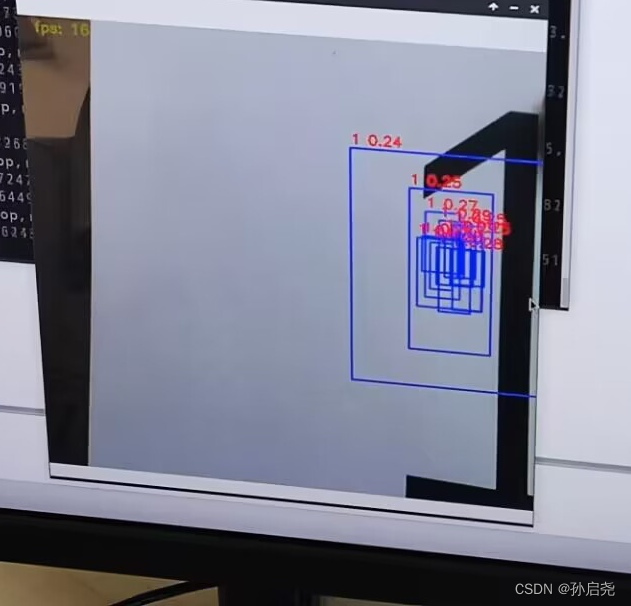
这个文件下面存放的是我们的先验框的锚点,大家要注意的是,一定要把锚点对应的值复制到下一步转换rknn模型的test.py文件里,否则就会像下图这样
将best.onnx转为RKNN格式
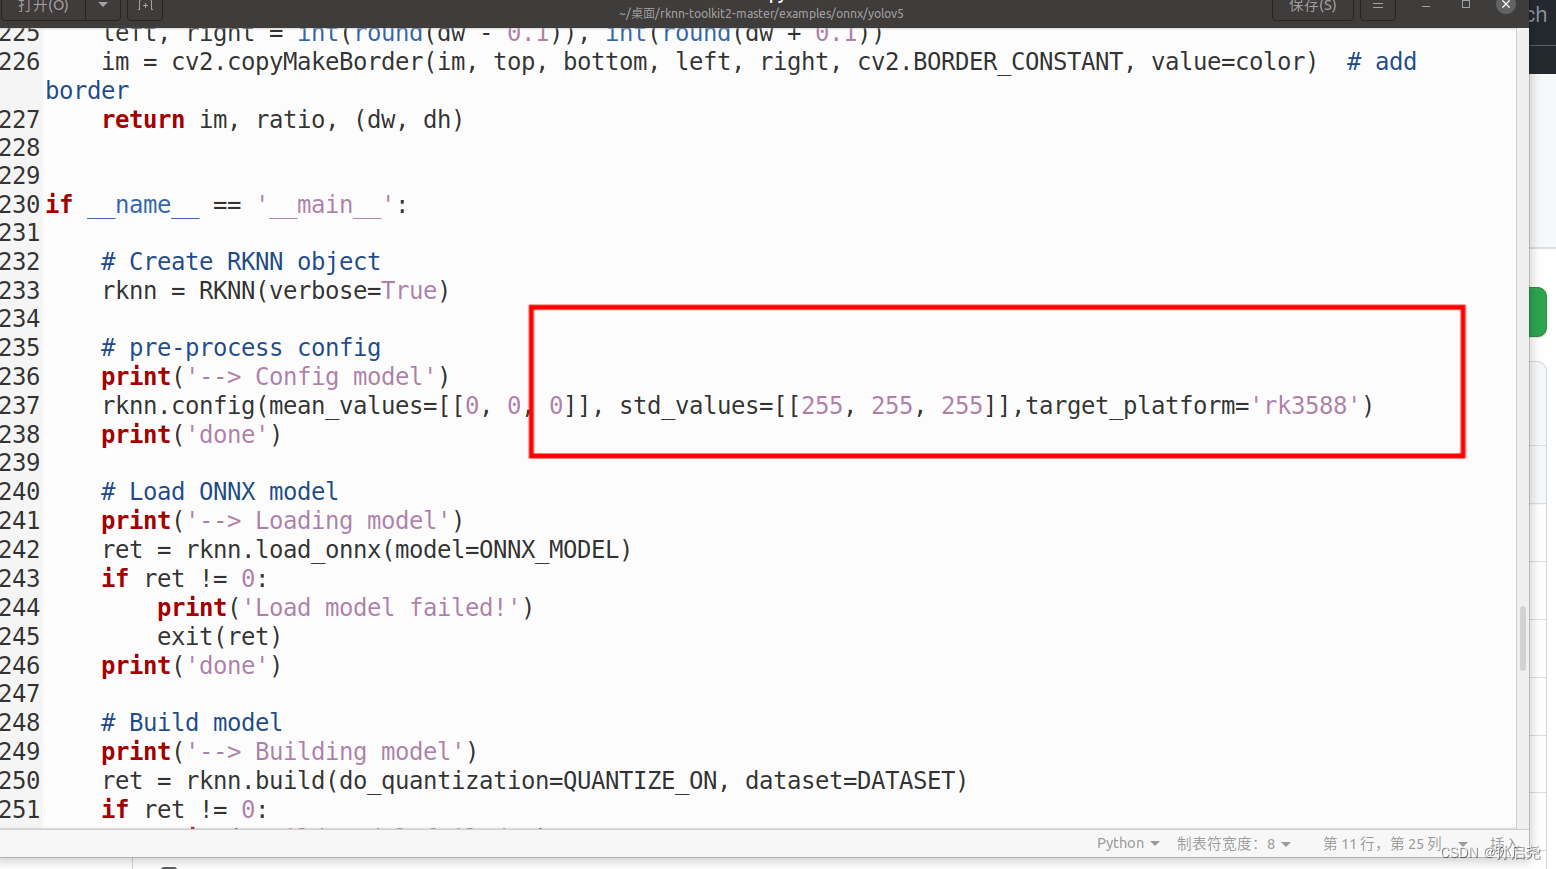
这一步就需要我们进入到Ubuntu20.04系统中了,我的Ubuntu系统中已经下载好了anaconda,使用anaconda的好处就是可以方便的安装一些库,而且还可以利用conda来配置虚拟环境,做到环境与环境之间相互独立。
conda create -n rknn_new python=3.8
之后,在RKNN的github仓库里我们将整个项目下载下来,解压后,我们进入刚刚创立虚拟环境下配置knn-toolkit2。进入doc目录后,输入命令
pip install -r requirements_cp38-1.4.0.txt -i https://mirror.baidu.com/pypi/simple还是那句话,这里一定要带上百度的镜像源,要不然会报错。
出现以上界面,就说明咱们的环境已经安装上了。
接下来,我们进入packages文件夹,输入一下命令
pip install rknn_toolkit2-1.4.0_22dcfef4-cp38-cp38-linux_x86_64.whl如果用的是这个官方文档的话,就不会出现我上一篇博客写到的那个错误。安装完成后,我们在终端输入python,再输入以下命令,如果没有报错,则证明我们的环境已经搭载好了
from rknn.api import RKNN
接下来,我们要进入example/onnx/yolov5文件夹下,找到我们的test.py文件,修改一下模型地址,和我们的类别。
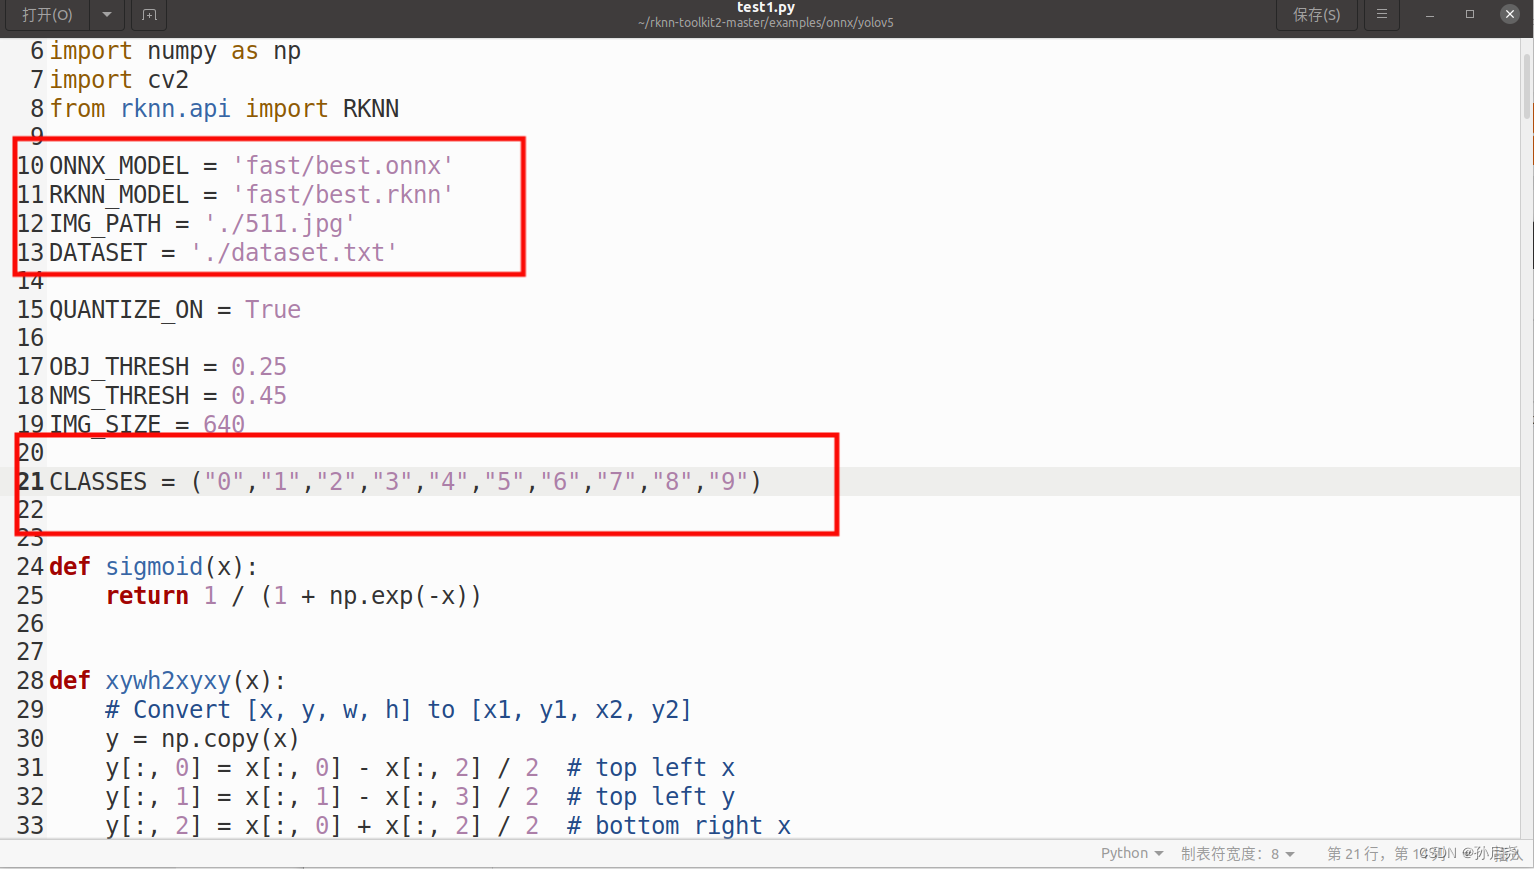
把我们上一步骤记录的RK_anchor复制到这边来,注意,保留整数。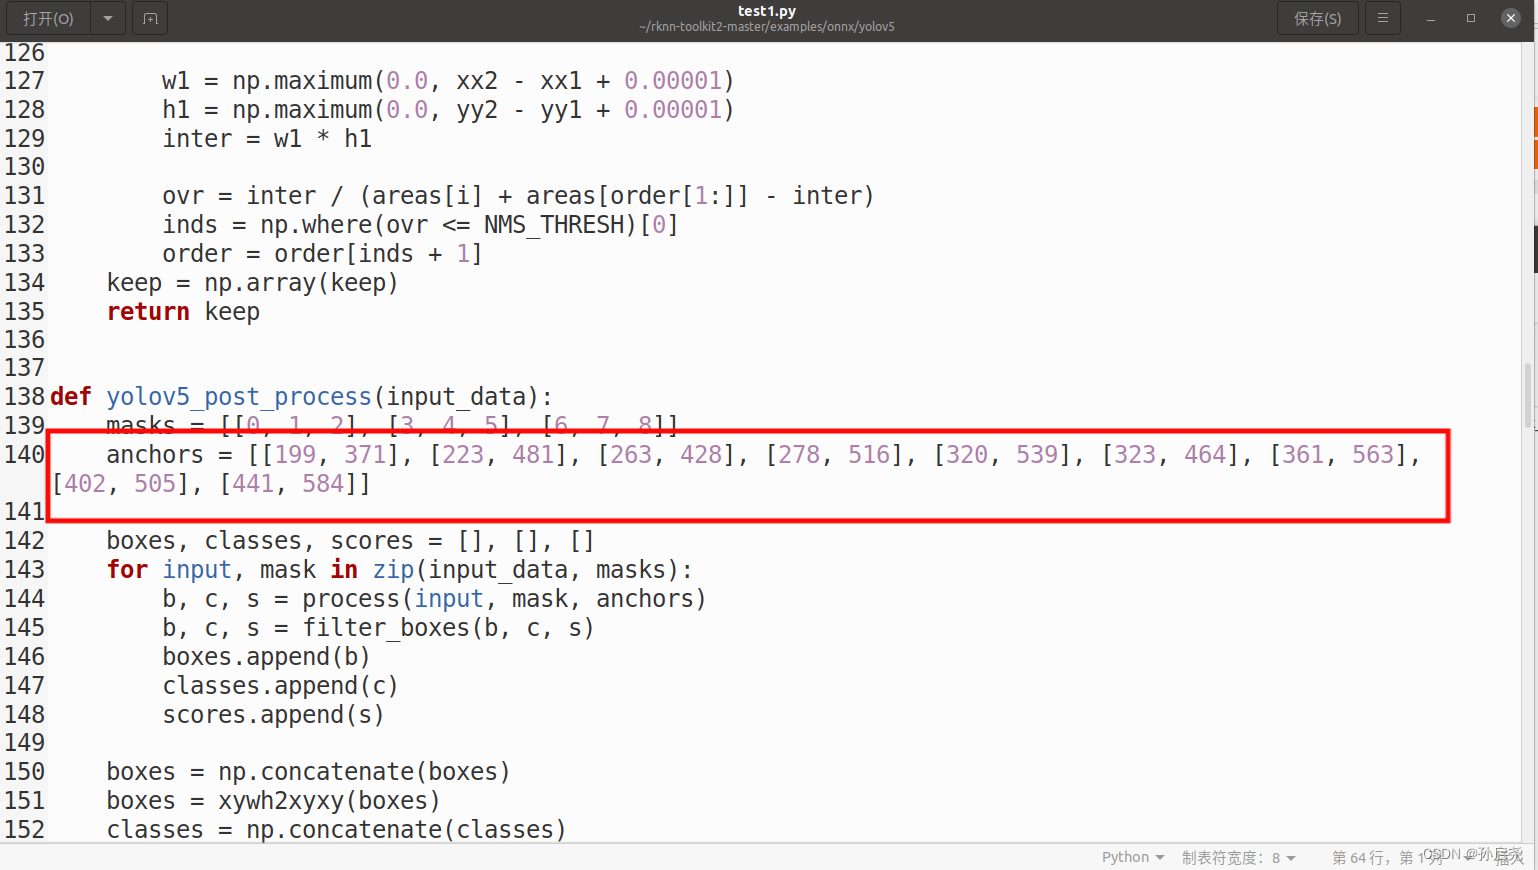
然后,我们还需要修改一下后处理process函数,将代码修改为以下格式(这也是我询问一个B站大佬才学会,感谢大佬的不吝赐教)
def process(input, mask, anchors):

    anchors = [anchors[i] for i in mask]
    grid_h, grid_w = map(int, input.shape[0:2])

    box_confidence = input[..., 4]
    box_confidence = np.expand_dims(box_confidence, axis=-1)

    box_class_probs = input[..., 5:]

    box_xy = input[..., :2]*2 - 0.5

    col = np.tile(np.arange(0, grid_w), grid_w).reshape(-1, grid_w)
    row = np.tile(np.arange(0, grid_h).reshape(-1, 1), grid_h)
    col = col.reshape(grid_h, grid_w, 1, 1).repeat(3, axis=-2)
    row = row.reshape(grid_h, grid_w, 1, 1).repeat(3, axis=-2)
    grid = np.concatenate((col, row), axis=-1)
    box_xy += grid
    box_xy *= int(IMG_SIZE/grid_h)

    box_wh = pow(input[..., 2:4]*2, 2)
    box_wh = box_wh * anchors

    box = np.concatenate((box_xy, box_wh), axis=-1)

    return box, box_confidence, box_class_probs
否则的话,就会出现以下情况,出现非常多的框
修改完成后,我们就可以在命令行里使用命令
python test.py
之后,会在指定位置给我们弹出一个名为best.rknn的文件。
只不过我这里放在了fast里面 ,图片里面展示的是之前存的。
在香橙派5上运行best.rknn
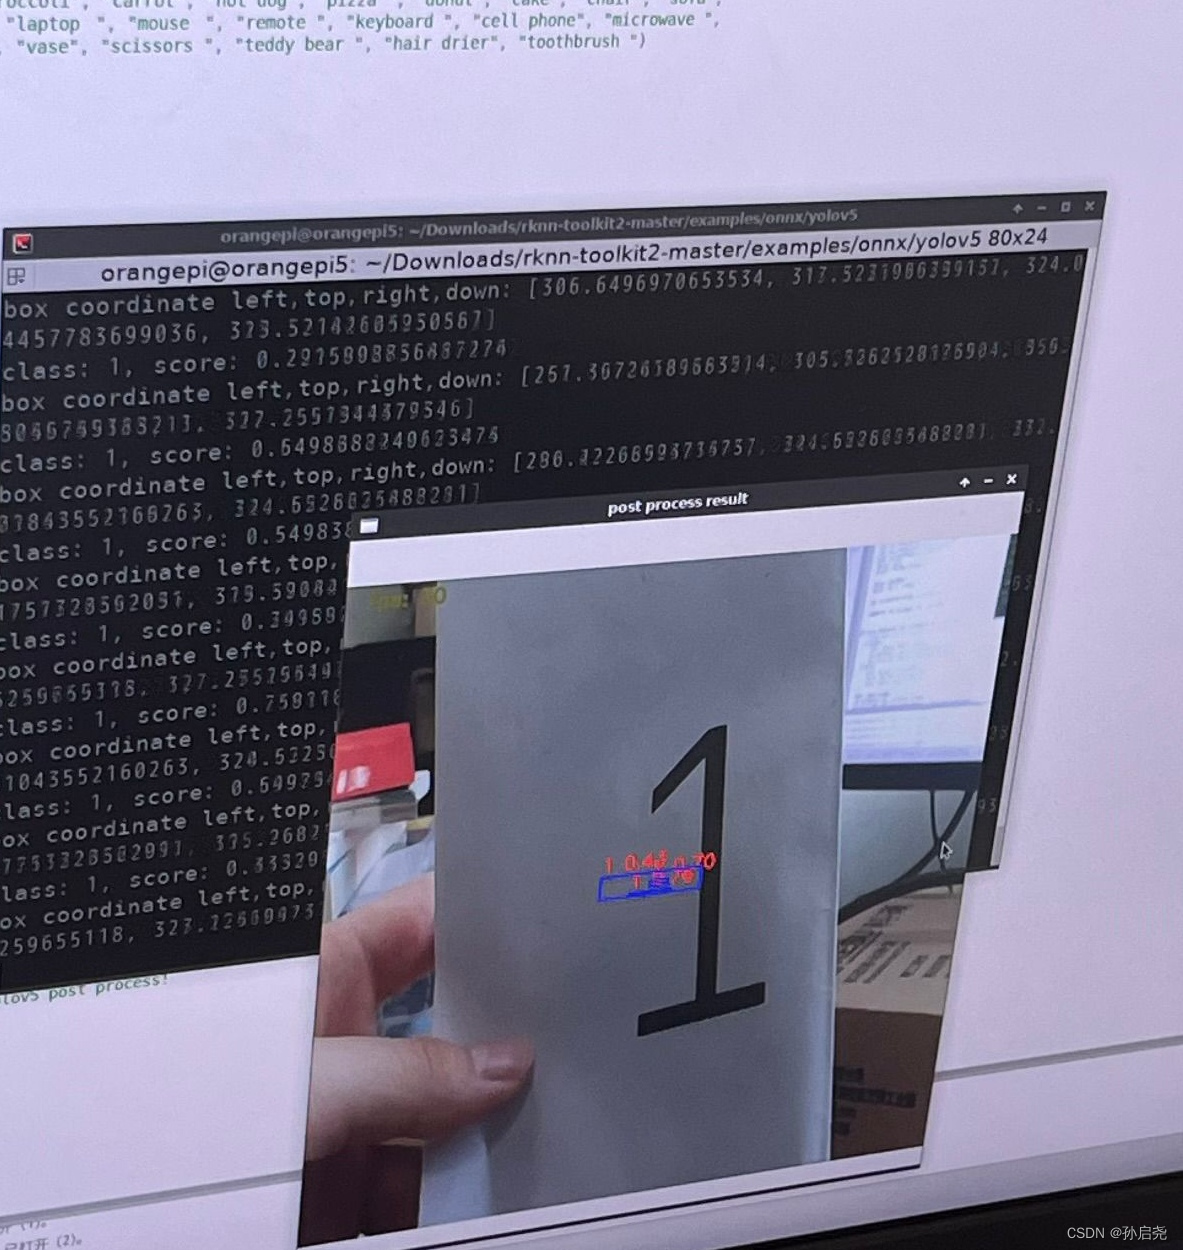
到了这一步,我们就需要把模型放到我们的香橙派上来了,我使用的是RKNN的python版本来实现NPU加速的,这里我们需要到Github上下载RKNN官方教程,下载完成后进入该文件夹,输入指令
cd /examples/onnx/yolov5进入文件夹后,创建一个名为demo.py的文件,将以下代码复制即可,我已经实现了实时视频,同样要注意的一点是,我们需要把RK_anchor的锚点在这里也修改一下,同样把我们的后处理部分修改一下,也就是上面提到的process函数修改一下(这里有一点很奇怪,按照大佬来说的话,其实这里应该修改的,可是我实践操作了一下,修改了process的话反而会出现很多的框,反正这里的话,大家根据实际情况修改)
import os
import urllib
import traceback
import time
import datetime as dt
import sys
import numpy as np
import cv2
from rknnlite.api import RKNNLite


#RKNN_MODEL = 'yolov5s-640-640.rknn'
RKNN_MODEL = 'new/best.rknn'
#DATASET = './dataset.txt'

QUANTIZE_ON = True

OBJ_THRESH = 0.25
NMS_THRESH = 0.45
IMG_SIZE = 640

'''CLASSES = ("person", "bicycle", "car", "motorbike ", "aeroplane ", "bus ", "train", "truck ", "boat", "traffic light",
           "fire hydrant", "stop sign ", "parking meter", "bench", "bird", "cat", "dog ", "horse ", "sheep", "cow", "elephant",
           "bear", "zebra ", "giraffe", "backpack", "umbrella", "handbag", "tie", "suitcase", "frisbee", "skis", "snowboard", "sports ball", "kite",
           "baseball bat", "baseball glove", "skateboard", "surfboard", "tennis racket", "bottle", "wine glass", "cup", "fork", "knife ",
           "spoon", "bowl", "banana", "apple", "sandwich", "orange", "broccoli", "carrot", "hot dog", "pizza ", "donut", "cake", "chair", "sofa",
           "pottedplant", "bed", "diningtable", "toilet ", "tvmonitor", "laptop	", "mouse	", "remote ", "keyboard ", "cell phone", "microwave ",
           "oven ", "toaster", "sink", "refrigerator ", "book", "clock", "vase", "scissors ", "teddy bear ", "hair drier", "toothbrush ")
'''
CLASSES = ("0","1","2","3","4","5","6","7","8","9")

def sigmoid(x):
    return 1 / (1 + np.exp(-x))


def xywh2xyxy(x):
    # Convert [x, y, w, h] to [x1, y1, x2, y2]
    y = np.copy(x)
    y[:, 0] = x[:, 0] - x[:, 2] / 2  # top left x
    y[:, 1] = x[:, 1] - x[:, 3] / 2  # top left y
    y[:, 2] = x[:, 0] + x[:, 2] / 2  # bottom right x
    y[:, 3] = x[:, 1] + x[:, 3] / 2  # bottom right y
    return y


def process(input, mask, anchors):

    anchors = [anchors[i] for i in mask]
    grid_h, grid_w = map(int, input.shape[0:2])

    box_confidence = sigmoid(input[..., 4])
    box_confidence = np.expand_dims(box_confidence, axis=-1)

    box_class_probs = sigmoid(input[..., 5:])

    box_xy = sigmoid(input[..., :2])*2 - 0.5

    col = np.tile(np.arange(0, grid_w), grid_w).reshape(-1, grid_w)
    row = np.tile(np.arange(0, grid_h).reshape(-1, 1), grid_h)
    col = col.reshape(grid_h, grid_w, 1, 1).repeat(3, axis=-2)
    row = row.reshape(grid_h, grid_w, 1, 1).repeat(3, axis=-2)
    grid = np.concatenate((col, row), axis=-1)
    box_xy += grid
    box_xy *= int(IMG_SIZE/grid_h)

    box_wh = pow(sigmoid(input[..., 2:4])*2, 2)
    box_wh = box_wh * anchors

    box = np.concatenate((box_xy, box_wh), axis=-1)

    return box, box_confidence, box_class_probs


def filter_boxes(boxes, box_confidences, box_class_probs):
    """Filter boxes with box threshold. It's a bit different with origin yolov5 post process!
    # Arguments
        boxes: ndarray, boxes of objects.
        box_confidences: ndarray, confidences of objects.
        box_class_probs: ndarray, class_probs of objects.
    # Returns
        boxes: ndarray, filtered boxes.
        classes: ndarray, classes for boxes.
        scores: ndarray, scores for boxes.
    """
    boxes = boxes.reshape(-1, 4)
    box_confidences = box_confidences.reshape(-1)
    box_class_probs = box_class_probs.reshape(-1, box_class_probs.shape[-1])

    _box_pos = np.where(box_confidences >= OBJ_THRESH)
    boxes = boxes[_box_pos]
    box_confidences = box_confidences[_box_pos]
    box_class_probs = box_class_probs[_box_pos]

    class_max_score = np.max(box_class_probs, axis=-1)
    classes = np.argmax(box_class_probs, axis=-1)
    _class_pos = np.where(class_max_score >= OBJ_THRESH)

    boxes = boxes[_class_pos]
    classes = classes[_class_pos]
    scores = (class_max_score* box_confidences)[_class_pos]

    return boxes, classes, scores


def nms_boxes(boxes, scores):
    """Suppress non-maximal boxes.
    # Arguments
        boxes: ndarray, boxes of objects.
        scores: ndarray, scores of objects.
    # Returns
        keep: ndarray, index of effective boxes.
    """
    x = boxes[:, 0]
    y = boxes[:, 1]
    w = boxes[:, 2] - boxes[:, 0]
    h = boxes[:, 3] - boxes[:, 1]

    areas = w * h
    order = scores.argsort()[::-1]

    keep = []
    while order.size > 0:
        i = order[0]
        keep.append(i)

        xx1 = np.maximum(x[i], x[order[1:]])
        yy1 = np.maximum(y[i], y[order[1:]])
        xx2 = np.minimum(x[i] + w[i], x[order[1:]] + w[order[1:]])
        yy2 = np.minimum(y[i] + h[i], y[order[1:]] + h[order[1:]])

        w1 = np.maximum(0.0, xx2 - xx1 + 0.00001)
        h1 = np.maximum(0.0, yy2 - yy1 + 0.00001)
        inter = w1 * h1

        ovr = inter / (areas[i] + areas[order[1:]] - inter)
        inds = np.where(ovr <= NMS_THRESH)[0]
        order = order[inds + 1]
    keep = np.array(keep)
    return keep


def yolov5_post_process(input_data):
    masks = [[0, 1, 2], [3, 4, 5], [6, 7, 8]]
    anchors = [[199, 371], [223, 481], [263, 428], [278, 516], [320, 539], [323, 464], [361, 563], [402, 505], [441, 584]]

    boxes, classes, scores = [], [], []
    for input, mask in zip(input_data, masks):
        b, c, s = process(input, mask, anchors)
        b, c, s = filter_boxes(b, c, s)
        boxes.append(b)
        classes.append(c)
        scores.append(s)

    boxes = np.concatenate(boxes)
    boxes = xywh2xyxy(boxes)
    classes = np.concatenate(classes)
    scores = np.concatenate(scores)

    nboxes, nclasses, nscores = [], [], []
    for c in set(classes):
        inds = np.where(classes == c)
        b = boxes[inds]
        c = classes[inds]
        s = scores[inds]

        keep = nms_boxes(b, s)

        nboxes.append(b[keep])
        nclasses.append(c[keep])
        nscores.append(s[keep])

    if not nclasses and not nscores:
        return None, None, None

    boxes = np.concatenate(nboxes)
    classes = np.concatenate(nclasses)
    scores = np.concatenate(nscores)

    return boxes, classes, scores


def draw(image, boxes, scores, classes, fps):
    """Draw the boxes on the image.
    # Argument:
        image: original image.
        boxes: ndarray, boxes of objects.
        classes: ndarray, classes of objects.
        scores: ndarray, scores of objects.
        fps: int.
        all_classes: all classes name.
    """
    for box, score, cl in zip(boxes, scores, classes):
        top, left, right, bottom = box
        print('class: {}, score: {}'.format(CLASSES[cl], score))
        print('box coordinate left,top,right,down: [{}, {}, {}, {}]'.format(top, left, right, bottom))
        top = int(top)
        left = int(left)
        right = int(right)
        bottom = int(bottom)

        cv2.rectangle(image, (top, left), (right, bottom), (255, 0, 0), 2)
        cv2.putText(image, '{0} {1:.2f}'.format(CLASSES[cl], score),
                    (top, left - 6),
                    cv2.FONT_HERSHEY_SIMPLEX,
                    0.6, (0, 0, 255), 2)

def letterbox(im, new_shape=(640, 640), color=(0, 0, 0)):
    # Resize and pad image while meeting stride-multiple constraints
    shape = im.shape[:2]  # current shape [height, width]
    if isinstance(new_shape, int):
        new_shape = (new_shape, new_shape)

    # Scale ratio (new / old)
    r = min(new_shape[0] / shape[0], new_shape[1] / shape[1])

    # Compute padding
    ratio = r, r  # width, height ratios
    new_unpad = int(round(shape[1] * r)), int(round(shape[0] * r))
    dw, dh = new_shape[1] - new_unpad[0], new_shape[0] - new_unpad[1]  # wh padding

    dw /= 2  # divide padding into 2 sides
    dh /= 2

    if shape[::-1] != new_unpad:  # resize
        im = cv2.resize(im, new_unpad, interpolation=cv2.INTER_LINEAR)
    top, bottom = int(round(dh - 0.1)), int(round(dh + 0.1))
    left, right = int(round(dw - 0.1)), int(round(dw + 0.1))
    im = cv2.copyMakeBorder(im, top, bottom, left, right, cv2.BORDER_CONSTANT, value=color)  # add border
    return im, ratio, (dw, dh)

# ==================================
# 如下为改动部分,主要就是去掉了官方 demo 中的模型转换代码,直接加载 rknn 模型,并将 RKNN 类换成了 rknn_toolkit2_lite 中的 RKNNLite 类
# ==================================

rknn = RKNNLite()

# load RKNN model
print('--> Load RKNN model')
ret = rknn.load_rknn(RKNN_MODEL)

# Init runtime environment
print('--> Init runtime environment')
# use NPU core 0 1 2
ret = rknn.init_runtime(core_mask=RKNNLite.NPU_CORE_0_1_2)
if ret != 0:
    print('Init runtime environment failed!')
    exit(ret)
print('done')

# Create a VideoCapture object and read from input file
# If the input is the camera, pass 0 instead of the video file name
cap = cv2.VideoCapture(0)

# Check if camera opened successfully
if (cap.isOpened()== False):
  print("Error opening video stream or file")

# Read until video is completed
while(cap.isOpened()):
    start = dt.datetime.utcnow()
    # Capture frame-by-frame
    ret, img = cap.read()
    if not ret:
        break

    img = cv2.cvtColor(img, cv2.COLOR_BGR2RGB)
    img = cv2.resize(img, (IMG_SIZE, IMG_SIZE))

    # Inference
    #print('--> Running model')
    outputs = rknn.inference(inputs=[img])
    #print('done')

    # post process
    input0_data = outputs[0]
    input1_data = outputs[1]
    input2_data = outputs[2]

    input0_data = input0_data.reshape([3, -1]+list(input0_data.shape[-2:]))
    input1_data = input1_data.reshape([3, -1]+list(input1_data.shape[-2:]))
    input2_data = input2_data.reshape([3, -1]+list(input2_data.shape[-2:]))

    input_data = list()
    input_data.append(np.transpose(input0_data, (2, 3, 0, 1)))
    input_data.append(np.transpose(input1_data, (2, 3, 0, 1)))
    input_data.append(np.transpose(input2_data, (2, 3, 0, 1)))

    boxes, classes, scores = yolov5_post_process(input_data)
    duration = dt.datetime.utcnow() - start
    fps = round(1000000 / duration.microseconds)

    # draw process result and fps
    img_1 = cv2.cvtColor(img, cv2.COLOR_RGB2BGR)
    cv2.putText(img_1, f'fps: {fps}',
            (20, 20),
            cv2.FONT_HERSHEY_SIMPLEX,
            0.6, (0, 125, 125), 2)
    if boxes is not None:
        draw(img_1, boxes, scores, classes, fps)

    # show output
    cv2.imshow("post process result", img_1)

    # Press Q on keyboard to  exit
    if cv2.waitKey(25) & 0xFF == ord('q'):
        break

# When everything done, release the video capture object
cap.release()

# Closes all the frames
cv2.destroyAllWindows()
到了这一步,还没完,如果要想要让NPU充分跑起来的话,需要给CPU和NPU进行定频操作。
CPU、NPU定频操作
这里呢我是根据RKNPU的官方文档摘抄下来的一些命令。
先进入root用户,直接输入su就可以了。
查看 CPU 频率:
# 方法一
cat /sys/devices/system/cpu/cpu0/cpufreq/scaling_cur_freq
# 方法二
cat /sys/kernel/debug/clk/clk_summary | grep arm
固定 CPU 频率
# 查看 CPU 可用频率
cat /sys/devices/system/cpu/cpufreq/policy0/scaling_available_frequencies
# 输出 => 408000 600000 816000 1008000 1200000 1416000 1608000 1800000

# 设置 CPU 频率,例如设置为最高的 1.8GHz
echo userspace > /sys/devices/system/cpu/cpufreq/policy0/scaling_governor
echo 1800000 > /sys/devices/system/cpu/cpufreq/policy0/scaling_setspeed
查看 NPU 频率(rk3588 专用)
cat /sys/class/devfreq/fdab0000.npu/cur_freq固定 NPU 频率(rk3588 专用)
# 查看 NPU 可用频率
cat /sys/class/devfreq/fdab0000.npu/available_frequencies
# => 300000000 400000000 500000000 600000000 700000000 800000000 900000000 1000000000
# 设置 NPU 频率,例如设为最高的 1 GHz
echo userspace > /sys/class/devfreq/fdab0000.npu/governor
echo 1000000000 > /sys/kernel/debug/clk/clk_npu_dsu0/clk_rate
不过要注意的一点是,在 NPU 驱动 0.7.2 版本之后,需要先打开 NPU 电源,才能进行频率设置 。
我经过实践发现,如果这一次把CPU给定频了的话,下一次再开机的话,CPU就回到了原来的频率,所以这里我学了一些shell知识,创建了两个.sh文件,这样每次就不需要我亲自来开启了。
第一个是root_set.sh
#!/usr/bin/expect

set password "orangepi"

spawn su root -c "/home/orangepi/NPU_run.sh"

expect "密码:"
send "$password\r"

interact
第二个是NPU_run.sh
#!/bin/bash
#sudo apt update
echo userspace > /sys/devices/system/cpu/cpufreq/policy0/scaling_governor
echo 1800000 > /sys/devices/system/cpu/cpufreq/policy0/scaling_setspeed
echo userspace > /sys/devices/system/cpu/cpufreq/policy4/scaling_governor
echo 2400000 > /sys/devices/system/cpu/cpufreq/policy4/scaling_setspeed
echo userspace > /sys/devices/system/cpu/cpufreq/policy6/scaling_governor
echo 2400000 > /sys/devices/system/cpu/cpufreq/policy6/scaling_setspeed
echo "CPU is done"
cat /sys/devices/system/cpu/cpufreq/policy0/cpuinfo_cur_freq
cat /sys/devices/system/cpu/cpufreq/policy4/cpuinfo_cur_freq
cat /sys/devices/system/cpu/cpufreq/policy6/cpuinfo_cur_freq
通过对root_set.sh的调用,我们可以让他自动开启CPU定频,同时给我们返回定频之后CPU的频率方便我们检查。
定频之后,我们的NPU就能加速到50FPS左右了
博主也是个小白,如果有不对的地方,欢迎大家评论指出,同时制作不易,希望大家给个三连支持一下。