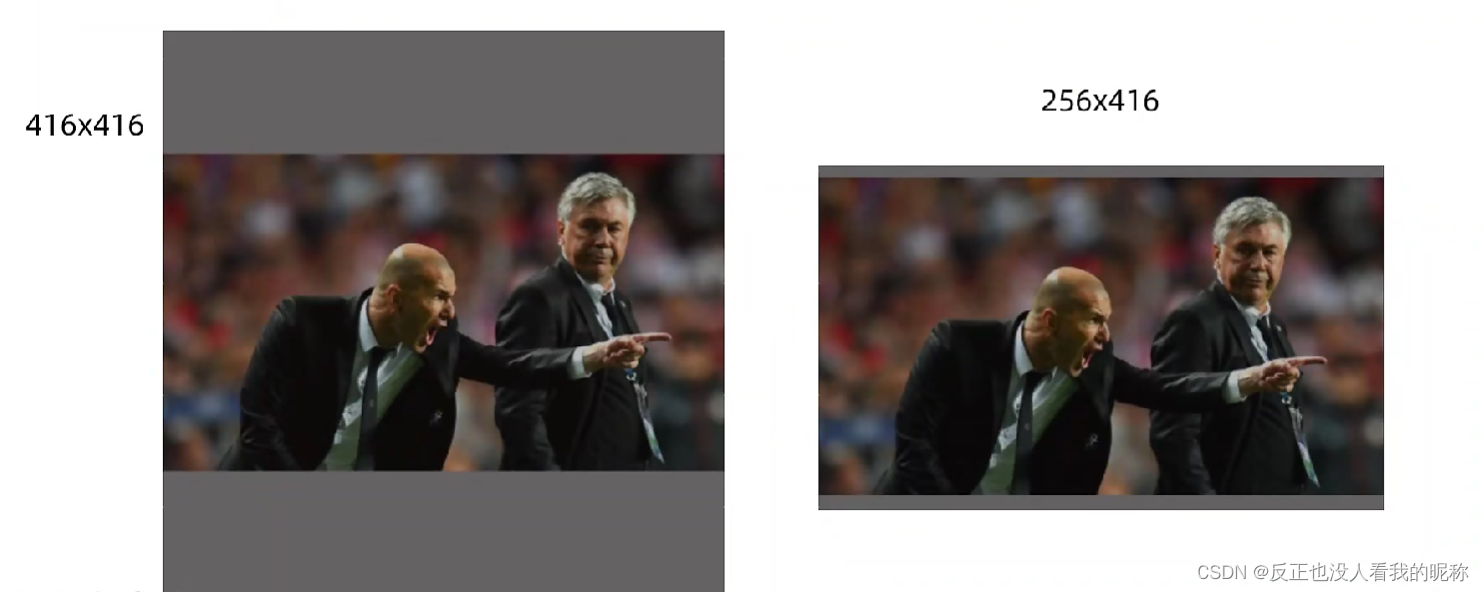
当我们把一个图片送到网络这种进行推理预测的时候,如果这个图片和网络指定的宽高不一致,一般的网络就会直接报错了,如果按照正常处理用resize直接变换,就会导致变换后的图像的变形,导致特征点的失真。一般来说有两种解决办法:
一种是扩充成416*416的正方形大小的,一种是扩充成256*416的长方形大小 。在yolov5中采用的是第二种。
这个功能的相关代码是在./yolov5_master/utils/augmentations.py这个文件下(我的yolov5的版本是5.0的,早期因为代码量少,这一部分功能他放在了dataset.py这个文件里):
具体代码解析
# 图像缩放:保持图像的宽高比,剩下的用灰度填充
def letterbox(im, new_shape=(640, 640), color=(114, 114, 114), auto=True, scaleFill=False, scaleup=True, stride=32):
    """
    im : 输入图片
    new_shape : 推理图片大小  默认640,640
    color : 填充颜色, 默认的(114, 114, 114)为灰色
    auto : 是否获取最小矩形填充
    scaleFill : 是否填充
    scaleup : 是否进行上采样
    """
    # Resize and pad image while meeting stride-multiple constraints
    # 切片操作,只取宽高   (bs, c, h, w) -> (h, w)
    shape = im.shape[:2]  # current shape [height, width]

    # 将预设的推理大小,进行赋值
    if isinstance(new_shape, int):
        new_shape = (new_shape, new_shape)

    # Scale ratio (new / old)
    # r 缩放因子(倍数) (设定的大小的长宽 和 原图的长宽 分别进行除法, 取最小倍数)
    r = min(new_shape[0] / shape[0], new_shape[1] / shape[1])
    """
    我们缩放的时候,如果没有设置上采样(放大),就只进行下采样(缩小)
    因为上采样会导致图像的模糊,在训练时影响性能
    """
    # 如果不进行上采样(放大),  再判断一次是 放大还是缩小,如果是缩小则保持原图
    if not scaleup:  # only scale down, do not scale up (for better val mAP)
        r = min(r, 1.0)


    # Compute padding   计算填充
    # ratio 宽高咱得同时放大,做一个元组出来
    ratio = r, r  # width, height ratios
    new_unpad = int(round(shape[1] * r)), int(round(shape[0] * r))
    # 计算出长宽需要填充的具体值
    dw, dh = new_shape[1] - new_unpad[0], new_shape[0] - new_unpad[1]  # wh padding
    # 如果auto为true   则重新计算出最小的矩形填充的值
    if auto:  # minimum rectangle
        dw, dh = np.mod(dw, stride), np.mod(dh, stride)  # wh padding
    # 是否填充,如果不填充,那么直接暴力缩放
    elif scaleFill:  # stretch
        dw, dh = 0.0, 0.0
        new_unpad = (new_shape[1], new_shape[0])
        ratio = new_shape[1] / shape[1], new_shape[0] / shape[0]  # width, height ratios
    # 计算上下左右填充的大小
    dw /= 2  # divide padding into 2 sides
    dh /= 2

    # 直接用cv的热size....
    if shape[::-1] != new_unpad:  # resize
        im = cv2.resize(im, new_unpad, interpolation=cv2.INTER_LINEAR)
    # 计算出是从上下左右哪一个方向填充,填充的坐标是多少
    top, bottom = int(round(dh - 0.1)), int(round(dh + 0.1))
    left, right = int(round(dw - 0.1)), int(round(dw + 0.1))
    # 给图片添加边界。。。。
    im = cv2.copyMakeBorder(im, top, bottom, left, right, cv2.BORDER_CONSTANT, value=color)  # add border
    return im, ratio, (dw, dh)
非常简单直接的代码,逻辑也很简单粗暴。