安装及引用
yarn add --save @fullcalendar/vue @fullcalendar/core
yarn add --save @fullcalendar/daygrid
yarn add --save @fullcalendar/timegrid
yarn add --save @fullcalendar/interaction
import FullCalendar from '@fullcalendar/vue'
import dayGridPlugin from '@fullcalendar/daygrid'
import interactionPlugin from '@fullcalendar/interaction'
import timeGridPlugin from '@fullcalendar/timegrid'
常用属性
更多属性可以看官网或者其它文章,这里只写了我用到的
 calendarOptions: {

     // FullCalendar的配置
        plugins: [dayGridPlugin, interactionPlugin, timeGridPlugin], // 需要用哪个插件引入后放到这个数组里
        initialDate: new Date(), // 日历第一次加载时显示的初始日期。可以解析为Date的任何职包括ISO8601日期字符串,例如"2014-02-01"。
        initialView: 'timeGridWeek', // 日历加载时的初始视图,默认值为'dayGridMonth',可以为任何可用视图的值,如例如'dayGridWeek','timeGridDay','listWeek'
        locale: 'zh-cn', // 设置日历的语言,中文为 “zh-cn”
        firstDay: new Date().getDay(), // 设置一周中显示的第一天是哪天,周日是0,周一是1,类推  new Date().getDay()当前天
        allDaySlot: false,//是否显示日历上方的allDay
        weekNumberCalculation: 'ISO', // 指定"ISO"结果为ISO8601周数。指定"ISO"将firstDay的默认值更改为1(Monday)
        selectable: true, // 是否可以选中日历格
        selectOverlap: false, // 是否允许重叠
        slotEventOverlap: false, // 相同时间段的多个日程视觉上是否允许重叠,默认true允许
        eventOverlap: false, // 拖拽时是否重叠
        nowIndicator: true, // 当前的时间线显示,为true时当前小时那一格有个红线,并且有红三角
        aspectRatio: "2.0", // 设置日历的宽高比率
        buttonText: {

     // 文本将显示在headerToolbar / footerToolbar的按钮上。不支持HTML注入。所有特殊字符将被转义。
          today: '今天',
          month: '月',
          week: '周',
          day: '天'
        },
        headerToolbar: {

     // 在日历顶部定义按钮和标题。将headerToolbar选项设置为false不会显示任何标题工具栏。可以为对象提供属性start/center/end或left/center/right。这些属性包含带有逗号/空格分隔值的字符串。用逗号分隔的值将相邻显示。用空格分隔的值之间会显示一个很小的间隙。
          left: 'today next',
          center: 'title',
          right: 'confirmBtn'
        },
        eventTimeFormat: {

     // 在每个事件上显示的时间的格式
          hour: 'numeric', // numeric:2022,2-digit:22
          minute: '2-digit',
          meridiem: false,
          hour12: false // 设置时间为24小时
        },
        events: [], // 日历上的事件
        customButtons: {

     // 自定义按钮
          confirmBtn: {


            text: '确定',
            click: this.confirm
          }
        },
        businessHours: undefined,
        // select: this.handleSelect,
        // selectAllow: this.handlerAllow,
        // eventClick: this.cancelClick, // 点击事件时,触发该回调
        // eventMouseLeave: this.handleDateHover, // 停止拖拽
        // dateClick: this.handleDateClick // 当用户单击日期或时间时触发
        dateClick: this.handleEvent, // 点击日期
        eventDrop: this.eventDrop, // 拖拽停止触发的事件
        eventConstraint: {

     // 设置可以拖放的时间段
          start: this.transformDate(new Date(new Date().getTime()), 2),
          end: this.transformDate(new Date(new Date().getTime()), 3),
        },
        selectConstraint: {

     // 设置可以拖动创建新事件的时间段
          start: this.transformDate(new Date(new Date().getTime()), 2),
          end: this.transformDate(new Date(new Date().getTime()), 3),
        },
      },
日历顶部增加按钮
	headerToolbar: {

     // 在日历顶部定义按钮和标题。将headerToolbar选项设置为false不会显示任何标题工具栏。可以为对象提供属性start/center/end或left/center/right。这些属性包含带有逗号/空格分隔值的字符串。用逗号分隔的值将相邻显示。用空格分隔的值之间会显示一个很小的间隙。
          left: 'today next',
          center: 'title',
          right: 'confirmBtn' // 这里将新建按钮设置在右边
        },
 	customButtons: {

     // 自定义按钮
          confirmBtn: {


            text: '确定', // 按钮文字
            click: this.confirm // 按钮点击事件
          }

点击下周或今天获得起始时间
给对应按钮绑定事件获取activeStart和activeEnd
	customButtons: {

     // 自定义按钮
          next: {


            click: this.nextWeek
          },
          today: {


            text: '今天',
            click: this.curWeek
          },
        },
	nextWeek () {

     // 下周
      this.calendarApi.next() // this.calendarApi = this.$refs.fullCalendar.getApi()
      const startTime = this.calendarApi.view.activeStart // 起始时间
      const endTime = calendarApi.view.activeEnd // 终止时间
    },

    curWeek () {

     // 本周
      this.calendarApi.today() // this.calendarApi = this.$refs.fullCalendar.getApi()
      const startTime = this.calendarApi.view.activeStart
      const endTime = calendarApi.view.activeEnd;
    }
时间格式处理相关
其实就是字符串的拼接
	// 时间格式处理,status为0只返回2022-10-28,为1返回2022-10-28 20:30,为2返回2022-10-28 20:30:00,为3返回2122-10-28 20:30:00
    transformDate (date, status) {


      let sign2 = ":"
      let year = date.getFullYear() // 年
      let month = date.getMonth() + 1 // 月
      let day = date.getDate() // 日
      let hour = date.getHours() // 时
      let minutes = date.getMinutes() // 分
      // 给一位数的数据前面加 “0”
      if (month >= 1 && month <= 9) {


        month = "0" + month
      }
      if (day >= 0 && day <= 9) {


        day = "0" + day
      }
      if (hour >= 0 && hour <= 9) {


        hour = "0" + hour
      }
      if (minutes >= 0 && minutes <= 9) {


        minutes = "0" + minutes
      }
      if (status === 0) {


        return year + "-" + month + "-" + day
      }
      else if (status === 1) {


        return year + "-" + month + "-" + day + " " + hour + sign2 + minutes
      } else if (status === 2) {


        return year + "-" + month + "-" + day + " " + hour + sign2 + minutes + sign2 + "00"
      } else if (status === 3) {


        year += 100
        return year + "-" + month + "-" + day + " " + hour + sign2 + minutes
      }
    },
创建新事件
看了很多文章都是用calendarOptions.events.push(newEvent),我的实践是如果点击一个时间段,侧边滚动轴会跳到中间。如果选择较早时间段,滚动轴跳到中间,体验显然不好,所以这里用的是:this.calendarApi.view.calendar
this.calendarFunc = this.calendarApi.view.calendar
this.calendarFunc.addEvent(newEvent)// 添加事件
this.calendarFunc.getEventById('事件id').remove()//移除事件
删除全部事件
我这边是把每条获取到的数据都加上id,id等于下标,移除的时候就for循环删除
	let i = 0
	list.forEach((item) => {

     // 最开始获取事件
        item['color'] = 'gray'
        item['editable'] = false
        item['overlap'] = false
        item['title'] = '不可选择时间'
        item['id'] = i++ // id等于数组下标
        this.calendarFunc.addEvent(item)
      })
 		let len = this.calendarFunc.getEvents().length // 获取事件数量
        for (let i = 0; i < len; i++) {

     // for循环逐个删除
          this.calendarFunc.getEventById(i).remove()
        }
一次只能选择一个时间段
思路是固定事件列表数量,比如从后端获得了20条已创建事件,因为一次只能选择一个时间段,那么用户的操作只是在对第21条事件进行创建删除
将事件数量作为事件id,每次点击判断是否有这个id的事件,如果有,就删除这个事件,创建新事件,否则直接创建新事件,这样怎么改都是对最后一条事件进行创建删除,实现功能
	if (this.calendarFunc.getEventById(this.listLength)) {


          this.calendarFunc.getEventById(this.listLength).remove()
        }
    this.calendarFunc.addEvent(newEvent)
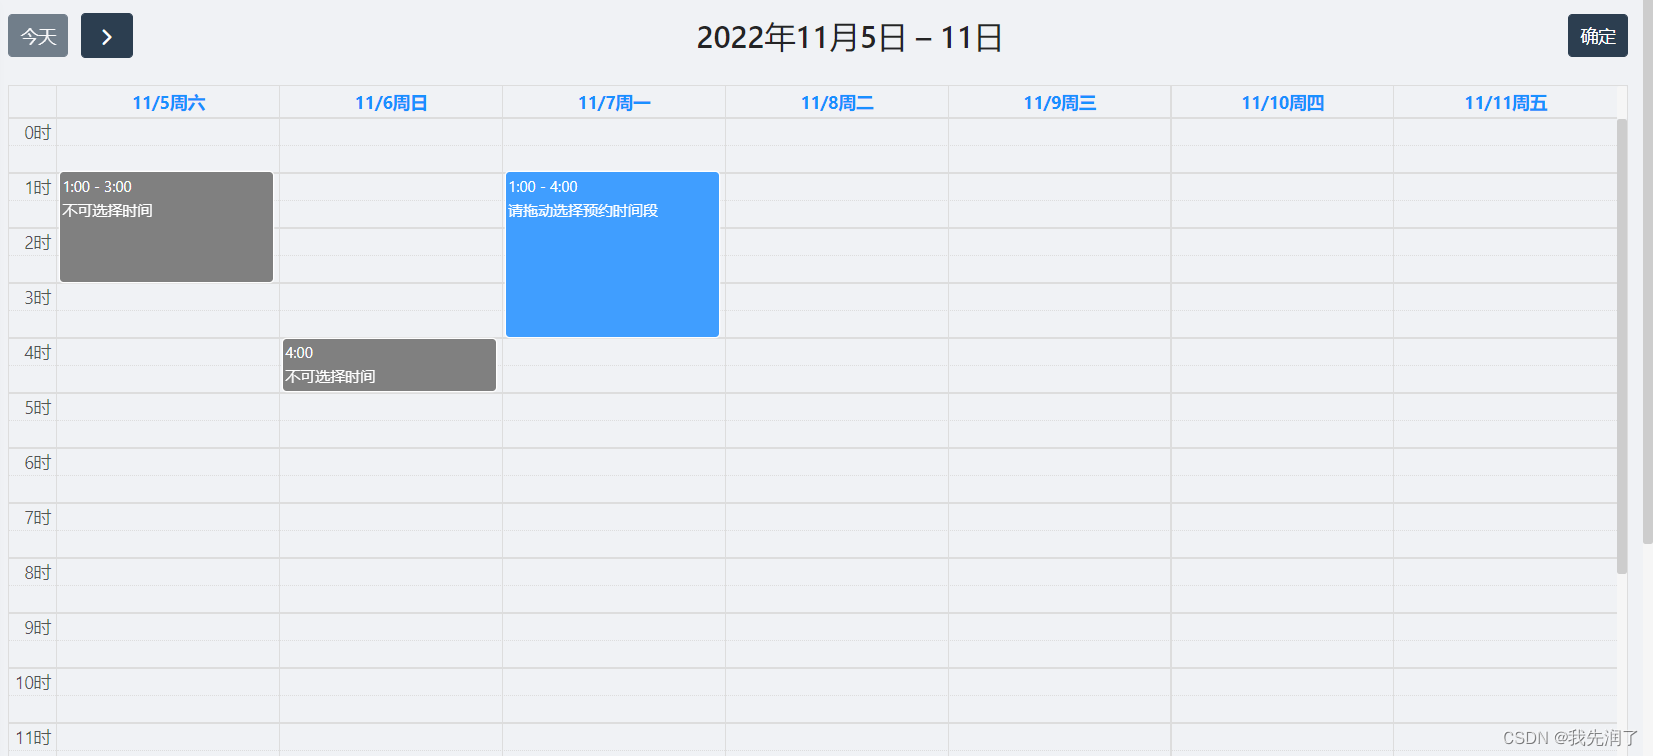
被预约时间段置灰,不可编辑
后端返回的列表:

实现功能需要给每个对象添加不可编辑,不可重叠,颜色为灰色的属性,再添加进this.calendarFunc
list.forEach((item) => {

     // 被预约的时间段
        item['color'] = 'gray'
        item['editable'] = false // 不可编辑
        item['overlap'] = false // 不可重叠
        item['title'] = '不可选择时间'
        this.calendarFunc.addEvent(item)
      })
过去时间不能选
过去时间不能选,相当于只能在当前时间后拖放及创建新事件
		eventConstraint: {

     // 设置可以拖放的时间段为当下到100年后
          start: this.transformDate(new Date(new Date().getTime()), 2),
          end: this.transformDate(new Date(new Date().getTime()), 3),
        },
        selectConstraint: {

     // 设置可以拖动创建新事件的时间段为当下到100年后
          start: this.transformDate(new Date(new Date().getTime()), 2),
          end: this.transformDate(new Date(new Date().getTime()), 3),
        },
但是我试过后发现虽然eventConstraint及selectConstraint中的事件不能拖拽到过去时间但是过去时间还是能点击创建新事件,所以对dateClick: this.handleEvent中的handleEvent时间做了判断
handleEvent (info) {

     // 事件处理
      if (info.date > new Date().getTime()) {

     // 过去时间段不可预约
      }
    },
更改当天背景色
可以在控制台找到对应的部分然后用/deep/更改对应class的内容
<style lang="less" scoped>
/deep/ .fc .fc-timegrid-col.fc-day-today {


  background-color: rgb(240, 242, 245);
}
/deep/ .fc .fc-daygrid-day.fc-day-today {


  background-color: rgb(240, 242, 245);
}
</style>