文章目录
前言
c++单文件部署之使用onnxruntime
通过代码熟悉onnxrununtime用于检测部署的整个流程
1.使用onnxruntime
在onnxruntime官网进行下载相应版本的压缩包:https://github.com/microsoft/onnxruntime/releases
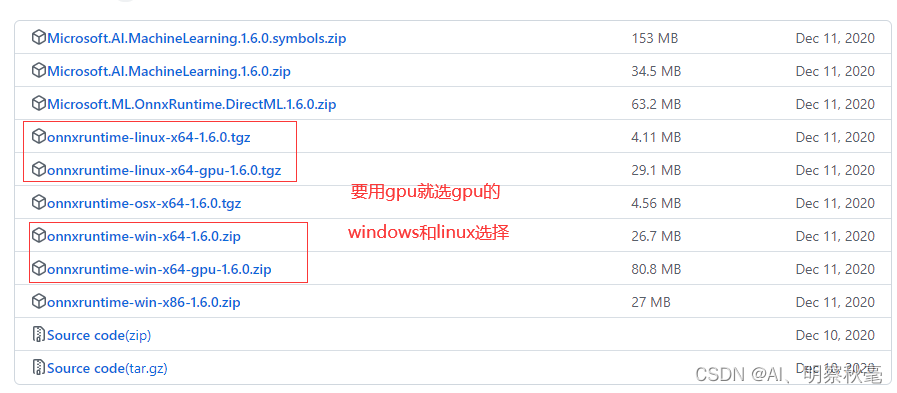
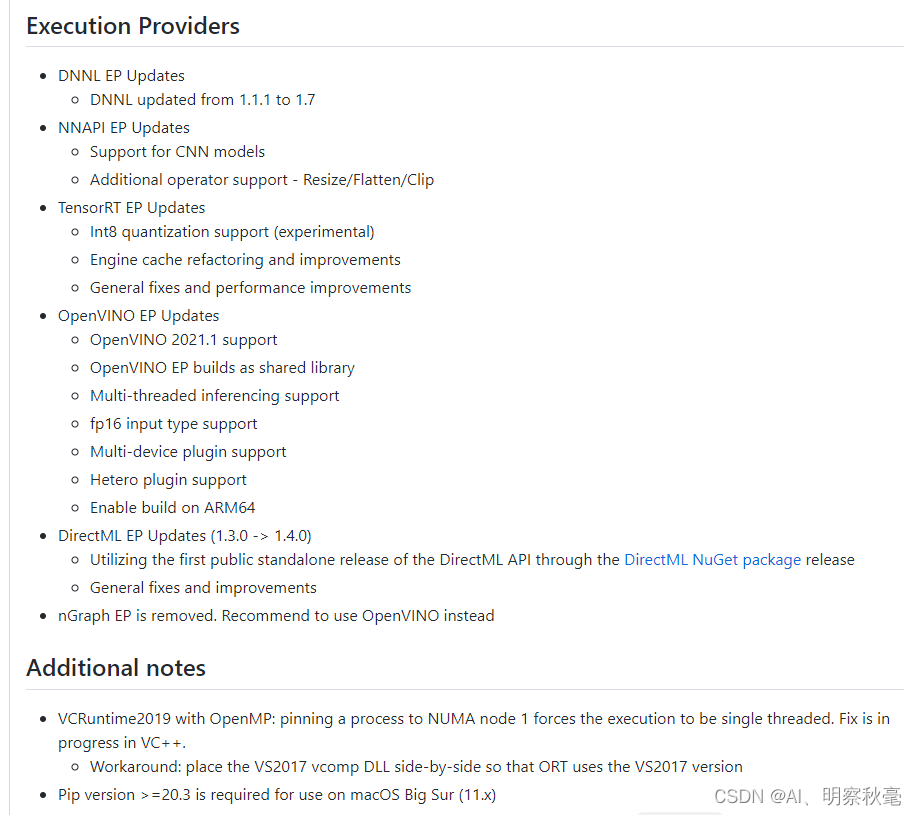
可以看看前面的提供的支持:
将下载好的压缩包解压,不用编译,直接在virtual stdio或者vscode上导入相应的头文件目录和库目录以及相应的依赖。这个百度解决,virtual stdio配置更容易,vscode相对要复杂些,Linux上更常用vscode,而且vscode更轻量也可以远程。当然可以两个都使用。
2 使用onnxruntime进行c++部署
对于里面一些不懂的api或者模块,建议自己查看源码或者去官网技术文档查看:https://onnxruntime.ai/docs/api/c/struct_ort_api.html
1.使用onnxruntime的主要头文件
#include <fstream>
#include <sstream>
#include <iostream>
#include <opencv2/imgproc.hpp>
#include <opencv2/highgui.hpp>
#include <cuda_provider_factory.h>   // 提供cuda加速
#include <onnxruntime_cxx_api.h>	 // C或c++的api

// 命名空间
using namespace std;
using namespace cv;
using namespace Ort;
2.自定义参数配置结构
// 自定义配置结构
struct Configuration
{


	public:
	float confThreshold; // Confidence threshold
	float nmsThreshold;  // Non-maximum suppression threshold
	float objThreshold;  //Object Confidence threshold
	string modelpath;
};

// 定义BoxInfo类型
typedef struct BoxInfo
{


	float x1;
	float y1;
	float x2;
	float y2;
	float score;
	int label;
} BoxInfo;
3.YOLOv5模块
在yolov5类里,定义一些需要使用的成员函数和属性
class YOLOv5
{


public:
	YOLOv5(Configuration config);
	void detect(Mat& frame);
private:
	float confThreshold;
	float nmsThreshold;
	float objThreshold;
	int inpWidth;
	int inpHeight;
	int nout;
	int num_proposal;
	int num_classes;
	string classes[80] = {

    "person", "bicycle", "car", "motorbike", "aeroplane", "bus",
							"train", "truck", "boat", "traffic light", "fire hydrant",
							"stop sign", "parking meter", "bench", "bird", "cat", "dog",
							"horse", "sheep", "cow", "elephant", "bear", "zebra", "giraffe",
							"backpack", "umbrella", "handbag", "tie", "suitcase", "frisbee",
							"skis", "snowboard", "sports ball", "kite", "baseball bat",
							"baseball glove", "skateboard", "surfboard", "tennis racket",
							"bottle", "wine glass", "cup", "fork", "knife", "spoon", "bowl",
							"banana", "apple", "sandwich", "orange", "broccoli", "carrot",
							"hot dog", "pizza", "donut", "cake", "chair", "sofa", "pottedplant",
							"bed", "diningtable", "toilet", "tvmonitor", "laptop", "mouse",
							"remote", "keyboard", "cell phone", "microwave", "oven", "toaster",
							"sink", "refrigerator", "book", "clock", "vase", "scissors",
							"teddy bear", "hair drier", "toothbrush"};
	const bool keep_ratio = true;
	vector<float> input_image_;		// 输入图片
	void normalize_(Mat img);		// 归一化函数
	void nms(vector<BoxInfo>& input_boxes);
	Mat resize_image(Mat srcimg, int *newh, int *neww, int *top, int *left); // 预处理

	Env env = Env(ORT_LOGGING_LEVEL_ERROR, "yolov5-6.1"); //初始化环境,
	Session *ort_session = nullptr;    //初始化Session指针选项
	SessionOptions sessionOptions = SessionOptions();  //初始化Session对象
	//SessionOptions sessionOptions;
	vector<char*> input_names;  // 定义一个字符指针vector
	vector<char*> output_names; // 定义一个字符指针vector
	vector<vector<int64_t>> input_node_dims; // >=1 outputs  ,二维vector
	vector<vector<int64_t>> output_node_dims; // >=1 outputs
};
Env:
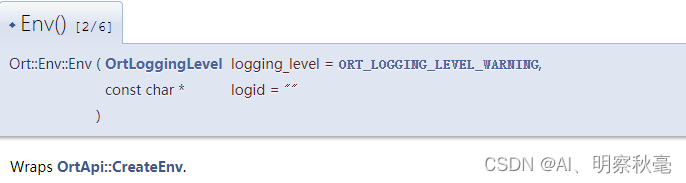
初始化
YOLOv5::YOLOv5(Configuration config)
{
this->confThreshold = config.confThreshold;
this->nmsThreshold = config.nmsThreshold;
this->objThreshold = config.objThreshold;
this->num_classes = sizeof(this->classes)/sizeof(this->classes[0]); // 类别数量
this->inpHeight = 640;
this->inpWidth = 640;
string model_path = config.modelpath;
//std::wstring widestr = std::wstring(model_path.begin(), model_path.end()); //用于UTF-16编码的字符
//gpu, https://blog.csdn.net/weixin_44684139/article/details/123504222
//CUDA加速开启,选择gpu
OrtSessionOptionsAppendExecutionProvider_CUDA(sessionOptions, 0);
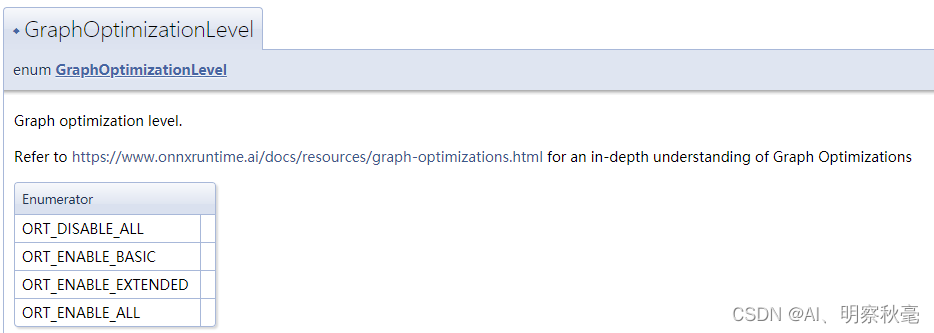
sessionOptions.SetGraphOptimizationLevel(ORT_ENABLE_BASIC); //设置图优化类型
//ort_session = new Session(env, widestr.c_str(), sessionOptions); // 创建会话,把模型加载到内存中
//ort_session = new Session(env, (const ORTCHAR_T*)model_path.c_str(), sessionOptions); // 创建会话,把模型加载到内存中
ort_session = new Session(env, (const char*)model_path.c_str(), sessionOptions);
size_t numInputNodes = ort_session->GetInputCount(); //输入输出节点数量
size_t numOutputNodes = ort_session->GetOutputCount();
AllocatorWithDefaultOptions allocator; // 配置输入输出节点内存
for (int i = 0; i < numInputNodes; i++)
{
input_names.push_back(ort_session->GetInputName(i, allocator)); // 内存
Ort::TypeInfo input_type_info = ort_session->GetInputTypeInfo(i); // 类型
auto input_tensor_info = input_type_info.GetTensorTypeAndShapeInfo(); //
auto input_dims = input_tensor_info.GetShape(); // 输入shape
input_node_dims.push_back(input_dims); // 保存
}
for (int i = 0; i < numOutputNodes; i++)
{
output_names.push_back(ort_session->GetOutputName(i, allocator));
Ort::TypeInfo output_type_info = ort_session->GetOutputTypeInfo(i);
auto output_tensor_info = output_type_info.GetTensorTypeAndShapeInfo();
auto output_dims = output_tensor_info.GetShape();
output_node_dims.push_back(output_dims);
}
this->inpHeight = input_node_dims[0][2];
this->inpWidth = input_node_dims[0][3];
this->nout = output_node_dims[0][2]; // 5+classes
this->num_proposal = output_node_dims[0][1]; // pre_box
}
SetGraphOptimizationLevel模块:
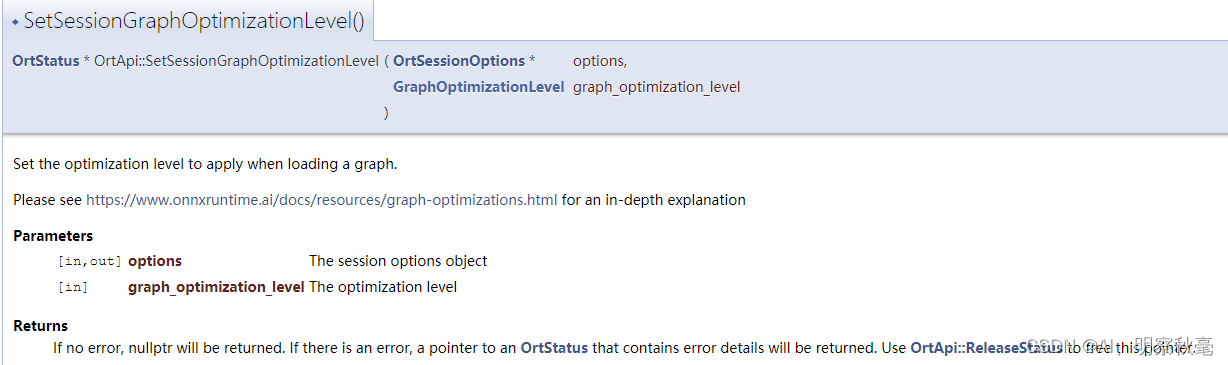
优化级别:
Session: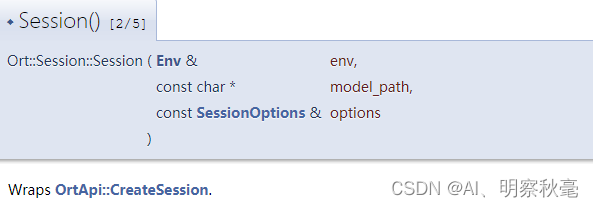
输入图像预处理
resize
resize图像尺寸和上篇博客使用opencv部署一样

Mat YOLOv5::resize_image(Mat srcimg, int *newh, int *neww, int *top, int *left)
{


	int srch = srcimg.rows, srcw = srcimg.cols;
	*newh = this->inpHeight;
	*neww = this->inpWidth;
	Mat dstimg;
	if (this->keep_ratio && srch != srcw) {


		float hw_scale = (float)srch / srcw;
		if (hw_scale > 1) {


			*newh = this->inpHeight;
			*neww = int(this->inpWidth / hw_scale);
			resize(srcimg, dstimg, Size(*neww, *newh), INTER_AREA);
			*left = int((this->inpWidth - *neww) * 0.5);
			copyMakeBorder(dstimg, dstimg, 0, 0, *left, this->inpWidth - *neww - *left, BORDER_CONSTANT, 114);
		}
		else {


			*newh = (int)this->inpHeight * hw_scale;
			*neww = this->inpWidth;
			resize(srcimg, dstimg, Size(*neww, *newh), INTER_AREA);
			*top = (int)(this->inpHeight - *newh) * 0.5;
			copyMakeBorder(dstimg, dstimg, *top, this->inpHeight - *newh - *top, 0, 0, BORDER_CONSTANT, 114);
		}
	}
	else {


		resize(srcimg, dstimg, Size(*neww, *newh), INTER_AREA);
	}
	return dstimg;
}
像素值归一化并将输入的bgr转成rgb
void YOLOv5::normalize_(Mat img)
{


	//    img.convertTo(img, CV_32F);
	int row = img.rows;
	int col = img.cols;
	this->input_image_.resize(row * col * img.channels());  // vector大小
	for (int c = 0; c < 3; c++)  // bgr
	{


		for (int i = 0; i < row; i++)  // 行
		{


			for (int j = 0; j < col; j++)  // 列
			{


				float pix = img.ptr<uchar>(i)[j * 3 + 2 - c];  // Mat里的ptr函数访问任意一行像素的首地址,2-c:表示rgb
				this->input_image_[c * row * col + i * col + j] = pix / 255.0; // 归一化
			}
		}
	}
}
onnxruntime推理
在对输入图片预处理后,不同于dnn的部署,ort这里要对输入先进行内存的分配。然后将输入数据变成Tensor类型。
void YOLOv5::detect(Mat& frame)
{
int newh = 0, neww = 0, padh = 0, padw = 0;
Mat dstimg = this->resize_image(frame, &newh, &neww, &padh, &padw);
this->normalize_(dstimg);
// 定义一个输入矩阵,int64_t是要符合下面输入参数时的类型
array<int64_t, 4> input_shape_{
1, 3, this->inpHeight, this->inpWidth };
//创建输入tensor
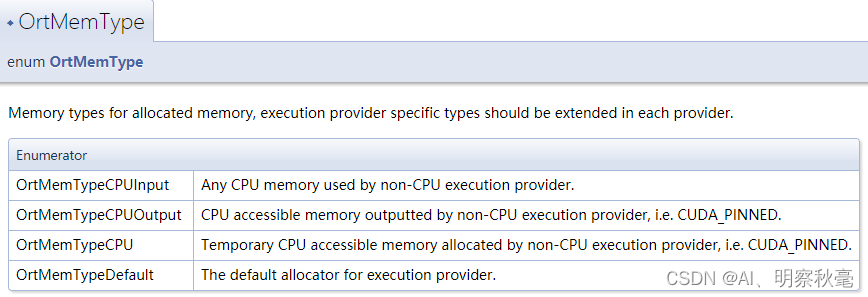
auto allocator_info = MemoryInfo::CreateCpu(OrtDeviceAllocator, OrtMemTypeCPU);
Value input_tensor_ = Value::CreateTensor<float>(allocator_info, input_image_.data(), input_image_.size(), input_shape_.data(), input_shape_.size());
// 开始推理
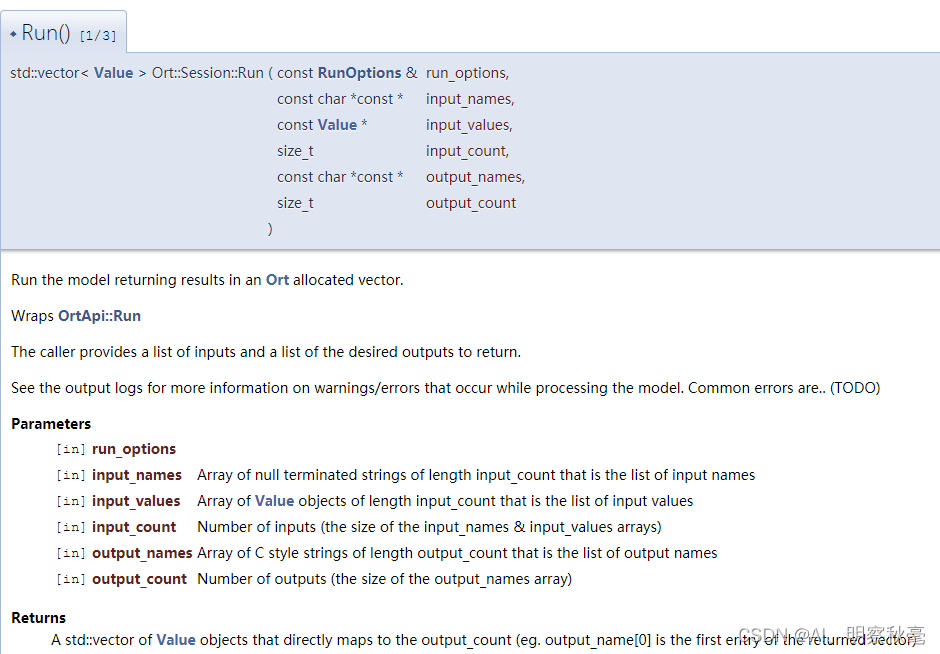
vector<Value> ort_outputs = ort_session->Run(RunOptions{
nullptr }, &input_names[0], &input_tensor_, 1, output_names.data(), output_names.size()); // 开始推理
/generate proposals
vector<BoxInfo> generate_boxes; // BoxInfo自定义的结构体
float ratioh = (float)frame.rows / newh, ratiow = (float)frame.cols / neww;
float* pdata = ort_outputs[0].GetTensorMutableData<float>(); // GetTensorMutableData
for(int i = 0; i < num_proposal; ++i) // 遍历所有的num_pre_boxes
{
int index = i * nout; // prob[b*num_pred_boxes*(classes+5)]
float obj_conf = pdata[index + 4]; // 置信度分数
if (obj_conf > this->objThreshold) // 大于阈值
{
// 求最大分数和索引
int class_idx = 0;
float max_class_socre = 0;
for (int k = 0; k < this->num_classes; ++k)
{
if (pdata[k + index + 5] > max_class_socre)
{
max_class_socre = pdata[k + index + 5];
class_idx = k;
}
}
max_class_socre *= obj_conf; // 最大的类别分数*置信度
if (max_class_socre > this->confThreshold) // 再次筛选
{
float cx = pdata[index]; //x
float cy = pdata[index+1]; //y
float w = pdata[index+2]; //w
float h = pdata[index+3]; //h
float xmin = (cx - padw - 0.5 * w)*ratiow;
float ymin = (cy - padh - 0.5 * h)*ratioh;
float xmax = (cx - padw + 0.5 * w)*ratiow;
float ymax = (cy - padh + 0.5 * h)*ratioh;
generate_boxes.push_back(BoxInfo{
xmin, ymin, xmax, ymax, max_class_socre, class_idx });
}
}
}
CreateCpu: 通过枚举参数列表,选择相应的输入参数给设备分配内存
OrtMemTypeCPU:非CPU执行提供程序分配的临时CPU可访问内存,即CUDA_PINNED。
Run:运行模型,返回Ort分配vector里的结果。
注意输入参数的类型,最好在定义的时候要符合输入类型标准。
nms代码
对应nms代码和python的一样,不过这里不是用加上偏移值进行多类别的nms,而是只对对同类的iou是否大于阈值来判断,对应方法二:yolov5的推理输出detect.py部分
void YOLOv5::nms(vector<BoxInfo>& input_boxes)
{


	sort(input_boxes.begin(), input_boxes.end(), [](BoxInfo a, BoxInfo b) {

     return a.score > b.score; }); // 降序排列
	vector<float> vArea(input_boxes.size());  // 面积
	for (int i = 0; i < input_boxes.size(); ++i)
	{


		vArea[i] = (input_boxes[i].x2 - input_boxes[i].x1 + 1)
			* (input_boxes[i].y2 - input_boxes[i].y1 + 1);
	}
	// 全初始化为false,用来作为记录是否保留相应索引下pre_box的标志vector
	vector<bool> isSuppressed(input_boxes.size(), false);
	for (int i = 0; i < input_boxes.size(); ++i)
	{


		if (isSuppressed[i]) {

     continue; }
		for (int j = i + 1; j < input_boxes.size(); ++j)
		{


			if (isSuppressed[j]) {

     continue; }
			float xx1 = max(input_boxes[i].x1, input_boxes[j].x1);
			float yy1 = max(input_boxes[i].y1, input_boxes[j].y1);
			float xx2 = min(input_boxes[i].x2, input_boxes[j].x2);
			float yy2 = min(input_boxes[i].y2, input_boxes[j].y2);

			float w = max(0.0f, xx2 - xx1 + 1);
			float h = max(0.0f, yy2 - yy1 + 1);
			float inter = w * h;	// 交集
			// 这里是对应yolov5里的nms,要进行多类别判断,只有同一类才进行iou计算
			if(input_boxes[i].label == input_boxes[j].label)
			{


				float ovr = inter / (vArea[i] + vArea[j] - inter);  // 计算iou
				if (ovr >= this->nmsThreshold)
				{


					isSuppressed[j] = true;
				}
			}
		}
	}
	// return post_nms;
	int idx_t = 0;
    // remove_if()函数 remove_if(beg, end, op) //移除区间[beg,end)中每一个“令判断式:op(elem)获得true”的元素
	input_boxes.erase(remove_if(input_boxes.begin(), input_boxes.end(), [&idx_t, &isSuppressed](const BoxInfo& f) {

     return isSuppressed[idx_t++]; }), input_boxes.end());
}
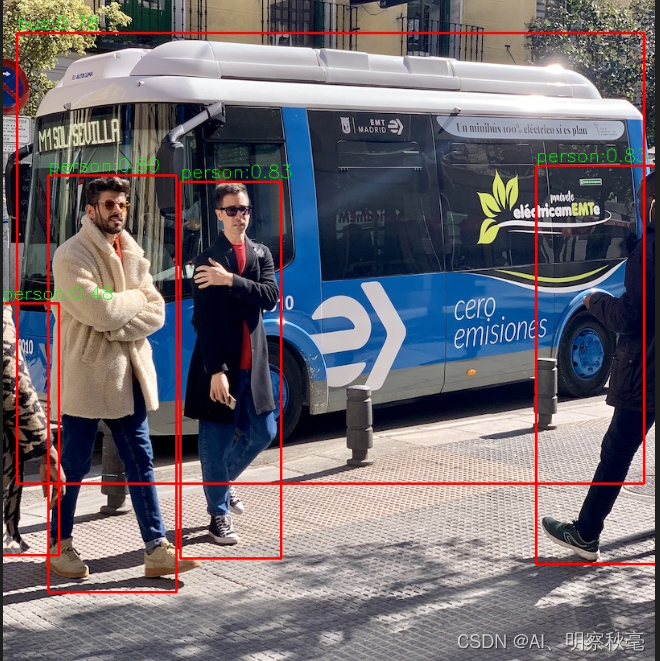
可视化输出结果
图:
时间:


总结
c++部署
整个代码放在:https://github.com/yzy12-max/yolov5_deploy
参考:
https://onnxruntime.ai/docs/api/c/struct_ort_api.html
https://github.com/hpc203/yolov5-v6.1-opencv-onnxrun