20230512补充,直接编译ONNXRuntime 的源代码,实现使用不同推理引擎(尤其是TensorRT)作为后端的ONNXRuntime。
- 文档:TensorRT Execution Provider,需要版本对应
- 当然,也可以使用别的推理引擎作为后端:ONNX Runtime Execution Providers
- 目前支持的后端如下:

- 版本自行查看,我验证成功 ONNX Runtime 1.12.1 版本,安装 TensorRT 8.4.3 | CUDA 11.4.4 | cuDNN 8.4.1,
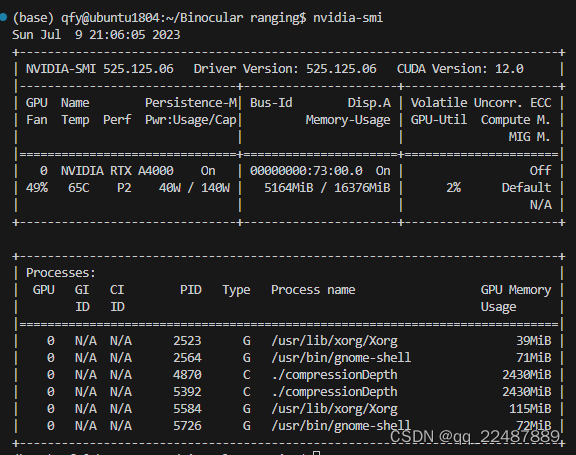
- 本来是 525.60 驱动版本,但是我重新安装 找不到了,智能安装525.125版本,此处的CUDA是驱动支持的最高版本!!
- 参考:
TensorRT Execution Provider
CUDA Execution Provider
tensorrt配置代码如下,只能支持FP16量化,不支持INT8量化。
    OrtTensorRTProviderOptions trt_options{

    };
    trt_options.device_id = 0;
    trt_options.has_user_compute_stream = 1;
    trt_options.trt_max_partition_iterations = 1000;
    trt_options.trt_min_subgraph_size = 1;
    trt_options.trt_engine_decryption_enable = false;
    trt_options.trt_dla_core = 0;
    trt_options.trt_dla_enable = 0;
    trt_options.trt_fp16_enable = 1;
    trt_options.trt_int8_enable = 0;
    trt_options.trt_max_workspace_size = 2147483648;
    trt_options.trt_int8_use_native_calibration_table = 1;
    trt_options.trt_engine_cache_enable = 1;
    trt_options.trt_engine_cache_path = "./trtcache";
    trt_options.trt_dump_subgraphs = 1;
    session_options.AppendExecutionProvider_TensorRT(trt_options);
可以使用Linux(x86_64)版本安装
可以通过 nvidia-smi 命令查看当前的驱动版本和最高支持的 CUDA 版本。
Note: Because of CUDA Minor Version Compatibility, Onnx Runtime built with CUDA 11.4 should be compatible with any CUDA 11.x version. Please reference Nvidia CUDA Minor Version Compatibility.
- 注意:
在 Ubuntu 中编译以 TensorRT 为后端的 ONNX Runtime,需要安装 cuDNN developer 版本,因为它包含了
cuDNN 的头文件和动态库,这些文件用于编译和链接使用 cuDNN 的代码。
注意,使用deb包安装cuDNN,cuDNN developer 版本与 cuDNN runtime版本不同,前者是包含开发所需的文件,而后者仅包含运行时库文件。在安装时,请确保选择正确的版本,但是安装dev版本必须先安装runtime版本。
在 Ubuntu 系统上使用 deb 包安装 cuDNN 后,cuDNN 库的文件通常会被安装在 /usr/lib/x86_64-linux-gnu/ 目录下。具体而言,libcudnn.so 会被安装在 /usr/lib/x86_64-linux-gnu/目录下,而头文件会被安装在 /usr/include/ 目录下。
下面 onnxruntime 官方文档的 docs 表格的版本对应并不准确!!!!!!!!!!!!!!!!!
ONNX Runtime TensorRT CUDA的版本对应最好参考 TensorRT 的文档和ONNX Runtime 的 github仓库:
TensorRT Release Notes
ONNX Runtime Release


- 补充知识
- IR-Intermediate Representation(中间表示):AI框架中图层IR的分析
- 算子(operator):什么是算子?
- ONNX opset(转换时参考的 ONNX 算子集 版本,默认 9):模型部署入门教程(三):PyTorch 转 ONNX 详解
- ONNX官网:Open Neural Network Exchange
- ONNX Runtime 官网:Optimize and Accelerate Machine Learning Inferencing and Training
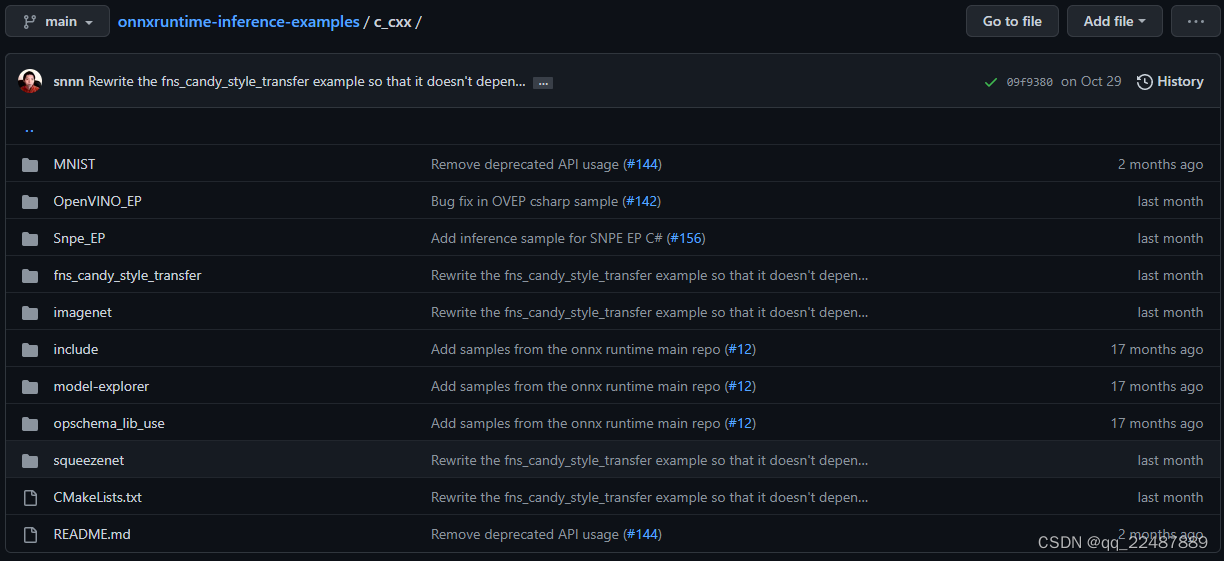
- GitHub上对每种语言的使用介绍,以及一些example:microsoft / nonnxruntime-inference-examples,其中的 c_cxx 文件夹就是 C++ 的 example(onnxruntime-inference-examples/c_cxx/)。
- 需要了解的 char* 和 string 相关的操作:c++ string转char*
1 ONNX模型的导出和验证
- Yolov5 转 ONNX模型 + 官方文档的介绍,见文章:详细介绍 Yolov5 转 ONNX模型 + 使用ONNX Runtime 的 Python 部署(包含官方文档的介绍)。
本文使用的模型如下图:

根据python的代码和环境,我是用的 opset 版本是 12。
parser.add_argument('--opset', type=int, default=12, help='ONNX: opset version')
onnx的版本是 1.12.0,onnxruntime在Python中使用1.13.1,这里也将使用1.13.1:

CUDA和TensorRT等的版本:(Windows 10)Yolov5-5.0模型的TensorRT加速+ C++部署 + VS2019封装 dll (CMake) + Qt调用
cuda 11.1
cudnn 8.5.0
TensorRT 8.2.1.8
Opencv 4.5.5
CMake 3.24.2
2 ONNX Runtime(C++)读取 ONNX 格式的模型
2.1 ONNX Runtime(C++)的版本兼容性查看
Python可以直接pip安装onnxruntime,但是C++就需要自己设置,并且还要考虑兼容性
2.1.1 进入 ONNX Runtime 的 Docs 页面

2.2.2 查看 ONNX Runtime 的 C++ 版本对不同系统的兼容性
通过How to use ONNX Runtime的选项进入 Get Started,之后进入 Get Started / C++。可以通过 Builds 查看兼容性。

2.2 ONNX Runtime(C++)的安装
- 本章节主要是介绍自己摸索 ONNX Runtime 的收获,可以根据自己的需求来选择不同的安装方法,我只是选择了最简单是方法,进行简单的学习和使用。
- 官方地址:Install ONNX Runtime (ORT),选择 C#/C/C++/WinML Installs。
也可以直接去GitHub上面下载:.zip and .tgz files are also included as assets in each Github release.
此处仅仅尝试CPU的部署,作为学习,重点是TensorRT的部署。 - 整个流程可以通过 主页 的 How it works 部分进行了解:

点击 basic tutorials 进入 ONNX Runtime Inferencing: API Basics 中,选择C/C++ examples 就进入了microsoft / onnxruntime-inference-examples / c_cxx ,在 README 中根据流程进行。
我这里主要是学习 Load and run the model with ONNX Runtime.
可以看到 C++ 版本的 ONNX Runtime 的使用,有两种选项:
- download a prebuilt package:直接下载 prebuilt package
- build from source:从源码中自己构建需要的版本,可以理解成根据自己电脑的环境构建一个自己的版本,例如不同的CUDA版本等
- 两种方法如下图所示:根据自己需求进行选择即可
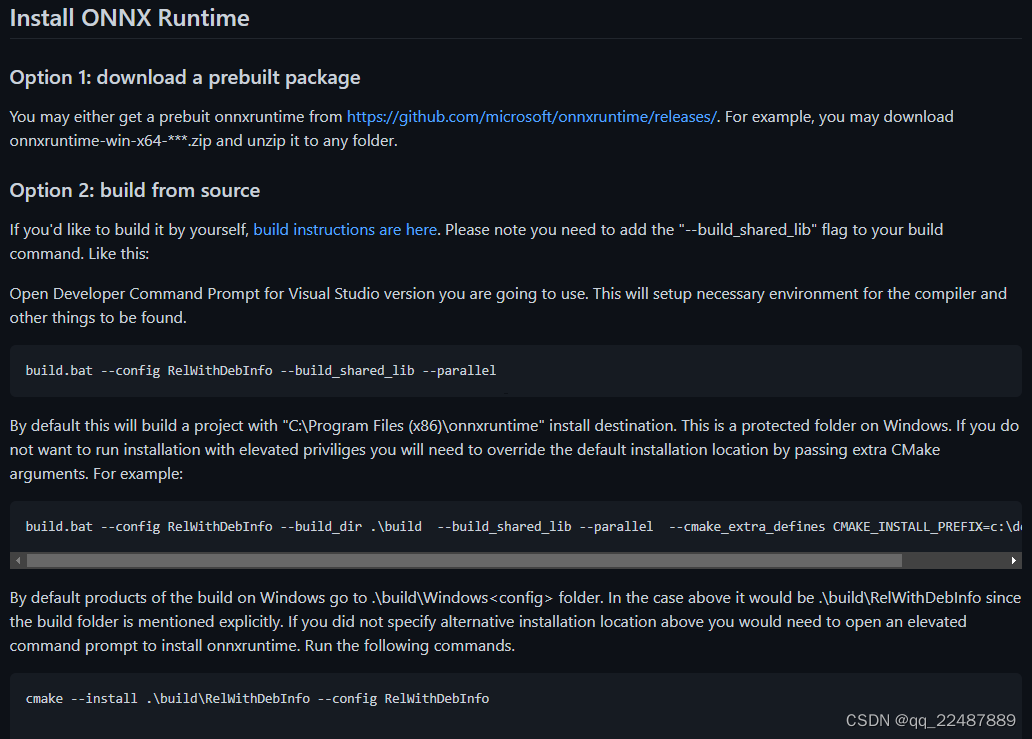
下面是两种选择的简单介绍
2.2.1 在GitHub中选择自己需要的 prebuilt 版本
Option 1: download a prebuilt package

我下载的版本:onnxruntime-win-x64-1.13.1.zip,下载好直接解压就可以使用了。
2.2.2 build from source
Option 2: build from source
根据上上图中的 Option 2 中的引导进行操作即可。
2.3 ONNX Runtime(C++)读取模型
- 此时进行到的官方文档步骤是:Get Started
- 也可以看一下官方的 Samples ,ONNX Runtime Inferencing: API Basics中选择 C/C++ examples 即可。
- 在example / C++ 的 GitHub仓库 https://github.com/microsoft/onnxruntime-inference-examples/tree/main/c_cxx 中,随便选一个sample,然后看里面的cpp文件即可:建议下载下来更方便
这里就可以直接根据里面的代码,照猫画虎的进行使用了。我的YOLOV5推理代码还参考 OpenCV部署yolov5v-v6.1目标检测(附源代码)、win10系统下使用onnxruntime部署yolov5模型 和 onnxruntime的c++使用
代码如下: 比较乱,我自己封装了类,可以依靠自己的需要定对下面的代码进行封装
#include <fstream>
#include <iostream>
#include <opencv2/imgproc.hpp>
#include <opencv2/highgui.hpp>
#include <onnxruntime_cxx_api.h>
#include <opencv2/core/utils/logger.hpp>
#include <opencv2/opencv.hpp>
using namespace cv;

Mat resize_image(Mat srcimg, int* newh, int* neww, int* top, int* left)
{


    int srch = srcimg.rows, srcw = srcimg.cols;
    int inpHeight = 640;
    int  inpWidth = 640;
    *newh = inpHeight;
    *neww = 640;
    bool keep_ratio = true;
    Mat dstimg;
    if (keep_ratio && srch != srcw) {


        float hw_scale = (float)srch / srcw;
        if (hw_scale > 1) {


            *newh = inpHeight;
            *neww = int(inpWidth / hw_scale);
            resize(srcimg, dstimg, Size(*neww, *newh), INTER_AREA);
            *left = int((inpWidth - *neww) * 0.5);
            copyMakeBorder(dstimg, dstimg, 0, 0, *left, inpWidth - *neww - *left, BORDER_CONSTANT, 114);
        }
        else {


            *newh = (int)inpHeight * hw_scale;
            *neww = inpWidth;
            resize(srcimg, dstimg, Size(*neww, *newh), INTER_AREA);
            *top = (int)(inpHeight - *newh) * 0.5;
            copyMakeBorder(dstimg, dstimg, *top, inpHeight - *newh - *top, 0, 0, BORDER_CONSTANT, 114);
        }
    }
    else {


        resize(srcimg, dstimg, Size(*neww, *newh), INTER_AREA);
    }
    return dstimg;
}

int main(int argc, char* argv[])
{


    //std::string imgpath = "images/bus.jpg";
    std::string imgpath = "images/real.jpg";
    utils::logging::setLogLevel(utils::logging::LOG_LEVEL_ERROR);//设置OpenCV只输出错误日志
    Ort::Env env(ORT_LOGGING_LEVEL_WARNING, "yolov5s-5.0");
    Ort::SessionOptions session_options;
    session_options.SetIntraOpNumThreads(1);

    session_options.SetGraphOptimizationLevel(GraphOptimizationLevel::ORT_ENABLE_EXTENDED);

#ifdef _WIN32
    //const wchar_t* model_path = L"yolov5s.onnx";
    const wchar_t* model_path = L"sim_best20221027.onnx";
#else
    const char* model_path = "yolov5s.onnx";
#endif

    std::vector<std::string> class_names;
    //std::string classesFile = "class.names";
    std::string classesFile = "myclass.txt";
    std::ifstream ifs(classesFile.c_str());
    std::string line;
    while (getline(ifs, line)) class_names.push_back(line);
    Ort::Session session(env, model_path, session_options);
    // print model input layer (node names, types, shape etc.)
    Ort::AllocatorWithDefaultOptions allocator;

    // print number of model input nodes
    size_t num_input_nodes = session.GetInputCount();
    std::vector<const char*> input_node_names = {

     "images"};
    std::vector<const char*> output_node_names = {

     "output0"};

    size_t input_tensor_size = 3*640*640;
    std::vector<float> input_tensor_values(input_tensor_size);
    cv::Mat srcimg = cv::imread(imgpath);
    int newh = 0, neww = 0, padh = 0, padw = 0;

    Mat dstimg = resize_image(srcimg, &newh, &neww, &padh, &padw);//Padded resize

    //resizedImage.convertTo(floatImage, CV_32FC3, 1 / 255.0);
	for (int c = 0; c < 3; c++)
	{


		for (int i = 0; i < 640; i++)
		{


			for (int j = 0; j < 640; j++)
			{


				float pix = dstimg.ptr<uchar>(i)[j * 3 + 2 - c];
                input_tensor_values[c * 640 * 640 + i * 640 + size_t(j)] = pix / 255.0;
			}
		}
	}
    // create input tensor object from data values
    std::vector<int64_t> input_node_dims = {

     1, 3, 640, 640 };
    auto memory_info = Ort::MemoryInfo::CreateCpu(OrtArenaAllocator, OrtMemTypeDefault);
    Ort::Value input_tensor = Ort::Value::CreateTensor<float>(memory_info, input_tensor_values.data(), input_tensor_size, input_node_dims.data(), input_node_dims.size());

    std::vector<Ort::Value> ort_inputs;
    ort_inputs.push_back(std::move(input_tensor));
    // score model & input tensor, get back output tensor
    std::vector<Ort::Value> output_tensors = session.Run(Ort::RunOptions{

     nullptr }, input_node_names.data(), ort_inputs.data(), input_node_names.size(), output_node_names.data(), output_node_names.size());

    // Get pointer to output tensor float values
    const float* rawOutput = output_tensors[0].GetTensorData<float>();
	//generate proposals
    std::vector<int64_t> outputShape = output_tensors[0].GetTensorTypeAndShapeInfo().GetShape();
    size_t count = output_tensors[0].GetTensorTypeAndShapeInfo().GetElementCount();
    std::vector<float> output(rawOutput, rawOutput + count);

    std::vector<cv::Rect> boxes;
    std::vector<float> confs;
    std::vector<int> classIds;
    int numClasses = (int)outputShape[2] - 5;
    int elementsInBatch = (int)(outputShape[1] * outputShape[2]);

    float confThreshold = 0.5;
    for (auto it = output.begin(); it != output.begin() + elementsInBatch; it += outputShape[2])
    {


        float clsConf = *(it+4);//object scores
        if (clsConf > confThreshold)
        {


            int centerX = (int)(*it);
            int centerY = (int)(*(it + 1));
            int width = (int)(*(it + 2));
            int height = (int)(*(it + 3));
            int x1 = centerX - width / 2;
            int y1 = centerY - height / 2;
            boxes.emplace_back(cv::Rect(x1, y1, width, height));

            // first 5 element are x y w h and obj confidence
            int bestClassId = -1;
            float bestConf = 0.0;

            for (int i = 5; i < numClasses + 5; i++)
            {


                if ((*(it + i)) > bestConf)
                {


                    bestConf = it[i];
                    bestClassId = i - 5;
                }
            }

            //confs.emplace_back(bestConf * clsConf);
            confs.emplace_back(clsConf);
            classIds.emplace_back(bestClassId);
        }
    }

    float iouThreshold = 0.5;
    std::vector<int> indices;
    // Perform non maximum suppression to eliminate redundant overlapping boxes with
    // lower confidences
    cv::dnn::NMSBoxes(boxes, confs, confThreshold, iouThreshold, indices);

    //随机数种子
    RNG rng((unsigned)time(NULL));
    for (size_t i = 0; i < indices.size(); ++i)
	{


        int index = indices[i];
        int colorR = rng.uniform(0, 255);
        int colorG = rng.uniform(0, 255);
        int colorB = rng.uniform(0, 255);

        //保留两位小数
        float scores = round(confs[index] * 100) / 100;
        std::ostringstream oss;
        oss << scores;

		rectangle(dstimg, Point(boxes[index].tl().x, boxes[index].tl().y), Point(boxes[index].br().x, boxes[index].br().y), Scalar(colorR, colorG, colorB), 1.5);
        putText(dstimg, class_names[classIds[index]] + " " + oss.str(), Point(boxes[index].tl().x, boxes[index].tl().y - 5), FONT_HERSHEY_SIMPLEX, 0.5, Scalar(colorR, colorG, colorB), 2);
	}
    imshow("检测结果", dstimg);
    cv::waitKey();
}
这里有一个大坑:原因是
直接赋值可以给 ONNX Runtime 的 API 使用
    std::vector<const char*> input_node_names = {

     "images"};
    std::vector<const char*> output_node_names = {

     "output0"};
这样用 ONNX Runtime 的API获得的 input_node_names 使用,会抛出异常,经过观察,两者的内容都是“images”的情况下区别就是 ‘i’ 的地址 const char* _ptr64 类型的值不一样
	// print number of model input nodes
	size_t num_input_nodes = session.GetInputCount();
	for (int i = 0; i < num_input_nodes; i++)
	{


		Ort::AllocatedStringPtr input_name_Ptr = session.GetInputNameAllocated(i, allocator);
		input_node_names.push_back(input_name_Ptr.get());//"images" char * __ptr64
		Ort::TypeInfo input_type_info = session.GetInputTypeInfo(i);
		auto input_tensor_info = input_type_info.GetTensorTypeAndShapeInfo();//Get OrtTensorTypeAndShapeInfo from an OrtTypeInfo.
		auto input_dims = input_tensor_info.GetShape();//Uses GetDimensionsCount & GetDimensions to return a std::vector of the shape.
		input_node_dims.push_back(input_dims);//input_node_dims[0] = vector<unsigned_int64>{1, 3, 640, 640}
	}
2.3.1 ONNX Runtime(C++)的API学习
- The C++ API is a thin wrapper of the C API. Please refer to C API for more details.
也可以从官方的 API Docs,选择 C/C++ API Docs 进行详细的了解。 - 根据官方文档的介绍,这里记下一些重要的API,官方文档感觉C / C++ 的很乱,这里直接根据 MNIST 的 demo 结合官方的 C & C++ APIs 进行学习。
- 参考:C++的 Ort Namespace Reference
- 下面的介绍,主要是介绍命名空间 Ort Namespace Reference,以其中的类作为分类依据,然后介绍每个类用到的的成员函数
- 根据Python的onnxruntime介绍,
InferenceSession是 ONNX Runtime 的主要类。它用于加载和运行 ONNX 模型,以及指定环境和应用程序配置选项 - 带有
deprecated(强烈反对 / 强烈抨击)的函数,不应该使用,应该使用其建议的替代版本 。
2.3.1.1 (Classes)Ort::MemoryInfo
- (Static Public Member Functions)
CreateCpu()
static MemoryInfo Ort::MemoryInfo::CreateCpu(OrtAllocatorType type, OrtMemType mem_type1)
- 函数输入:
OrtAllocatorType type:

OrtMemType mem_type1:

- 函数返回
OrtMemoryInfo:介绍来自于需要 OrtMemoryInfo 作为输入的函数
Memory description of where the p_data (Pointer to the data buffer) buffer resides (CPU vs GPU etc).

2.3.1.2 (Classes)Ort::Value
- (Static Public Member Functions)
CreateTensor()
一共有四种重载形式,可进入链接查看:CreateTensor() [1/4]
MNIST使用的是第一种:

- 输入
p_data:可以用 .data() 函数来获取
p_data_element_number:可以用 .size() 函数来获取
shape:维度(1, 3, 640, 640)的指针
shape_len:维度的数量(4) - 函数返回:Ort::Value Struct Reference
根据Creates a tensor with a user supplied buffer. Wraps OrtApi::CreateTensorWithDataAsOrtValue。
进入链接可知返回是 If no error, nullptr will be returned. If there is an error, a pointer to anOrtStatusthat contains error details will be returned.
UseOrtApi::ReleaseStatusto free this pointer.

- (Static Public Member Functions)
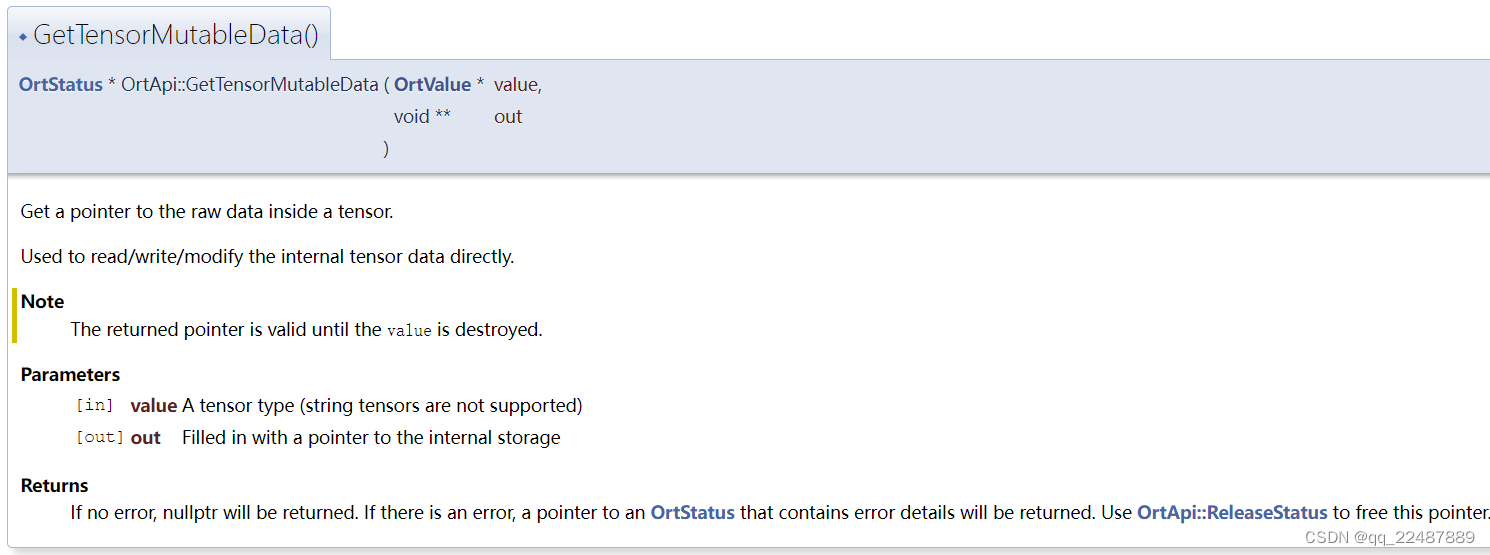
GetTensorMutableData ()或者GetTensorData (),而且区别在于后者的输入和返回都是 const 。


其 Wraps 的函数 GetTensorMutableData()如下:
获取指向张量内原始数据(row data)的指针。
用于直接读/写/修改内部张量数据。
2.3.1.3 (Classes)Ort::Session
- (Static Public Member Functions):链接
size_t GetInputCount () const
size_t GetOutputCount () const
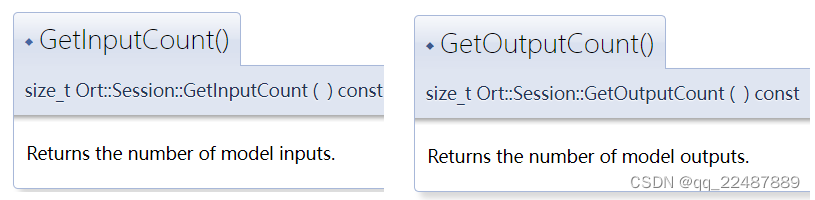
注意是输入的个数,需要几个输入,不是输入图片的个数Batch。例如 yolov5 的模型输出未经处理的适合,有一个输入,三个输出,这个就是输入输出的个数。 - (Static Public Member Functions)
Run()
一共有四种重载形式,可进入链接查看:Run() [1/3]
MNIST使用的是第二种:
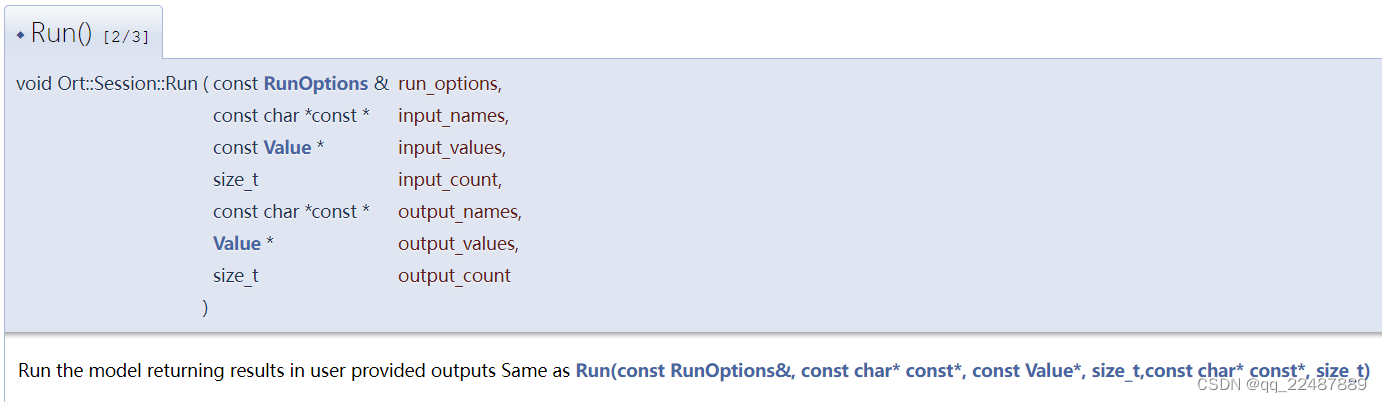
- 输入参数:
input_names:每个输入的名字的 Array
input_values:输入的数据,需要使用Value的CreateTensor()函数获得
其中的参数可以参考第一种形式:

- 第一种形式的函数返回:
A std::vector of Value objects that directly maps to the output_count (eg. output_name[0] is the first entry of the returned vector)
- (Public Member Functions)
Session()
一共有5种重载形式,可进入链接查看: Session() [1/5]
使用了第二种:

其中的 OrtApi::CreateSession. :

- (Static Public Member Functions):Get In / Out putName()
char * GetInputName (size_t index, OrtAllocator *allocator) const
char * GetOutputName (size_t index, OrtAllocator *allocator) const
可以看到下面的 Deprecated,所以这两个成员函数也已经被抛弃了,应该换成GetInputNameAllocated()和GetOutputNameAllocated()


其wrap的函数的介绍:
SessionGetInputName() 和 SessionGetOutputName()
- 显然,此处出现了deprecated,因此
应该换成GetInputNameAllocated()和GetOutputNameAllocated()。
返回指定索引处 输入/ 输出名称(对应onnx的输入输出名称) 的副本。


返回值是 AllocatedStringPtr ,一个智能指针(unique_ptr)的实例,详细介绍见 2.3.1.8。
- (Static Public Member Functions):链接
TypeInfo GetInputTypeInfo (size_t index) const
TypeInfo GetOutputTypeInfo (size_t index) const

通过其Wrap的函数可知其输入输出参数的使用:
SessionGetInputTypeInfo()

SessionGetOutputTypeInfo()

2.3.1.4 (Classes)Ort::Env
- 参考:Ort::Env Struct Reference
- The Env holds the logging state used by all other objects. Note: One Env must be created before using any other Onnxruntime functionality
- (Public Member Functions)
Env()
一共有6种重载形式,可进入链接查看: Env() [1/6]
使用了第二种:

其中的 OrtLoggingLevel :指定要显示的日志消息的最低严重性

2.3.1.5 (Classes)Ort::SessionOptions
- 参考:Ort::SessionOptions Struct Reference
- Options object used when creating a new Session object .
- (Public Member Functions)
SessionOptions()
一共有3种重载形式,可进入链接查看: SessionOptions() [1/3]
使用了第二种:

其中的 CreateSessionOptions()l :首先在您最喜欢的执行提供者上调用此方法,然后是不太喜欢的执行提供者。如果没有调用 Ort 将使用其内部 CPU 执行提供程序。

- (Public Member Functions)
SetGraphOptimizationLevel()
介绍:Graph Optimizations in ONNX Runtime
一个级别的优化在应用前一级别的优化之后执行。

其中的 GraphOptimizationLevell

- (Public Member Functions)
SetIntraOpNumThreads()
介绍:SetIntraOpNumThreads()
 其中的 OrtApi::SetIntraOpNumThreads.
设置用于在节点内并行执行的线程数。
运行单节点操作时,例如。add,这将设置要使用的最大线程数。

2.3.1.6 (Classes)Ort::TypeInfo
- (Public Member Functions)
Unowned< TensorTypeAndShapeInfo > GetTensorTypeAndShapeInfo () const
可进入链接查看: GetTensorTypeAndShapeInfo()

其 wraps 的 CastTypeInfoToTensorInfo():Get OrtTensorTypeAndShapeInfo from an OrtTypeInfo.

2.3.1.7 (Classes)Ort::TensorTypeAndShapeInfo
- (Public Member Functions)
std::vector< int64_t > GetShape () const
可进入链接查看: GetShape()

Uses GetDimensionsCount & GetDimensions to return a std::vector of the shape. - (Public Member Functions)
size_t GetElementCount () const
可进入链接查看: GetElementCount ()

其 Wraps :GetTensorShapeElementCount(),返回数据总数(all dimensions multiplied by each other),0 维返回 1,有小于0 的维度返回 -1。

2.3.1.8 (Classes)Ort::AllocatorWithDefaultOptions / Ort::Allocator
- 参考:Ort::AllocatorWithDefaultOptions Struct Reference
- a instance of smart pointer(一个智能指针的实例) that would deallocate the buffer when out of scope.
The OrtAllocator instances must be valid at the point of memory release. - 补充参考:Ort::Allocator Struct Reference 和 OrtAllocator Struct Reference
- (Typedef Documentation)AllocatedStringPtr

是一个 unique_ptr typedef,用于拥有由 OrtAllocators 分配的字符串并在范围结束时释放它们。给定分配器的生命周期必须超过 AllocatedStringPtr 实例的生命周期。
2.3.1.10 (Classes)Ort::RunOptions
2.3.1.11 (Classes)AllocatedStringPtr
AllocatedStringPtr:注意这里有坑,AllocatedStringPtr 是智能指针,一定要注意生命周期的问题。

unique_ptr typedef 用于拥有 OrtAllocators 分配的字符串,并在作用域结束时释放它们。给定分配器的生命周期必须超过分配字符串 Ptr 实例的生命周期
2.3.2 OpenCV(C++)基本的学习
要想对图像进行推理,就需要使用OpenCV对图像进行处理
2.3.2.1 重要的库函数
1. 使用函数cv::imread()读取图片
2. 使用函数cv::imshow()显示图片
- 使用
imshow(),后面要搭配waitkey()函数,否则无法正常显示。
waitkey()的解释:
@brief: Polls for a pressed key。
函数pollKey无需等待即可轮询按键事件。它返回按下的键的代码,或者 -1 (如果自上次调用以来没有按下任何键)。
要等到按下某个键,使用waitKey。
@note:函数waitKey和pollKey是HighGUI中唯一可以获取和处理GUI 事件的方法,因此需要定期调用其中之一以进行正常的事件处理,除非HighGUI 在负责事件处理的环境中使用。
@note:该函数仅在至少创建了一个 HighGUI 窗口并且该窗口口处于活动状态时有效。如果有多个 HighGUI 窗口,它们中的任何一个都可以被激活。
3. 使用函数cv::dnn::NMSBoxes进行非极大值抑制
4. 使用函数cv::rectangle()画矩形框
4. 使用函数cv::putText()写文字
2.3.2.2 基本数据结构 Mat
- 参考Opencv C++ 基本数据结构 Mat 、 OpenCV基础类型4–cv::Mat详解 和 【opencv】cv::Mat 图像格式 (Data Type) 注意有的操作是调用成员函数(带括号),有的操作是直接输出成员变量。
- 查看数据类型:OpenCV的Mat类用于获取图像信息的常用属性与方法
形式:Mat(int rows, int cols, int type)
比较重要的操作介绍:
1. 使用成员函数channels()获取矩阵的通道数
颜色通道的转换:cvtColor(cv_image, cv_image, cv::COLOR_BGR2RGB);
【OpenCV3】颜色空间转换——cv::cvtColor()详解
2. 使用成员变量dims获取矩阵的维数
3. 使用成员函数size()获取矩阵的尺寸
4. 使用成员函数convertTo()转换矩阵的格式
cv::Mat::convertTo(),可以实现数据类型的转换,通道的顺序转换,数据的位数转换等,具体实现自己搜索。

5. 使用成员函数 ptr() / at<T>() / 地址 获取矩阵某个像素点的值
官方文档: ptr() [1/20]
uchar* cv::Mat::ptr ( int i0 = 0 ) 返回指向指定矩阵行的指针。
- 那么如何获取 C H W 格式的图片的某个位置的值呢?
第 i 行,第 j 列,第 c 通道 的值:at操作简单方便,但效率低,推荐使用ptr操作。
at方法:float pix = img.at<Vec3b>(i, j)[c];
矩阵元素地址:float pix = (int)(*(img.data + img.step[0] * i + img.step[1] * j + c));
指针ptr:float pix = img.ptr<uchar>(i)[j * channel + channel-1 - c];//channel-1 是因为数组从0开始
迭代器:较难,新手不建议 - 其中,
cout<<img.at<Vec3b>(i, j)<<endl;可输出三通道的值,如[230 222 102],而cout<<img.at<Vec3b>(i, j)[c]<<endl;输出的是uchar类型的乱码,需要数据类型转换才能输出值。 - 上述访问方法参考:C++版本OpenCv教程(四)4种读取Mat类元素的的方法 和 【C++ Opencv】读写灰度图像,RGB图像的某个像素、修改像素值、图像取反(源码+API),也可以找一些别的方法。
- 参考其中数据类型使用
int,uchar,Vec3b或者还是其他的,参考 opencv cv::Mat数据类型总结 的第二个表格。 - 注意OpenCV 使用中,使用的颜色通道顺序为 BGR 颜色格式而不是 RGB 格式,如果想要按照 RGB 格式取出,应该
float pix = img.ptr<uchar>(i)[j * 3 + 2 - c]; - 下面是我手画的图像:

2.4 ONNX Runtime(C++)推理模型
推理模型的步骤:
OpenCV读取图像—>对图像进行处理,获得合适尺寸的图像—>进行推理—>获得推理的结果
2.4.1 输入数据前的处理
输入数据的处理最好采用yolov5提出的 Padded resize 方法来实现
2.4.1.1 Padded Resize 方法介绍
Padded Resize:可以保持图片的长宽比例,剩下的部分采用灰色填充,从而以填充边界(通常是灰色填充)的方式来保持原始图片的长宽比例,同时又满足模型正方形输入的需要。- 其 Pyhon 源码位于 yolov5 的 dataset.py 的
letterbox()方法
其返回值只需要第一个参数 img(padded resize 之后的图片) :

其源码如下:知道原理然后用 C++ 复现即可
def letterbox(img, new_shape=(640, 640), color=(114, 114, 114), auto=True, scaleFill=False, scaleup=True, stride=32):
    # Resize and pad image while meeting stride-multiple constraints
    shape = img.shape[:2]  # current shape [height, width]
    if isinstance(new_shape, int):
        new_shape = (new_shape, new_shape)

    # Scale ratio (new / old)
    r = min(new_shape[0] / shape[0], new_shape[1] / shape[1])
    if not scaleup:  # only scale down, do not scale up (for better test mAP)
        r = min(r, 1.0)

    # Compute padding
    ratio = r, r  # width, height ratios
    new_unpad = int(round(shape[1] * r)), int(round(shape[0] * r))
    dw, dh = new_shape[1] - new_unpad[0], new_shape[0] - new_unpad[1]  # wh padding
    if auto:  # minimum rectangle
        dw, dh = np.mod(dw, stride), np.mod(dh, stride)  # wh padding
    elif scaleFill:  # stretch
        dw, dh = 0.0, 0.0
        new_unpad = (new_shape[1], new_shape[0])
        ratio = new_shape[1] / shape[1], new_shape[0] / shape[0]  # width, height ratios

    dw /= 2  # divide padding into 2 sides
    dh /= 2

    if shape[::-1] != new_unpad:  # resize
        img = cv2.resize(img, new_unpad, interpolation=cv2.INTER_LINEAR)
    top, bottom = int(round(dh - 0.1)), int(round(dh + 0.1))
    left, right = int(round(dw - 0.1)), int(round(dw + 0.1))
    img = cv2.copyMakeBorder(img, top, bottom, left, right, cv2.BORDER_CONSTANT, value=color)  # add border
    return img, ratio, (dw, dh)
2.4.1.2 学习 cv::resize() 函数
参考:官方文档 cv::resize()
先看源码:位于imgproc.hpp
CV_EXPORTS_W void resize( InputArray src, OutputArray dst,
                          Size dsize, double fx = 0, double fy = 0,
                          int interpolation = INTER_LINEAR );
参数介绍:
- src:input image,输入图像
- dst:output image that has the size
dsizeand the same type as src . 输出图像,有着dsize的尺寸和src的类型。 - dsize:
dsize = Size(round(fx*src.cols), round(fy*src.rows)),C++的函数round()和OpenCV的类Size参考:C++:round函数用法 和 Opencv的Size类-尺寸类,注意Size是先宽后高 - interpolation:插值的方式,默认双线性插值,参考:enum cv::InterpolationFlags
截图如下:


2.4.1.3 学习 cv::copyMakeBorder() 函数
参考:官方文档:copyMakeBorder(),作用是 Forms a border around an image.
- 该函数将源图像复制到目标图像的中间。
复制的源图像左侧、右侧、上方和下方的区域将填充外推像素。这不是基于它的过滤函数所做的(它们动态地推断像素),而是其他更复杂的函数(包括您自己的函数)可以用来简化图像边界处理。
函数支持 src 已经在 dst 中间的模式。在这种情况下,该函数不会复制 src 本身,而只是简单地构造边框。 - 当源图像是更大图像的一部分(ROI:region of interest)时,该函数将尝试使用 ROI 之外的像素来形成边框。要禁用此功能并始终进行外推,就好像 src 不是 ROI 一样,请使用 borderType | BORDER_ISOLATED。
CV_EXPORTS_W void copyMakeBorder(InputArray src, OutputArray dst,
                                 int top, int bottom, int left, int right,
                                 int borderType, const Scalar& value = Scalar() );
参数介绍:
- src:input image,输入图像
- dst:output image that has the size
dsizeand the same type as src . 输出图像,有着dsize的尺寸和src的类型。且尺寸为Size(src.cols+left+right, src.rows+top+bottom) - top, bottom, left, right:在原图四周扩充边缘的大小
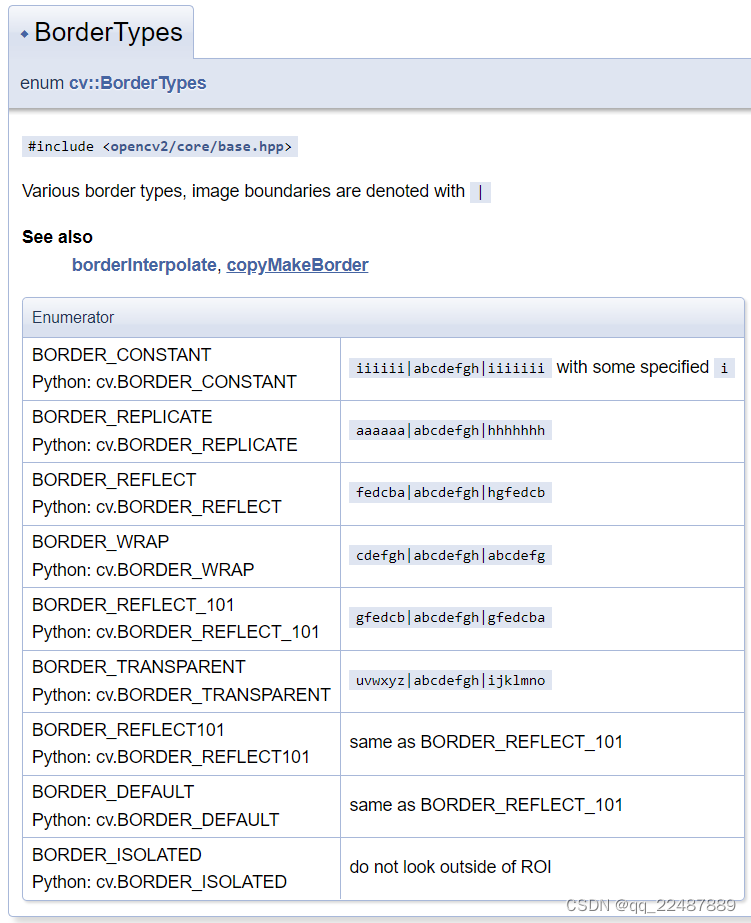
- borderType:扩充边缘的类型, See borderInterpolate for details。
- value:Border value if borderType==BORDER_CONSTANT . 否则就取决于原图,和 value 没关系
- BorderTypes的官方介绍 中可以看到下图中的各种边界类型,图像边界用 | 表示,中间是 input 的图像,两边是图像被扩展的边界和内部的关系,具体可看 OpenCV库成员——BorderTypes。
- Scalar()函数在OpenCV中是用来设置颜色的,格式
Scalar(B,G,R),如果直接写一个数字X,相当于Scalar(X,0,0),参考:opencv中的Scalar()函数。以及官方示例:typedef Scalar_ cv::Scalar
2.4.1.4 像素归一化
需要了解的知识:[-Opencv中数据类型CV_8U, CV_16U, CV_16S, CV_32F 以及 CV_64F是什么?,我的应是从CV_8UC3转换成CV_32FC3。
此处需要注意:OpenCV读取的图像通道顺序是是BGR,归一化作为输入应该是RGB顺序,同时我的输入类型是float32,也要进行转换。
3 ONNX Runtime(C++)推理 ONNX 格式的模型
构造输入数据使用的函数:Ord::Value 的 公共成员函数 CreateTensor()
推理主要使用函数: Ord::Session 的 公共成员函数 Run
3.1 模型的输入数据规范
仔细研究函数的输入,将自己的数据构建成它需要的数据格式以及自己模型的输入数据类型和格式,然后进行输入就可以了。
- 对于数据类型的规范,参考文章:
浅析C语言之uint8_t / uint16_t / uint32_t /uint64_t
【C/C++】uin8_t uint16_t uint32_t uint64_t数据类型解析
DSP中的C语言(一)——int16、Uint16、float32等定义的用法和区别
c++数据类型之uint8_t/uint16_t/uint32_t/float128_t
对于我的模型,属于应当是 float32(1, 3, 640, 640)
- 现在用的OpenCV,所以使用的是OpenCV的输入数据规范,位于头文件如下:


- 对于 C/ C++ 的数据类型规定,可以看其自己的头文件,可以看到对于同一种数据类型,给了很多个别名


还有位于下面头文件的另一个别名:typedef unsigned short wchar_t;

看 stdint.h 的源码,可以看到除了数据类型别名,定义了很多数据相关的宏,可以用来检测数据的大小,避免溢出等问题。
//
// stdint.h
//
//      Copyright (c) Microsoft Corporation. All rights reserved.
//
// The C Standard Library <stdint.h> header.
//
#pragma once
#define _STDINT

#include <vcruntime.h>

#if _VCRT_COMPILER_PREPROCESSOR

#pragma warning(push)
#pragma warning(disable: _VCRUNTIME_DISABLED_WARNINGS)

typedef signed char        int8_t;
typedef short              int16_t;
typedef int                int32_t;
typedef long long          int64_t;
typedef unsigned char      uint8_t;
typedef unsigned short     uint16_t;
typedef unsigned int       uint32_t;
typedef unsigned long long uint64_t;

typedef signed char        int_least8_t;
typedef short              int_least16_t;
typedef int                int_least32_t;
typedef long long          int_least64_t;
typedef unsigned char      uint_least8_t;
typedef unsigned short     uint_least16_t;
typedef unsigned int       uint_least32_t;
typedef unsigned long long uint_least64_t;

typedef signed char        int_fast8_t;
typedef int                int_fast16_t;
typedef int                int_fast32_t;
typedef long long          int_fast64_t;
typedef unsigned char      uint_fast8_t;
typedef unsigned int       uint_fast16_t;
typedef unsigned int       uint_fast32_t;
typedef unsigned long long uint_fast64_t;

typedef long long          intmax_t;
typedef unsigned long long uintmax_t;

// These macros must exactly match those in the Windows SDK's intsafe.h.
#define INT8_MIN         (-127i8 - 1)
#define INT16_MIN        (-32767i16 - 1)
#define INT32_MIN        (-2147483647i32 - 1)
#define INT64_MIN        (-9223372036854775807i64 - 1)
#define INT8_MAX         127i8
#define INT16_MAX        32767i16
#define INT32_MAX        2147483647i32
#define INT64_MAX        9223372036854775807i64
#define UINT8_MAX        0xffui8
#define UINT16_MAX       0xffffui16
#define UINT32_MAX       0xffffffffui32
#define UINT64_MAX       0xffffffffffffffffui64

#define INT_LEAST8_MIN   INT8_MIN
#define INT_LEAST16_MIN  INT16_MIN
#define INT_LEAST32_MIN  INT32_MIN
#define INT_LEAST64_MIN  INT64_MIN
#define INT_LEAST8_MAX   INT8_MAX
#define INT_LEAST16_MAX  INT16_MAX
#define INT_LEAST32_MAX  INT32_MAX
#define INT_LEAST64_MAX  INT64_MAX
#define UINT_LEAST8_MAX  UINT8_MAX
#define UINT_LEAST16_MAX UINT16_MAX
#define UINT_LEAST32_MAX UINT32_MAX
#define UINT_LEAST64_MAX UINT64_MAX

#define INT_FAST8_MIN    INT8_MIN
#define INT_FAST16_MIN   INT32_MIN
#define INT_FAST32_MIN   INT32_MIN
#define INT_FAST64_MIN   INT64_MIN
#define INT_FAST8_MAX    INT8_MAX
#define INT_FAST16_MAX   INT32_MAX
#define INT_FAST32_MAX   INT32_MAX
#define INT_FAST64_MAX   INT64_MAX
#define UINT_FAST8_MAX   UINT8_MAX
#define UINT_FAST16_MAX  UINT32_MAX
#define UINT_FAST32_MAX  UINT32_MAX
#define UINT_FAST64_MAX  UINT64_MAX

#ifdef _WIN64
    #define INTPTR_MIN   INT64_MIN
    #define INTPTR_MAX   INT64_MAX
    #define UINTPTR_MAX  UINT64_MAX
#else
    #define INTPTR_MIN   INT32_MIN
    #define INTPTR_MAX   INT32_MAX
    #define UINTPTR_MAX  UINT32_MAX
#endif

#define INTMAX_MIN       INT64_MIN
#define INTMAX_MAX       INT64_MAX
#define UINTMAX_MAX      UINT64_MAX

#define PTRDIFF_MIN      INTPTR_MIN
#define PTRDIFF_MAX      INTPTR_MAX

#ifndef SIZE_MAX
    // SIZE_MAX definition must match exactly with limits.h for modules support.
    #ifdef _WIN64
        #define SIZE_MAX 0xffffffffffffffffui64
    #else
        #define SIZE_MAX 0xffffffffui32
    #endif
#endif

#define SIG_ATOMIC_MIN   INT32_MIN
#define SIG_ATOMIC_MAX   INT32_MAX

#define WCHAR_MIN        0x0000
#define WCHAR_MAX        0xffff

#define WINT_MIN         0x0000
#define WINT_MAX         0xffff

#define INT8_C(x)    (x)
#define INT16_C(x)   (x)
#define INT32_C(x)   (x)
#define INT64_C(x)   (x ## LL)

#define UINT8_C(x)   (x)
#define UINT16_C(x)  (x)
#define UINT32_C(x)  (x ## U)
#define UINT64_C(x)  (x ## ULL)

#define INTMAX_C(x)  INT64_C(x)
#define UINTMAX_C(x) UINT64_C(x)

#pragma warning(pop) // _VCRUNTIME_DISABLED_WARNINGS

#endif // _VCRT_COMPILER_PREPROCESSOR
3.2 ONNVRuntime(C++)的模型输入数据及推理介绍
根据选取的推理函数 inline std::vector<Value> Session::Run() 设置输入,我选择的是有三种形式,我选择的是第一种:Run() [1/3]
std::vector< Value > Ort::Session::Run	(	const RunOptions & 	run_options,
const char *const * 	input_names,
const Value * 	input_values,
size_t 	input_count,
const char *const * 	output_names,
size_t 	output_count
)
调用者提供输入列表和要返回的所需输出列表。
- 函数内创建一个
std::vector<Ort::Value> output_values;作为输出。

- run_options:自行设置
- input_names:存放输入名称,例如:如果
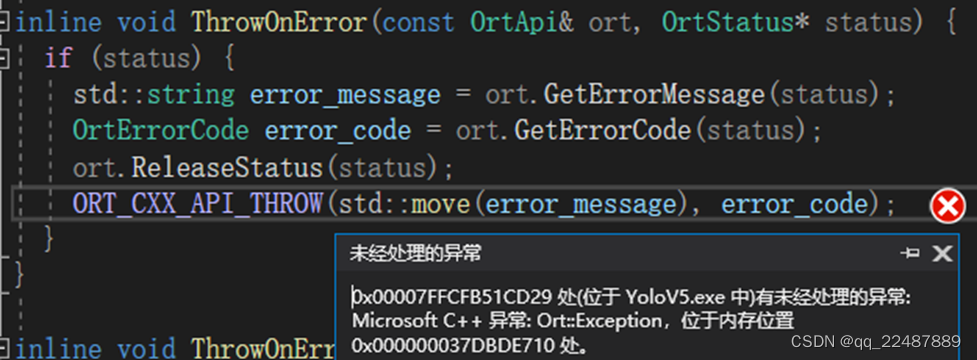
vector<const char*> input_names = { "images"};那么input_names.data()(因为要使用指针),当然,多输入模型可以有多个参数。 - input_values:这个是重点,有坑!!!!!要使用右值引用,后面会对该参数进行详细介绍
- input_count:输入名称的数量,也是模型输入节点的数量。例如
input_names.size()。 - output_names:模型的输出的名称。参考input_names。
- output_count:输出名称的数量,也是模型输入节点的数量,参考input_count。
然后进入下面的函数:
inline void Session::Run(const RunOptions& run_options, const char* const* input_names, const Value* input_values, size_t input_count,
                         const char* const* output_names, Value* output_values, size_t output_count) {


  static_assert(sizeof(Value) == sizeof(OrtValue*), "Value is really just an array of OrtValue* in memory, so we can reinterpret_cast safely");
  auto ort_input_values = reinterpret_cast<const OrtValue**>(const_cast<Value*>(input_values));
  auto ort_output_values = reinterpret_cast<OrtValue**>(output_values);
  ThrowOnError(GetApi().Run(p_, run_options, input_names, ort_input_values, input_count, output_names, output_count, ort_output_values));
}
可以看到:
- 对于
input_values的操作auto ort_input_values = reinterpret_cast<const OrtValue**>(const_cast<Value*>(input_values))
首先去掉输入的const属性,然后转换为const OrtValue**的值 - 新建的
output_values进行reinterpret_cast<OrtValue**>操作,最终获得了ort_input_values和ort_output_values。 - 所最终对值(
OrtValue **类型)进行了返回,该类型被封装。
4 ONNVRuntime(C++)的 推理结果展示

Tip: Qt(MinGW)部署ONNX Runtime 推理框架:
ONNXRuntime 是使用MSVC进行编译的,无法再MinGW编译器使用,参考如下:
error: unknown type name ‘Frees_ptr_opt’
error: ‘Frees_ptr_opt’ has not been declared