这里给大家分享我在网上总结出来的一些知识,希望对大家有所帮助

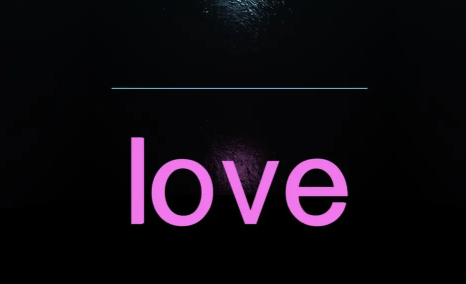
建模
首先我们需要一些贴图素材
贴图素材一般可以在3dtextures网站上找到,这里我找了2份,包含了墙的法线贴图和潮湿地面的法线、透明度、粗糙度贴图
通过kokomi.AssetManager将贴图素材一次性全部加载出来,将它们应用到Mesh上,加上基本的环境光照,即可完成最基本的建模
// 光照
const pointLight1 = new THREE.PointLight(config.color, 0.5, 17, 0.8);
pointLight1.position.set(0, 2, 0);
this.scene.add(pointLight1);
...

// 网格
const aspTex = am.items["asphalt-normal"];
aspTex.rotation = THREE.MathUtils.degToRad(90);
aspTex.wrapS = aspTex.wrapT = THREE.RepeatWrapping;
aspTex.repeat.set(5, 8);

const wallMat = new THREE.MeshPhongMaterial({
  color: new THREE.Color("#111111"),
  normalMap: aspTex,
  normalScale: new THREE.Vector2(0.5, 0.5),
  shininess: 200,
});

const wall = new THREE.Mesh(new THREE.BoxGeometry(25, 20, 0.5), wallMat);
this.scene.add(wall);
wall.position.y = 10;
wall.position.z = -10.3;
...

// 文字
const t3d = new kokomi.Text3D(this, config.text, font, {
  size: 3,
  height: 0.2,
  curveSegments: 120,
  bevelEnabled: false,
});
t3d.mesh.geometry.center();

const tm = new THREE.Mesh(
  t3d.mesh.geometry,
  new THREE.MeshBasicMaterial({
    color: config.color,
  })
);
this.scene.add(tm);
tm.position.y = 1.54;
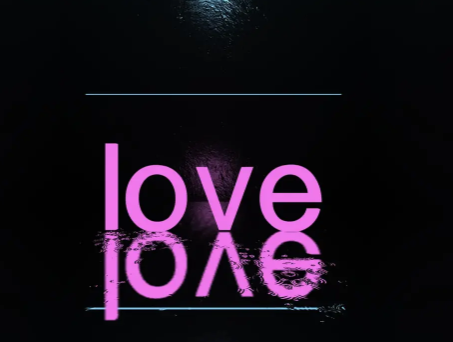
积水地面
地面上的积水能反射出周围的景色,因此我们将选用kokomi.Reflector来实现反射效果
const mirror = new kokomi.Reflector(new THREE.PlaneGeometry(25, 100));
mirror.position.z = -25;
mirror.rotation.x = -Math.PI / 2;

普通的反射器仅仅是一面镜子,因此我们要自定义反射器的Shader
涟漪效果
之前逛shadertoy时看到了一个很棒的涟漪特效,就直接拿来用了
// https://www.shadertoy.com/view/4djSRW
float hash12(vec2 p){
    vec3 p3=fract(vec3(p.xyx)*.1031);
    p3+=dot(p3,p3.yzx+19.19);
    return fract((p3.x+p3.y)*p3.z);
}

vec2 hash22(vec2 p){
    vec3 p3=fract(vec3(p.xyx)*vec3(.1031,.1030,.0973));
    p3+=dot(p3,p3.yzx+19.19);
    return fract((p3.xx+p3.yz)*p3.zy);
}

// https://gist.github.com/companje/29408948f1e8be54dd5733a74ca49bb9
float map(float value,float min1,float max1,float min2,float max2){
    return min2+(value-min1)*(max2-min2)/(max1-min1);
}

vec2 rippleUv=75.*p*uTexScale;

vec2 p0=floor(rippleUv);

float rainStrength=map(uRainCount,0.,10000.,3.,.5);
if(rainStrength==3.){
    rainStrength=50.;
}

vec2 circles=vec2(0.);
for(int j=-MAX_RADIUS;j<=MAX_RADIUS;++j)
{
    for(int i=-MAX_RADIUS;i<=MAX_RADIUS;++i)
    {
        vec2 pi=p0+vec2(i,j);
        #if DOUBLE_HASH
        vec2 hsh=hash22(pi);
        #else
        vec2 hsh=pi;
        #endif
        vec2 p=pi+hash22(hsh);

        float t=fract(.8*iTime+hash12(hsh));
        vec2 v=p-rippleUv;
        float d=length(v)-(float(MAX_RADIUS)+1.)*t+(rainStrength*.1*t);

        float h=1e-3;
        float d1=d-h;
        float d2=d+h;
        float p1=sin(31.*d1)*smoothstep(-.6,-.3,d1)*smoothstep(0.,-.3,d1);
        float p2=sin(31.*d2)*smoothstep(-.6,-.3,d2)*smoothstep(0.,-.3,d2);
        circles+=.5*normalize(v)*((p2-p1)/(2.*h)*(1.-t)*(1.-t));
    }
}
circles/=float((MAX_RADIUS*2+1)*(MAX_RADIUS*2+1));

float intensity=.05*floorOpacity;
vec3 n=vec3(circles,sqrt(1.-dot(circles,circles)));

vec2 rainUv=intensity*n.xy;
与地面结合
光有涟漪效果也不够,要将它与地面的贴图相结合起来
这里采用了自定义mipmap技术,利用kokomi.PackedMipMapGenerator生成了多个贴图的mipmap
自定义mipmap除了能捆绑贴图外,还有个好处就是可以动态控制贴图的模糊程度
const mipmapper = new kokomi.PackedMipMapGenerator();
const mirrorFBO = mirror.getRenderTarget();
const mipmapFBO = new kokomi.FBO(this);
mirror.material.uniforms.tDiffuse.value = mipmapFBO.rt.texture;
this.update(() => {
  mipmapper.update(mirrorFBO.texture, mipmapFBO.rt, this.renderer);
});
vec2 p=vUv;
vec2 texUv=p*uTexScale;
texUv+=uTexOffset;
float floorOpacity=texture(uOpacityTexture,texUv).r;
vec3 floorNormal=texture(uNormalTexture,texUv).rgb*2.-1.;
floorNormal=normalize(floorNormal);
float roughness=texture(uRoughnessTexture,texUv).r;

vec2 finalUv=reflectionUv+floorNormal.xy*uDistortionAmount-rainUv;

float level=roughness*uBlurStrength;

vec3 col=packedTexture2DLOD(tDiffuse,finalUv,level,uMipmapTextureSize).rgb;

下雨动画
生成雨滴
雨滴数量会很多,因此要用到THREE.InstancedMesh来生成实例化网格对象
const rain = new THREE.InstancedMesh(new THREE.PlaneGeometry(), rainMat, count);
rain.instanceMatrix.needsUpdate = true;

const dummy = new THREE.Object3D();

for (let i = 0; i < rain.count; i++) {
  dummy.position.set(
    THREE.MathUtils.randFloat(-10, 10),
    0,
    THREE.MathUtils.randFloat(-20, 10)
  );
  dummy.scale.set(0.03, THREE.MathUtils.randFloat(0.3, 0.5), 0.03);
  dummy.updateMatrix();
  rain.setMatrixAt(i, dummy.matrix);
}
rain.rotation.set(-0.1, 0, 0.1);
rain.position.set(0, 4, 4);
这里要注意一点:雨滴的方向是始终朝向用户的,为了达成这点就要用billboard方案来实现
vec3 billboard(vec3 v,mat4 view){
    vec3 up=vec3(view[0][1],view[1][1],view[2][1]);
    vec3 right=vec3(view[0][0],view[1][0],view[2][0]);
    vec3 pos=right*v.x+up*v.y;
    return pos;
}

vec3 billboardPos=billboard(transformed,modelViewMatrix);
transformed=billboardPos;
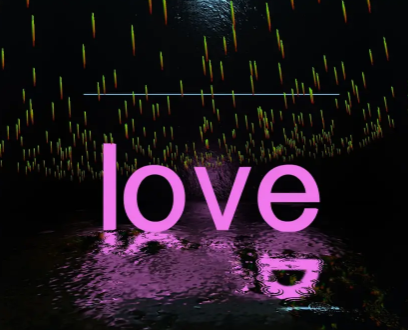
下落动画
我们可以给雨滴赋予随机的高度和速度attribute,并在顶点着色器中让它动起来
const progressArr = [];
const speedArr = [];

for (let i = 0; i < rain.count; i++) {
  ...

  progressArr.push(Math.random());
  speedArr.push(dummy.scale.y * 10);
}

rain.geometry.setAttribute(
  "aProgress",
  new THREE.InstancedBufferAttribute(new Float32Array(progressArr), 1)
);
rain.geometry.setAttribute(
  "aSpeed",
  new THREE.InstancedBufferAttribute(new Float32Array(speedArr), 1)
);
attribute float aProgress;
attribute float aSpeed;

uniform float uSpeed;
uniform float uHeightRange;

vec3 distort(vec3 p){
    float y=mod(aProgress-iTime*aSpeed*.25*uSpeed,1.)*uHeightRange-(uHeightRange*.5);
    p.y+=y;
    return p;
}

transformed=distort(transformed);

反射效果
创建背景的离屏渲染FBO,将其作为反射的主要材质
const bgFBO = new kokomi.FBO(this, {
  width: window.innerWidth * 0.1,
  height: window.innerHeight * 0.1,
});
rainMat.uniforms.uBgRt.value = bgFBO.rt.texture;

const fboCamera = this.camera.clone();

this.update(() => {
  rain.visible = false;
  this.renderer.setRenderTarget(bgFBO.rt);
  this.renderer.render(this.scene, fboCamera);
  this.renderer.setRenderTarget(null);
  rain.visible = true;
});
在顶点着色器中获取屏幕空间vScreenspace
// https://github.com/Samsy/glsl-screenspace
vec2 screenspace(mat4 projectionmatrix,mat4 modelviewmatrix,vec3 position){
    vec4 temp=projectionmatrix*modelviewmatrix*vec4(position,1.);
    temp.xyz/=temp.w;
    temp.xy=(.5)+(temp.xy)*.5;
    return temp.xy;
}

vScreenspace=screenspace(projectionMatrix,modelViewMatrix,transformed);
在片元着色器中采样反射材质
uniform sampler2D uNormalTexture;
uniform sampler2D uBgRt;
uniform float uRefraction;
uniform float uBaseBrightness;

varying vec2 vScreenspace;

void main(){
    vec2 p=vUv;

    vec4 normalColor=texture(uNormalTexture,p);

    if(normalColor.a<.5){
        discard;
    }

    vec3 normal=normalize(normalColor.rgb);

    vec2 bgUv=vScreenspace+normal.xy*uRefraction;
    vec4 bgColor=texture(uBgRt,bgUv);

    float brightness=uBaseBrightness*pow(normal.b,10.);

    vec3 col=bgColor.rgb+vec3(brightness);

    col=vec3(p,0.);

    gl_FragColor=vec4(col,1.);
}
这里有一点要注意:积水地面中要把雨滴的反射去掉,不然会看着很乱
rainFloor.mirror.ignoreObjects.push(rain);

灯光闪烁
用setInterval来间歇地设置文字和灯光材质的颜色即可
// flicker
const turnOffLight = () => {
  tm.material.color.copy(new THREE.Color("black"));
  pointLight1.color.copy(new THREE.Color("black"));
};

const turnOnLight = () => {
  tm.material.color.copy(new THREE.Color(config.color));
  pointLight1.color.copy(new THREE.Color(config.color));
};

let flickerTimer = null;

const flicker = () => {
  flickerTimer = setInterval(async () => {
    const rate = Math.random();
    if (rate < 0.5) {
      turnOffLight();
      await kokomi.sleep(200 * Math.random());
      turnOnLight();
      await kokomi.sleep(200 * Math.random());
      turnOffLight();
      await kokomi.sleep(200 * Math.random());
      turnOnLight();
    }
  }, 3000);
};

flicker();

后期处理
为了让文字灯光看上去更加明亮,可以用Bloom滤镜来照亮文字
由于后期处理中原先renderer的抗锯齿会失效,故用SMAA滤镜来实现抗锯齿
// postprocessing
const composer = new POSTPROCESSING.EffectComposer(this.renderer);
this.composer = composer;

composer.addPass(new POSTPROCESSING.RenderPass(this.scene, this.camera));

// bloom
const bloom = new POSTPROCESSING.BloomEffect({
  luminanceThreshold: 0.4,
  luminanceSmoothing: 0,
  mipmapBlur: true,
  intensity: 2,
  radius: 0.4,
});
composer.addPass(new POSTPROCESSING.EffectPass(this.camera, bloom));

// antialiasing
const smaa = new POSTPROCESSING.SMAAEffect();
composer.addPass(new POSTPROCESSING.EffectPass(this.camera, smaa));

待优化
效果算是基本实现了,但也有很多待优化的点
- 添加现实中的雨声
- 实现更棒的相机交互
- 添加更多的物体
本文转载于:
https://juejin.cn/post/7200443454567137336
如果对您有所帮助,欢迎您点个关注,我会定时更新技术文档,大家一起讨论学习,一起进步。
