一、实时 GI
字面意思,实时计算间接光照,设置与代码修改如下:
1. LightSetting 里面开启 Realtime Lighting,并将对应的主光源 Mode 设置为 Realtime
![]()
![]()
2. 修改 Shader 代码,和之前 Lightmap 采样一样,不过这次采样 dynLightmap,也就是动态光照贴图:MetaPass 的代码可以参考《UnityGI2:Lightmaps》这一章的第三节
struct appdata
{
    float4 vertex: POSITION;
    float3 normal: NORMAL;                  //法线
    float4 tangent: TANGENT;                //切线
    float2 uv: TEXCOORD0;                   //uv坐标
    #if defined(LIGHTMAP_ON)
        float2 lightmapUV: TEXCOORD1;           //光照贴图uv坐标
    #endif
    #if defined(DYNAMICLIGHTMAP_ON)
        float2 dynLightmapUV: TEXCOORD2;        //动态光照贴图uv坐标
    #endif
};

//……
v2f vert(appdata v)
{
    //……
    #if defined(LIGHTMAP_ON)
        o.lightmapUV = v.lightmapUV * unity_LightmapST.xy + unity_LightmapST.zw;
    #endif
    #if defined(DYNAMICLIGHTMAP_ON)
        o.dynLightmapUV = v.dynLightmapUV * unity_DynamicLightmapST.xy +
    unity_DynamicLightmapST.zw;
    #endif
}

//……
fixed4 frag(v2f i): SV_Target
{
    //……
    float3 indirectDiffuse = 0;
    #if defined(LIGHTMAP_ON)
        float3 defIndirectDiffuse = DecodeLightmap(UNITY_SAMPLE_TEX2D(unity_Lightmap, i.lightmapUV));
        #if defined(DIRLIGHTMAP_COMBINED)
            float4 lightmapDirection = UNITY_SAMPLE_TEX2D_SAMPLER(unity_LightmapInd, unity_Lightmap, i.lightmapUV);
            defIndirectDiffuse = DecodeDirectionalLightmap(defIndirectDiffuse, lightmapDirection, normal);
        #endif
        indirectDiffuse += defIndirectDiffuse;
    #endif
    #if defined(DYNAMICLIGHTMAP_ON)
        float3 dynIndirectDiffuse = DecodeRealtimeLightmap(UNITY_SAMPLE_TEX2D(unity_DynamicLightmap, i.dynLightmapUV));
        #if defined(DIRLIGHTMAP_COMBINED)
            float4 dynLightmapDirection = UNITY_SAMPLE_TEX2D_SAMPLER(unity_DynamicDirectionality, unity_DynamicLightmap, i.dynLightmapUV);
            dynIndirectDiffuse = DecodeDirectionalLightmap(dynIndirectDiffuse, dynLightmapDirection, normal);
        #endif
        indirectDiffuse += dynIndirectDiffuse;
    #endif
    #if !defined(LIGHTMAP_ON) && !defined(DYNAMICLIGHTMAP_ON)
        indirectDiffuse += max(0, ShadeSH9(float4(normal, 1)));
    #endif
}
此时调整主光源的大小、亮度和方向,可以看到效果(包括间接光)也会实时变化:
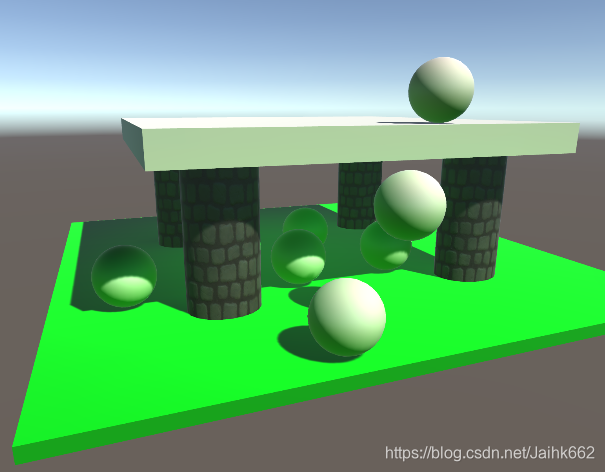
可以通过调整光源的 indirect lighting 属性调整间接光的亮度:

支持多光源,但是不支持烘焙点光源和聚光灯的间接光阴影
二、光探针代理体
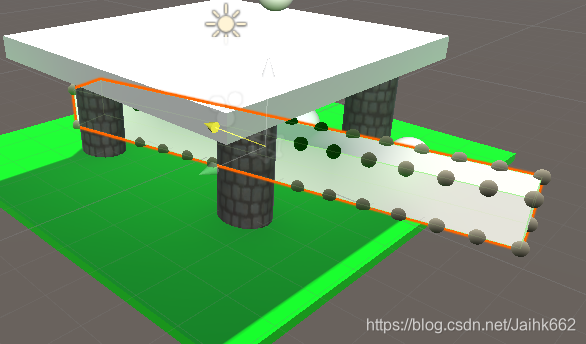
动态物体的间接光是通过光照探针来获取的,运行时会判断物体的中心在哪4个光照探针连成的区域内,并从这些探针获取光照数据,如果一个动态物体过大,就不能只拿动态物体的中心点作为参照了,否则物体上将不会有间接光过渡的效果
使用光探针代理体:
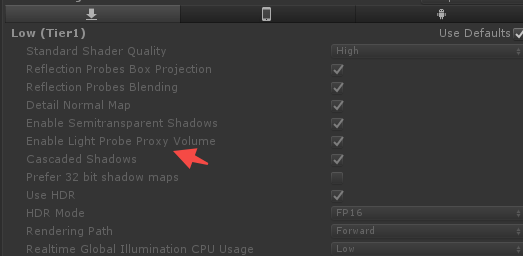
1. 检查 Project Setting → Graphics 中是否支持使用光探针代理体,除此之外,这对硬件也有一定的要求,如果硬件和设置都支持,在 Shader 中 UNITY_LIGHT_PROBE_PROXY_VOLUME 宏就会被启用
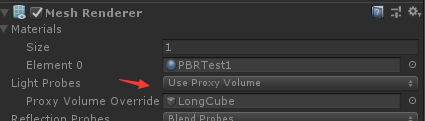
2. 给对应的过大的动态物体对象添加 LightProbeProxyVolume 组件,组件参数可以参考 U3D 官网,这里就不再多介绍了,同时别忘了还要设置物体 MeshRender 组件上的 Light Probes 属性

3. 修改 Shader 代码如下:单个对象是否使用 LPPV 由 unity_ProbeVolumeParams 的 x 向量指示,该组件在 UnityShaderVariables 中定义,除此之外,核心代码在内置方法 ShadeSHPixel 中,具体可以参考 UnityStandardUtils.cginc 文件
#if !defined(LIGHTMAP_ON) && !defined(DYNAMICLIGHTMAP_ON)
    #if UNITY_LIGHT_PROBE_PROXY_VOLUME
        if (unity_ProbeVolumeParams.x == 1)
        {
            float3 LPPVDiffuse = max(0, ShadeSHPerPixel(float4(normal, 1), 0, i.posWorld));
            indirectDiffuse += LPPVDiffuse;
        }
        else
            indirectDiffuse += max(0, ShadeSH9(float4(normal, 1)));
    #else
        indirectDiffuse += max(0, ShadeSH9(float4(normal, 1)));
    #endif
#endif
搞定:

参考文章: