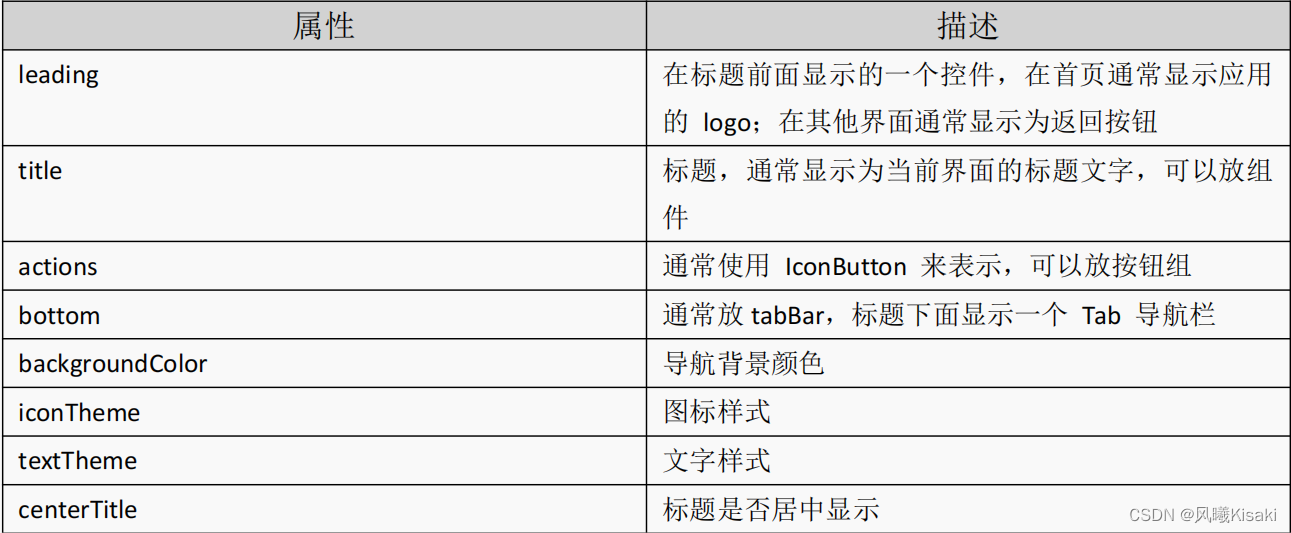
1.Flutter AppBar 自定义顶部按钮图标、颜色
return Scaffold(
      appBar: AppBar(
        backgroundColor: Colors.red,
        leading: IconButton(
            icon: Icon(Icons.menu), tooltip: "Search", onPressed: () {


          print('menu Pressed');
        }
        ), title: Text('FlutterDemo'), actions: <Widget>[
        IconButton(
            icon: Icon(Icons.search), tooltip: "Search", onPressed: () {


          print('Search Pressed');
        }
        ), IconButton(
            icon: Icon(Icons.more_horiz), tooltip: "more_horiz", onPressed: () {


          print('more_horiz Pressed');
        }
        )
      ],), body: Text('这是 Appbar'),);
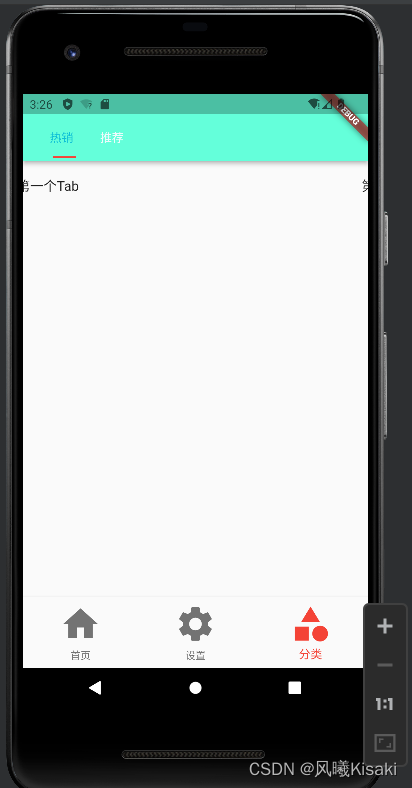
2.AppBar 中自定义 TabBar 实现顶部 Tab 切换,并把把 TabBar 放在导航最顶部

    return DefaultTabController(
        length: 2,  //列数
        child: Scaffold(
          appBar: AppBar(
            backgroundColor: Colors.tealAccent,
            title: Row(
              children: [
                Expanded(
                  child: TabBar(
                    isScrollable: true,//多个菜单可以滑动
                    indicatorColor: Colors.red,
                    labelColor: Colors.cyan,//选中颜色
                    unselectedLabelColor: Colors.white,//未选中颜色
                    indicatorSize: TabBarIndicatorSize.label,
                    tabs: [
                      Tab(
                        text: '热销',
                      ),
                      Tab(
                        text: '推荐',
                      ),
                    ],
                  ),
                )
              ],
            ),
          ),
          body: TabBarView(
            children: [
              ListView(
                children: [
                  ListTile(
                    title: Text('第一个Tab'),
                  ),
                ],
              ),
              ListView(
                children: [
                  ListTile(
                    title: Text('第er个Tab'),
                  ),
                ],
              ),
            ],
          ),
        ));
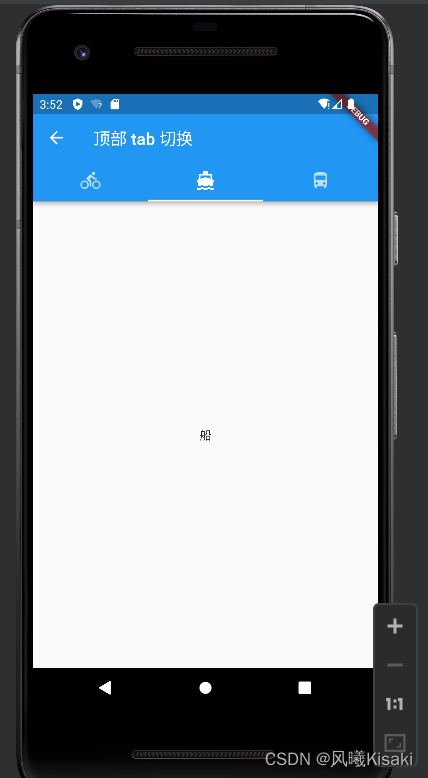
3.AppBar 中自定义 TabBar 实现 Tabs 的另一种方法
定义TapBar和上面的方法差不多,唯一要注意的就是_tabController
import 'package:flutter/material.dart';

class TapBarContollerPage extends StatefulWidget {


  //AppBardemoPage({

    Key key}) : super(key: key);

  _TapBarContollerPageState createState() => _TapBarContollerPageState();
}

class _TapBarContollerPageState extends State<TapBarContollerPage>
    with SingleTickerProviderStateMixin {

      //还要继承SingleTickerProviderStateMixin
  late TabController _tabController;

  @override
  void dispose() {

       //生命周期函数(销毁)
    _tabController.dispose();
    super.dispose();
  }

  void initState() {

       //生命周期函数
    super.initState();
    _tabController = new TabController(
        vsync: this,  //固定写法
        length: 3   //长度
    );
  }

  @override
  Widget build(BuildContext context) {


    return new Scaffold(
      appBar: new AppBar(
        title: new Text('顶部 tab 切换'),
        bottom: new TabBar(
          tabs: <Widget>[
            new Tab(
              icon: new Icon(Icons.directions_bike),
            ),
            new Tab(
              icon: new Icon(Icons.directions_boat),
            ),
            new Tab(
              icon: new Icon(Icons.directions_bus),
            ),
          ],
          controller: _tabController,  //注意
        ),
      ),
      body: new TabBarView(
        controller: _tabController,   //注意
        children: <Widget>[
          new Center(child: new Text('自行车')),
          new Center(child: new Text('船')),
          new Center(child: new Text('巴士')),
        ],
      ),
    );
  }
}