前言
首先我们要知道插件是在plugins文件夹下定义的,让我们开始编写吧
自定义插件
需要在根目录下创建
plugins文件夹,nuxt会自动识别引用
这里我创建了plugins文件夹—》testplug.ts
import {

     defineNuxtPlugin } from '#app'
export default defineNuxtPlugin(()=>{


    return{


        provide:{


            pengke:()=> '认准碰磕Study'
        }
    }
})
使用该定义的pengke
<script lang="ts" setup>
    const {

      $pengke} = useNuxtApp()
    console.log($pengke)
</script>
这样就能使用定义好的pengke了
UI组件库
每个框架都需要用到第三方组件库,这里我演示使用
element-ui-plus
安装
npm install element-plus --save
引入
在plugins 文件夹下创建/element-plus.ts
import {

     defineNuxtPlugin } from '#app'
import ElementPlus from 'element-plus/dist/index.full'
export default defineNuxtPlugin(nuxtApp=>{


    nuxtApp.vueApp.use(ElementPlus)
})
这样elementplus引入了但样式还没引入,在app.vue根文件下全局引入
<style>
@import 'element-plus/dist/index.css';
</style>
这样就实现引入成功了,开始使用吧
使用
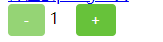
<div>
        <el-button type="success" @click="count--">-</el-button>
        1
        <el-button type="success" @click="count++">+</el-button>
</div>
成功使用,完结~