学完vue使用了element-ui 有没有想自己封装一个ui库 不求多好看,只求学习一个技能或者一个知识点,那我可以帮到你,如果你喜欢请点个赞再走吧。
小提示 千万别在props子组件里面直接改父组件的值 需要data过渡赋值一下
分几步
第一步是注册npm账号 这个自行搜索
第二步是自己封装一个组件
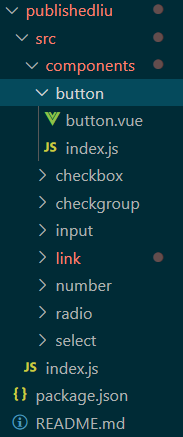
这张图
是一个ui组件库基本的结构
publishedliu 是组件库的名字 这个名字的文件夹下面
包含一个src 一个package.json文件
这是用来解释main执行index.js发生了什么 看到这可能迷糊别急 这是解释json里面的main键值对的意思
import Button from 'publishedliu'
Vue.use(Button)//Button其实是导出了install与Button是组件Checkbox也是
执行use的时候 其实是把所有的外部组件全部定义为全局组件 通过install方法
index.js文件
import Button from './components/button/index';
import Checkbox from './components/Checkbox/index';
const components = [
  Button,
  Checkbox,
];
const install = function(Vue, opts = {

    }) {

    //vue插件的用法install
  components.forEach(component => {


    Vue.component(component.name, component);
  });
};//install是默认方式与vue.use()结合
export default {


 install
};
{


  "name": "publishedliu",//包的名字
  "version": "1.0.0",//版本 可以 自行修改
  "description": "组件库",//上传成功之后npm库里的提示
  "author": "liuyong-byte <[email protected]>",//是你创建npm账号的邮箱
  "private": false,//这个一定改成false 用于上传npm的时候
  "main": "./src/index.js",//是执行文件夹
  "files": [//上传组件库必须要的文件
    "src/components/*",//上传这个文件夹下面所有文件
    "src/index.js"//导出ui库的时候执行文件 个人觉得这个月理解容易一些
  ],
  "__npminstall_done": "Wed May 27 2020 10:54:02 GMT+0800 (GMT+08:00)",
  "_from": "[email protected]",
  "_resolved": "https://registry.npm.taobao.org/publishedliu/download/publishedliu-1.0.0.tgz"
}
这个是帮助你切换npm镜像与cnpm淘宝使用的
1.设置使用淘宝cnpm

npm config set registry https://registry.npm.taobao.org
2.查看是否配置成功,成功后即可直接使用cnpm命令

npm config get registry
3.还原npm仓库

npm config set registry https://registry.npmjs.org
组件封装 比如上面的Button组件
插槽的那一期https://blog.csdn.net/qq_43505774/article/details/106303148
<template>
    <button class="L-but" :style="{color:this.fColor,backgroundColor:this.bgColor}" @click="click">
        <slot>按钮</slot>//默认插槽 父组件分发子组件
    </button>
</template>

<script>
export default {


    name:"Button",//这个很重要 很重要 是上面的component.name的参数
    //当你导入组件库之后输入的Button组件 它就会找到这个name进行加载 个人理解
    props:{

    //这个是父组件传参个子组件
        bgColor:{


            type:String,
            value:"skyblue"
        },
        fColor:{


            type:String,
            value:"white"
        }

    },
    data() {


        return {


        }
    },
    methods:{


        click:function(e){

    //这个是子组件与父组件通信
        //通信有很多种 attr libar vue.$emit props options slot vuex provide inject等等
            this.$emit('click自定义随便都可以',e)//当点击子组件的时候 父组件通过click方法获取值 @父组件方法 与click 同名就ok
        }
    }
}
</script>

<style scoped>//这是style作用域 当然了你也可以使用less sass 或者src连接
.L-but{


    border: 1px solid white;
}
</style>
现在是上传组件
在登录之前需要切换为npm 源 而不是淘宝cnpm
npm login 登录
输入username password email
然后没有报错 就npm publish
可能会报错 json文件的name名字冲突
如果需要跟换版本号 直接可以在json里面修改 就ok 也可以命令自行搜索
我认为直接修改方便一点
当上传成功 需要等几分钟 cnpm才会映射到 所以先用npm下载
npm install 包名
当你导入ui组件库的时候 它会自动加载执行src 下面的index文件
把组件库导出来
然后vue.use成为全局组件
就 ok了
Button 里面的index.js文件内容 也很重要
import Button from './button.vue';

/* istanbul ignore next */
// Button.install = function(Vue) {


//   Vue.component(Button.name, Button);
// }; 这个你如果重复写在每一个组件index.js里面 那你没必要
//在src的index里面install循环了

export default Button;