跟着杜老师学AI
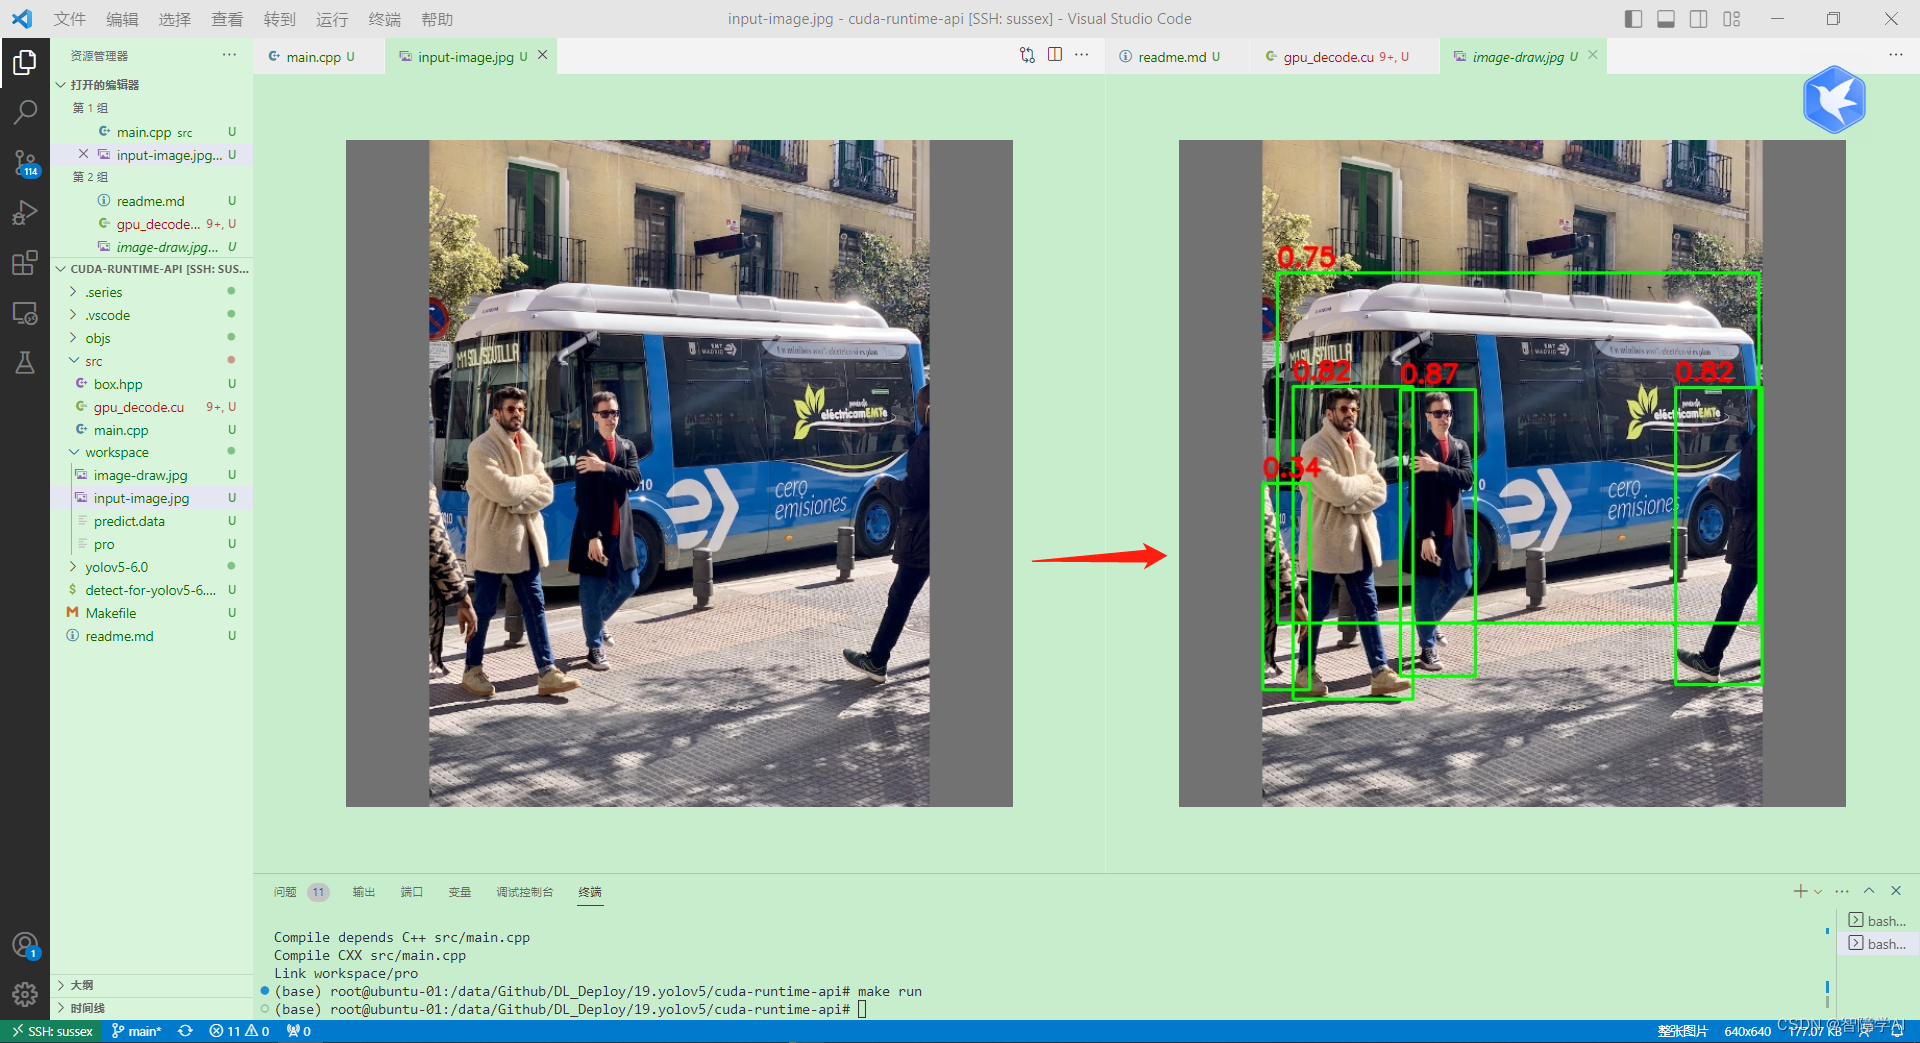
看看我们干了什么, 就是把bouding box恢复成框而已
1.1 知识点和先验知识
- 对于模型推理后的后处理,可以直接使用cuda核函数进行解码,效率比较高
- nms也可以在核函数里面实现
- 这里演示了一个yolov5的实际案例,后续其他的操作都是类似的
- gpu_decoder难度较大,一般先写一个cpu的decoder, 再写个gpu_decoder.
- 注意: yolov5 中的detect.py是对一张图片做推理, 推理用的信息是(n x num_classes + 5)
- yolov5的输出tensor(n x 85), n 是 n个bounding box
- 其中85是cx, cy, width, height, objness, classification * 80
- objctness(物体检测)的意思是当前这个Bounding Box是否包含检测目标
- class_confidence条件概率的意思是当前Bounding Box的对于是否包含这个类别目标的概率, 并且每一个bounding box里面有全类别的class_confidence。
- 当前bounding box的 confidence(置信度) = objectness(物体概率) x class_confidence(条件概率)
- 最后拿来计算置信度的confidence是最大的class_confidence
- 总之, 无论是CPU解码还是GPU解码, 都是两步走, 置信度过滤后NMS过滤, 把一张图多余的框去掉。但是NMS操作之前需要先把Box信息恢复成框
- 在GPU解码输出中,[count, box1, box2, box3] 因为GPU解码是多线程的, 所以需要用count记录已经处理了多少个bounding box。CPU单线程不需要, GPU需要确保不会将一个检测框重复输出或者漏掉。
- 在深度学习部署中,通常使用单精度浮点数(float)来存储数据。单精度浮点数占用4个字节,相比于双精度浮点数(double)占用的8个字节,可以减少存储空间和计算时间,同时也可以更好地利用GPU的计算资源。不过,在某些特殊情况下,可能需要使用双精度浮点数来更准确地表示数据。代码中看到f要知道为什么
- 在CPU和GPU用box信息回复bounding box的时候需要知道, 图像的左上角才是原点
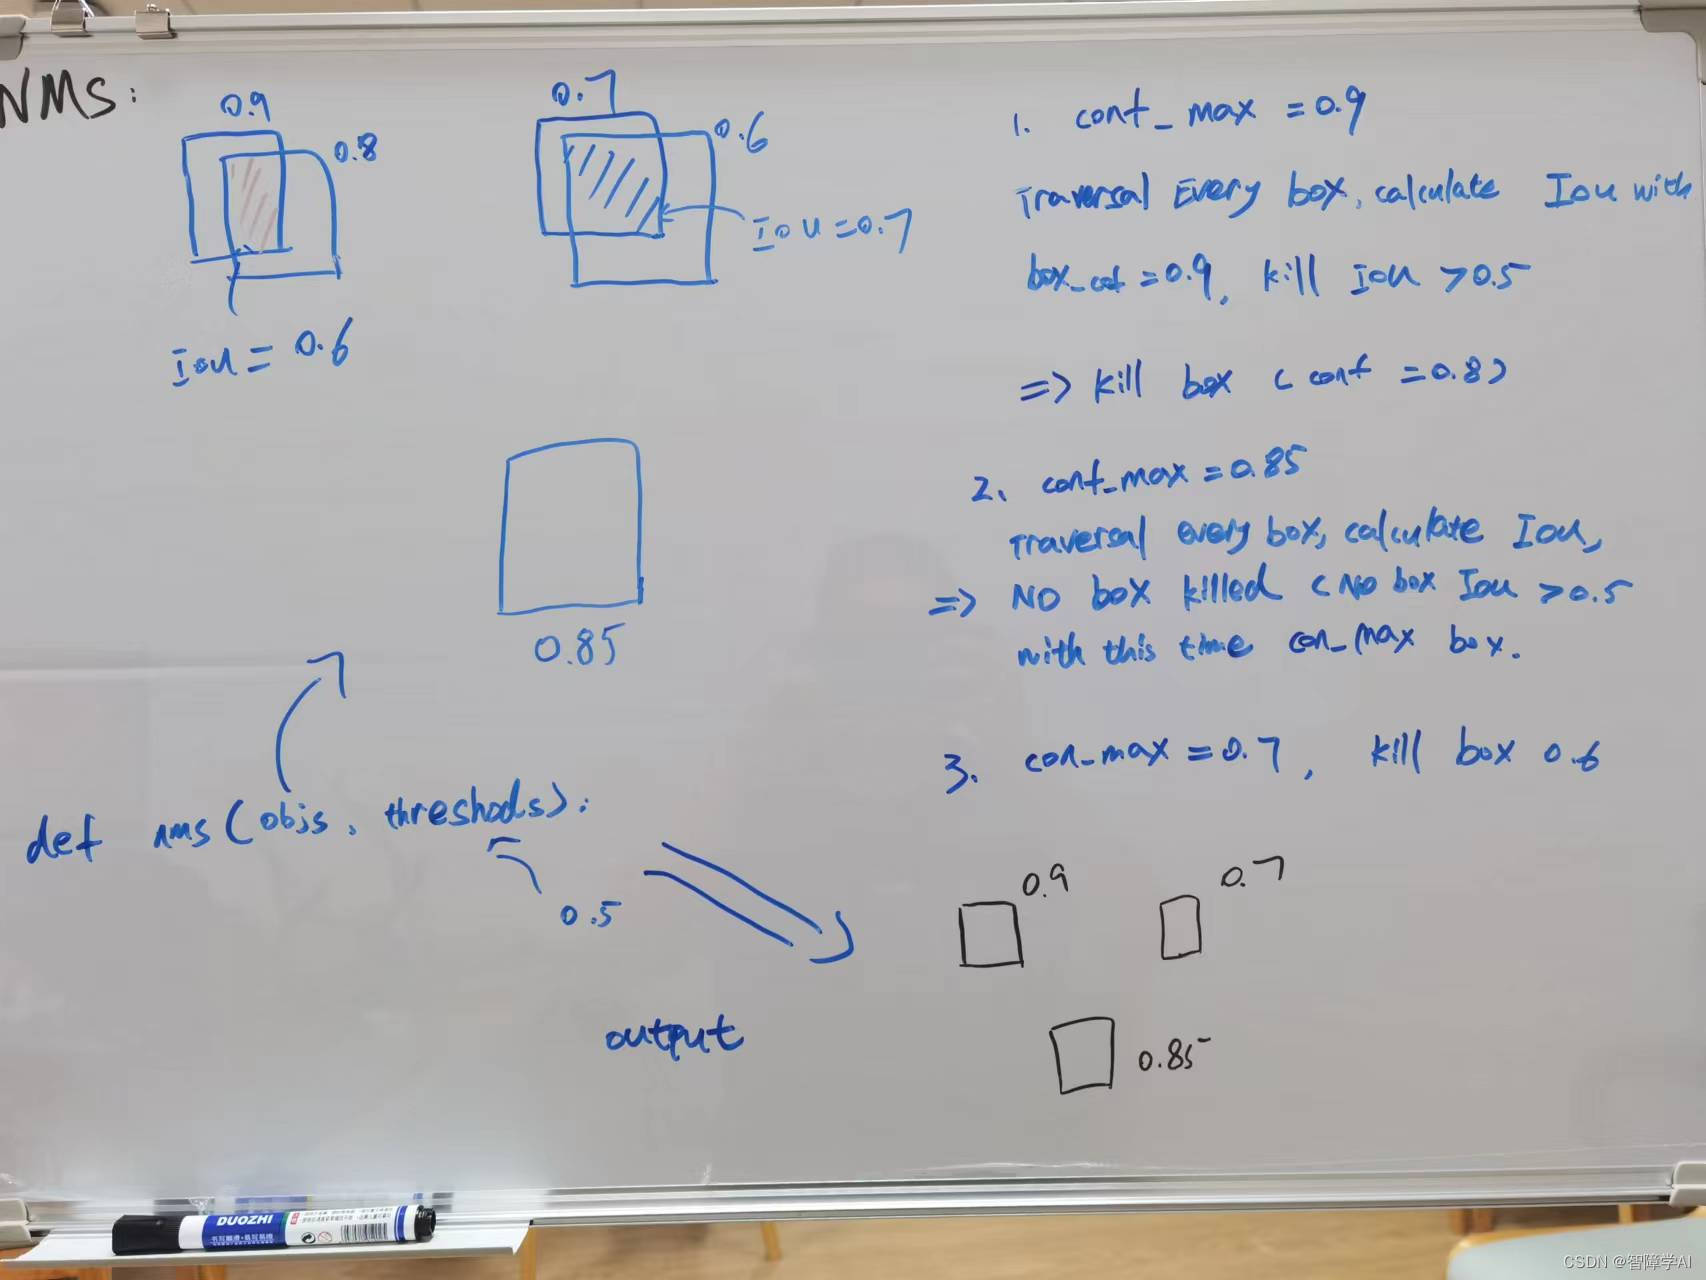
- 下图是NMS流程图
1.2 kernel函数的简单了解
- kernel函数可以理解为是对线程的模板, 写好了一个模板其他线程都可以用这个模板高性能计算
- 这里面怎么知道是哪一个呢? 用position索引就行了
- 在CUDA中,静态修饰符static用于限制变量、函数、结构体等在当前文件中的作用范围。在Kernel函数中,使用静态修饰符可以避免编译器为每个线程重新创建一份变量,提高代码的效率。通常情况下,我们会将Kernel函数声明为static。
流程
在detect.py文件中加了这么一句,可以把PyTorch的数据通过转换成numpy后,tobytes再写到文件
# NMS
with open("../workspace/predict.data", "wb") as f:
    f.write(pred.cpu().data.numpy().tobytes())
- 运行脚本
#!/bin/bash

cd yolov5-6.0

python detect.py --weights=yolov5s.pt --source=../workspace/input-image.jpg --iou-thres=0.5 --conf-thres=0.25 --project=../workspace/

mv ../workspace/exp/input-image.jpg ../workspace/input-image-pytorch.jpg
rm -rf ../workspace/exp
这是一个使用 CUDA 加速 YOLOv5 目标检测后处理的程序。其中包含两个文件:一个是 C++ 文件(main.cpp),另一个是 CUDA 文件(yolov5_postprocess.cu)。这个程序从一个二进制文件中加载预测结果,然后使用 GPU 对预测结果进行解码和非极大值抑制(NMS)操作,最后将检测到的边界框绘制在输入图像上。
在 CUDA 文件(yolov5_postprocess.cu)中,包含了两个核函数:decode_kernel 和 fast_nms_kernel。decode_kernel 函数负责从预测结果中提取边界框、置信度和类别。fast_nms_kernel 函数负责非极大值抑制(NMS)操作,根据阈值去除重叠边界框。这两个核函数通过 decode_kernel_invoker 函数一起调用。
简而言之,这个程序使用 CUDA 在 GPU 上对 YOLOv5 的预测结果进行解码和后处理,包括非极大值抑制,然后将检测到的目标绘制在输入图像上。
3. main.cpp 中的int main()
在 main.cpp 文件中,首先加载了一个二进制文件(predict.data),该文件包含预测结果。然后,使用 gpu_decode 函数处理预测结果,该函数将预测结果发送到 GPU 进行解码和非极大值抑制(NMS)操作。这个函数返回一个包含检测到的边界框的向量。之后,使用 OpenCV 在输入图像上绘制这些边界框,并将绘制结果保存为一个新的图像文件(image-draw.jpg)。
int main()
{


   // yolov5的输出tensor(n x 85)
   // 其中85是cx, cy, width, height, objness, classification * 80

    // 加载一个二进制的文件
    auto data = load_file("predict.data");
    auto image = cv::imread("input-image.jpg");

    // 因为数据是以二进制存储在文件中的, 如果想对二进制文件进行访问,需要使用指针
    // char * -> float *
    float *ptr = (float *)data.data();
    int nelem = data.size() / sizeof(float); // 计算data有多少个数据
    int ncols = 85;                          // cx, cy, width, height, objness, classification * 80
    int nrows = nelem / ncols;

    // 这里是用gpu_decode拿到框框
    // 这里的boxes是一个vector的数据类型
    auto boxes = gpu_decode(ptr, nrows, ncols);

    // 这里是把框框在图像上画出来
    // for (auto it = boxes.begin(); it != boxes.end(); ++it) 有点像这句话
    for (auto &box : boxes)
    {


        // image, 左上角坐标,右小角坐标, 线的颜色, 线的宽度
        cv::rectangle(image, cv::Point(box.left, box.top), cv::Point(box.right, box.bottom),
                      cv::Scalar(0, 255, 0), 2);
        cv::putText(image, cv::format("%.2f", box.confidence), cv::Point(box.left, box.top - 7),
                    0, 0.8, cv::Scalar(0, 0, 255), 2, 16);
    }

    cv::imwrite("image-draw.jpg", image);
    return 0;
}
4. load_file
// 二进制模式打开文件(ios::binary), 使用static std::vector<uint8_t>存储数据
// uint8_t是一个无符号8位整数类型。
// 使用const string &file作为函数的参数,可以指定文件的路径和名称
static std::vector<uint8_t> load_file(const string &file)
{


    // 创建一个输入文件流 in,用于读取文件。
    // ios::in | ios::binary 表示以输入模式和二进制模式打开文件
    ifstream in(file, ios::in | ios::binary);
    // 如果文件未成功打开,函数返回一个空的 std::vector<uint8_t>
    if (!in.is_open()){


        return {

    };
    }

    // 将文件流的读取位置设置到文件末尾,获取文件长度
    in.seekg(0, ios::end);  // 将文件流的读取位置设置到文件末尾,获取文件长度
    size_t length = in.tellg();  // 获取当前读取位置,即文件长度

    std::vector<uint8_t> data;  // 用于存储文件
    if (length > 0)
    {


        in.seekg(0, ios::beg); // 先把文件流的位置放回一开始
        data.resize(length);   // 把data resize成文件的长度

        // in.read()从文件流in中读取数据进指定的内存缓存区
        // 内存缓存区首地址是data[0], 缓冲区大小是length
        // in.read()读取二进制文件时需要传入 char*, float*  放到main函数做
        in.read((char *)&data[0], length);
    }
    in.close(); // 关闭文件流
    return data;}
5. cpu decoder
- 避免多余的计算,需要知道有些数学运算需要的时间远超过很多if,减少他们的次数就是性能的关键
- nms的实现是可以优化的,例如remove flag并且预先分配内存,reserve对输出分配内存
- cpu上面的资源非常的宝贵,能少一次计算就要少一次计算
- cpu的decoder用在很多嵌入式的场景,通过学习这种思维,能少一次就少一次的想法
- 这里代码先用了两个if过滤掉了一些confidence不够的bbounding box。然后在这个基础上继续把iou计算放在最后面,尽可能的去减少计算, 这是一个思想
- 这里还用着
 /*
    这个代码流程如下:
    1. 从nx85的维度中把每个结果的left, top, right, bottom confidence取出来,然后放进vector<box>里面
    2. 对储存好的box执行NMS操作
    3. 这里需要知道用了两个if减少n的维度减少了计算量
    4. 并没有直接的去boxes里面删除框, 做了预分配, 给他们打上了标签, 合适的用emplace_back加上
    */
    // auto boxes = cpu_decode(ptr, nrows, ncols);
    vector<Box> cpu_decode(float *predict, int rows, int cols, float confidence_threshold = 0.25f, float nms_threshold = 0.45f)
    {


    // 创建一个boxes的结构体储存box
    // box 里面储存着左上角的(x, y) 右小角的(x, y) confidence label
    vector<Box> boxes; // 这里面就储存着一堆的box

    // 计算这里面的类别数, 输出的cols前面5列都是位置信息
    int num_classes = cols - 5;

    /*
    这个for 循环是用来遍历结果输出data的, n x 85个维度是n个结果
    85 包含了其中85是cx, cy, width, height, objness, classification * 80

    */
    for (int i = 0; i < rows; i++)
    {


        float *pitem = predict + i * cols;
        // objness是预测出这个bounding box是否包含目标的概率
        float objness = pitem[4];
        if (objness < confidence_threshold){


            continue;
        }

        // 第6个才指向类别 可以理解为pclass[0] = pitem[5];
        // 但是pclass更加清晰地表明了这部分内存的含义
        float *pclass = pitem + 5;
        // 找到那个类别, 类别几,想象成是第一个类别是 1
        int label = std::max_element(pclass, pclass + num_classes) - pclass;
        // 获取类别置信度的最大值
        float prob = pclass[label];

        // 计算置信度
        float confidence = prob * objness;
        if (confidence < confidence_threshold){


            continue;
        }

        /*
        这里面的操作的目的是为了把前面过预测出来的结果(n x 85的结果)变成 n 个box储存在
        当前前面用了两层条件就是为了减少这个的操作过程,也就是减少n这个rows, 减小维度
        上面两个if() 满足就直接跳出循环, 这样可以减少下面的操作
        还是CPU计算的思维问题, 尽可能地减少计算很重要的
        上面两个If其实不做也可以,但是问题就是会增加很多的计算量
        */

        // 拿到前面4个参数, cx, cy, width, height
        float cx = pitem[0];
        float cy = pitem[1];
        float width = pitem[2];
        float height = pitem[3];

        // 通过cx, cy, width, height  左上角 右下角的坐标
        float left = cx - width * 0.5;
        float top = cy - height * 0.5;
        float right = cx + width * 0.5;
        float bottom = cy + height * 0.5;

        // 将left, top, right, bottom, confidence, float(label) 都储存进boxes里面
        boxes.emplace_back(left, top, right, bottom, confidence, (float)label);
    }
        // 现在开始对全部的box做NMS操作
        /*
        这句话是拿来对confidence进行排序的, 从boxes的开头到结尾
        这句话是lambda表达式, C++中lambda表达式用[]开始
        Box &a, Box &b表示lambda表达式的函数头
        return a.confidence > b.confidence; 如果满足,返回True
        这里用引用的目的是为了不去修改
        */
        std::sort(boxes.begin(), boxes.end(), [](Box &a, Box &b)
                  {

     return a.confidence > b.confidence; });

        // 定义一个标签用于判断是否删除这个框, 长度跟boxes等同
        // false保留True删除
        std::vector<bool> remove_flags(boxes.size());

        // 提前做了预分配, 用了这个性能会好很多
        std::vector<Box> box_result;
        box_result.reserve(boxes.size());

        // 定义一个lambda表达式计算iou
        auto iou = [](const Box &a, const Box &b)
        {


            // 求交集, 所以需要左上角里面的点和右下角里面的点,这里用的是里面的点
            // 思考用max还是min,考虑清楚图像中, 左上角才是(0, 0)
            float cross_left = std::max(a.left, b.left);
            float cross_right = std::min(a.right, b.right);
            float cross_top = std::max(a.top, b.top);
            float cross_bottom = std::min(a.bottom, b.bottom);
            //计算出来corss area
            float cross_area = std::max(0.0f, cross_right - cross_left) * std::max(0.0f, cross_bottom - cross_top);
            // 计算出并集, 这里是计算出两个面积相加再减去cross_area, 比较巧妙的实现
            float union_area = std::max(0.0f, a.right - a.left) * std::max(0.0f, a.bottom - a.top) + std::max(0.0f, b.right - b.left) * std::max(0.0f, b.bottom - b.top) - cross_area;

            // 没有交集的情况
            if (cross_area == 0 || union_area == 0)
            {


                return 0.0f;
            }

            // 如果有交并集
            return cross_area / union_area;
        };

        // 便利每一个box, 看下
        for (int i = 0; i < boxes.size(); ++i)
        {


            // if True, 表示前面标记过了会被删除, 跳过
            if (remove_flags[i]){


                continue;
            }

            /*
            第一次循环找到最大的那个框,然后开始对比其他删掉跟他iou重合度大的
            第二次就是第一次删完之后iou最大的框,这个框跟第一个框iou不大所以没有被删除
            开始删掉框框然后继续往下走
            这里说的删除就是给框框打上True的标签
            */
            auto &ibox = boxes[i];
            box_result.emplace_back(ibox);
            for (int j = i + 1; j < boxes.size(); j++)
            {


                if (remove_flags[j]){


                    continue; // 被标记过跳出循环
                }

                // 这里判断框框两个条件: 删掉重合度大的还有类别是一样的
                auto &jbox = boxes[j];
                if (ibox.label == jbox.label){


                    // 判断NMS阈值
                    if (iou(ibox, jbox) >= nms_threshold){


                        remove_flags[j] = true;
                    }
                }
            }
        }

        return box_result;
    }
6. gpu decoder
这段代码显示创建一个box_result来储存解码后的box信息。然后像正常的操作一样, 创建三个指针指向预测结果(predict), 解码后储存的信息的指针(output_device), Host上用于展示的内存。注意这里三个指针都是在CPU上面的。
这里的output_device, output_host第一个数是count, count框框的数量
开辟好内存后, 把CPU上的predict放到GPU上操作, 然后操作完把结果放到output_device里面去, 这里还是在GPU上, 然后把GPU的output_device放到CPU上面去, 这里是output_host。
返回的output_device, output_host是带有全部output信息, 这里的n会通过objectness, confidence过滤而减少再送去NMS过滤, 这里面的信息是flag表达是否会被添加进box_result, 这是为了在送去NMS的时候高效操作, 这里也是出于对性能的考虑, vector增删改查是O(n)时间复杂度, 这里的信息就是告诉后面的box_result是否把框加进去。
最后for循环添加
vector<Box> gpu_decode(float *predict, int rows, int cols, float confidence_threshold = 0.25f, float nms_threshold = 0.45f)
{


    /*
    参数解析:
    predict 是指向data的指针
    rows 是输出data的行数
    cols是是5(位置信息) + 类别
    confidence_threshold 置信度阈值
    nms_threshold nms阈值
    */
    vector<Box> box_result; // 用来保存解码后的边界框信息
    // 创建一个cudaStream_t类型的流, stream
    cudaStream_t stream = nullptr;
    checkRuntime(cudaStreamCreate(&stream));

    // 定义三个float指针变量
    float *predict_device = nullptr;
    float *output_device = nullptr;
    float *output_host = nullptr;

    /*表示输出数量不确定的数组,用[count, box1, box2, box3]的方式,此时需要有最大数量限制
    分配一块足够大的内存, 第一个元素是count, 这里我们设置每个图像不超过1000个bounding box
    */
    int max_objects = 1000;
    // left, top, right, bottom, confidence, class, keepflag 一共7个
    int NUM_BOX_ELEMENT = 7;

    // 分配内存到GPU上
    checkRuntime(cudaMalloc(&predict_device, rows * cols * sizeof(float)));
    // 分配一块足够大的内存, 第一个元素是count
    checkRuntime(cudaMalloc(&output_device, sizeof(float) + max_objects * NUM_BOX_ELEMENT * sizeof(float)));
    // 分配CPU内存
    checkRuntime(cudaMallocHost(&output_host, sizeof(float) + max_objects * NUM_BOX_ELEMENT * sizeof(float)));
    // 把predict的内存复制到predict_device
    checkRuntime(cudaMemcpyAsync(predict_device, predict, rows * cols * sizeof(float), cudaMemcpyHostToDevice, stream));
    // 调用kernel函数, 在GPU进行解码
    decode_kernel_invoker(
        predict_device, rows, cols - 5, confidence_threshold,
        nms_threshold, nullptr, output_device, max_objects, NUM_BOX_ELEMENT, stream);

    // 使用cudaMemcpyAsync将解码好的output_device拷贝到CPU上面去
    checkRuntime(cudaMemcpyAsync(output_host, output_device,
                                 sizeof(int) + max_objects * NUM_BOX_ELEMENT * sizeof(float),
                                 cudaMemcpyDeviceToHost, stream));

    // 等待异步拷贝完成
    checkRuntime(cudaStreamSynchronize(stream));

    // 这里解码完了之后, 这个是框框的个数
    int num_boxes = min((int)output_host[0], max_objects);
    // 遍历每一个框框
    for (int i = 0; i < num_boxes; i++)
    {


        // 找到第一个地址
        float *ptr = output_host + 1 + NUM_BOX_ELEMENT * i;
        int keep_flag = ptr[6]; // 最后一个位置就是flag的值
        if (keep_flag)  // True
        {


            box_result.emplace_back(
                ptr[0], ptr[1], ptr[2], ptr[3], ptr[4], (int)ptr[5]);
        }
    }

    // 销毁先前创建的CUDA流对象, 释放流对象占用的内存空间
    checkRuntime(cudaStreamDestroy(stream));
    checkRuntime(cudaFree(predict_device));  // 释放GPU上分配预测结果的内存
    checkRuntime(cudaFree(output_device));   // 释放GPU上分配解码输出的内存
    checkRuntime(cudaFreeHost(output_host)); // 释放在主机上分配的输出结果缓冲区的内存

    return box_result;
}
7. gpu_decode.cu文件 void decode_kernel_invoker()
在这段代码中间使用了两个核函数, 第一个核函数decode_kernel是用来对置信度的阈值做一个过滤, 第二个fast_nms_kernel用来对NMS做一个过滤操作。
/*
decode_kernel_invoker(
    predict_device, rows, cols - 5, confidence_threshold,
    nms_threshold, nullptr, output_device, max_objects, NUM_BOX_ELEMENT, stream);
*/
void decode_kernel_invoker(
    float* predict, int num_bboxes, int num_classes, float confidence_threshold,
    float nms_threshold, float* invert_affine_matrix, float* parray, int max_objects, int NUM_BOX_ELEMENT, cudaStream_t stream){


/*
参数解析:
predict: 预测结果, 这个就是data, 未处理未过滤的predict
num_bboxes: 在预测结果的(n x num_classes+ 5) tensor中, 多少行就是多少个box
num_classes: 类别数量
confidence_threshold: 置信度阈值
nms_threshold: nms阈值
invert_affine_matrix: 逆矩阵的指针
parray: 输出结果数组
max_objects: 最大数量框, 这边设置的是1000, 只是拿来确保有足够的内存
NUM_BOX_ELEMENT: Box的element, left, top, right, bottom, confidence, class, keepflag 一共7个
stream: 流
*/
    // 这里是确保有足够的线程去处理每一个box, 也就是每一个预测结果,所以用num_boxxes
    // 确保每个block的线程不超过512
    auto block = num_bboxes > 512 ? 512 : num_bboxes;
    auto grid = (num_bboxes + block - 1) / block;

    /* 如果核函数有波浪线,没关系,他是正常的,你只是看不顺眼罢了 */
    decode_kernel<<<grid, block, 0, stream>>>(
        predict, num_bboxes, num_classes, confidence_threshold,
        invert_affine_matrix, parray, max_objects, NUM_BOX_ELEMENT
    );

    // 这里是针对每张图的框,确保每个狂都能被线程处理
    // 同样确保每个block的线程不超过512
    block = max_objects > 512 ? 512 : max_objects;
    grid = (max_objects + block - 1) / block;
    fast_nms_kernel<<<grid, block, 0, stream>>>(parray, max_objects, nms_threshold, NUM_BOX_ELEMENT);
}
8. kernel函数decode_kernel
-
先是在输入的predict(n x 85)的tensor上找到每一个objectness, 先拿objectness跟置信度阈值过滤。这个过程中给你,pitem是每一个n中object的指针, 计算的时候需要索引position。这里是过滤操作就不需要atomicAdd(), 不满足条件直接过滤掉.这里的过滤操作不需要使用 atomicAdd(),因为每个线程都是独立处理一个 bounding box。
-
过滤完了再拿confidence过滤一次, 这边也是减少计算量, objectness过滤掉了就不用计算confidence, 仍然在predict的输出tensor操作
-
这边过滤完就要恢复成框送给NMS过滤了, parray是output_device, 前面return了就不会存入parray/output_device, 这里的指针用pout_item纸箱每一个输出的结果, output_device存着很多没有被NMS过滤的bounding box
-
在写入output_device/parray,需要使用atomicAdd()确保不会被写入同个输出位置
-
写入的时候flag是1, 这是为了方便后续NMS过滤,一旦NMS不达标, 直接flag = 0
static __global__ void decode_kernel(
    float *predict, int num_bboxes, int num_classes, float confidence_threshold,
    float *invert_affine_matrix, float *parray, int max_objects, int NUM_BOX_ELEMENT)
{


    // 确保有足够的thread, 每一个thread处理一个bounding box
    // 如果threadId超过了bounding box的数量, 这样就不会进行后续处理, 每个预测框都敲好被处理了一次
    int position = blockDim.x * blockIdx.x + threadIdx.x;
    if (position >= num_bboxes){


        return;
    }

    /*
     predict是n x 85tensor输出的首地址
     pitem 就是每行的指针, pitem[0] - pitem[3] 是位置信息, pitem[4]是objness
    */
    float *pitem = predict + (num_classes + 5) * position;
    float objectness = pitem[4];
    if (objectness < confidence_threshold){


        return;
    }

    // 从这个元素开始都是confidence
    float *class_confidence = pitem + 5;
    // 这里是第一个condience, 取到数值
    float confidence = *class_confidence++;

    // for循环判断是哪个类别
    int label = 0;
    for (int i = 1; i < num_classes; i++, ++class_confidence)
    {


        if (*class_confidence > confidence)
        {


            // 如果大了, 就更新class_confidence
            confidence = *class_confidence;
            label = i; // 取到label
        }
    }

    /*
    上面的最后算出来的condifence是class_confidence只是条件概率
    当前bounding box的 confidence(置信度) =  objectness(物体概率) x class_confidence(条件概率)
    最后拿来计算置信度的confidence是最大的class_confidence
    */
    confidence *= objectness;
    if (confidence < confidence_threshold){


        return;
    }

    /*
    这里是恢复boudingbox的操作, 需要先取出来中心点(cx, cy), width, height
    */
    float cx = *pitem++;
    float cy = *pitem++;
    float width = *pitem++;
    float height = *pitem++;
    float left = cx - width * 0.5f;
    float top = cy - height * 0.5f;
    float right = cx + width * 0.5f;
    float bottom = cy + height * 0.5f;
    // affine_project(invert_affine_matrix, left,  top,    &left,  &top);
    // affine_project(invert_affine_matrix, right, bottom, &right, &bottom);


    /*
    atomicAdd()简介:
    int atomicAdd(int* address, int val);
    这个函数执行的操作是将指定地址 address 处的值与 val 相加,并将结果写回 address 处。这个操作是原子性的,即不会受到并发写入的干扰,保证了数据的正确性。
    使用 atomicAdd 函数可以保证多个线程在对同一个内存地址进行写操作时,不会发生数据覆盖的问题。
    由于每个线程都会在输出中写入一个bounding box,因此需要使用原子操作确保每个线程写入的位置唯一
    */

    /*
    [count, box1, box2, box3]
    因为GPU解码是多线程的, 所以需要用count记录已经处理了多少个bounding box。
    CPU单线程不需要, GPU需要确保不会将一个检测框重复输出或者漏掉。
    atomicAdd -> count +=1 返回 old_count
    这里是对parray(output_device第一个值+1)
    */
    int index = atomicAdd(parray, 1);
    // 如果超过了1000, 这个线程就没必要处理后面的boxes
    if (index >= max_objects)
        return;

    // left, top, right, bottom, confidence, class, keepflag
    float *pout_item = parray + 1 + index * NUM_BOX_ELEMENT;
    *pout_item++ = left;
    *pout_item++ = top;
    *pout_item++ = right;
    *pout_item++ = bottom;
    *pout_item++ = confidence;
    *pout_item++ = label;
    *pout_item++ = 1; // 1 = keep, 0 = ignore
}
9. fast_nms_kernel
- 这里开的线程其实是不超过1000的
- 这里不删除bounding box,只是一个一个比较而已
- 如果当前pcurrent被更高的阈值pitem高度重合(达到NMS阈值), 将被干掉
static __global__ void fast_nms_kernel(float *bboxes, int max_objects, float threshold, int NUM_BOX_ELEMENT)
{


/*
参数解析:
bboxes:存储了所有待处理的检测框信息的一维数组;
max_objects:最大的输出检测框数量; 案例设置的是1000, 预计一张图不会超过1000个bounding box
threshold:用于判断两个检测框是否重叠的 IOU 阈值;
NUM_BOX_ELEMENT:每个检测框存储的元素个数
一般包含: left, top, right, bottom, confidence, class, keepflag
*/

    // 计算position, 超过count不用进行下面计算了
    int position = blockDim.x * blockIdx.x + threadIdx.x;
    int count = min((int)*bboxes, max_objects);
    if (position > count){


        return;
    }

    /*
    重叠度高, 并且类别相同,然后是condience小于另外一个, 就删掉他
    极端情况下会有误删, 如果测试cpu map的时候, 只能采用cpu nms
    日常推理的时候, 则可以使用这个NMS
    left, top, right, bottom, confidence, class, keepflag
    */

    // 这里计算出来当前的指针, 在bboxes上
    float *pcurrent = bboxes + 1  + position * NUM_BOX_ELEMENT;
    // 便利每一个bbox
    for (int i = 0; i < count; ++i){


        float *pitem = bboxes + 1 + i * NUM_BOX_ELEMENT;
        // NMS计算需要保证类别必须相同
        if (i == position || pcurrent[5] ){


            continue;
        }

        // 判断置信度大小, 如果比pcurrent大,干掉pcurrent
        if (pitem[4] > pcurrent[4]){


            // 如果两个一样大,保留编号小的那个
            if (pitem[4] == pcurrent[4] && i < position){


                continue;
            }

            // 拿前面四个信息计算IOU
            float iou = box_iou(
                pcurrent[0], pcurrent[1], pcurrent[2], pcurrent[3],
                pitem[0], pitem[1], pitem[2], pitem[3]);

            if (iou > threshold){


                pcurrent[6] = 0;  // 这里pitem跟pcurrent重合度高而且达到阈值
                return;
            }
        }
    }
}
10. box_iou
跟CPU一样, a_area + b_area - c_area
static __device__ float box_iou(
    float aleft, float atop, float aright, float abottom,
    float bleft, float btop, float bright, float bbottom)
{


    float cleft = max(aleft, bleft);
    float ctop = max(atop, btop);
    float cright = min(aright, bright);
    float cbottom = min(abottom, bbottom);

    float c_area = max(cright - cleft, 0.0f) * max(cbottom - ctop, 0.0f);
    if (c_area == 0.0f)
        return 0.0f;

    float a_area = max(0.0f, aright - aleft) * max(0.0f, abottom - atop);
    float b_area = max(0.0f, bright - bleft) * max(0.0f, bbottom - btop);
    return c_area / (a_area + b_area - c_area);
}
11. 总结:
- int main(){}
- 这里用load_file打开图片, 这里是用二进制模式打开文件(ios::binary), 使用static std::vector<uint8_t>存储数据。
- YOLOV5给出来的data是n x (5 + classes)的, 这里通过计算可以获得行数列数, 然后传入只想data的指针, nrows, ncols解码, 本案例提供cpu解码和GPU解码
- 解码结束后返回的是
vector<Box>,Box是自定义数据类型, 每一个box是一个bounding box, 里面储存着left, top, right, bottom, confidence, label - 用OPencv给他在input-image画出来
- 再存到workspace里面
- cpu解码流程
- 创建一个box类型的vector, 后面用来添加过滤好的bounding box
- 对每一个bouding box进行objectness(物体概率)的过滤再进行confidence概率的过滤
- 上面两步过滤完就可以恢复成框准备进行NMS过滤,恢复成框记得左上角才是原点
- 这里NMS是使用打分的办法, 用remove_flags(vector)因为vector的增加元素时间复杂度高, 这里是新开一个box_result, 把合格的bounding box的信息加进去
- CPU的计算资源很宝贵的, 能少一次就要少一次
- GPU解码流程
- 在GPU分别开辟输入内存, 输出结果内存, 在CPU上开辟输出结果内存。先把YOLOV5输出的数据放到GPU, 操作结束再拿回CPU
- 操作结束后返回到Host的数据是经过objectness, confidence过滤的bounding box信息,因为NMS过滤删除太浪费资源, 就给他们打上了flag, 用vector中的emplace_back()添加合格的
- 相比于 push_back,emplace_back 的效率更高,因为 push_back 会将对象复制或移动到容器中,而 emplace_back 直接在容器中构造对象,避免了复制或移动的开销。需要频繁向容器中添加元素的场景下,使用emplace_back可以获得更好的性能
- 释放内存
- GPU解码的布局分配
- 第一步objectness, confidence过滤, 要确保有足够线程去处理box, 所以这里是num__bboxes
- 第二部确保每个bounding boxes中不超过1000个objectness
- 跟CPU是一样的, 只不过没有了循环, 这里的index是threadIdx来告诉当前线程处理哪个数据
- 作者说的极端情况下误删
- 在极端情况下,可能会出现多个检测框重叠度非常高,condience值也非常接近的情况。在这种情况下,根据条件进行过滤时,可能会误删某些框,即删除了应该保留的框。这是因为在重叠度很高的情况下,IOU的计算结果可能不太准确,所以需要注意这种情况的处理。
- 这个fastnms满足日常推理, 如果用做map计算, 还是用CPU解码