1- 前言
本文以小案例的形式,总结一下vuex+常用api+内置组件+自定义组件+第三方插件。
关于uni-app的知识,可以查看这篇博客:
【uni-app】详细总结uni-app基础知识和如何配置项目,运行到模拟器和小程序端,附案例和图(建议收藏)
2- 组件
2.1 简介
- 组件是视图层的基本组成单元。
- 组件是一个单独且可复用的功能模块的封装。
每个组件,包括如下几个部分:以组件名称为标记的开始标签和结束标签、组件内容、组件属性、组件属性值。
- 组件名称由尖括号包裹,称为标签,它有开始标签和结束标签。结束标签的
<后面用/来表示结束。结束标签也称为闭合标签. - 在开始标签和结束标签之间,称为组件内容。
- 开始标签上可以写属性,属性可以有多个,多个属性之间用空格分割。
- 每个属性通过
=赋值。
2.2 内置组件
举例view
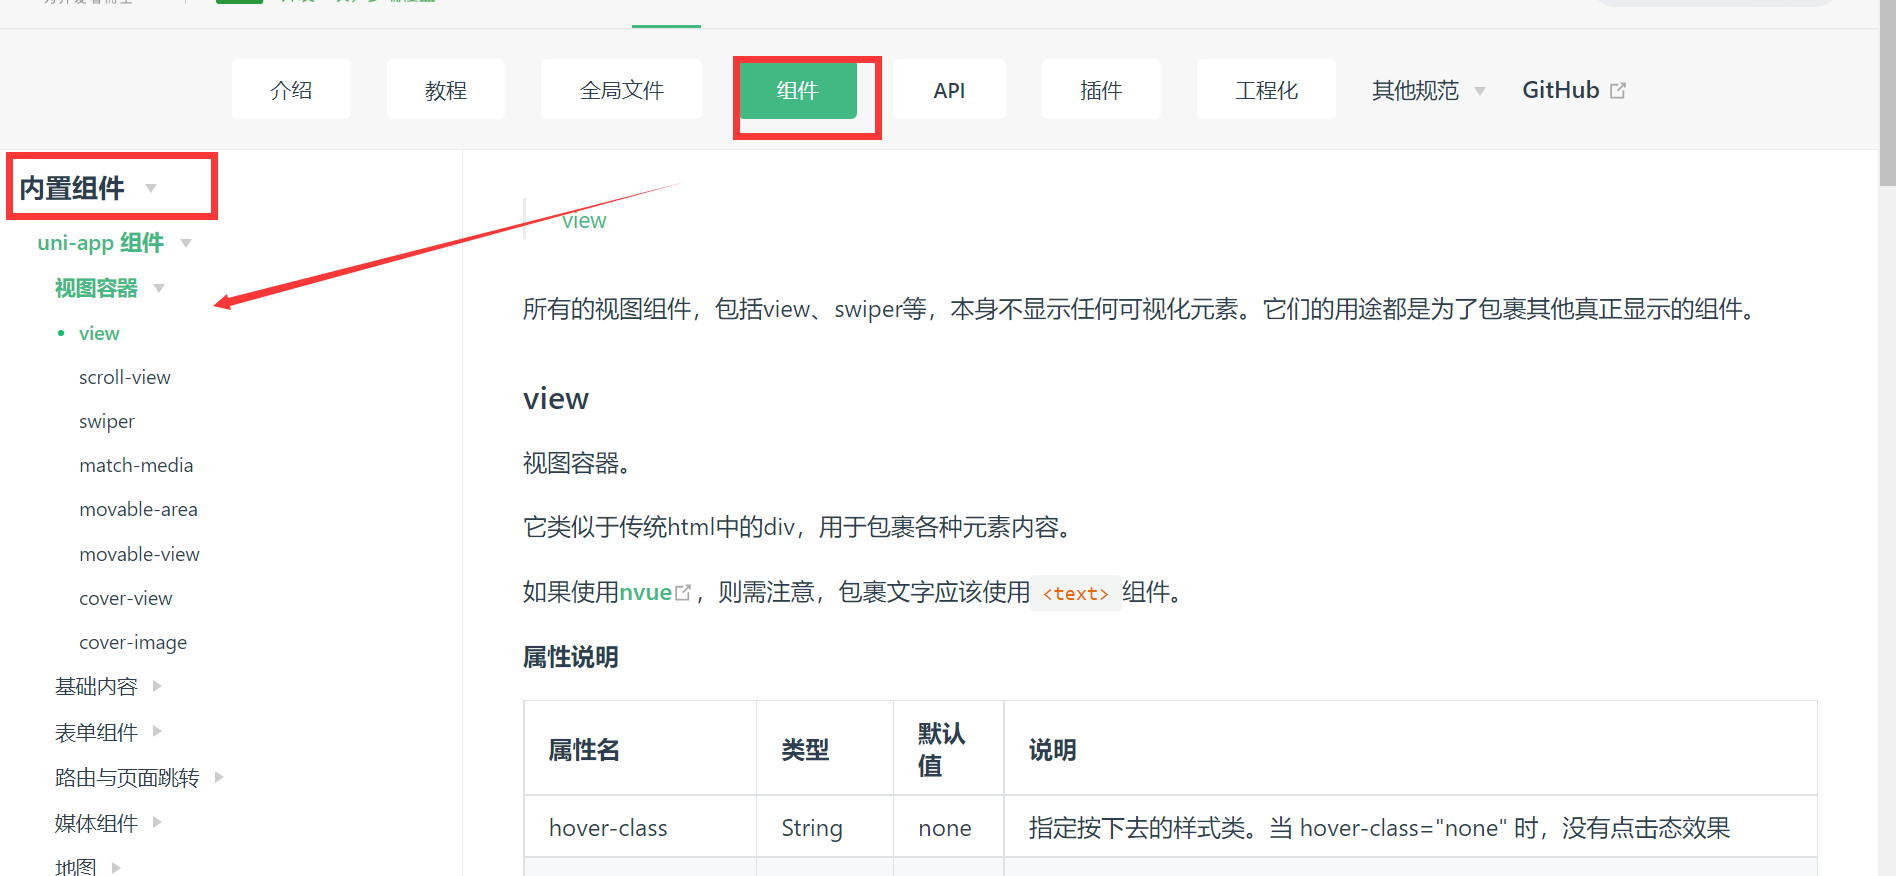
view
所有的视图组件,包括view、swiper等,本身不显示任何可视化元素。它们的用途都是为了包裹其他真正显示的组件。
- Tips
小程序平台如果使用 <div> ,编译时会被转换为 <view>。
App平台 Vue2 项目在节点非常多时可以尝试使用 <div> 替换 <view> 以提升渲染性能。
3- 插件
3.1 常用插件
- hbuilder 插件市场
https://ext.dcloud.net.cn/search?q=&orderBy=Relevance&cat1=2
- uview
- uView UI,是全面兼容nvue的uni-app生态框架,全面的组件和便捷的工具会让您信手拈来,如鱼得水
https://www.uviewui.com/
- ColorUI
- 鲜亮的高饱和色彩,专注视觉的小程序组件
https://github.com/weilanwl/ColorUI
https://beta3.color-ui.com/
3.2 介绍 uview
- 详细看官网笔记
- 图示
3.2 案例
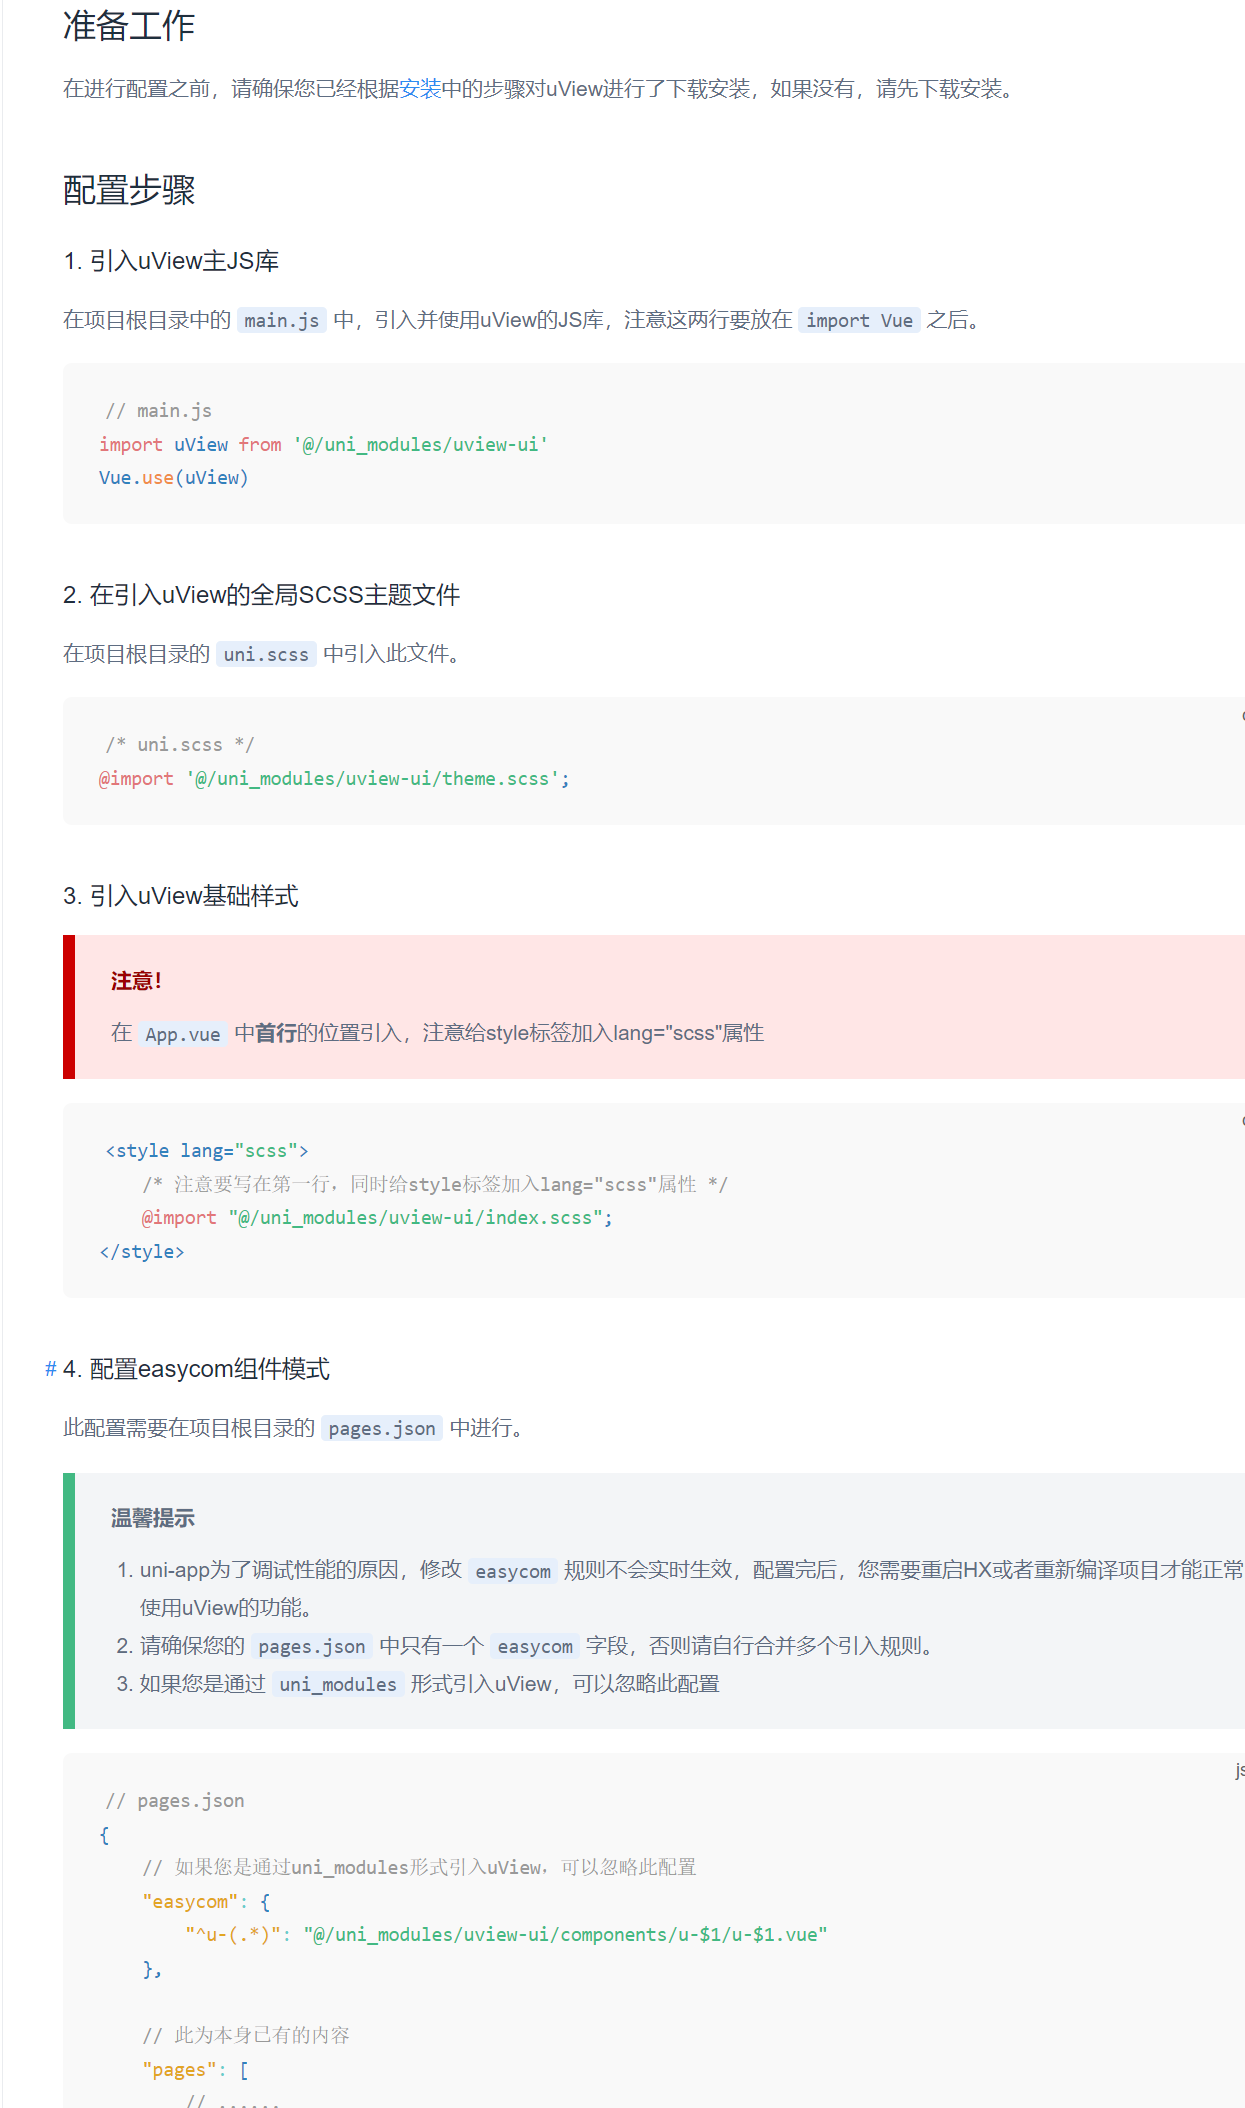
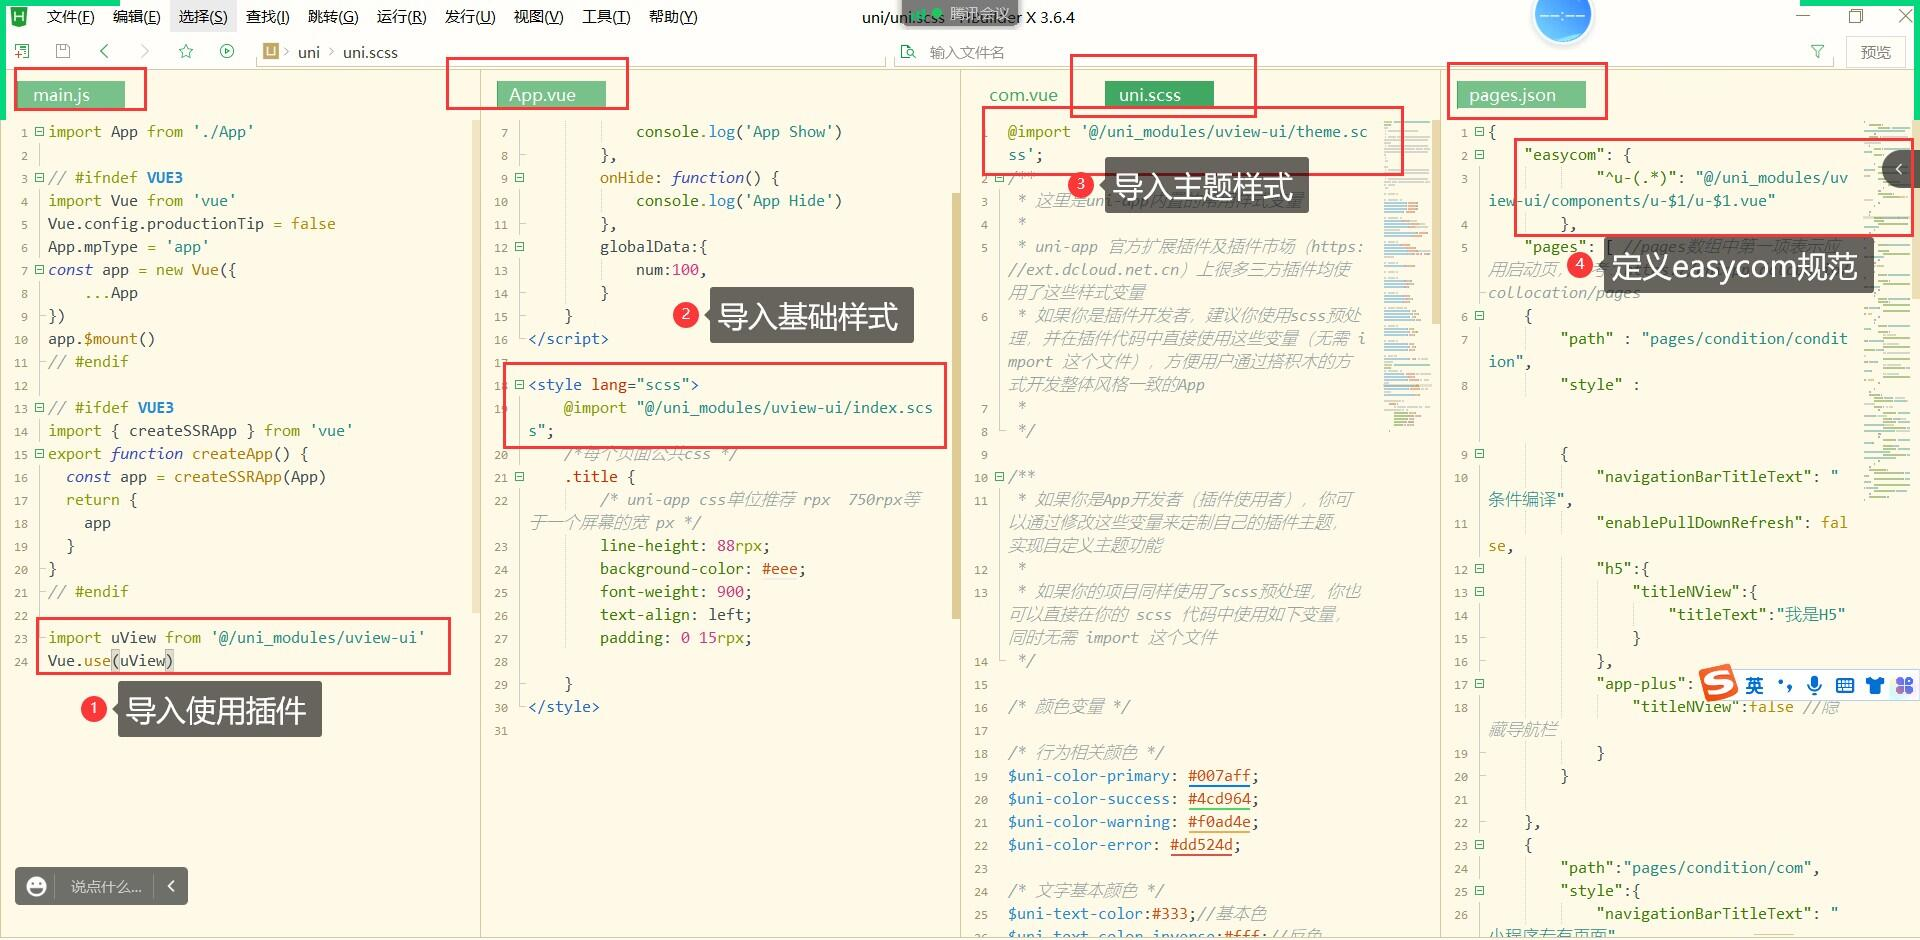
3.2.1 引入uView主JS库
- 在项目根目录中的
main.js中,引入并使用uView的JS库,注意这两行要放在importVue之后。
// main.js
import uView from '@/uni_modules/uview-ui'
Vue.use(uView)
3.2.2 在引入uView的全局SCSS主题文件
- 在项目根目录的
uni.scss中引入此文件。
/* uni.scss */
@import '@/uni_modules/uview-ui/theme.scss';
3.2.3 引入uView基础样式
注意!
在App.vue中首行的位置引入,注意给style标签加入lang="scss"属性
<style lang="scss">
	/* 注意要写在第一行,同时给style标签加入lang="scss"属性 */
	@import "@/uni_modules/uview-ui/index.scss";
</style>
3.2.4 配置easycom组件模式
- 此配置需要在项目根目录的
pages.json中进行。
温馨提示
uni-app为了调试性能的原因,修改easycom规则不会实时生效,配置完后,您需要重启HX或者重新编译项目才能正常使用uView的功能。
请确保您的pages.json中只有一个easycom字段,否则请自行合并多个引入规则。
如果您是通过uni_modules形式引入uView,可以忽略此配置
// pages.json
{


	// 如果您是通过uni_modules形式引入uView,可以忽略此配置
	"easycom": {


		"^u-(.*)": "@/uni_modules/uview-ui/components/u-$1/u-$1.vue"
	},

	// 此为本身已有的内容
	"pages": [
		// ......
	]
}
3.2.5 使用
<template>
	<view style="padding: 20px;">
		<u-button type="primary" text="确定"></u-button>
		<u-button type="primary" :plain="true" text="镂空"></u-button>
		<u-button type="primary" :plain="true" :hairline="true" text="细边"></u-button>
		<u-button type="primary" :disabled="disabled" text="禁用"></u-button>
		<u-button type="primary" loading loadingText="加载中"></u-button>
		<u-button type="primary" icon="map" text="图标按钮"></u-button>
		<u-button type="primary" shape="circle" text="按钮形状"></u-button>
		<u-button text="渐变色按钮" color="linear-gradient(to right, rgb(66, 83, 216), rgb(213, 51, 186))"></u-button>
		<u-button type="primary" size="small" text="大小尺寸"></u-button>
	</view>
</template>

<script>
export default {
	data() {
		return {
			disabled: true
		};
	}
};
4- 全局vuex
4.1 介绍
- Vuex 是什么?
Vuex 是一个专为 Vue.js 应用程序开发的状态管理模式。它采用集中式存储管理应用的所有组件的状态,并以相应的规则保证状态以一种可预测的方式发生变化。
uni-app 内置了 Vuex 。
- 核心概念
每一个Vuex应用的核心就是 store(仓库),它包含着你的应用中大部分的状态 (state)。
状态管理有5个核心:state、getter、mutation、action、module。
state存放数据mutations更新数据(唯一方式)actions动作(异步api操作)getters计算,从现有的 state 计算出新的数据modules模块
4.2 初始化
- store/index.js
import Vuex from 'vuex'
import Vue from 'vue'
// 使用vuex
Vue.use(Vuex)
export default new Vuex.Store({


        // 状态
        state:{

     },
        // 改变状态的唯一方法
        mutations:{

    },
        // 异步api操作
        actions:{

    },
        // 内部计算
        getters:{

    },
        // 模块
        modules:{

    }

})
- main.js
//导入vuex
import Vuex from './store/index.js'
Vue.prototype.$store = store
4.3 案例
- store/index.js
import Vuex from 'vuex'
import Vue from 'vue'
// 使用vuex
Vue.use(Vuex)
export default new Vuex.Store({


	// 状态
	state:{


		gTitle:{


			text:'你好Vuex',
			color:'#000',
			fontSize:'24px',
			background:'#f70'
		},
		joks:[]
	},
	// 改变状态的唯一方法
	mutations:{


		setSize(state,data){


			state.gTitle.fontSize = data + 'px'
		},
		setBackgroundColor(state,data){


			state.gTitle.background = data
		},
		setJoks(state,data){


			state.joks = data
		}
	},
	// 异步api操作
	actions:{


		// 和后端交互,异步操作都会放在actions 中
		getJok(context,data){


			uni.request({


				url:"http://520mg.com/mi/list.php",
				method:'GET',
				data:data,
				/* axios get请求传参用的params,post用data,
				 uni.request post 与get 传参 也是用data
				content-type  如果是application/json
				那么data 是json ,如果是urlencoeded data就是url 编码形式
				 */
				success:res=> {


					console.log(res,"getJok");
					// actions 去调用 mutations
					context.commit('setJoks',res.data.result)
				}
			})
		}
	},
	// 内部计算
	getters:{


		// 计算所有笑话字数总和
		"totalLen":function(state){


			var count = 0;
			for(var i = 0;i <state.joks.length;i++){


				count += state.joks[i].summary.length
			}
			return count
		}
	},
	// 模块
	modules:{

    }
})
- gvuex/gvuex.vue
<template>
	<view>
		<view class="title">vuex数据</view>
		<!-- 使用vuex 的数据 更新样式与文本 -->
		<view :style="gTitle">
			{

   {$store.state.gTitle.text}}

		</view>
		<navigator url="./fontSize">修改文字大小</navigator>
		<navigator url="./backgroundColor">修改背景</navigator>
		<view>总{

   {$store.state.joks.length}}条笑话</view>
		<view>共{

   {totalLen}}字</view>
		<view class="title">
			<view class="item" v-for="item in $store.state.joks">{

   {item.summary}}</view>
		</view>

	</view>
</template>

<script>
	import {


		mapState,mapActions,mapGetters
	} from 'vuex'

	export default {


		computed:{


			...mapState(['gTitle']),
			...mapGetters(["totalLen"])
		},
		data() {


			return {


			};
		},
		onLoad() {


			// 调用getJok方法并传入参数
			// this.$store.dispatch("getJok", {


			// 	page: 1
			// })
			this.getJok()
		},
		methods:{


			...mapActions(["getJok"])
		}
	}
</script>

<style lang="scss">
	.item {


		padding: 20px;
	}
</style>
- gvuex/backgroundColor.vue
<template>
	<view>
		<view class="title">
			修改背景颜色
		</view>
		<view :style="{'backgroundColor':bgColor,height:'100px',width:'100px'}">
			{

   {bgColor}}
		</view>
		<!-- 用bgColor双向绑定 -->
		<input type="text" v-model="bgColor">
	</view>

</template>

<script>
	export default{


		data(){


			return{


				// 初始化颜色
				bgColor:this.$store.state.gTitle.background
			}
		},
		watch:{


			// 初始化颜色变化
			'bgColor':{


				handler(){


					// 更新背景颜色
					this.$store.commit('setBackgroundColor',this.bgColor)
				},
				deep:true
			}
		}
	}
</script>

<style>
</style>
- gvuex/fontSize.vue
<template>
	<view>
		<view class="title">
			修改文字大小
		</view>
		<view>
			<slider :value="fontSize" @change="sizeChange"></slider>
		</view>
	</view>

</template>

<script>
	import {


		methods
	} from '../../uni_modules/uview-ui/libs/mixin/mixin'
	export default {


		data() {


			return {


				fontSize: parseInt(this.$store.state.gTitle.fontSize)
			}
		},
		methods: {


			sizeChange(e) {


				this.fontSize = e.detail.value
				// 更新vuex中的数据
				this.$store.commit('setSize', e.detail.value)
			}
		}

	}
</script>

<style>
</style>
5- api
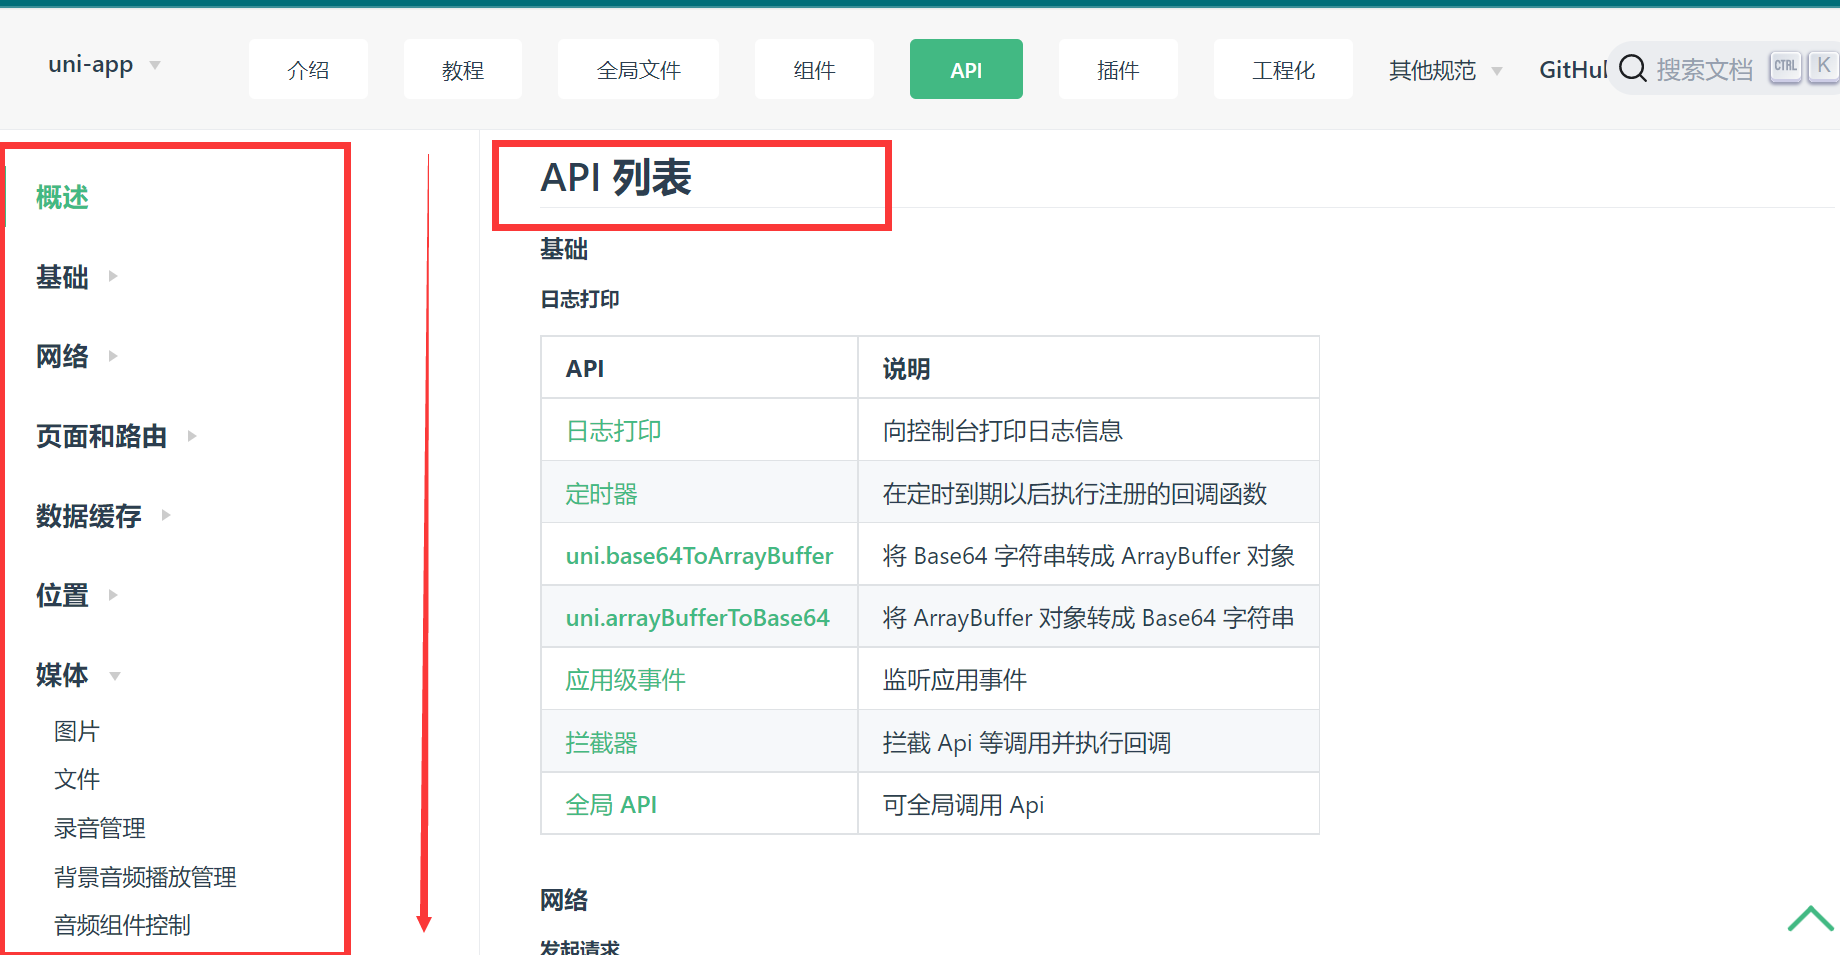
5.1 案例
写一个案例,举一下几个常用的API
uni.chooseImage()uni.uploadFile()uni.previewImage()uni.saveImageToPhotosAlbum()uni.share()uni.getSystemInfoSync()uni.setStorageSync()uni.getMenuButtonBoundingClientRect()
- info.vue
	<view>
		<view>
			<view>状态栏高度:{

   {info.statusBarHeight}}</view>
			<view>屏幕高度:{

   {info.screenHeight}};屏幕宽度:{

   {info.screenWidth}}</view>
			<view>系统:{

   {info.system}}</view>
			<view>品牌:{

   {info.model }}</view>
			<view>系统名字:{

   {info.osName}}</view>
			<view>brand:{

   {info.brand}}</view>
			<view>可以使用窗口的顶部位置:{

   {info.windowTop }}</view>
			<view>安全区域:{

   {JSON.stringify(info.safeArea) }}</view>
			<view>安全区域:{

   {JSON.stringify(info.safeAreaInsets)}}</view>
			<!-- #ifdef MP -->
			<view class="title">胶囊微信小程序</view>
			<view>导航栏高度:{

   {(menuButtonInfo.top-info.statusBarHeight)*2+menuButtonInfo.height}}</view>
			<view>胶囊:{

   {JSON.stringify(menuButtonInfo)}}</view>
			<!-- #endif -->
		</view>
		<view>
			图片预览
			<view class="title">
				选择图片
			</view>
			<button type="primary" @click="uploadImg">上传</button>
			<view v-for="item in list" :key="item" @click="preview(item)">
				<image :src="item"></image>
			</view>
	  </view>
	</view>
</template>
<script>
	export default {


		methods: {


			uploadImg() {


				var that = this;
				// 选择图片
				uni.chooseImage({


					count: 3,
					success(res) {


						for (let i = 0; i < res.tempFilePaths.length; i++) {


							uni.uploadFile({


								url: 'http://520mg.com/ajax/file.php',
								filePath: res.tempFilePaths[i],
								name: 'file',
								success: result => {


									// 转换为json
									var data = JSON.parse(result.data)
									that.list.push("http://520mg.com" + data.pic)
								}
							})
						}
					}
				})
			},
			preview(item) {


				var that = this;
				uni.previewImage({


					urls: that.list,
					current: item,
					longPressActions: {


						itemList: ['发送给朋友', '保存图片', '收藏'],
						success: function(data) {


							console.log('选中了第' + (data.tapIndex + 1) + '个按钮,第' + (data.index + 1) + '张图片');
							if (data.tapIndex == 1) {


								uni.saveImageToPhotosAlbum({


									filePath: that.list[data.index],
									success() {


										uni.showToast({


											title: "保存成功"
										})
									}
								})
							}
							if (data.tapIndex == 0) {


								uni.share({


									provider: 'weixin',
									scene: 'WXSceneSession',
									type: 2,
									imageUrl: that.list[data, index],
									success: function(res) {


										console.log("fail" + JSON.stringify(res));
									},
									fail: function(err) {


										console.log("fail" + JSON.stringify(err));
									}
								})
							}

						},
						fail: function(err) {


							console.log(err.errMsg);
						}
					}
				})
			}
		},
		data() {


			return {


				info: {

    },
				menuButtonInfo: {

    },
				list: []
			};
		},
		onLoad() {


			//获取系统信息
			const info = uni.getSystemInfoSync()
			this.info = info
			console.log(info);
			// 存储api
			uni.setStorageSync("info", info)

			// #ifdef APP-PLUS
			// 获取胶囊按钮的边界
			let menuButtonInfo = uni.getMenuButtonBoundingClientRect()
			this.menuButtonInfo = menuButtonInfo
			console.log("menuButtonInfo", menuButtonInfo);
			// #endif
		}
	}
</script>
6- 自定义组件
6.1 步骤1
在项目中新建一个 components文件夹, 用来存放公用组件, 然后有新建组件如下图:
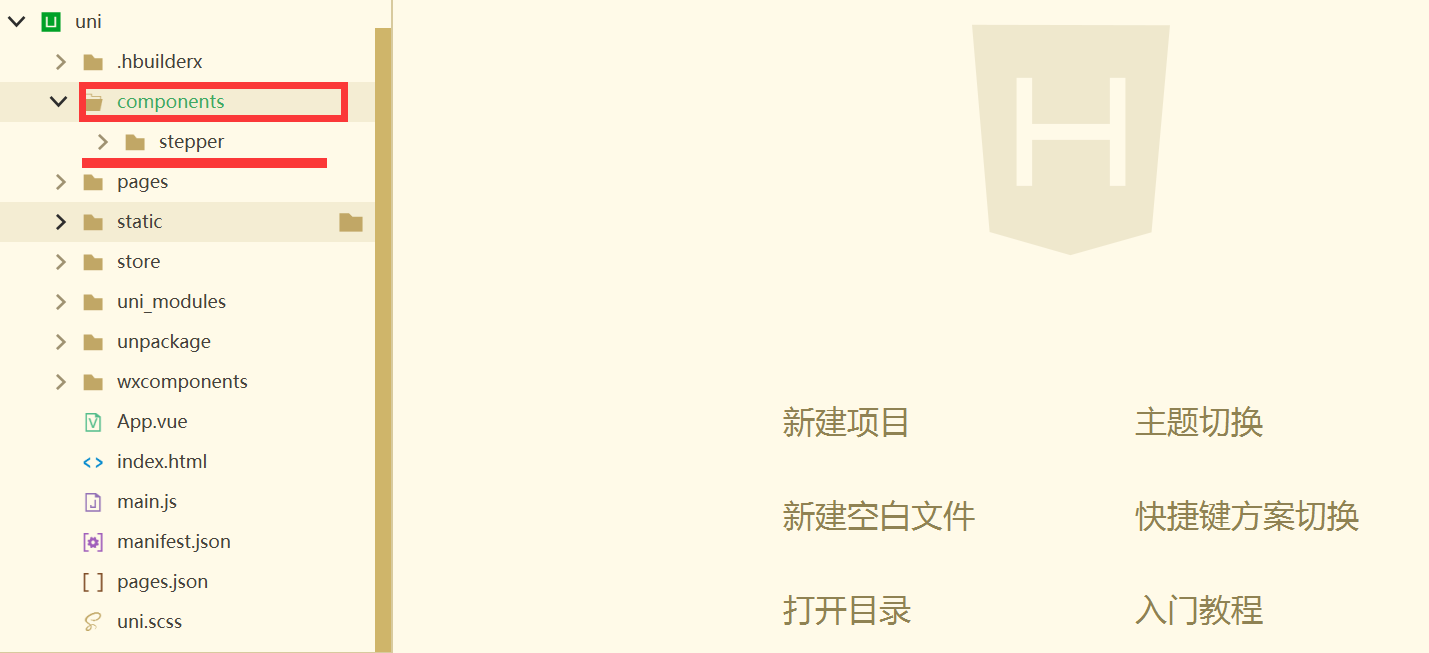
- 在新建组件中需要在
组件.vue文件中书写内容:
<template>
	<view class="stepper">
		<button size="mini" @click="count--">-</button>
		<input type="text" v-model.number="count">
		<button size="mini" @click="count++">+</button>
	</view>
</template>
- 还需要在
export default中声明方法,然后在props定义需要外界传入的参数
<script>
	export default {


		name: "stepper",
		created() {


			uni.$on('add', $event => {


				//add 事件,更新count 的值
				this.count += $event
			})
		},
		data() {


			return {


				count: this.value
			};
		},
		props: {


			// 接收参数value
			value: {


				type: Number,
				default: 1
			}
		},
		watch: {


			"count": {


				handler() {


					this.$emit("input", this.count)
				},
				deep: true
			}
		}
	}
</script>
<style lang="scss">
	.stepper {


		button,
		input {


			display: inline-block;
			width: 100rpx;
			height: 100rpx;
			font-size: 32rpx;
			line-height: 100rpx;
			text-align: center;
			padding: 0;
		}
	}
</style>
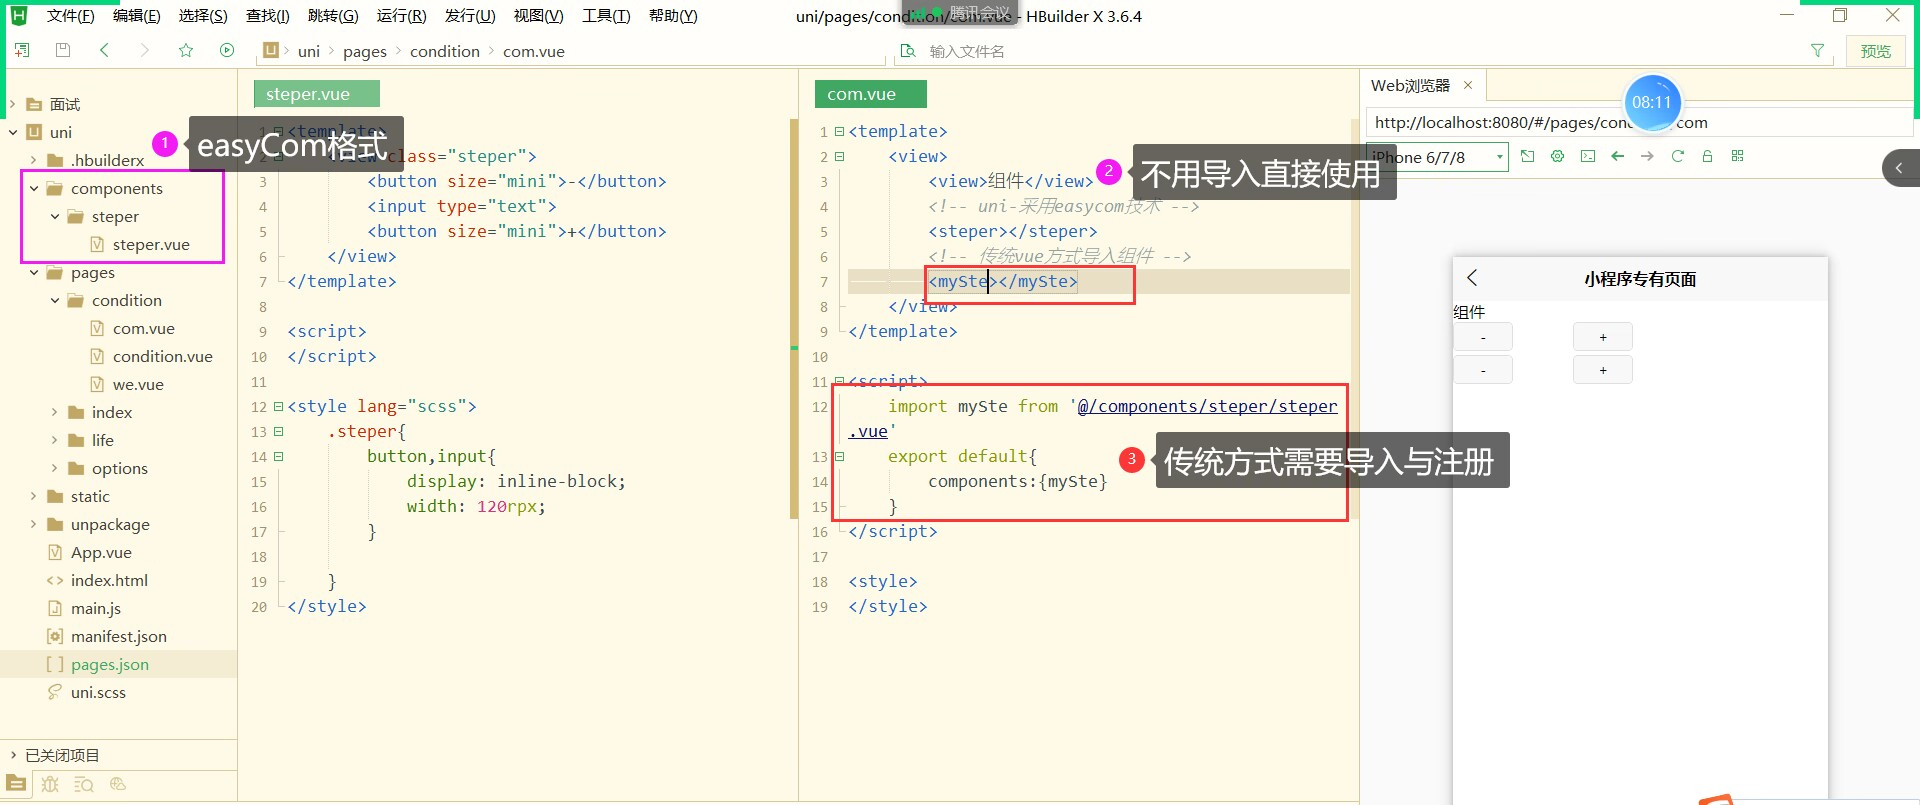
6.2 步骤2
在需要用组件的页面:
- import 导入,warning注意不要写成绝对路径
import myStep from "@/components/stepper/stepper.vue"
- 然后在
components中注册组件名称,以后用的时候就直接用这个定义的名称
components: {


			myStep
		},
6.2 步骤3
- 具体用法
:value=即为需要传入的数据
	<template>
		<view class="title">组件</view>
		<!-- uni-采用 easycom 技术 -->
		<stepper :value="d1" @input="d1=$event"></stepper>
		<!-- 传统vue 方式 导入组件v-model 是 :value="d2"和 @input="d2=$event"简写  -->
		<myStep v-model="d2"></myStep>
		<view class="title">
			<button type="primary" @click="addFive">加5</button>
		</view>
		<view>
			<view class="d1" :style="{width:d1+'px',height:d1+'px',lineHeight:d1+'px'}">
				{

   {d1}}
			</view>
			<view class="d2" :style="{width:d2+'px',height:d2+'px',lineHeight:d2+'px'}">
				{

   {d2}}
			</view>
		</view>
		<input type="text" v-model.number="d2">
	</template>
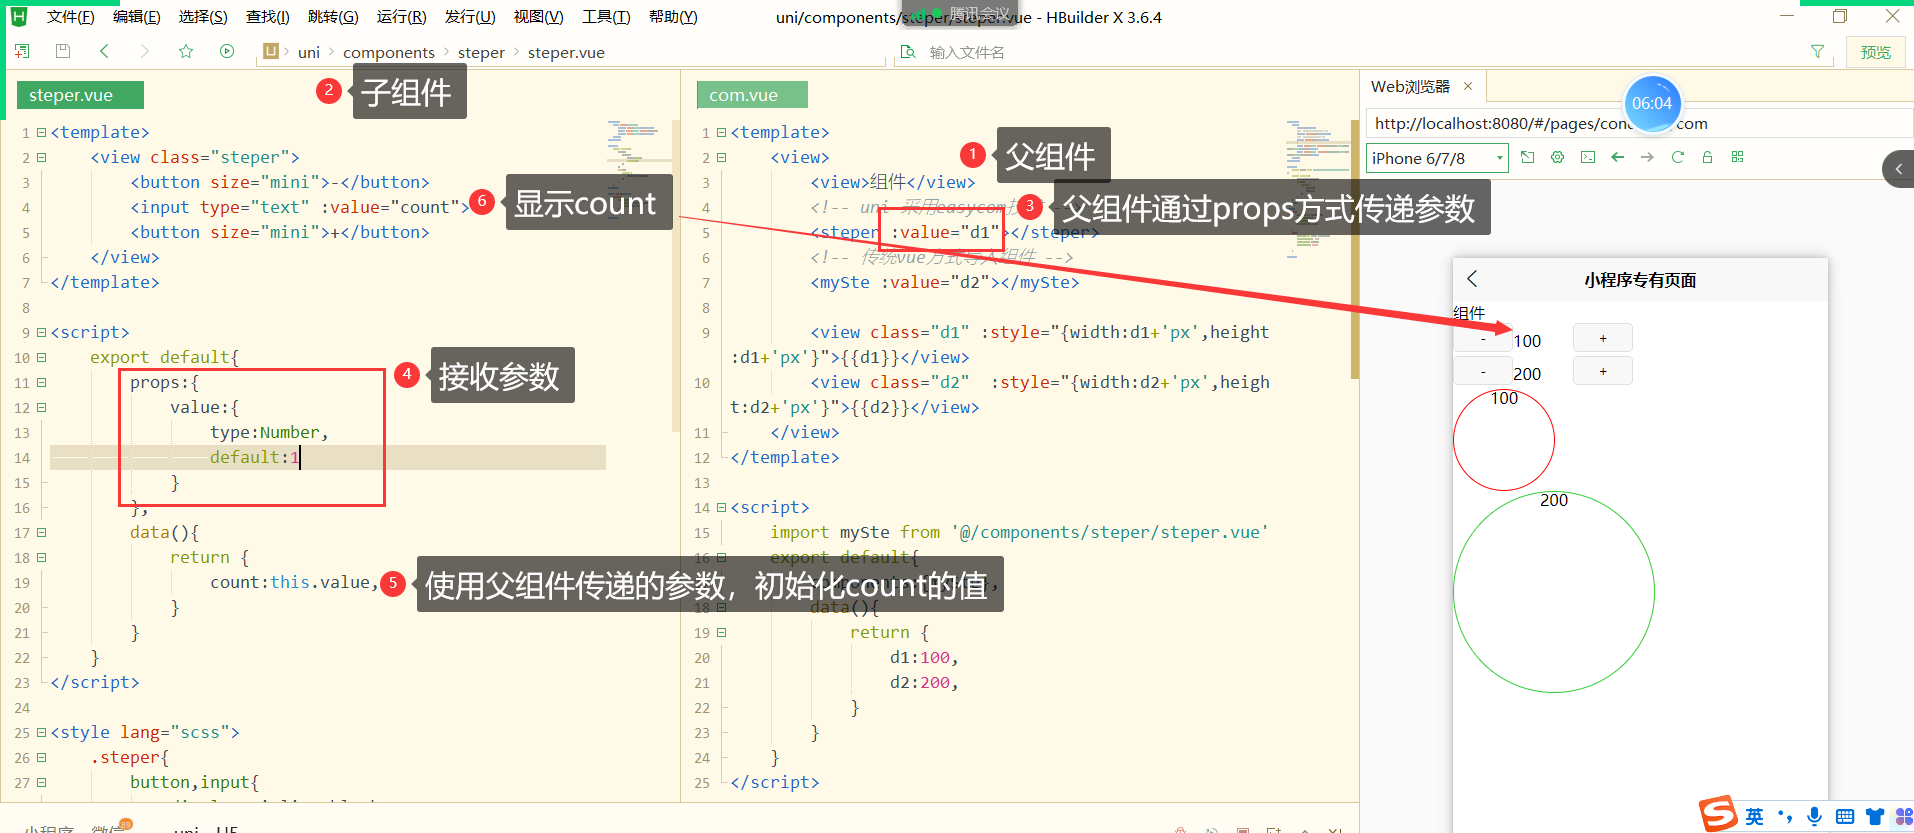
6.2 组件传参
6.2.1 父传子 props
- 父通过属性的方式传递个字组件
<steper :value="d1" ></steper>
- 子通过
props接收
props:{


    // 接收参数value
    value:{


       type:Number, //数字类型默认值为1
    default:1,
    }
 }
- 子组件可以使用
this .count = this.value
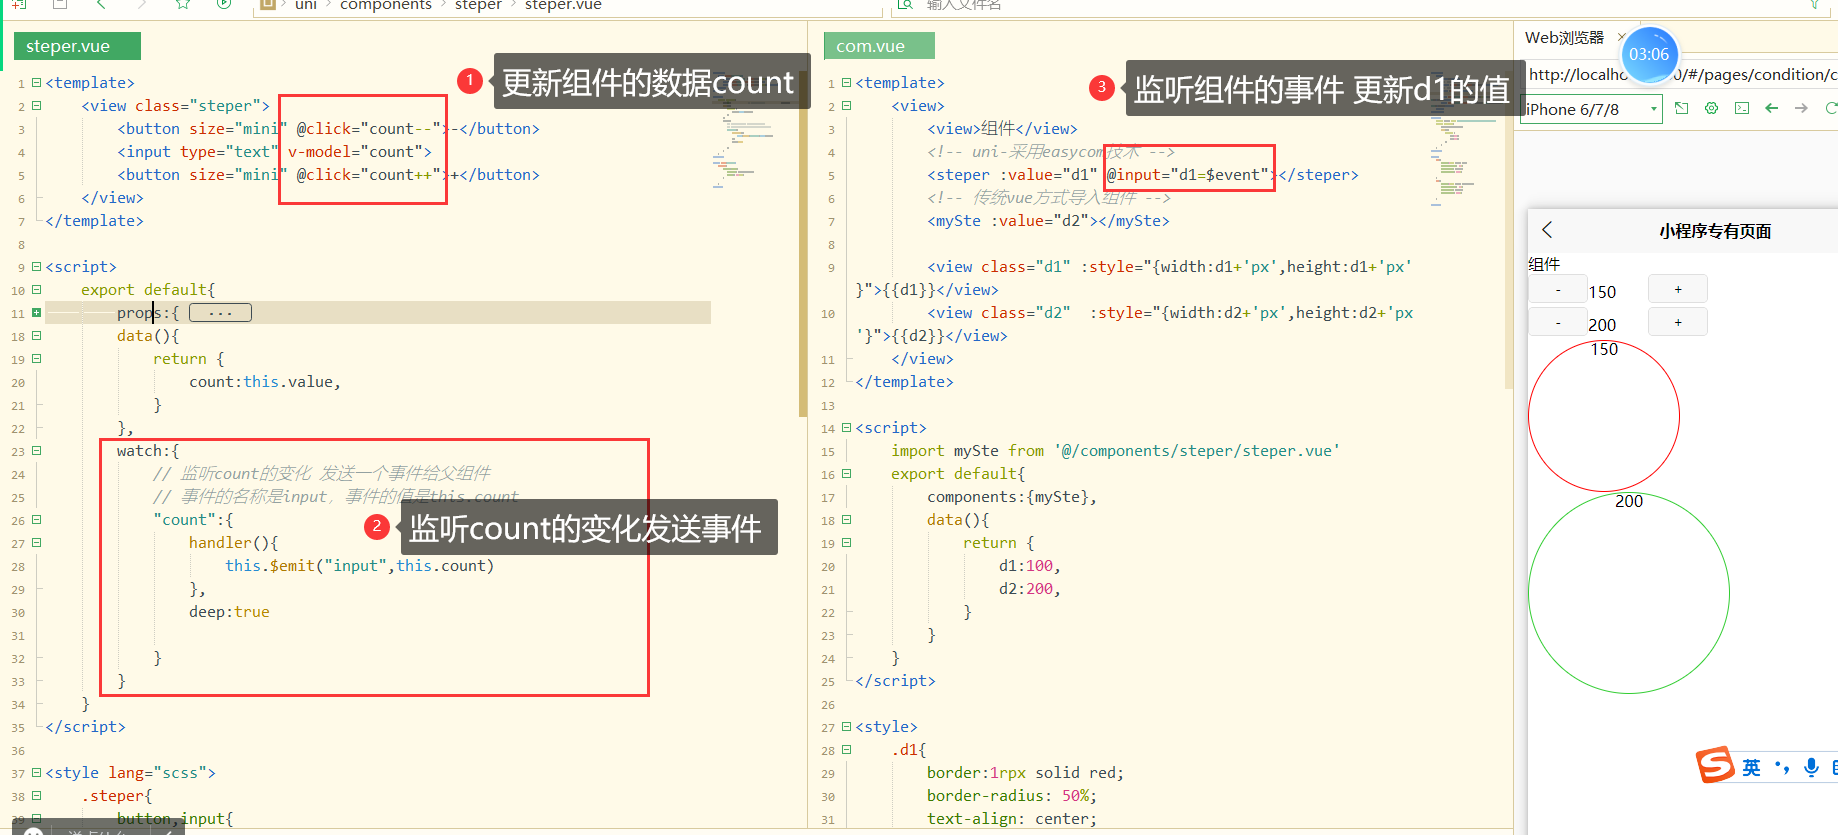
6.2.2 子传父 事件 $emit
- 子触发事件
this.$emit("input",this.count)
- 父监听事件更新值
<steper :value="d1" @input="d1=$event"></steper>
6.2.3 全局传参 uni.$on
- 全局发送事件
uni.$on("事件名",事件值)
- 全局监听(发送事件前已经注册监听)
//created生命周期
uni.$on("事件名",$event=>{

    响应操作})
6.4 图示
- 定义组件
easycom
- 文件夹
components/组件名.vue - 不需要导入可以在页面中直接使用
uni_modlues/components/组件名/组件名.vue(这种模式也是可以)
- 定义组件
.vue 文件就是一个组件(vue是一致)
今天的总结就到这里了~