前言:
上一篇文章我们介绍了uniapp的基础使用,相信大家都已经了解了,那么接下来我们开始学习uniapp进阶,学习vuex以及api和组件插件的使用。
目录
一、Vuex
在讲解之前我们需要了解到vuex的模块构成。vuex模块主要是由state、mutations、actions、getters、modules五个模块。
1. 初始化
- 首先就是新建一个store 目录,里面再写一个index.js文件,在index.js对vuex进行初始化。
import Vuex from 'vuex'
import Vue from 'vue'
Vue.use(Vuex)
export default new Vuex.store({
//定义数据
state,
//改变数据
mutations,
//异步操作
actions,
//计算
getters,
//模块
modules
})
- 在main.js文件中对vuex进行导入,同时定义全局$store。
import store from './store/index.js'
Vue.prototype.$store=store
2. state定义数据
state用来存放数据
- 在/store/index.js
state:{


		gTitle:{


			text:"你好vuex",
			color:"#000",
			fontSize:"24px",
			background:"#f70"
		}
	},
- 在页面中使用
$store.state.gTitle.text - 修改只能通过mutations
3. mutations改变数据
mutations是改变state数据的唯一途径
- 在index.js的mutations模块中设置改变state数据的方式
setFontSize(state,data){state.gTitle.fontSize=data+"px"}, - 在页面使用时
this.$store.commit("setFontSize",e.detail.value), - 简写方式
引入
import {mapMutations} from 'vuex',
定义
methods:{...mapMutations(["setFontSize"])} ,
使用
this.setFontSize(100)
4. actions异步操作
在与后端交互中,异步操作都放在actions模块中进行。
- 在index.js文件actions模块中
state:{


		joks:[]
	},
mutations:{


	setJoks(state,data){


		state.joks=data;
	}
},
actions:{


		getJok(context,data){


			uni.request({


				url:"http://520mg.com/mi/list.php",
				method:'get',
				data:data,
				//axios get 请求参数用params,post用data
				//uni.request post和get传参都用data
				//根据content-type,如果是application/json,那么data是json,如果是urlencoded data是url编码形式
				success: (res) => {


					console.log(res);
					context.commit('setJoks',res.data.result);
				}
			})
		}
	},
- 在使用页面中
export default {


		data() {


			return {


			}
		},
		onLoad() {


			this.$store.dispatch("getJok",{

    page:1})
		}
}
- 简写
导入import {mapActions} from 'vuex'
计算methods:{...mapActions["getJok""]}
使用this.getJok
5. getters 计算
用于内部计算,从现有的state计算出新的数据(只读)
- 在index.js中定义
getters:{"totalLen":function(state){return }}, - 在使用页面中
import {mapGetters} from "vuex";
computed:{...mapGetters(["totalLen"])}
使用简写
this.totalLen
6. modules模块
开头已经讲过,模块主要是由state、mutations、actions、getters、modules五个模块构成。
二、常用api
1. uni.getSystemInfoSync() 获取系统信息
用来获取屏幕宽高、系统、品牌、brand、可使用窗口顶部位置、安全区域等信息。不同的端样式有稍微不同
<template>
	<view>
		<view>屏幕宽高{

    {

    info.screenWidth}},{

    {

    info.screenHeight}}</view>
		<view>系统 {

    {

    info.osName}}</view>
		<view>品牌 {

    {

    info.model}}</view>
		<view>brand {

    {

    info.brand}}</view>
		<view>可使用的窗口顶部位置 {

    {

    info.windowTop}}</view>
		<view>安全区域 {

    {

    JSON.stringify(info.safeArea)}}</view>
		<view>安全区域 {

    {

    JSON.stringify(info.safeAreaInsets)}}</view>
</template>

<script>
	export default {


		data() {


			return {


				info:{

    },
			}
		},
		onLoad() {


			//获取系统信息
			var info=uni.getSystemInfoSync();
			this.info=info;
			console.log(this.info);
			//存储api
			uni.setStorageSync("info",info);
		}
    }
2. 获取胶囊信息uni.getMenuButtonBoundingClientRect()
这个功能还是比较常用的,一般只用于微信小程序。

<template>
	<view>
		<!-- #ifdef MP -->
		<view>胶囊微信小程序</view>
		<view>导航栏高度{

    {

    (menuButtonInfo.top-info.statusBarHeight)*2+menuButtonInfo.height}}</view>
		<view>胶囊{

    {

    JSON.stringify(menuButtonInfo)}}</view>
		<!-- #endif -->
	</view>
</template>

<script>
	export default {


		data() {


			return {


				menuButtonInfo:{

    }
			}
		},
		onLoad() {


			//获取胶囊按钮的边界
			let menuButtonInfo=uni.getMenuButtonBoundingClientRect();
			this.menuButtonInfo=menuButtonInfo;
			console.log(menuButtonInfo);
		},
3. 图片相关api
- 上传图片,使用uni.chooseImage()
- 选择图片,其内部嵌套uni.uploadFile()
- 单击图片实现图片预览模式uni.previewImage()
- 在接口内部可以实现分享uni.share()
- 保存uni.saveImageToPhotosAlbum()等功能
<template>
	<view>
		<view>图片操作</view>
		<view>选择与预览图片</view>
		<button @click="selectPic">选择</button>
		<view v-for="item in list" :key="item" @click="preview(item)">
			<image :src="item"></image>
		</view>
	</view>
</template>

<script>
	export default {


		data() {


			return {


			}
		},
		methods: {


			preview(item){


				var that=this;
				//单击图片实现预览
				uni.previewImage({


					//预览的图片列表
					urls:this.list,
					current:item,//当前图片
					longPressActions:{


						//定义长按按钮
						itemList:['发送给朋友','保存图片','收藏'],
						success:function(data){


							console.log('选中了第'+(data.tapIndex+1)+'个按钮,第'+(data.index+1)+'张图片');
							//保存
							if(data.tapIndex==1){


								//保存到本地相册
								uni.saveImageToPhotosAlbum({


									filePath:that.list[data.index],
									success() {


										uni.showToast({


											title:"保存成功"
										})
									}
								})
							}
							//分享
							if(data.tapIndex==0){


								//分享给朋友 (app打包时候分享要去微信的开发平台注册)
								uni.share({


									provider:"weixin",
									scene:"WXSceneSession",
									type:2,
									imageUrl:that.list[data.index],
									success:function(res){


										console.log("success:"+JSON.stringify(res));
									},
									fail:function(err){


										console.log("fail:"+JSON.stringify(err));
									}
								})
							}
						},
						fail:function(err){


							console.log(err.errMsg);
						}
					}
				})
			},
			selectPic(){


				var that=this;
				//选择图片
				uni.chooseImage({


					count:3,//默认选3张
					success(res){


						//遍历结果的
						for(let i=0;i<res.tempFilePaths.length;i++){


							//上传图片
							uni.uploadFile({


								//上传地址
								url:'http://520mg.com/ajax/file.php',
								//图片信息
								filePath:res.tempFilePaths[i],
								//name需要和后端约定,默认都会叫file
								name:'file',
								success:result=>{


									//转换为json
									var data=JSON.parse(result.data);
									//添加域名后加入list
									that.list.push("http://520mg.com"+data.pic);
								}
							})
						}
					}
				})
			}
		}
	}
</script>
三、 自定义组件
自定义组件使用easycom方式,使用方式较vue简便了很多。组件定义完以后,可以不用import 导入,不用在components中注册,直接使用。
组件传参
1. 父组件向子组件传参,通过属性的方式进行传递
<steper :value="d1"></steper>,
2. 子组件通过props来接收
props:{ value:{ type:Number, default:1 } }
3. 子组件向父组件传参,
子组件通过this.$emit("事件名",传递的参数)
触发事件后,父组件监听事件并更新值。
四、 第三方组件
uni-app有很多第三方插件,我们可以进入官网查看。uniapp官网 在官网点击插件市场可以看到很多插件。
我们比较常用的是uview第三方插件。接下来就以uview为例,给大家介绍一下第三方插件使用步骤。
- 首页->组件->扩展组件,找到uview
- 我们看到右侧有插件下载,我们一般推荐使用HBuilderX导入插件。当然也可通过下载插件ZIP方式实现。

- 找到下载文件配置,进行如下配置
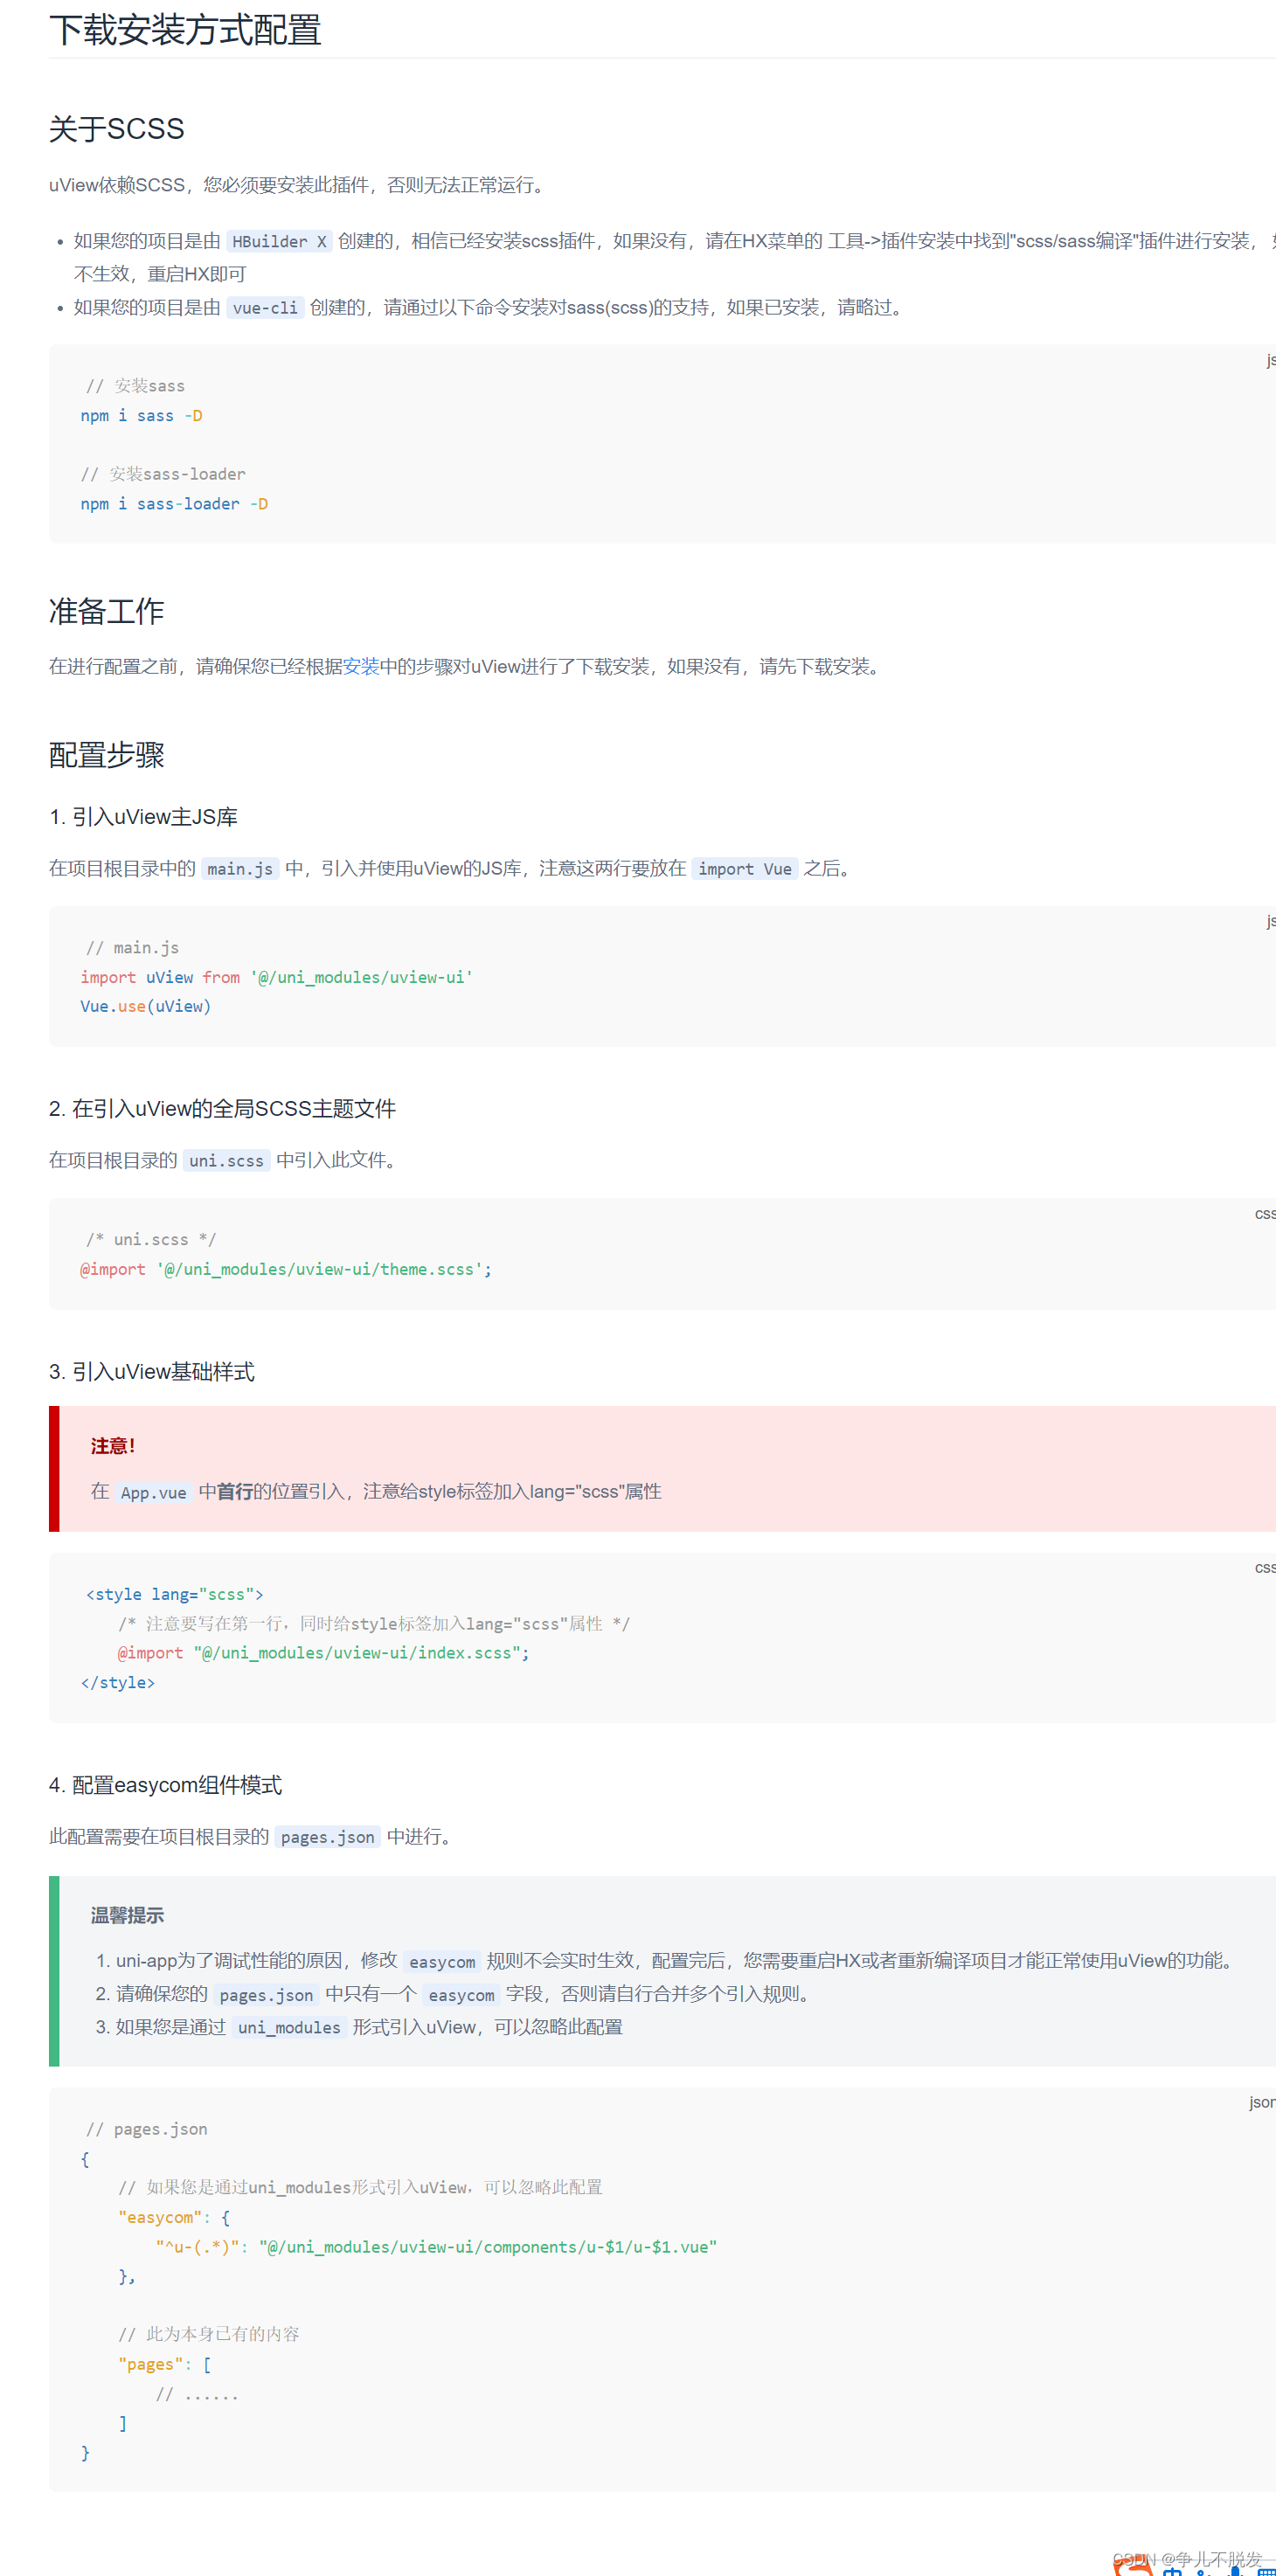
下图可供大家参考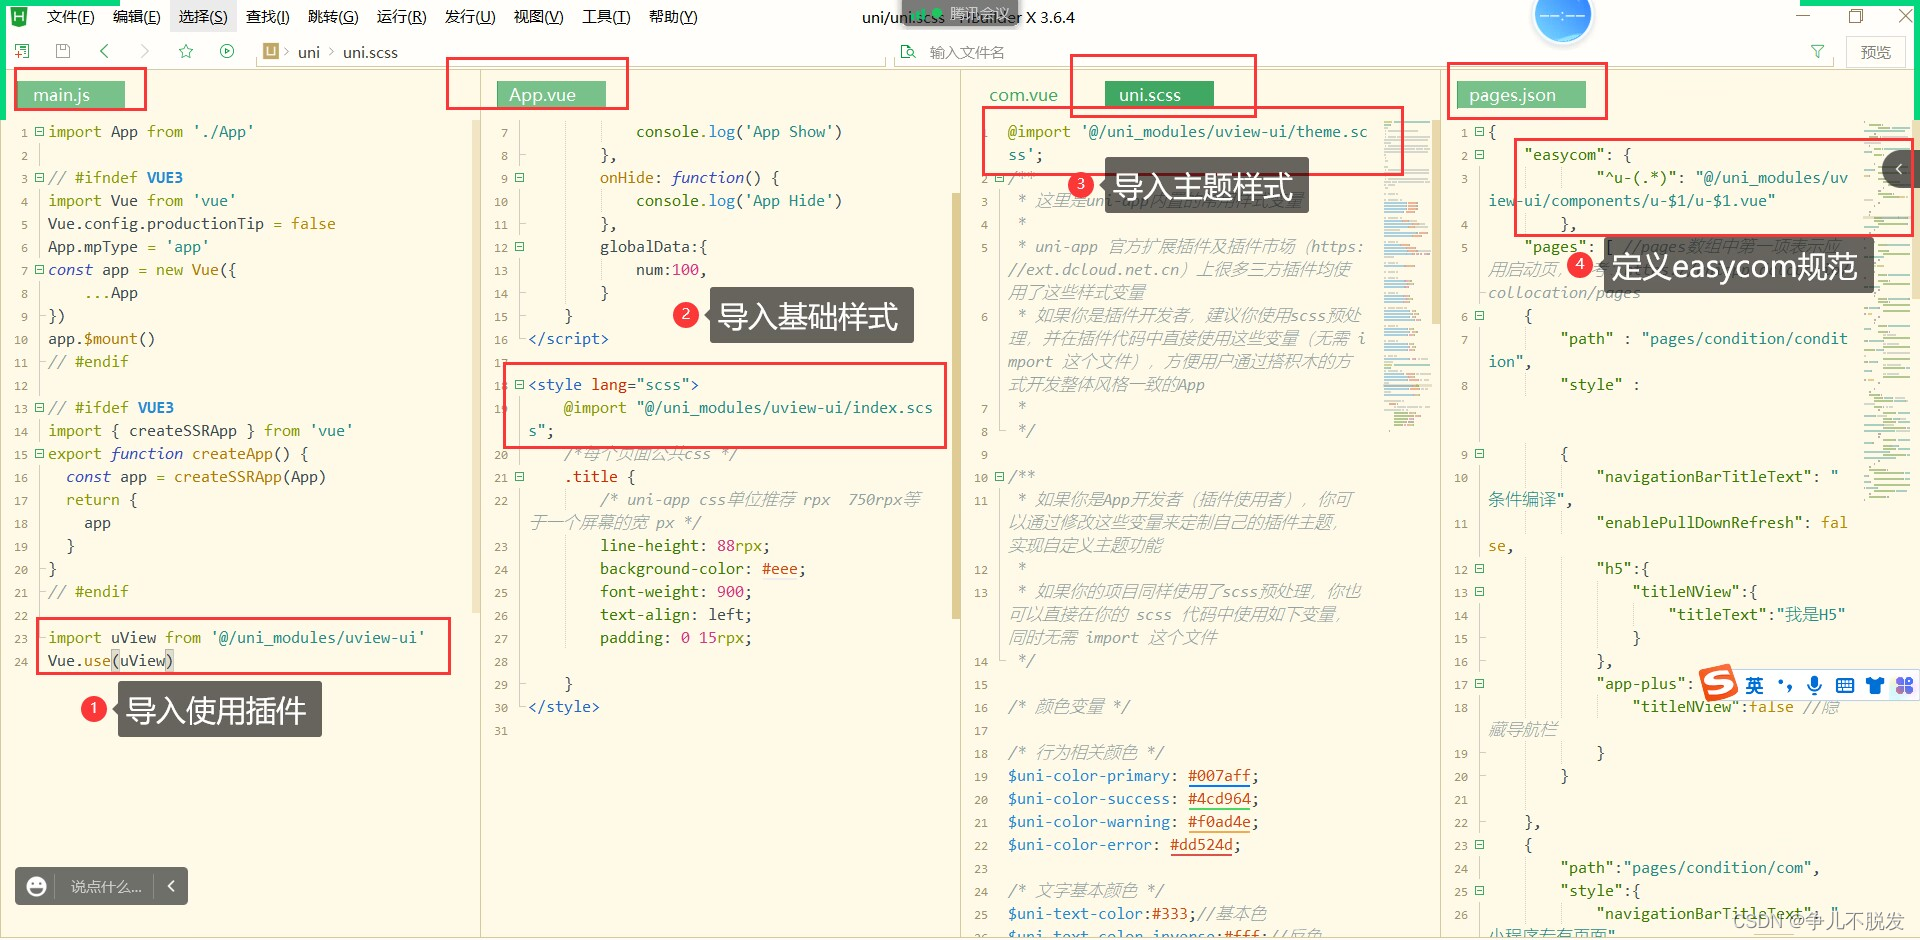
- 如何判断配置成功呢 ,我们可以使用一个简单的组件按钮,发现可以出现,那就说明成功
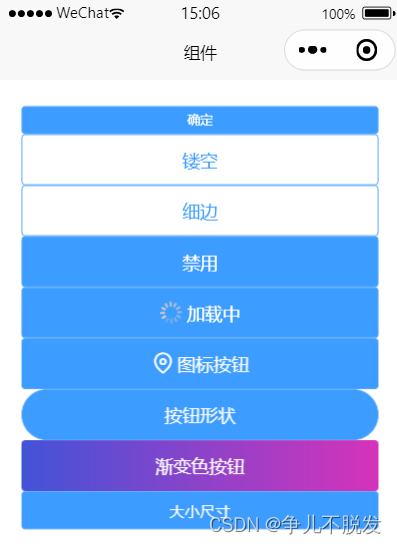
这就是给大家说一下步骤,其他的也是一样的。而且uniapp里面有大量封装好的组件,用起来都是很方便的,大家可以根据项目需要进行尝试,可以多看一下官方文档。
希望对你有用哦!!!
