博主(昊虹图像算法)注:为了更好的理解这篇博文的内容,建议大家先阅读博主对OpenCV轮廓检测函数findContours()的详细介绍,链接 https://blog.csdn.net/wenhao_ir/article/details/125537919
本篇博文详细探究OpenCV的轮廓绘制函数drawContours()。
先来复习一下轮廓绘制函数drawContours()的原型和参数。
C++原型如下
void cv::drawContours(	InputOutputArray 	image,
						InputArrayOfArrays 	contours,
						int 	contourIdx,
						const Scalar & 	color,
						int 	thickness = 1,
						int 	lineType = LINE_8,
						InputArray 	hierarchy = noArray(),
						int 	maxLevel = INT_MAX,
						Point 	offset = Point()
					 )
Python原型如下:
image = cv.drawContours(image, contours, contourIdx, color[, thickness[, lineType[, hierarchy[, maxLevel[, offset]]]]] )
OpenCV4.1.2官方文档对各参数意义的介绍如下:
- image—Destination image.
- contours—All the input contours. Each contour is stored as a point vector.
- contourIdx—Parameter indicating a contour to draw. If it is negative, all the contours are drawn.
- color—Color of the contours.
- thickness—Thickness of lines the contours are drawn with. If it is negative (for example, - thickness=FILLED ), the contour interiors are drawn.
- lineType—Line connectivity. See LineTypes
- hierarchy—Optional information about hierarchy. It is only needed if you want to draw only some of the contours (see maxLevel ).
- maxLevel—Maximal level for drawn contours. If it is 0, only the specified contour is drawn. If it is 1, the function draws the contour(s) and all the nested contours. If it is 2, the function draws the contours, all the nested contours, all the nested-to-nested contours, and so on. This parameter is only taken into account when there is hierarchy available.
- offset—Optional contour shift parameter. Shift all the drawn contours by the specified offset=(dx,dy) .
下面是上面官方文档的翻译: - image—轮廓画到图像image上。
- contours—需要绘制的轮廓,这个通常为函数findContours()的输出参数contours。每个轮廓都被以点数组的形式存储。
- contourIdx—通过轮廓的索引值指定哪个轮廓需要被绘制,如果这个值为负,则表示所有的轮廓都需要绘制。博主昊虹君大胆猜测这个值应该就是数组contours的最高维索引。
- color–轮廓的颜色。
- thickness—绘制轮廓的线条的粗细程度,如果这个值为负,比如说值为FILLED,那么轮廓内部将被以填充的形式绘制。关于这个参数的值为FILLED时,官方文档还补充进行了说明:
When thickness=FILLED, the function is designed to handle connected components with holes correctly even when no hierarchy date is provided. This is done by analyzing all the outlines together using even-odd rule. This may give incorrect results if you have a joint collection of separately retrieved contours. In order to solve this problem, you need to call drawContours separately for each sub-group of contours, or iterate over the collection using contourIdx parameter.
上面这段话的意思是:当 thickness的值为FILLED,即使轮廓的拓扑结构没有被提供,这个函数也会对带孔的连接组件按一定的算法进行填充处理,处理的算法为奇偶法则。这样的处理也许并不是使用者本身希望得到的处理效果,当您发现这个函数进行FILLED填充处理的效果不是您想要的效果时,您可以单独对每个轮廓调用drawContours进行填充绘制,或者使用轮廓索引参数contourIdx进行迭代处理。
使用迭代处理的典型代码如下:
	int idx = 0;
    for( ; idx >= 0; idx = hierarchy[idx][0] )
    {


        Scalar color( rand()&255, rand()&255, rand()&255 );
        drawContours( dst, contours, idx, color, FILLED, 8, hierarchy );
    }
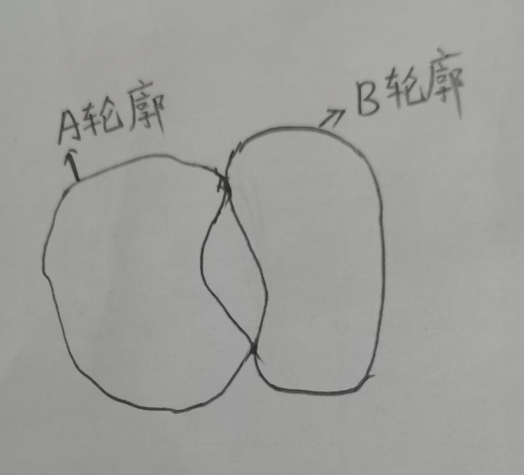
可能有朋友看来上段这段话,还是不知道这段英文说得什么意思。举个例子来说吧,比如下面这幅图里的A轮廓和B轮廓,是相互连接的带孔轮廓,
如果进行填充绘制,我希望得到下面的填充绘制效果:

但实际上有可能函数会根据它内部的算法给我绘制成下面这样:

如果不想让这个函数给我自动填充绘制成这样,我们可以对每个轮廓单独进行填充绘制处理,具体来说可以对每个轮廓调用drawContours进行填充绘制,或者使用轮廓索引参数contourIdx进行迭代处理。
使用迭代处理的典型代码如下:
	int idx = 0;
    for( ; idx >= 0; idx = hierarchy[idx][0] )
    {


        Scalar color( rand()&255, rand()&255, rand()&255 );
        drawContours( dst, contours, idx, color, FILLED, 8, hierarchy );
    }
因为博主手上目前并没有样例来进行测试,所以上面的处理方式是博主举的例子而已,这个函数真实的处理效果可能与上面所举的例子并不一样,但大概意思就是例子中体现出的意思。
- lineType—线条类型,关于线条类型的详细介绍见我的另一篇博文 https://blog.csdn.net/wenhao_ir/article/details/125535836
- hierarchy—轮廓的拓扑结构,这个通常为函数findContours()的输出参数hierarchy,这个参数配合参数maxLevel使用可以让我们指定只对部分轮廓行绘制。
- maxLevel—表示要绘制轮廓的最深层级。这个参数仅在参数hierarchy有效的情况下才有效。这里博主只先说当contourIdx不为-1时,即通过contourIdx指定了具体的轮廓时的情况,这种情况也是官方文档中提到的情况:
为了说明的方便,设contourIdx指定的轮廓为轮廓A、轮廓A的相关子轮廓的拓扑关系如下图所示:
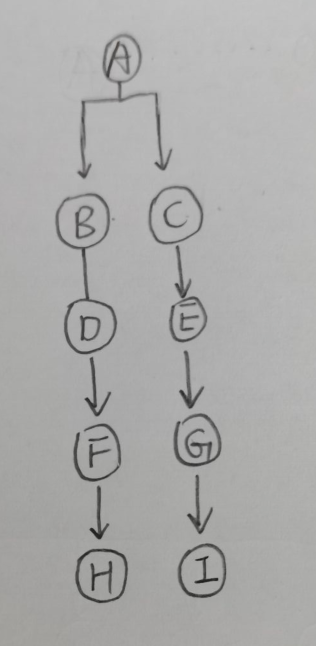
则当maxLevel=0时,绘制的轮廓为轮廓A;
当maxLevel=1时,绘制的轮廓为轮廓为A、B、C;
当maxLevel=2时,绘制的轮廓为轮廓为A、B、C、D、E;
当maxLevel=3时,绘制的轮廓为轮廓为A、B、C、D、E、F、G;
当maxLevel=4时,绘制的轮廓为轮廓为A、B、C、D、E、F、G、H、I;
以此类推…
至于contourIdx为-1时的情况,一两句话说不清楚,所以就放在本文后面的内容中进行专题说明。
- offset—可选的轮廓偏移参数,按指定的偏移量绘制所有的轮廓。
接下来用实例对上面的一些参数进行更深一步的认识:
目录

01-使用参数contourIdx选择要绘制的轮廓
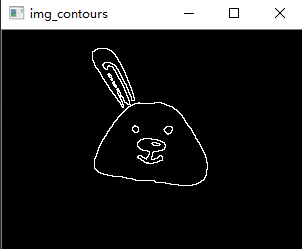
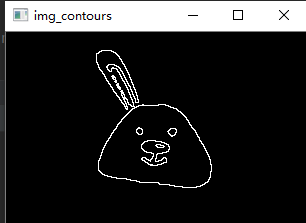
以下面这幅手绘小白兔为例:
图片名字为“img_300_320.jpg”,百度网盘下载链接:https://pan.baidu.com/s/1IaJ8nrQzGuHt3RA8jbu0GQ?pwd=bjkm

从博文 https://blog.csdn.net/wenhao_ir/article/details/51798533我们知道使用函数findContours()能检测到25个轮廓,这25个轮廓的索引值分别0,1,2,…24。
我们随机抽取三个轮廓进行分别绘制,随机抽取值为4、7、16
代码如下:
# 博主微信/QQ 2487872782
# 有问题可以联系博主交流
# 有图像处理需求也请联系博主
# 图像处理技术交流QQ群 271891601
# !/usr/bin/env python
# -*- coding: utf-8 -*-
# OpenCV的版本为4.1
import numpy as np
import cv2 as cv
import sys
# image = cv.imread('F:/material/images/2022/2022-06/ring.bmp')
# image = cv.imread('F:/material/images/P0044-hand-02.jpg')
image = cv.imread('F:/material/images/2022/2022-06/img_300_320.jpg')
if image is None:
print('Error: Could not load image')
sys.exit()
# cv.imshow('Source Image', image)
# 原图像转化为灰度图
img_gray = cv.cvtColor(image, cv.COLOR_BGR2GRAY)
# cv.imshow('img_gray', img_gray)
# 灰度图进行二值化处理,并不是函数findContours要求输入图像为二值图像,
# 而是函数findContours在进行轮廓提取前会把原图中的非0值全部当成1处理。
_, img_B = cv.threshold(img_gray, 71, 255, cv.THRESH_BINARY)
# cv.imshow('img_B', img_B)
# 轮廓检测
cnts, harch = cv.findContours(img_B, mode=cv.RETR_TREE, method=cv.CHAIN_APPROX_SIMPLE)
# 绘制轮廓
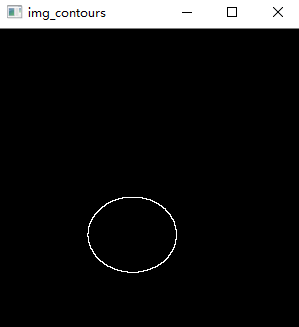
img_contours_4 = np.zeros((image.shape[0], image.shape[1]), dtype='uint8')
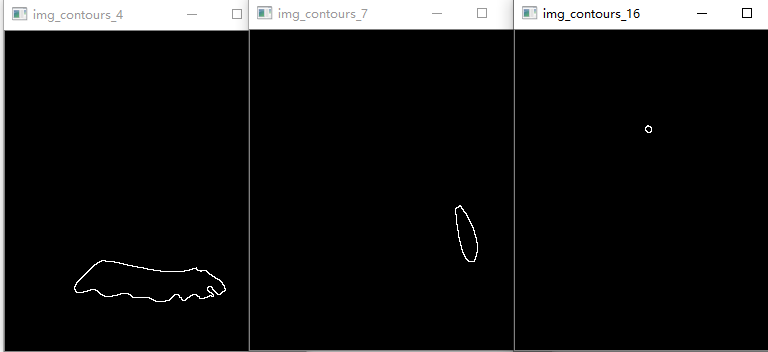
img_contours_4 = cv.drawContours(img_contours_4, cnts, 4, 255, 1, 1)
cv.imshow('img_contours_4', img_contours_4)
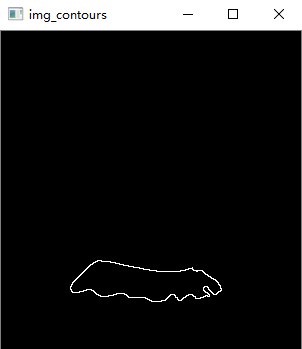
img_contours_7 = np.zeros((image.shape[0], image.shape[1]), dtype='uint8')
img_contours_7 = cv.drawContours(img_contours_7, cnts, 7, 255, 1, 1)
cv.imshow('img_contours_7', img_contours_7)
img_contours_16 = np.zeros((image.shape[0], image.shape[1]), dtype='uint8')
img_contours_16 = cv.drawContours(img_contours_16, cnts, 16, 255, 1, 1)
cv.imshow('img_contours_16', img_contours_16)
cv.waitKey(0)
cv.destroyAllWindows()
运行结果如下:
02-根据轮廓拓扑结信息(hierarchy)绘制不同深度的轮廓图
02-01 提供轮廓拓扑结信息(hierarchy)且contourIdx的值不为-1的情况
根据上面对参数maxLevel的介绍,再根据博文(https://blog.csdn.net/wenhao_ir/article/details/125570930)中绘制的图像轮廓的拓扑结构:
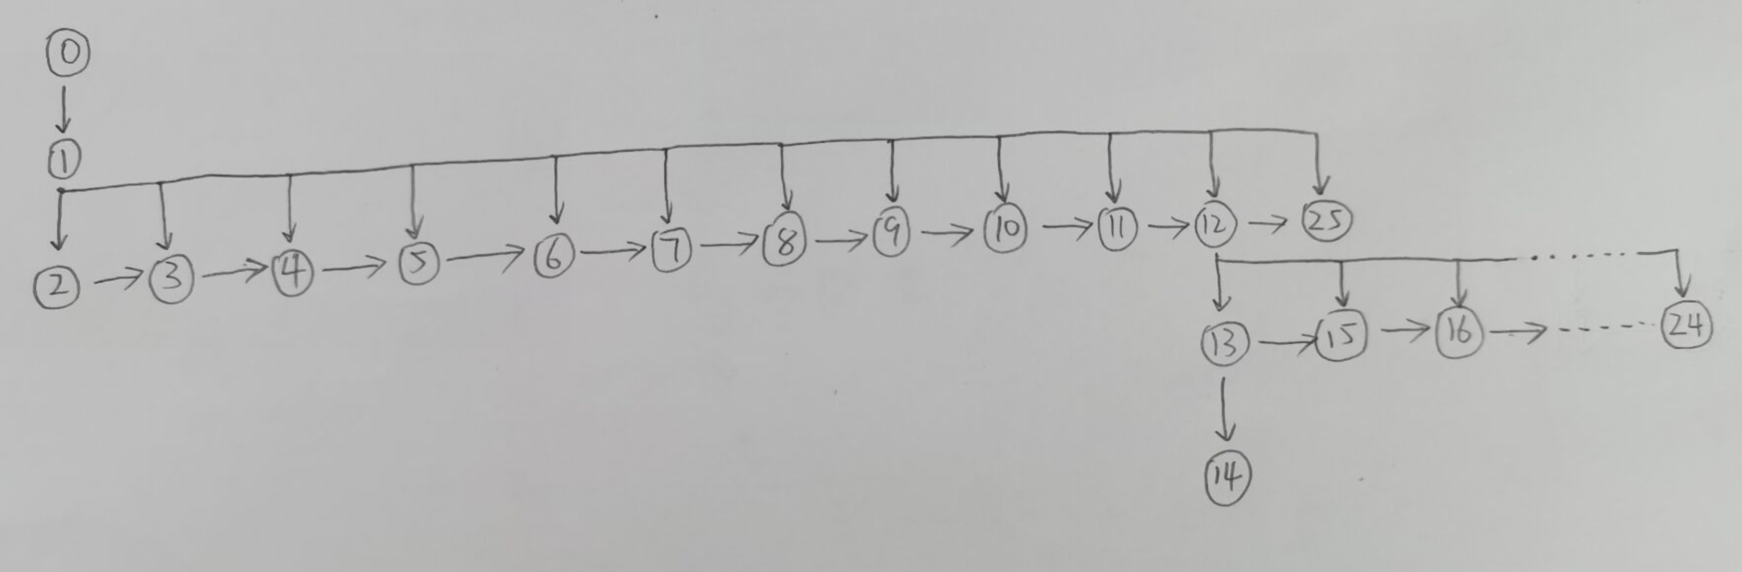
我们可以指定contourIdx的值为12,然后观察不同maxLevel情况下绘制的轮廓图:
为了便于大家进行观察分析,大家可以到博文 https://blog.csdn.net/wenhao_ir/article/details/125573892中下载查看每一个轮廓。
首先我们先看下索引值为12的轮廓是怎么样的:
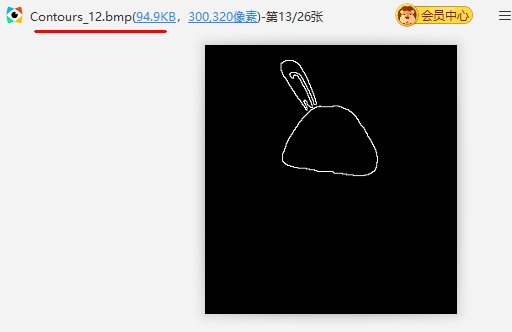
当maxLevel=0时:
根据拓扑结构,此时应该绘制的是轮廓12。
img_contours = cv.drawContours(img_contours, cnts, 12, 255, 1, 1, harch, maxLevel=0)
运行结果如下:
可见,此时绘制的就是轮廓12本身。
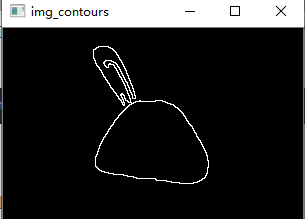
当maxLevel=1时:
根据拓扑结构,此时应该绘制的是轮廓12、轮廓13至轮廓24。
img_contours = cv.drawContours(img_contours, cnts, 12, 255, 1, 1, harch, maxLevel=1)
运行结果如下:

轮廓13至轮廓24如下面两张截图所示:

当maxLevel=2时:
根据拓扑结构,此时应该绘制的是轮廓12、轮廓13至轮廓24、轮廓14。
img_contours = cv.drawContours(img_contours, cnts, 12, 255, 1, 1, harch, maxLevel=2)
运行结果如下:
轮廓14如下图:

当maxLevel=3时:
根据拓扑结构,此时应该绘制的轮廓还是和maxLevel=2时一样,即轮廓12、轮廓13至轮廓24、轮廓14。我们看下是不是这样:
img_contours = cv.drawContours(img_contours, cnts, 12, 255, 1, 1, harch, maxLevel=3)
可见,maxLevel=3和maxLevel=2的结果是一样的。
到这里,我们就把contourIdx的值不为-1时的情况有一个深入细致的了解了。
02-02-提供轮廓拓扑结信息(hierarchy)且contourIdx的值为-1的情况
contourIdx的值为-1的情况就复杂了,博主对这个问题也是探索了许久才得出了结论,其间的曲折过程就不说了,直接上结论了吧。
由于是博主花时间和精力去研究探索并写出的内容,所以把这部分内部上传到了CSDN的付费下载区,价格为1.9元,链接:https://download.csdn.net/download/wenhao_ir/85896119
这部分内容的草稿链接:https://blog.csdn.net/wenhao_ir/article/details/125580624【注:这个草稿链接只有博主能访问,仅为博主查阅之方便,其他人均不能访问浏览】
03-当参数thickness的值为FILLED的轮廓绘制效果
看几个例子就知道效果了。
1、我们对下面这个轮廓(轮廓索引为0)进行以thickness=FILLED的绘制。
img_contours = cv.drawContours(img_contours, cnts, 0, 255, cv.FILLED, 1)
运行结果如下:

我们再对下面这个轮廓(轮廓索引为4)进行以thickness=FILLED的绘制。
img_contours = cv.drawContours(img_contours, cnts, 4, 255, cv.FILLED, 1)
运行结果如下:
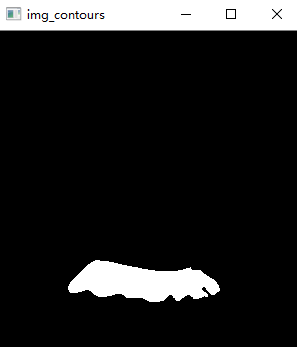
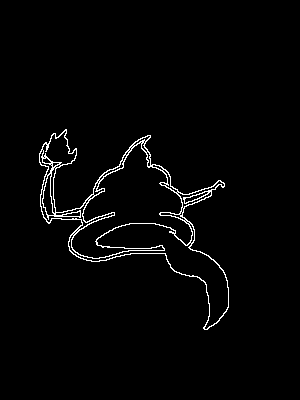
光靠上面两个例子,还不足以完全明白FILLED是怎么填充的。看下面这个填充的例子:
上面这个轮廓用FILLED填充的结果如下:
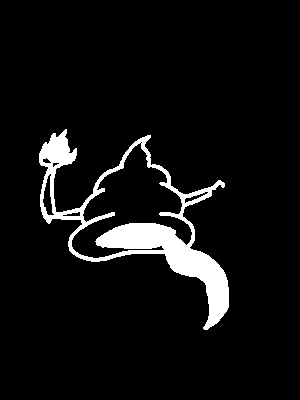
通过上面这几个例子,大家就明白了当参数thickness的值为FILLED的轮廓绘制效果了吧。