vue-cli 安装
查看 node 版本
PS E:\node> node -v
v11.15.0
PS E:\node>
vue-cli 是 vue 官方出品的快速构建单页应用的脚手架,里面集成了 webpack,npm,nodejs,babel,vue,vue-router。
全局安装脚手架
PS E:\node> npm install vue-cli -g
npm WARN deprecated vue-cli@2.9.6: This package has been deprecated in favour of @vue/cli
npm WARN deprecated request@2.88.2: request has been deprecated, see https://github.com/request/request/issues/3142
npm WARN deprecated coffee-script@1.12.7: CoffeeScript on NPM has moved to "coffeescript" (no hyphen)
npm WARN deprecated har-validator@5.1.5: this library is no longer supported
npm WARN deprecated uuid@3.4.0: Please upgrade  to version 7 or higher.  Older versions may use Math.random() in certain circumstances, which is known to be problematic.  See https://v8.dev/blog/math-random for details.
C:\Program Files\nodejs\vue-init -> C:\Program Files\nodejs\node_modules\vue-cli\bin\vue-init
C:\Program Files\nodejs\vue -> C:\Program Files\nodejs\node_modules\vue-cli\bin\vue
C:\Program Files\nodejs\vue-list -> C:\Program Files\nodejs\node_modules\vue-cli\bin\vue-list
+ vue-cli@2.9.6
added 245 packages from 230 contributors in 27.375s

PS E:\node>
查看 vue 版本
PS E:\node> vue --version
2.9.6
PS E:\node>
vue-cli 初始化创建项目
1、vue init命令讲解
用 vue init 命令来初始化项目,具体使用方法如下:
vue init <template-name> <project-name>
init: 表示要用 vue-cli 来初始化项目。
<template-name>: 表示模板名称,vue-cli 官方提供的5种模板:
1、webpack:
一个全面的 webpack+vue-loader 的模板,功能包括热加载,linting,检测和CSS扩展。
2、webpack-simple:
一个简单 webpack+vue-loader 的模板,
不包含其他功能,让你快速的搭建 vue 的开发环境。
3、browserify:
一个全面的 Browserify+vueify 的模板,功能包括热加载,linting,单元检测。
4、browserify-simple:
一个简单 Browserify+vueify 的模板,
不包含其他功能,让你快速的搭建 vue 的开发环境。
5、simple:一个最简单的单页应用模板。
<project-name>: 标识项目名称,用户根据自己的项目来起名字。
2、初始化创建项目
在实际开发中,一般都会使用 webpack 这个模板,命令使用如下:
PS E:\node> vue init webpack vue296

? Project name vue296
? Project description A Vue.js project
? Author wgchen
? Vue build standalone
? Install vue-router? Yes
? Use ESLint to lint your code? Yes
? Pick an ESLint preset Standard
? Set up unit tests No
? Setup e2e tests with Nightwatch? No
? Should we run `npm install` for you after the project has been created? (recommended) npm

   vue-cli · Generated "vue296".


# Installing project dependencies ...
# ========================

npm WARN deprecated babel-eslint@8.2.6: babel-eslint is now @babel/eslint-parser. This package will no longer receive updates.
npm WARN deprecated eslint-loader@1.9.0: This loader has been deprecated. Please use eslint-webpack-plugin
npm WARN deprecated extract-text-webpack-plugin@3.0.2: Deprecated. Please use https://github.com/webpack-contrib/mini-css-extract-plugin
npm WARN deprecated html-webpack-plugin@2.30.1: out of support
npm WARN deprecated browserslist@2.11.3: Browserslist 2 could fail on reading Browserslist >3.0 config used in other tools.
npm WARN deprecated uglify-es@3.3.9: support for ECMAScript is superseded by `uglify-js` as of v3.13.0
npm WARN deprecated bfj-node4@5.3.1: Switch to the `bfj` package for fixes and new features!
npm WARN deprecated chokidar@2.1.8: Chokidar 2 does not receive security updates since 2019. Upgrade to chokidar 3 with 15x fewer dependencies
npm WARN deprecated core-js@2.6.12: core-js@<3.4 is no longer maintained and not recommended for usage due to the number of issues. Because of the V8 engine whims, feature detection in old core-js versions could cause a slowdown up to 100x even if nothing is polyfilled. Please, upgrade your dependencies to the actual version of core-js.
npm WARN deprecated flatten@1.0.3: flatten is deprecated in favor of utility frameworks such as lodash.
npm WARN deprecated fsevents@1.2.13: fsevents 1 will break on node v14+ and could be using insecure binaries. Upgrade to fsevents 2.
npm WARN deprecated uuid@3.4.0: Please upgrade  to version 7 or higher.  Older versions may use Math.random() in certain circumstances, which is known to be problematic.  See https://v8.dev/blog/math-random for details.
npm WARN deprecated browserslist@1.7.7: Browserslist 2 could fail on reading Browserslist >3.0 config used in other tools.
npm WARN deprecated svgo@0.7.2: This SVGO version is no longer supported. Upgrade to v2.x.x.
npm WARN deprecated circular-json@0.3.3: CircularJSON is in maintenance only, flatted is its successor.
npm WARN deprecated querystring@0.2.0: The querystring API is considered Legacy. new code should use the URLSearchParams API instead.
npm WARN deprecated svgo@1.3.2: This SVGO version is no longer supported. Upgrade to v2.x.x.
npm WARN deprecated source-map-resolve@0.5.3: See https://github.com/lydell/source-map-resolve#deprecated
npm WARN deprecated resolve-url@0.2.1: https://github.com/lydell/resolve-url#deprecated
npm WARN deprecated urix@0.1.0: Please see https://github.com/lydell/urix#deprecated
npm WARN deprecated source-map-url@0.4.1: See https://github.com/lydell/source-map-url#deprecated

> core-js@2.6.12 postinstall E:\node\vue296\node_modules\core-js
> node -e "try{require('./postinstall')}catch(e){}"

Thank you for using core-js ( https://github.com/zloirock/core-js ) for polyfilling JavaScript standard library!

The project needs your help! Please consider supporting of core-js on Open Collective or Patreon:
> https://opencollective.com/core-js
> https://www.patreon.com/zloirock

Also, the author of core-js ( https://github.com/zloirock ) is looking for a good job -)


> ejs@2.7.4 postinstall E:\node\vue296\node_modules\ejs
> node ./postinstall.js

Thank you for installing EJS: built with the Jake JavaScript build tool (https://jakejs.com/)


> es5-ext@0.10.61 postinstall E:\node\vue296\node_modules\es5-ext
>  node -e "try{require('./_postinstall')}catch(e){}" || exit 0


> uglifyjs-webpack-plugin@0.4.6 postinstall E:\node\vue296\node_modules\webpack\node_modules\uglifyjs-webpack-plugin
> node lib/post_install.js

npm notice created a lockfile as package-lock.json. You should commit this file.
npm WARN optional SKIPPING OPTIONAL DEPENDENCY: fsevents@~2.3.2 (node_modules\chokidar\node_modules\fsevents):
npm WARN notsup SKIPPING OPTIONAL DEPENDENCY: Unsupported platform for fsevents@2.3.2: wanted {

    "os":"darwin","arch":"any"} (current: {

    "os":"win32","arch":"x64"})
npm WARN optional SKIPPING OPTIONAL DEPENDENCY: fsevents@^1.2.7 (node_modules\watchpack-chokidar2\node_modules\chokidar\node_modules\fsevents):
npm WARN notsup SKIPPING OPTIONAL DEPENDENCY: Unsupported platform for fsevents@1.2.13: wanted {

    "os":"darwin","arch":"any"} (current: {

    "os":"win32","arch":"x64"})
npm WARN optional SKIPPING OPTIONAL DEPENDENCY: fsevents@^1.2.7 (node_modules\webpack-dev-server\node_modules\chokidar\node_modules\fsevents):
npm WARN notsup SKIPPING OPTIONAL DEPENDENCY: Unsupported platform for fsevents@1.2.13: wanted {

    "os":"darwin","arch":"any"} (current: {

    "os":"win32","arch":"x64"})

added 1397 packages from 715 contributors in 66.359s


Running eslint --fix to comply with chosen preset rules...
# ========================


> vue296@1.0.0 lint E:\node\vue296
> eslint --ext .js,.vue src "--fix"


# Project initialization finished!
# ========================

To get started:

  cd vue296
  npm run dev

Documentation can be found at https://vuejs-templates.github.io/webpack


PS E:\node>
cd 命令进入到项目目录
PS E:\node> npm run start

 DONE  Compiled successfully in 19319ms                                                      10:17:28

 I  Your application is running here: http://localhost:8080
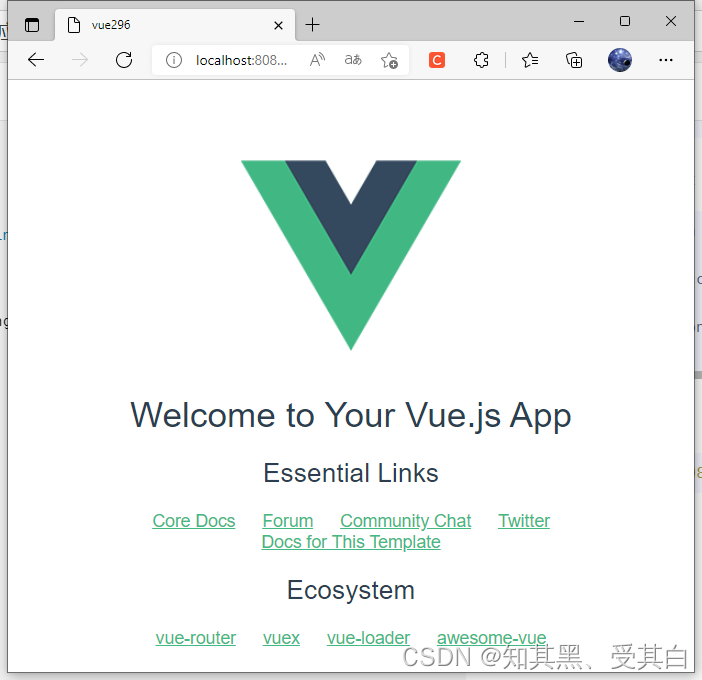
访问页面
http://localhost:8080
package.json
{


  "name": "vue296",
  "version": "1.0.0",
  "description": "A Vue.js project",
  "author": "wgchen",
  "private": true,
  "scripts": {


    "dev": "webpack-dev-server --inline --progress --config build/webpack.dev.conf.js",
    "start": "npm run dev",
    "lint": "eslint --ext .js,.vue src",
    "build": "node build/build.js"
  },
  "dependencies": {


    "vue": "^2.5.2",
    "vue-router": "^3.0.1"
  },
  "devDependencies": {


    "autoprefixer": "^7.1.2",
    "babel-core": "^6.22.1",
    "babel-eslint": "^8.2.1",
    "babel-helper-vue-jsx-merge-props": "^2.0.3",
    "babel-loader": "^7.1.1",
    "babel-plugin-syntax-jsx": "^6.18.0",
    "babel-plugin-transform-runtime": "^6.22.0",
    "babel-plugin-transform-vue-jsx": "^3.5.0",
    "babel-preset-env": "^1.3.2",
    "babel-preset-stage-2": "^6.22.0",
    "chalk": "^2.0.1",
    "copy-webpack-plugin": "^4.0.1",
    "css-loader": "^0.28.0",
    "eslint": "^4.15.0",
    "eslint-config-standard": "^10.2.1",
    "eslint-friendly-formatter": "^3.0.0",
    "eslint-loader": "^1.7.1",
    "eslint-plugin-import": "^2.7.0",
    "eslint-plugin-node": "^5.2.0",
    "eslint-plugin-promise": "^3.4.0",
    "eslint-plugin-standard": "^3.0.1",
    "eslint-plugin-vue": "^4.0.0",
    "extract-text-webpack-plugin": "^3.0.0",
    "file-loader": "^1.1.4",
    "friendly-errors-webpack-plugin": "^1.6.1",
    "html-webpack-plugin": "^2.30.1",
    "node-notifier": "^5.1.2",
    "optimize-css-assets-webpack-plugin": "^3.2.0",
    "ora": "^1.2.0",
    "portfinder": "^1.0.13",
    "postcss-import": "^11.0.0",
    "postcss-loader": "^2.0.8",
    "postcss-url": "^7.2.1",
    "rimraf": "^2.6.0",
    "semver": "^5.3.0",
    "shelljs": "^0.7.6",
    "uglifyjs-webpack-plugin": "^1.1.1",
    "url-loader": "^0.5.8",
    "vue-loader": "^13.3.0",
    "vue-style-loader": "^3.0.1",
    "vue-template-compiler": "^2.5.2",
    "webpack": "^3.6.0",
    "webpack-bundle-analyzer": "^2.9.0",
    "webpack-dev-server": "^2.9.1",
    "webpack-merge": "^4.1.0"
  },
  "engines": {


    "node": ">= 6.0.0",
    "npm": ">= 3.0.0"
  },
  "browserslist": [
    "> 1%",
    "last 2 versions",
    "not ie <= 8"
  ]
}
项目结构
一个 vue-cli 的项目结构如下,其中 src 文件夹是需要掌握,其余了解即可。
文件夹目录如下:
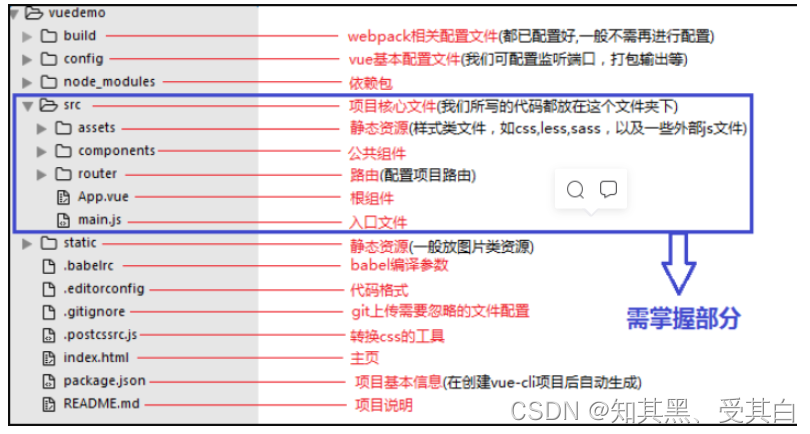
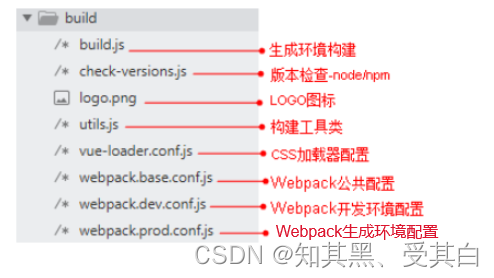
1、build目录(webpack配置)
build 文件主要是 webpack 的配置,目录详情如下:
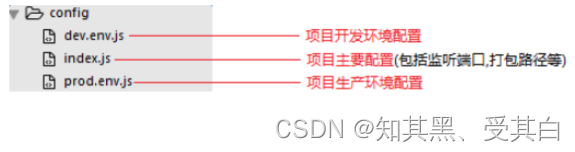
2、config目录(vue项目配置目录)
config 文件主要是项目相关配置,常用的就是当端口冲突时配置监听端口,打包输出路径及命名等,目录详情如下:
3、node_modules(项目依赖包)
node_modules 里面是项目依赖包,其中包括很多基础依赖,自己也可以根据需要安装其他依赖。
安装方法打开命令工具,进入项目目录,输入 npm install [依赖包名称],回车。
安装依赖:npm i
在两种情况下我们会自己去安装依赖:
》项目运行缺少该依赖包
》安装插件:如 vuex
PS:有时会安装指定依赖版本,需在依赖包名称后加上版本号信息,
如 npm install [email protected]
src 项目核心文件讲解
核心文件目录前面已经说明了,下面重点讲解 :
index.html,main.js,App.vue,router 的 index.js,HelloWorld.vue。
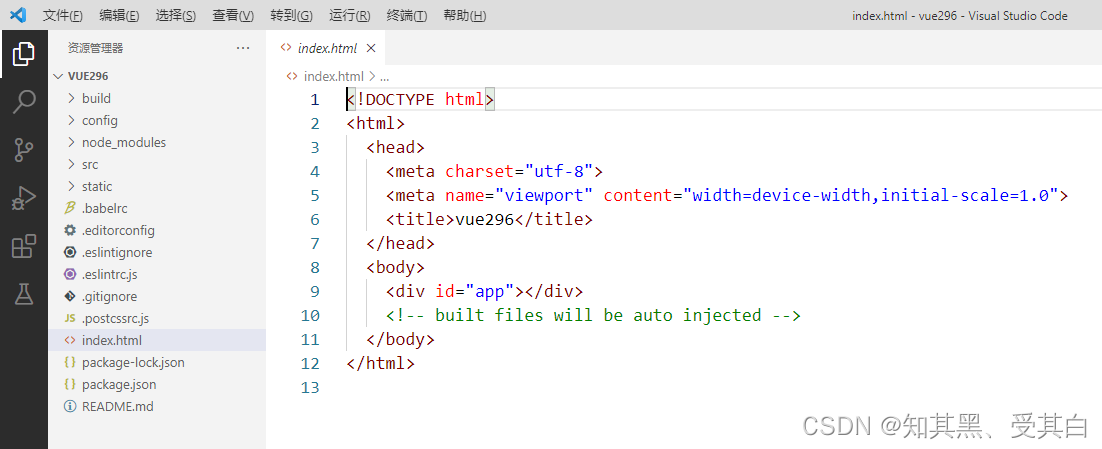
项目的主页 E:\node\vue296\index.html
项目目录:vue296、index.html 根文件
index.html 为项目的主页,跟其他 html 一样,但一般只定义一个空的根节点,在 main.js 里面定义的实例将挂载在根节点下,内容都通过 vue 组件来填充。
说明如下:
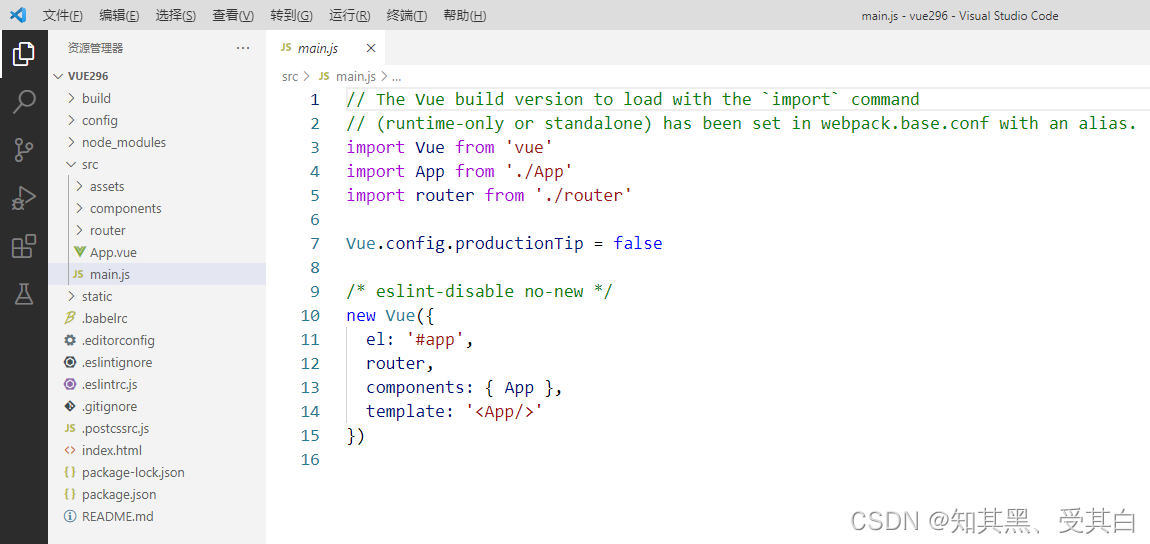
入口文件 E:\node\vue296\src\main.js
main.js 为项目的入口文件,即单入口,主要是引入 vue 框架,根组件及路由设置,并且定义 vue 实例,说明如下:
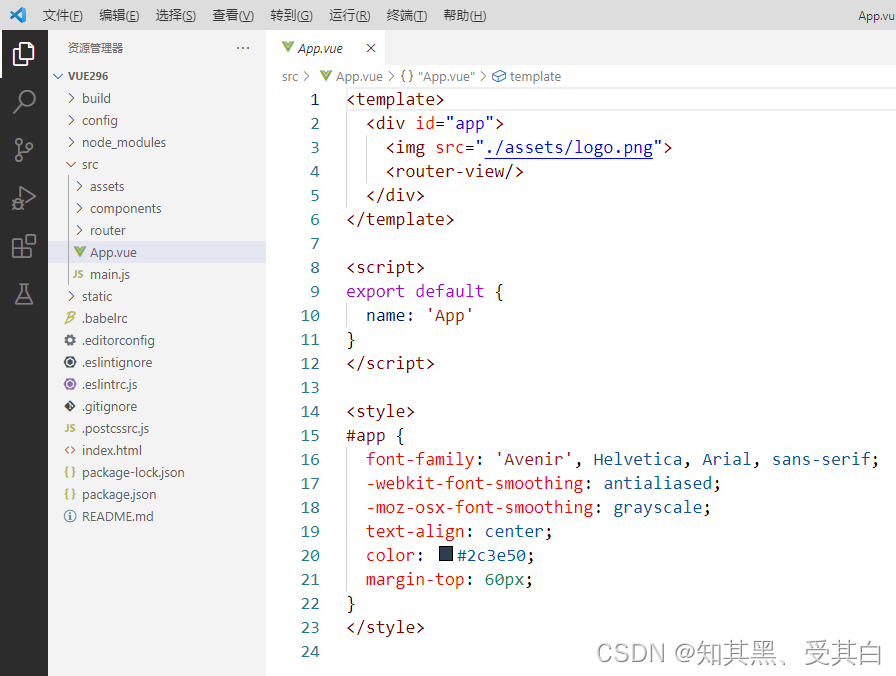
根组件 E:\node\vue296\src\App.vue
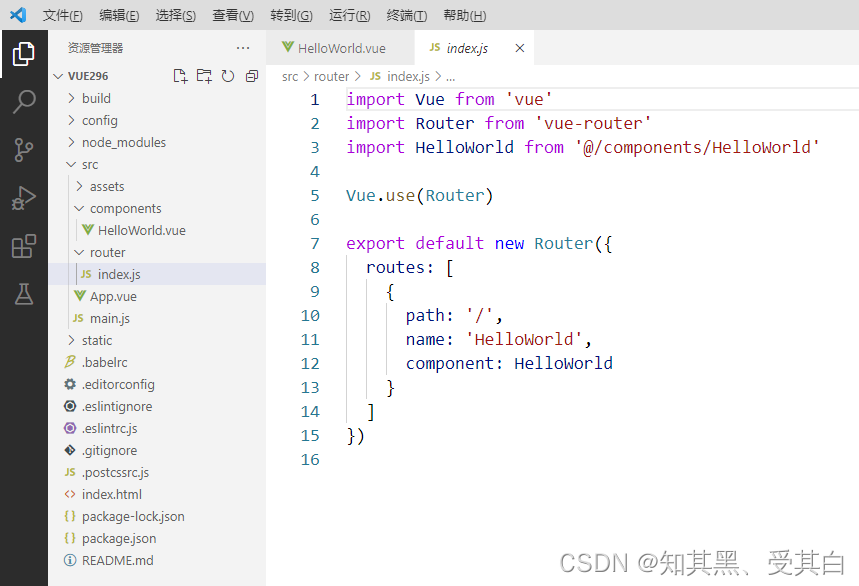
路由配置 E:\node\vue296\src\router\index.js
router文件夹下,有一个 index,js 的路由配置文件,说明如下:

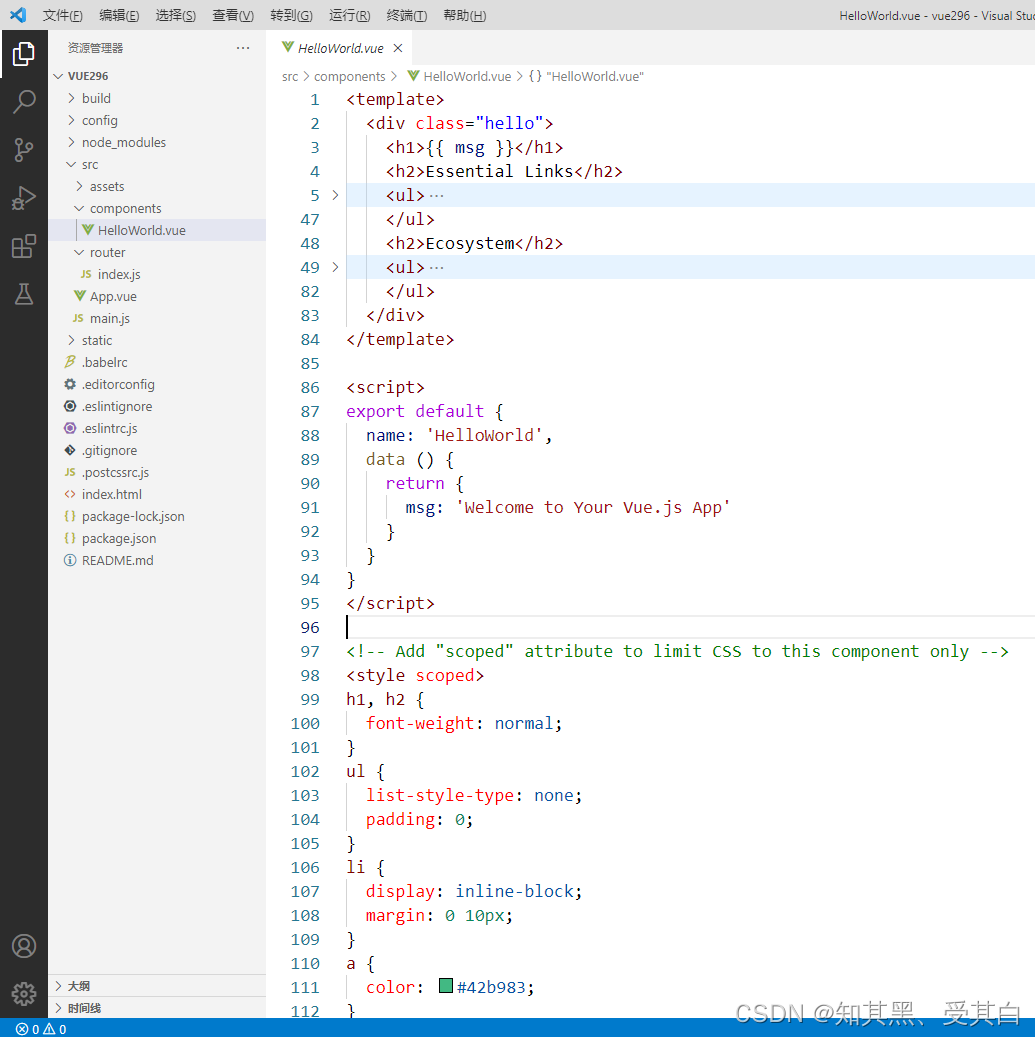
页面组件 E:\node\vue296\src\components\HelloWorld.vue
初始化项目应用
路由的基本应用
在 html 标签内使用 router-link 跳转,相应于超链接 a 标签,使用方式如下:
E:\node\vue296\src\components\HelloWorld.vue
<template>
<p>导航 :
<router-link to="/">首页 {
{
msg }} </router-link> <br/>
<router-link to="/hello"> 单页 hello</router-link>
</p>
</template>
<script>
export default {
name: 'HelloWorld',
data () {
return {
msg: 'HelloWorld'
}
}
}
</script>
<!-- Add "scoped" attribute to limit CSS to this component only -->
<style scoped>
a {
text-decoration:none;
}
</style>
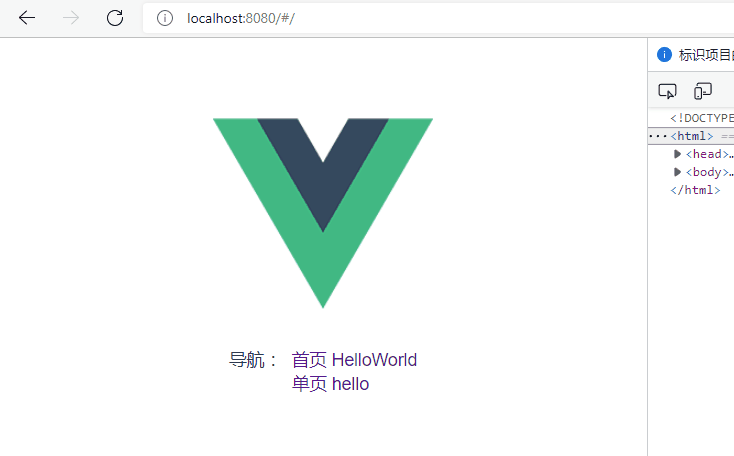
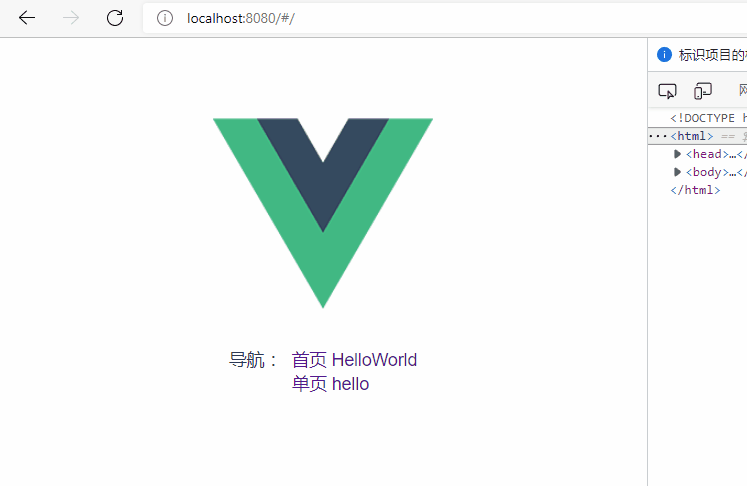
添加组件并通过路由访问
添加 Hello 组件并在组件页返回到根组件。
E:\node\vue296\src\router\index.js
import Vue from 'vue'
import Router from 'vue-router'
import HelloWorld from '@/components/HelloWorld'
// 引入组件
import Hello from '@/components/Hello'

Vue.use(Router)

export default new Router({


  routes: [
    /*首页*/
    {


      path: '/',
      name: 'HelloWorld',
      component: HelloWorld
    },
    /*添加路由*/
    {


      path: '/hello',
      name: 'Hello',
      component: Hello
    }
  ]
})
新建 Hello 组件
E:\node\vue296\src\components\Hello.vue
<template>
  <p>{

    {

     msg }} 页 :
    <button @click="goHome">回到首页</button>
  </p>
</template>

<script>
export default {


  name: 'Hello',
  data () {


    return {


      msg: 'Hllo'
    }
  },
  methods: {


    /*编程式导航-JS代码内部跳转*/
    goHome(){


        this.$router.push('/');
    }
  }
}
</script>

<!-- Add "scoped" attribute to limit CSS to this component only -->
<style scoped>
a {


  text-decoration:none;
}
</style>
子路由-路由嵌套
子路由,也叫路由嵌套,采用在 children 后跟路由数组来实现,
数组里和其他配置路由基本相同,需要配置 path 和 component,
然后在相应部分添加 <router-view/> 来展现子页面信息,相当于嵌入 iframe 。
添加子路由
文件路径:E:\node\vue296\src\router\index.js
添加 One、Two 组件到 Hello 组件下的子路由。
import Vue from 'vue'
import Router from 'vue-router'
import HelloWorld from '@/components/HelloWorld'
import Hello from '@/components/Hello'
import One from '@/components/One'
import Two from '@/components/Two'

Vue.use(Router)

export default new Router({


  routes: [
    {


      path: '/',
      name: 'HelloWorld',
      component: HelloWorld
    },
    {


      path: '/hello',
      name: 'Hello',
      component: Hello,
      // 嵌套子路由
      children: [
        {


          path: 'one', // 子页面1
          component: One
        },
        {


          path: 'two', // 子页面2
          component: Two
        },
      ]
    }
  ]
})
创建 One.vue 组件
E:\node\vue296\src\components\One.vue
<template>
    <div class="hello">
        <h1>{

    {

     msg }}</h1>
    </div>
</template>
<script>
export default {


    name: 'One',
    data () {


        return {


            msg: 'Hi, I am One Page!'
        }
    }
}
</script>

<style scoped>
</style>
创建 Two.vue 组件
E:\node\vue296\src\components\Two.vue
<template>
    <div class="hello">
        <h1>{

    {

     msg }}</h1>
    </div>
</template>
<script>
export default {


    name: 'Two',
    data () {


        return {


            msg: 'Hi, I am Two Page!'
        }
    }
}
</script>

<style scoped>
</style>
Hello.vue 添加子组件展示位置
E:\node\vue296\src\components\Hello.vue
<template>
    <div>
        <p>
            {

    {

     msg }} 页 :
            <button @click="goHome">回到首页</button>
        </p>
        <p>
            <router-link to="/hello/one">子页面1</router-link> |
            <router-link to="/hello/two">子页面2</router-link>
        </p>
        <!-- 子页面展示部分 -->
        <router-view/>
    </div>
</template>

<script>
export default {


  name: 'Hello',
  data () {


    return {


      msg: 'Hllo'
    }
  },
  methods: {


    goHome(){


        this.$router.push('/');
    }
  }
}
</script>

<!-- Add "scoped" attribute to limit CSS to this component only -->
<style scoped>
a {


  text-decoration:none;
}
</style>
根组件 HelloWorld.vue
E:\node\vue296\src\components\HelloWorld.vue
<template>
<p>导航 :
<router-link to="/">首页 {
{
msg }} </router-link> <br/>
<router-link to="/hello"> 单页 hello</router-link>
</p>
</template>
<script>
export default {
name: 'HelloWorld',
data () {
return {
msg: 'HelloWorld'
}
}
}
</script>
<!-- Add "scoped" attribute to limit CSS to this component only -->
<style scoped>
a {
text-decoration:none;
}
</style>
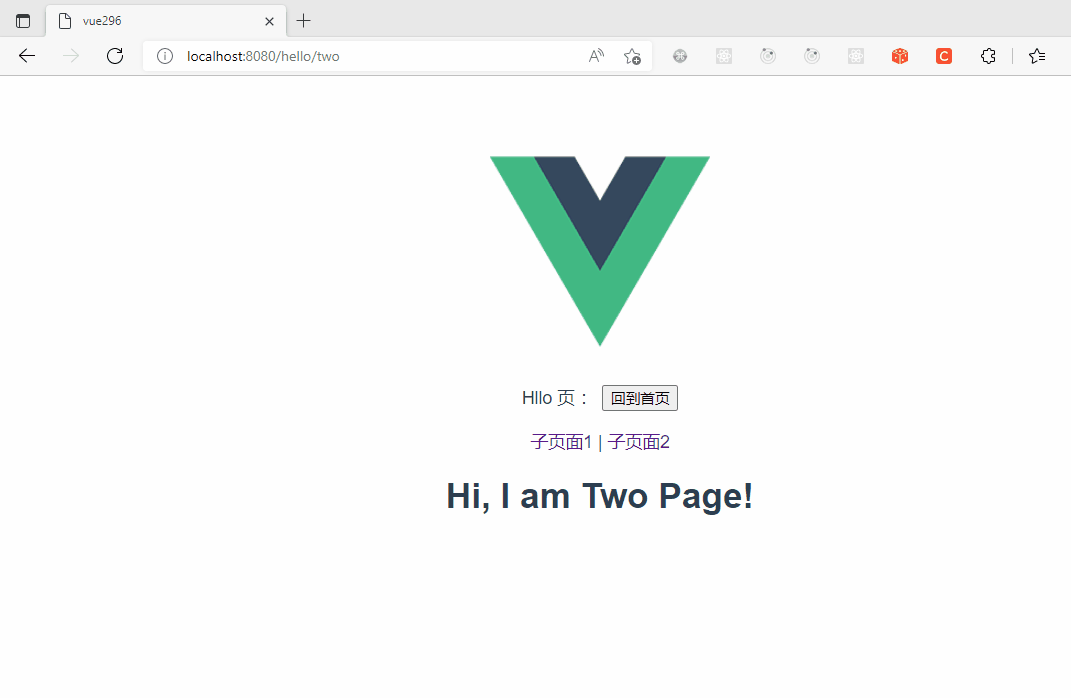
预览
知识点
一个 vue 页面通常由三部分组成
模板 (template)
  js (script)
样式 (style)
说明如下:
<!-- 模板 -->
<template>
    <div id="app">
        <img src="./assets/logo.png">
        <router-view/>
    </div>
</template>

<!-- js代码 -->
<script>
export default {


    name: 'App'
}
</script>

<!-- css样式 -->
<style>
#app {


    font-family: 'Avenir', Helvetica, Arial, sans-serif;
    -webkit-font-smoothing: antialiased;
    -moz-osx-font-smoothing: grayscale;
    text-align: center;
    color: #2c3e50;
    margin-top: 60px;
}
</style>
[ template-模板 ]
(1) 模板只能包含一个父节点,也就是说顶层的 div 只能有一个
(如上图,父节点为 #app 的 div,其没有兄弟节点)
(2)是子路由视图插槽,后面的路由页面都显示在此处,相当于 iframe
[ script-JS代码 ]
vue 通常用 es6 来写,用 export default 导出,其下面可以包含数据 data,
生命周期 ( mounted 等),方法( methods )等。
[ style-CSS样式 ]
样式通过 style 标签 <style></style> 包裹,默认是影响全局的,
如需定义作用域只在该组件下起作用,需在标签上加 scoped,
<style scoped>
...
</style>
引入外部CSS示例:
<style>
    import './assets/css/public.css'
</style>
Vue 项目中应用 vue-router
Vue Router 是 Vue.js 官方的路由管理器。
它和 Vue.js 的核心深度集成,让构建单页面应用变得易如反掌。
包含的功能有:
		                 嵌套的路由/视图表、
		        模块化的、基于组件的路由配置、
		             路由参数、查询、通配符、
		  基于 Vue.js 过渡系统的视图过渡效果、
                          细粒度的导航控制、
            带有自动激活的 CSS class 的链接、
HTML5 历史模式或 hash 模式,在 IE9 中自动降级、
                          自定义的滚动条行为
安装(本项目在cli创建的时候已创建router无需再次执行命令)
vue-router 是一个插件包,需要用 npm 来进行安装的。如果采用 vue-cli 构建初始化项目会提示安装,也可以自己使用命令安装:
npm install vue-router --save
解读核心文件
用 vue-cli 构建项目之后,在 src/router/index.js 文件中,看到以下的路由核心文件:
// 引入vue框架
import Vue from 'vue'

// 引入vue-router路由依赖
import Router from 'vue-router'

// 引入页面组件,命名为 HelloWorld
import HelloWorld from '@/components/HelloWorld'

// Vue全局使用Router
Vue.use(Router)

// 定义路由配置
export default new Router({


  routes: [                  //配置路由,这里是个数组
    {

                            //每一个链接都是一个对象
      path: '/',             //链接路径
      name: 'HelloWorld',    //路由名称,
      component: HelloWorld  //对应的组件模板
    }
  ]
})
使用在系统入口文件 E:\node\vue296\src\main.js 中注入 router,代码如下:
// 引入vue框架
import Vue from 'vue'

// 引入根组件
import App from './App'

// 引入路由配置
import router from './router'

// 关闭生产模式下给出的提示
Vue.config.productionTip = false

// 定义实例
new Vue({


  el: '#app',
  router, // 注入框架中
  components: {

     App },
  template: '<App/>'
})
路由属性配置说明
history 与 hash 模式的区别:history 路由无 # 号
export default new Router({


    mode: 'history', //路由模式,取值为 history 与 hash
    base: '/', //打包路径,默认为/,可以修改
    routes: [
    {


        path: string, //路径
        ccomponent: Component; //页面组件
        name: string; // 命名路由-路由名称
        components: {

     [name: string]: Component }; // 命名视图组件
        redirect: string | Location | Function; // 重定向
        props: boolean | string | Function; // 路由组件传递参数
        alias: string | Array<string>; // 路由别名
        children: Array<RouteConfig>; // 嵌套子路由
        // 路由单独钩子
        beforeEnter?: (to: Route, from: Route, next: Function) => void;
        meta: any; // 自定义标签属性,比如:是否需要登录
        icon: any; // 图标
        // 2.6.0+
        caseSensitive: boolean; // 匹配规则是否大小写敏感?(默认值:false)
        pathToRegexpOptions: Object; // 编译正则的选项
    }
    ]
})
去掉端口后的那个#号
添加
mode: 'history', //mode模式
文件路径:E:\node\vue296\src\router\index.js
import Vue from 'vue'
import Router from 'vue-router'
import HelloWorld from '@/components/HelloWorld'
import Hello from '@/components/Hello'
import One from '@/components/One'
import Two from '@/components/Two'

Vue.use(Router)

const router = new Router({


  mode: 'history', //mode模式
  routes: [
    {


      path: '/',
      name: 'HelloWorld',
      component: HelloWorld
    },
    {


      path: '/hello',
      name: 'Hello',
      component: Hello,
      // 嵌套子路由
      children: [
        {


          path: 'one', // 子页面1
          component: One
        },
        {


          path: 'two', // 子页面2
          component: Two
        },
      ]
    }
  ]
})

export default router